
Rebuilding the 510 Atomizer - applies well to 801 & 901 atomizers as well.
Many requests for this and it's not all that different than an 801 or 901 in construction. I've tried to include instructions and links that will make it easily understandable to do all 3 atomizers. Some different methods in removing the outer tube to expose the internal components may be needed. There may be small differences inside so some of the pictures may not be exactly like what you see even with your particular 510 atomizer. It is fairly easy to understand what the difference is and how to handle it.
There are 3 types of 510 atomizers. The exposed bridge type (Blu and the Janty Mini Fogger, 306A), the thick brass band one and the thin brass band one. The last 2 have the bridge in the base of the tube like the 801 & 901.
The thin brass band one is the easiest to take apart IMO. So this tutorial will address it. The exposed bridge 510 atomizers are about impossible to get apart without cutting and breaking something. Usually the ceramic cup.
I will not attempt to address those, but most of the methods here can be used to rebuild the 801 & 901 atomizers too. Removing the outer tube being the greatest difference and postings on the forum address removing the outer tube of these models.
www.e-cigarette-forum.com/forum/atomizer-mods/49160-3-74-801-atomizer-connector-extractor.html
Let's get started!
I like to put them in a cup of boiling hot water for 10-15 min. This softens any glue between the brass fitting and the atomizer tube. You'll need an old 510 battery to screw it onto, or a suitable bottoming tap/bolt, and an 11/32 drill bit ground just slightly on the end that goes in the drill chuck.. If used a "bottoming tap" is preferred as it will give more thread grip than a standard hole tap.
www.e-cigarette-forum.com/forum/modders-forum/30256-taps-dies-901-801-510-4xx.html
Once hot carefully remove, drain and thread the atomizer onto the battery/bolt/tap tight. Fit the drill shaft end in and push towards and away from you lightly, with the pressure at the point of the thin brass band as if you are trying to break it easy at first and as you increase pressure you should see it "break free" from the brass ring.
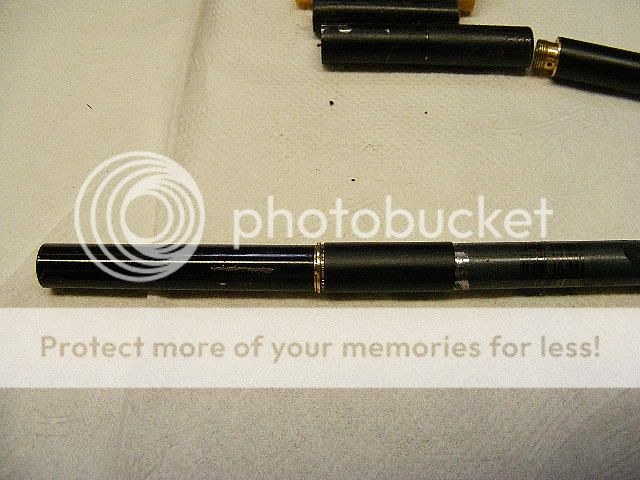
Once the knurling is showing and the thin brass band has separated from the tube you can now wiggle it and pull at the same time until the black atomizer tube pulls off.

The atomizer may or may not come out of the tube with the metal sleeve. At times the sleeve will remain in the tube and need to be slid out separately. Here is what it will look like with and without the metal sleeve.
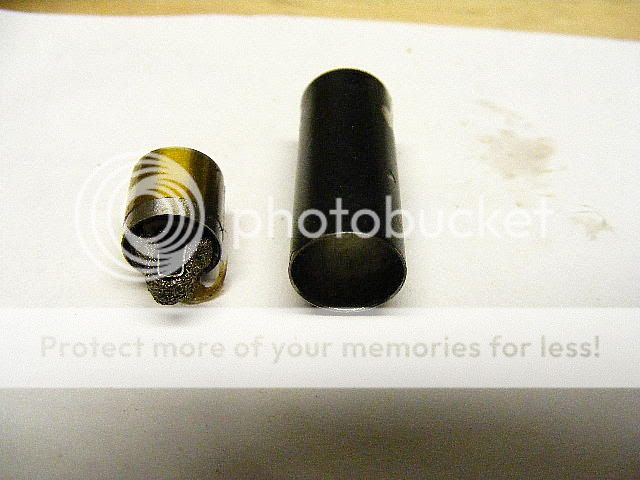

In the picture above you can see a problem with the atomizer on the left. The center air feed hole has melted closed. Only a very tiny hole is present if you look close. This will need to be reopened with a 1/16" drill or similar size that fits through the center connector hole in the bottom of the atomizer. The one on the right still has the hole full size unmelted and is fine. As bad as the melted one looks, it will still work fine if the hole is reopened. The slight gap on the edge does not deter its performance. It is possible for liquid to leak thru the gap easier, which can damage automatic batteries, and you may or may not want to seal it with silicone. Do not block of the bottom center air feed hole doing so.
Next it's time to start unwrapping the metal mesh. Carefully remove the celophane tape(yellow) if present.
I do not replace the tape on rebuilding. Start by using a needle or small flat jewelers screwdriver to pick around the bottom edge of the mesh. At one point you will see it start to peel up. This is where we will start to unwrap. Notice that the top edge of the mesh is even and makes a good reference when rewrapping.

As you can see there are 4 holes in the mesh of this particular atomizer. These are on both sides of the ceramic cup. Hold the atomizer up to the light and see how much light through each hole can be seen.
You will want it to look like this when rewrapped as described below.
When unwrapping it's a good idea to take pictures or make notes of things you want to remember.
We are going to rewrap this all back later! Place the pieces in the same order they came off in for easier reassembly. You can see the wick that is tucked under the top layer of mesh and the bottom edge of the bridge frame. Keep a close eye for "dents" in the mesh as this will be the place to start the rewrapping and keeping the diameter the same as the original.
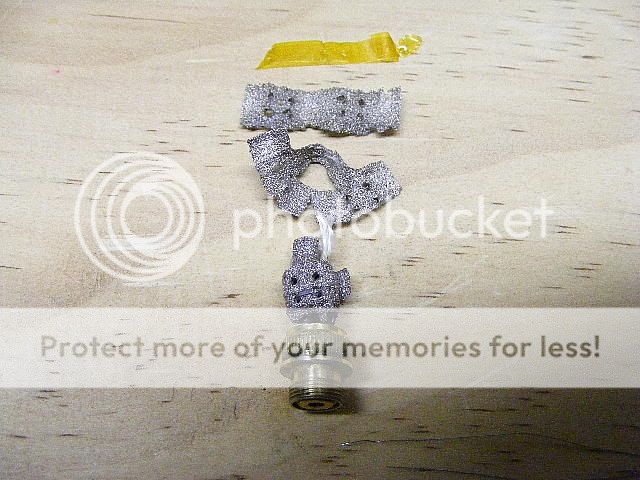
Finally you will reach the metal bridge. It simply slides off. You can now see the amount of wick used and the length that was tucked under the top layer of mesh. In the background (upper right) is the part of the wick that burnt off. The coil is now visible also.

At this point the you will need to decide if you want to replace the entire coil lead wire or trim it as shown above the plastic insert and solder it there using heat shrink tubing. The plastic insert just pops out of the brass fitting. I've used both methods and each work well. Some find it easier not to solder to the original connector. Excess solder can easily block the hole or damage the insulator of the center connector creating a short circuit that cannot be seen. That choice is yours, As I said, both methods work fine. You can also now see the removed original coil, which burnt in half in the middle.
Now is a good time to clean any parts. The cup can be cleaned with peroxide, rubbing alcohol and an old toothbrush. The mesh can be rinsed and should be allowed to dry completely. The final layer of mesh can be left on the ceramic cup.

Now we need to replace the coil. If you haven't made one or have one you can find instructions on making an atomizer coil here.
www.e-cigarette-forum.com/forum/ato...zer-coil-101-actual-working-methods-only.html

The new coil is in and leads twisted a couple of times to keep it in place while we wrap the mesh back on.
Start by replacing the parts back on in the reverse order they came off. Bridge first and then the mesh. Align the top edge of the mesh to the cup and the 4 holes on each side. Sometimes the holes won't align as perfectly as they came off. Do the absolute best you can and wrap tight, more squeezing than stretching. Especially near the top. Tuck the wick ends under the top mesh layer. The wick ends can be left long and trimmed with fingernail clippers when completed. At some point on your first few attempts, you may wish you had 3 hands! It does get easier with practice. If you have to cut a short length of the final layer of mesh so it will fit in the metal sleeve, don't fret, I have done this with no ill effects on performance. The sleeve must fit tight though when slid/worked on the mesh.

Next you will need to slide the metal sleeve down over the top of the newly wrapped atomizer.
You may need to use your fingernail to help tuck the mesh into the sleeve to start. That's fine. Now, before you cover the 4 holes on each side you will need to make sure they can breathe. A needle or a round toothpick can be carefully worked in each hole till you can see light coming in from the top of the atomizer as you saw it when prior to unwrapping as described earlier in this tutorial. It is important that you do this for proper airflow and liquid feed. Be careful not to damage the new coil. Now it's time to squeeze, tuck and slide the metal sleeve on the atomizer until it is flush with the top of the mesh. The bridge will be protruding. Roll any remaining mesh at the bottom towards the center as it was when you started picking it away in the begining. See the picture above with the sleeve on.
Untwist and solder the lead wires using your preferred method as described above. I very slightly twist the tube causing the wires to begin a wrap in a circular pattern leaving the center air feed hole clear. The metal tube then fits on the top of the brass threaded fitting. You can see the area just above the knurling. It does not go over the knurling. Check with an ohm meter to see that the atomizer is not shorted or open. It should read the same ohms value or very close to what was measured in the Building an Atomizer Coil Tutorial.
One final rinse with water and let dry overnight or use a hairdryer. This removes any small fibers that may have broken during assembly. The fibers are large enough that no hazard should be present , especially when wet, but let's be safe.
When dry, slide the outer tube on, a little PG or VG coating on the inside of the tube can be helpful.Force it back down to where it outer tube touches the thin brass ring.
I don't glue mine back on. I've rebuilt the same one as many as 10-15 times and the brass knurling still holds fine. It makes it easier to rebuild in the future. If it is to loose, a very thin strip of paper can be placed on the knurling and the tube slid over it. This compresses in the knurling and holds the tube securely.
Prime with a little eliquid let it sit for 5 minutes and you are ready to vape again and again and again!

Enjoy!
Many requests for this and it's not all that different than an 801 or 901 in construction. I've tried to include instructions and links that will make it easily understandable to do all 3 atomizers. Some different methods in removing the outer tube to expose the internal components may be needed. There may be small differences inside so some of the pictures may not be exactly like what you see even with your particular 510 atomizer. It is fairly easy to understand what the difference is and how to handle it.
There are 3 types of 510 atomizers. The exposed bridge type (Blu and the Janty Mini Fogger, 306A), the thick brass band one and the thin brass band one. The last 2 have the bridge in the base of the tube like the 801 & 901.
The thin brass band one is the easiest to take apart IMO. So this tutorial will address it. The exposed bridge 510 atomizers are about impossible to get apart without cutting and breaking something. Usually the ceramic cup.
I will not attempt to address those, but most of the methods here can be used to rebuild the 801 & 901 atomizers too. Removing the outer tube being the greatest difference and postings on the forum address removing the outer tube of these models.
www.e-cigarette-forum.com/forum/atomizer-mods/49160-3-74-801-atomizer-connector-extractor.html
Let's get started!
I like to put them in a cup of boiling hot water for 10-15 min. This softens any glue between the brass fitting and the atomizer tube. You'll need an old 510 battery to screw it onto, or a suitable bottoming tap/bolt, and an 11/32 drill bit ground just slightly on the end that goes in the drill chuck.. If used a "bottoming tap" is preferred as it will give more thread grip than a standard hole tap.
www.e-cigarette-forum.com/forum/modders-forum/30256-taps-dies-901-801-510-4xx.html
Once hot carefully remove, drain and thread the atomizer onto the battery/bolt/tap tight. Fit the drill shaft end in and push towards and away from you lightly, with the pressure at the point of the thin brass band as if you are trying to break it easy at first and as you increase pressure you should see it "break free" from the brass ring.
Once the knurling is showing and the thin brass band has separated from the tube you can now wiggle it and pull at the same time until the black atomizer tube pulls off.
The atomizer may or may not come out of the tube with the metal sleeve. At times the sleeve will remain in the tube and need to be slid out separately. Here is what it will look like with and without the metal sleeve.
In the picture above you can see a problem with the atomizer on the left. The center air feed hole has melted closed. Only a very tiny hole is present if you look close. This will need to be reopened with a 1/16" drill or similar size that fits through the center connector hole in the bottom of the atomizer. The one on the right still has the hole full size unmelted and is fine. As bad as the melted one looks, it will still work fine if the hole is reopened. The slight gap on the edge does not deter its performance. It is possible for liquid to leak thru the gap easier, which can damage automatic batteries, and you may or may not want to seal it with silicone. Do not block of the bottom center air feed hole doing so.
Next it's time to start unwrapping the metal mesh. Carefully remove the celophane tape(yellow) if present.
I do not replace the tape on rebuilding. Start by using a needle or small flat jewelers screwdriver to pick around the bottom edge of the mesh. At one point you will see it start to peel up. This is where we will start to unwrap. Notice that the top edge of the mesh is even and makes a good reference when rewrapping.
As you can see there are 4 holes in the mesh of this particular atomizer. These are on both sides of the ceramic cup. Hold the atomizer up to the light and see how much light through each hole can be seen.
You will want it to look like this when rewrapped as described below.
When unwrapping it's a good idea to take pictures or make notes of things you want to remember.
We are going to rewrap this all back later! Place the pieces in the same order they came off in for easier reassembly. You can see the wick that is tucked under the top layer of mesh and the bottom edge of the bridge frame. Keep a close eye for "dents" in the mesh as this will be the place to start the rewrapping and keeping the diameter the same as the original.
Finally you will reach the metal bridge. It simply slides off. You can now see the amount of wick used and the length that was tucked under the top layer of mesh. In the background (upper right) is the part of the wick that burnt off. The coil is now visible also.
At this point the you will need to decide if you want to replace the entire coil lead wire or trim it as shown above the plastic insert and solder it there using heat shrink tubing. The plastic insert just pops out of the brass fitting. I've used both methods and each work well. Some find it easier not to solder to the original connector. Excess solder can easily block the hole or damage the insulator of the center connector creating a short circuit that cannot be seen. That choice is yours, As I said, both methods work fine. You can also now see the removed original coil, which burnt in half in the middle.
Now is a good time to clean any parts. The cup can be cleaned with peroxide, rubbing alcohol and an old toothbrush. The mesh can be rinsed and should be allowed to dry completely. The final layer of mesh can be left on the ceramic cup.
Now we need to replace the coil. If you haven't made one or have one you can find instructions on making an atomizer coil here.
www.e-cigarette-forum.com/forum/ato...zer-coil-101-actual-working-methods-only.html
The new coil is in and leads twisted a couple of times to keep it in place while we wrap the mesh back on.
Start by replacing the parts back on in the reverse order they came off. Bridge first and then the mesh. Align the top edge of the mesh to the cup and the 4 holes on each side. Sometimes the holes won't align as perfectly as they came off. Do the absolute best you can and wrap tight, more squeezing than stretching. Especially near the top. Tuck the wick ends under the top mesh layer. The wick ends can be left long and trimmed with fingernail clippers when completed. At some point on your first few attempts, you may wish you had 3 hands! It does get easier with practice. If you have to cut a short length of the final layer of mesh so it will fit in the metal sleeve, don't fret, I have done this with no ill effects on performance. The sleeve must fit tight though when slid/worked on the mesh.
Next you will need to slide the metal sleeve down over the top of the newly wrapped atomizer.
You may need to use your fingernail to help tuck the mesh into the sleeve to start. That's fine. Now, before you cover the 4 holes on each side you will need to make sure they can breathe. A needle or a round toothpick can be carefully worked in each hole till you can see light coming in from the top of the atomizer as you saw it when prior to unwrapping as described earlier in this tutorial. It is important that you do this for proper airflow and liquid feed. Be careful not to damage the new coil. Now it's time to squeeze, tuck and slide the metal sleeve on the atomizer until it is flush with the top of the mesh. The bridge will be protruding. Roll any remaining mesh at the bottom towards the center as it was when you started picking it away in the begining. See the picture above with the sleeve on.
Untwist and solder the lead wires using your preferred method as described above. I very slightly twist the tube causing the wires to begin a wrap in a circular pattern leaving the center air feed hole clear. The metal tube then fits on the top of the brass threaded fitting. You can see the area just above the knurling. It does not go over the knurling. Check with an ohm meter to see that the atomizer is not shorted or open. It should read the same ohms value or very close to what was measured in the Building an Atomizer Coil Tutorial.
One final rinse with water and let dry overnight or use a hairdryer. This removes any small fibers that may have broken during assembly. The fibers are large enough that no hazard should be present , especially when wet, but let's be safe.
When dry, slide the outer tube on, a little PG or VG coating on the inside of the tube can be helpful.Force it back down to where it outer tube touches the thin brass ring.
I don't glue mine back on. I've rebuilt the same one as many as 10-15 times and the brass knurling still holds fine. It makes it easier to rebuild in the future. If it is to loose, a very thin strip of paper can be placed on the knurling and the tube slid over it. This compresses in the knurling and holds the tube securely.
Prime with a little eliquid let it sit for 5 minutes and you are ready to vape again and again and again!
Enjoy!
Last edited by a moderator:
