Atomizer / Cartomizer for life....

Status
Not open for further replies.

l3oertjie

Super Member
ECF Veteran
Aug 26, 2009
549
236
South Africa
Considering the cost associated with replacing an atomizer or cartomizer with a new unit I wanted to develop something that would be "serviceable" with relative ease and only replace the parts that de-generate with continued use - heating coil and wick.

There are some great links in this forum teaching you how to solder and make a new heating coil and there are some more telling you how to calculate the length vs. resistance of nichrome wire and how it would perform using high or low voltage batteries. Thank you to all those contributors, all your great ideas assisted me in developing this simple method of creating a serviceable and highly "modifiable" (if that is an acceptable English word....) atomizer.

There are similar atomizers / cartomizer designs in this forum but what makes this one quite unique is that you can replace the heating coil and wick with great ease and it doesn't necessitate any specialist soldering techniques.


Basically I wanted to make an atomizer with simple connections where it would be easy to replace the wick and heating coil without having to solder wires onto the nichrome wires. Having experimented with various types of cartridges I also wanted an atomizer (or is it a cartomizer?) that would fill easy, hold at least 20 drops of liquid and vape dry to the last drop.


I have made a few "beta" versions of this atomizing cartridge and gave it to my friends at work. They all like the idea and it works far better than the original atomizers, it cleans easily, lasts longer and replacement cost of a wick and heating coil is a fraction of replacing an atomizer or cartomizer..... Off course making a new wick and coil is also very easy - takes about 3 minutes, so you can produce a years supply of wicks and heating coils in under an hour. I guess if you start considering the cost of replacement atomizers you would most likely be able to produce 20 (or more) wicks and coils for the cost of one atomizer with this method.... :2cool:


I will post pictures and the method of making this cartridge tomorrow.


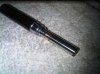
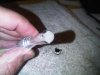
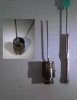
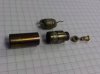
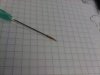
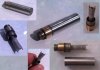
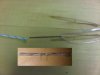
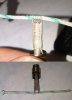
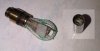
Here is a little apetizer in the mean time.... (fitted onto a Janty Ego battery). It will be possibile to adapt this method to any type PV on the market - whether they use carts or atomizer - I think.....


Happy vaping friends!
 

Attachments

  • Fitted cart.jpg
    Fitted cart.jpg
    22.3 KB · Views: 2,930
  • Smokin.jpg
    Smokin.jpg
    22 KB · Views: 3,031

l3oertjie

Super Member
ECF Veteran
Aug 26, 2009
549
236
South Africa
You will need the following items: (Pictures below)

Atomizer:
  • 1 old battery and atomizer
  • 2 Syringe needles
  • 2 Sewing needles where the sharp ends would fit into the Syringe needles (Pictures below)
  • Copper capillary tube - I used one with an OD (outer diameter) of approximately 3mm.
  • Thin copper wire strand
  • Epoxy glue (non toxic off course…..)
  • Lead free solder & crystaline soldering flux
  • Sewing thread (Colour of you choice)
  • Thin double sided tape
  • Small butane blow torch (I used a butane soldering iron for this purpose)
  • Electrical tester to check for conductivity and shorts….

Wick & Heating coil:
  • Fibreglass sheath found on silicon wiring (shown in pictures)
  • Fibreglass / Silica strands (I used the woven fibreglass type)
  • Nichrome wire for heating coil. (I use 36ga Nichrome – your choice)
  • Good quality flat tip tweezers
  • Magnifying glass (if your eyesight is not that good)

Method, tips & tricks:
Essentially what we will be doing is removing the guts from the old atomizer and convert it to something that resembles a cartomizer. (Pic. 1). I found it almost impossible to “tin” the solder onto the syringe needles and hence came up with another way of skinning the cat… You will see in the pictures what worked for me. Before you apply any heat to the battery to remove the pressed brass fitting, take care to remove the lithium pack inside. It may – no, it WILL explode if you don’t!

OK, first of all, in order to remove the aluminium shell from the bottom part of the atomizer and battery (pressed fitting with some glue in between) you will need to heat the shell with a flame. Allow the glue to burn completely but take care in not overheating – I found that the brass fitting becomes quite soft when heated and the clips I used to hold it actually caused it to deform. Once all parts have been removed, inspect for any damage and clean properly with a solution of caustic soda – please take care of that stuff – it is caustic after all! Let it sit in the solution for an hour or so, add clean water, rinse, brush with a hard brush and repeat until the parts are clean. Let it dry completely before proceeding. (Pic. 2)

Wind a piece of copper wire around the tip of both syringe needles – about 5mm wide. This will enable you to “tin” the solder onto the needle. (Pic. 3) Now solder one needle to the side of the brass fitting and the other to the capillary tube as shown in Pic. 1. Wind some sewing thread to the tip of the capillary tube and seal with epoxy glue. Also note how I bent the needle before soldering onto the brass fitting. This will make it easier to attach to the capillary tube once fitted. We will be using the capillary tube as the “air passage” as well as an electrical conductor. The brass fitting and other needle will be the other conductor. It is therefore essential that they are insulated from each other to prevent electrical shorts. The capillary tube must be inserted into the brass fitting’s centre hole to protrude straight through to the bottom – I let mine stick through about 1mm and used sandpaper to trim it back to be level with the thread that screws onto the battery. The capillary tube’s end must make contact with the battery connection in order to conduct current to the needle attached to it. The brass fitting makes contact with the opposite battery pole and thus conducts current to the other needle attached to the side. (Pic. 4).

I used a small piece of double sided tape and attached that between the capillary tube and the needle attached to the brass fitting to ensure proper insulation. Put a drop of epoxy glue into the brass fitting to hold the capillary tube in position. You have to ensure that the epoxy covers the small vent holes on the sides of the cart – in fact the level should be about 2mm above the vent holes. I made a small cad drawing to indicate what I mean. (Pic. 4) Once the epoxy is cured, we will drill four vent holes at an angle as shown. This is done to prevent a hissing sound when drawing air through the vents…. First hand experience is the best teacher in the world! :oops:

Once the capillary tube is in position, the needle attached to the brass fitting should be right next to the tube with a piece of double sided tape between them. Wind some more sewing thread around the capillary tube and needles and seal with a drop epoxy. Don’t use to much glue, the bigger the volume in the cart, the more drops of PV it will hold…. obviously.

This is more or less what the finished cart should look like. (Pic. 5)

I will do a separate post on the wick and coil assembly.
 

Attachments

  • Pic 1.jpg
    Pic 1.jpg
    20.4 KB · Views: 2,908
  • Pic 2.jpg
    Pic 2.jpg
    21.1 KB · Views: 2,728
  • Pic 3.jpg
    Pic 3.jpg
    20.3 KB · Views: 2,592
  • Pic 5.jpg
    Pic 5.jpg
    20.6 KB · Views: 2,731
  • Pic 6.jpg
    Pic 6.jpg
    21.8 KB · Views: 3,331

l3oertjie

Super Member
ECF Veteran
Aug 26, 2009
549
236
South Africa
The wick and heating coil:

In my opinion, the single most important part next to the actual heating coil is the wick. Now I do not have access to that nice silica rope mentioned in some of the other great posts (I wish I did) and the method I use could probably be much improved upon. The method I describe here works well, is cheap and easy to do and it lasts for a long time.

Initially I started off by calculating the length of the nichrome wire to achieve a 3-ohm coil, but soon realised it is far better to experiment with different lengths since it is so easy to change and replace. When I started vaping, I though if the coil doesn’t glow red hot it is pretty much useless. Well, to my surprise just the opposite! If it glows red hot, you will be burning the liquid and have an awful taste experience before long. If the coil length is too long it doesn’t produce enough heat to vaporize the liquid and poor vapour production with hardly any throat hit will be the result. I found that even different flavour liquids require different coils for optimum performance.

Having said all of that, with this cartridge is very easy to replace the wick and heating coil and one can thus experiment to your hearts content – without spending hours and hours to make teeny weenie little solder joints. B.t.w. that was what made me look for other options. I guess I was last in line when soldering talents were given out….

Ok, first of all you will need a blunt tip threading needle – quite large – about 1.5mm diameter. Basically what I do is take a strand of fibreglass, fold it double and thread it through a silicon wire fibreglass sleeve. Pic. 1. You end up with thin strands of fibreglass surrounded by a sleeve – the ideal wick. Cut a piece of wick at approximately 60mm long and hold the two ends with clips. Insert one end nichrome wire THROUGH the wick and start coiling around your wick. Make sure you don’t coil too tight, it has to allow liquid to move freely inside to make proper contact with the heater coil. If you over tighten the coil it will burn the fibreglass. In the picture (Pic. 1) I made seven rotations plus one half rotation on either side. At the moment I use 4 full rotations and 2 half rotations. The equivalent length of wire is approximately 35mm. The reason for threading the ends of the nichrome wire through the wick is to ensure that the ends of the coil always touch the wick. I found that if you don’t, the two ends lift away from the wicking material and since not in direct contact with the liquid starts glowing red and burns the fibreglass sleeve. The wick and coil is now ready to be inserted into the atomizer.

The two end pieces of nichrome wire can be trimmed to about 5mm or so. These tips will be inserted into the open ends of the syringe needles so that the heating coil is directly over the opening of the capillary tube. There should be a gap of approximately 2mm between the air tube and the heating coil as shown in pic. 2. If the gap is too small, it makes the draw quite hard. You can play around with this gap to experiment a bit.

Once the wires are in position, you need to take the two thin sewing needles, cut the tips at about 5mm and insert them into the syringe needles to hold the nichrome wires in place. Don’t push them in too hard else you will cut the nichrome wires off. Some of you may think at this stage that this will never work, but you need to find the correct diameter needles that would hold the nichrome coil wires in position. I have vaped on one of my coils for two weeks, washed it out regularly (with a small brush directly on the coil) and it still holds fine. Once the coil is secured you must bend the wick tips down to fold into the brass cup. It doesn’t matter if they are too long – just wrap them around the air tube if necessary. I have found that they absorb the PG liquid very nicely. (Pic. 3).

You should now cut two small pieces of filler material (blue foam will also work) and hold them next to the wick in order to seal the top of the atomizer. These plugs must not be too dense or tight – remember that you will be dripping directly into your atomizer to fill it and if these plugs are too tigh the liquid won’t seep through. It will also act as a breather to allow air into the lower compartment of your atomizer as you vape the liquid dry. Carefully fit the metal sleeve over the whole assembly taking care not to disrupt the foam plugs or push them down. They should sit just below the top of the capillary tube end to prevent liquid running down the air tube. When filling your atomizer, hold it at an angle to prevent the drops from falling straight into the air tube. It is not really a train smash if you do - once the cartridge is near full, just draw through the atomizer to pull the liquid from the capillary tube. Don’t draw too hard however – else you will end up with a mouthful of PG…. YUCK!

I am now quite experienced in filling the cart and hardly ever get PG into the air tube. Once you have successfully filled your cart, put your normal cartridge onto the atomizer and you are ready to give it your first draw!


A few tips:

Don’t let the foam plugs protrude higher than the air tube’s (capillary tube) opening otherwise you will constantly have PG running back to your battery’s terminals. This could be fatal for those automatic batteries with the vacuum switches.

If vapour production is poor, decrease the length of the nichrome wire coil to produce more heat. Also check that your coils are not too tight over the wick.

If you get strange tasting vapour, make sure your fibreglass and sleeve is clean. I wash mine with hot water, rinse in vinegar for half a day, and then rinse properly with some more hot water. Any chemical residue in the fibreglass strands or sleeves will produce strange tastes. (Ask me, I know).

If the metal sleeve does not fit tightly over the brass fitting you will have to make a seal to prevent PG leaking out. I added a very thin layer of epoxy over the brass fitting’s sleeve and made a seal with sewing thread right at the end. (The thin black stripe you see between the brass and aluminium sleeve).

I hope someone else tries to make this atomizer - it may take some time but is well worth the effort. This atomizer will last you for many years and to replace the wick takes two minutes. I carry a spare wick with me all the time - just in case. Still in my pocket and haven't used it yet... :)

Happy vaping!
 

Attachments

  • Pic. 1.jpg
    Pic. 1.jpg
    19.6 KB · Views: 1,839
  • Pic. 3.jpg
    Pic. 3.jpg
    21.6 KB · Views: 2,046
  • Pic. 5.jpg
    Pic. 5.jpg
    19.9 KB · Views: 2,478

l3oertjie

Super Member
ECF Veteran
Aug 26, 2009
549
236
South Africa
I'd be very happy if anyone can contribute some good ideas to improve this design.

Some things I think could be improved:

  • Wicking material. Would silica rope perhaps work better?
  • Foam plugs. I have used my atomizer without any foam plugs whatsoever. Just coiled the wick around the centre tube. Works fine and absorbs liquid just great. Only problem is the PG could potentially leak out if carried upside down.... Any thoughts?
  • The end cap on the atomizer. I just used a piece of my old cartridges. Maybe this cap could be made to prevent leaking if no plugs are used.
  • The lenght of your atomizer would dictate the amount of liquid it will hold. Obviously the PG flow to the coil must battle against gravity. A longer atomizer means a further path for the PG liquid to the coil. Maybe if wicking is easier we don't have to worry about that?

Any thoughts are most welcome please - :2c:
 

Bubo

Super Member
ECF Veteran
Wow - this is really a nicely laid out thread.....
Great job l3oertjie!

You might want to take a look at Scubabatdan's "Pill Fob Cartomizer" Blog and his postings - he has alot of good (similar) thoughts that you are working on....

As far as thoughts....
Scubabatdan has been using a silica fire wick product around the atty and using it as your 'foam plug'... I don't think that it'd leak out with my vaping mix - it's pretty thick (Mostly VG).. But with straight PG it might... But perhaps if you used a blank stock cartridge, it'd give you more time to collect the 'drippings'... (I dunno - I use a blank cart on my cartomizers and have never had them drip - but like I said, my juice is pretty thick.)
 
Last edited:

KYFlyer67

Senior Member
ECF Veteran
Verified Member
Mar 20, 2010
243
5
Ky
I have studied the posts on rebuilding 510 atomizers. With much frustration and practice, I have managed to rebuild a dozen times or so. However, the soldering work is so tedious, it still takes me anywhere from 30-60 minutes to rebuild one - 30 if I get it right the first time, 60 if I mess up along the way (which I often do). I tried various ideas over a month or so to find a way to easily replace the nichrome coil & wick, WITHOUT SOLDER in a 510 atty. Some of my attempts almost worked, but I never quite got there. I decided to give it a break for a while and just rebuild with solder (and sometimes replacement lead wires).

In my humble opinion, this is brilliant. I haven't built this yet, but you can bet I will. I'm confident this will work - everything about it looks right. My only concern is the use of epoxy - even "non-toxic" epoxy. I may try the ceramic paste that vaporer advocates in place of epoxy. Also, I'll probably use silica wick in place of fiberglass.

This virtually eliminates the ongoing cost of replacement atomizers, not to mention the fact that it makes it simple to routinely change coil resistance. Excellent post!
 

WillyB

Vaping Master
ECF Veteran
Oct 21, 2009
3,709
591
USA
Well done l3oertjie. I love it. I also like the simple solution, needles, to hold the wire.

Someone will be along to offer to send you you some silica rope so you can experiment further.

Here's what those Krazy Krauts are doing. Maybe some inspiration for further projects.

grVerdampfer.JPG


All GreenCig style.

Note the second one with some crimp on connectors and sockets.

They seem to like RCA type plugs for atty connectors.
 

l3oertjie

Super Member
ECF Veteran
Aug 26, 2009
549
236
South Africa
KY & Willy, thank you for your kind words! Our resource base is unfortunately somewhat limited in SA and for speciality items like loosely braided silica rope we have to look at the bigger countries... I think the ceramic paste is definately a great solution - ty KY.
If anyone has access to the wick and paste, please pm me, I can do a payment via paypal?
All we need now is to take this idea and play with to find the best and safest way of building it.
As Willy says, never replace an atomizer again!
Cheers guys, have fun experimenting!
 
Last edited:
Status
Not open for further replies.

Users who are viewing this thread