Smoktech VIVI TANK rebuildable atomizer - mod ideas

Status
Not open for further replies.

nz1001

Senior Member
ECF Veteran
Verified Member
Jun 7, 2012
188
159
NY
Hi there.

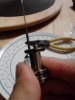
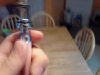
I’ve tried few different set up on this one for past couple days, with SS mesh U shape, SS mesh + silica combo, dual coil with SS.… It’s tricky to place the coil over the original air hole. Dual coil using original airhole is impossible, little vapor and inhumane TH.

So far I like the one below the best, quite close to the Phoenix RA (got 3 authentic & 3 knock off, they replaced my HR 510 and 306 attys for daily use) performance.

Wick hole: 7/64 (tip: drill a 5/16 hole on a wood piece, fit the battery connector in there. Now you can hold it down firmly)

Air hole: 1/16 (and seal the original air hole. Tip: drill with slow speed)

The plastic isolating piece: cuts down the chamber volume by ~40% (tip: soak in hot water before cutting)


took one coil out from the dual coil setup (man, I had both at 2.8-2.9)
IMG_5339.jpg


how it is now
IMG_5340.jpg

the closer airhole to the coil, the more vapor and smooth TH
IMG_5341.jpg

Pls input your idea of improvement and recommendations :)
 
Last edited:

nz1001

Senior Member
ECF Veteran
Verified Member
Jun 7, 2012
188
159
NY
Chain vaping = puffing every other second? I guess I am not one.;) Just did several 15-sec run - it took about a sec or 2 for liquid (70/30, not one of my most favorate) to fill back to the tip of wick.
How big the drill tip would you suggest? This is my first rebuildable tank, the numbers I took from other member’s recommendations here. In fact, my RA venture started just over a week ago. Bigger wick buffers more juice, and more wraps allows more contact and higher voltage, I have tried/improved with these on the phoenix RAs.
Smaller the chamber the better the flavor, also from past reading. Just did a comparison again, it’s definitely noticeable. The volumn can be further reduced.
Thanks,
N
 
Last edited:

nz1001

Senior Member
ECF Veteran
Verified Member
Jun 7, 2012
188
159
NY
Both tanks leaked from the bottom, where the center post joins the base. one had 70/30 juice, a full tank would empty in 4 -5 hours, and the other 100VG did it over night.
...... off and pull the center post out from base, there was a good ml of juice stored in there... broke the positive wire and repired with the silver non-resist wire; seal off both top and bottom air holes for good; and wrapped ~2in of white PTFE thread seal tape around the bottom part of post before plug back in (O-ring wont fit in there)

This thing needs revision. they work pretty good now, but next time pulling the tube off the center post would likely come out as well... too much tinkering for most I would guess.

Question - is PTFE tape safe? A small amount is exposed to juice, vaped 1ml NLV gold so far - no funny taste yet.

Thx. N
 
Last edited:

Hydrophoid

Full Member
Aug 11, 2012
51
20
Clarksville, TN
Please post pics of the leaky area, just ordered 2 of these and want to know if there is going to be any problems that can be fixed automatically (pics may help other members help you fix the problem w/o tape).

I have no idea if PTFE is safe to inhale, but it is also know as Teflon tape. Teflon can be found in many nonstick coatings of pans, and according to wikipedia it is also used to line plastic containers of corrosive liquids. (It also ends up in many peoples tap water fittings so we feel pretty confident it is safe to consume). Wiki Quote: "According to DuPont, its melting point is 327 °C (621 °F)."

After the repair how is it vaping? I can't wait to try a SS wick, been using vivi clearomizers; new to vaping, love to tinker, so pretty sure this tank is for me.
 

ricklovesnic

Senior Member
ECF Veteran
Verified Member
Nov 10, 2009
138
45
Dallas, TX
Question - is PTFE tape safe? A small amount is exposed to juice, vaped 1ml NLV gold so far - no funny taste yet.

PTFE tape is used in plumbing for potable water, so I wouldn't be *too* worried. PTFE is pretty harmful if the vapors are breathed, but from my knowledge of cookware, that doesn't happen until upwards of 450 degrees. If you have birds in the house, I wouldn't vape this around them as I have heard they are sensitive to PTFE (never keep a Parrot in a kitchen with nonstick pans). Then again, if you have birds, it's probably not advisable to vape around them at all.
 

Hydrophoid

Full Member
Aug 11, 2012
51
20
Clarksville, TN
I just got a package with 2 of these tanks in it. I have to say after hearing how bad they tasted out of the box I had to see what bad tasted like (pretty new to vaping, using vivi stardusts along with a drip tip for tasting, have melted one wic on stardust, dont really know what good/bad tasted like). I filled the tank using the bottom method from the video posted earlier. Took the drip tip off, saturated the top of the wic and gave it a shot. Wonderful flavor compared to the stardust, way easier pull, no noticeable leaks, a great all around experience.

Maybe I got a second run where some of the problems have been fixed? The tube casing has no holes in it, the only hole comes up from the connector post (like the stardust).

I will try and roll a SS wick for it and widen one side to drop it in and see what happens.

nz1001, it looks like you used the brass colored connectors that were on the original wic, my question is what the point of those brass connectors are? Can I reuse them or must I find a supplier of them as well?
 
Last edited:

Hydrophoid

Full Member
Aug 11, 2012
51
20
Clarksville, TN
Ok, as stated earlier I got 2 of em, so modding one was not much risk to me. I went with a single SS wick and it is not bent in a U shape. the total resistance is 1.2, measured from the connector points on the tank, not the wire. The first coil I build blew on the dry fire, the second is vaping just fine. I bought all my tools at harbor freight, but the torch was not filled, so I went out to get a different one, also not filled.

Tip: if you dont have butane, get some when you get your torch cause a lighter will not do.

Step 1 for me was to drill out the the wick hole closest to the air hole (they say the closer to the air hole the wick is, the smoother your vape, more on this in final adjustments.) I do not have the bit size cause it was the stock bit that was in my generic dremmell tool.

After that I cut a bit of SS, it was about 1 sq inch, maybe a little bit bigger. I used a paperclip to roll (thanks youtube)

IMG_20120901_184030.jpg

After that I torched the SS wick. I used a bic lighter, it didn't work the first time around, so I had to torch it after I blew the first coil.

IMG_20120901_184844.jpg

One I had oxidized my wick with a torch, I stuck the whole thing down the drilled out wick hole:

IMG_20120901_201641.jpg

TIP: the outer post gets its connection as a ground would, so it is ok to put your coil wire on the "Floor" so to speak. I did this cause the screw that came on this post didn't hold the wire very good. I screwed it underneath the brass connector and just started my wrap.

I bent the Paper clip so that the top of the wick was leaning over the air hole and wrapped. Once I got what I felt was enough wraps, I used the wire to hold the coil bent over the air hole and tightened it to the middle post. Here is some pics of the final set up as well as dry fire (don't know why its purple on my camera, but whateva):

IMG_20120903_141411.jpg

Grr hit the upload limit, ok that is the last one I will post the others in a new post.

Also, I had this tank on an ego twist for leverage while I took off the plastic tube, and it pulled my twist apart. It is dead for now, till I have time to make a mod with the parts, just wanted to tell you all to be careful cause those seals are really tight, good thing I had backups.
 

Attachments

  • IMG_20120901_201804.jpg
    IMG_20120901_201804.jpg
    21.7 KB · Views: 1,257

Hydrophoid

Full Member
Aug 11, 2012
51
20
Clarksville, TN
The other pics for you to see. It vapes great, I did have to undo the center post, reposition the wire so it would be over the air hole better, and tighten it down. This is my first SS wick, my first mod, and my second coil, cause the first one blew. It tastes great, I am down to the gross flavors from my sampler packs I started with, but the are bearable now. This will be great for long term tanking, and I got a Phoenix for dripping, (ya it bleeds to the top cause I didn't cover the second hole but no big deal to me, havent had any leak out the top yet). I will maybe try the U mesh for my other tank, when I have time.
IMG_20120903_141357.jpg

IMG_20120903_141411-001.jpg

IMG_20120903_141415.jpg

IMG_20120903_141426.jpg

Grr, ok blurry pic has a thumbnail still, sorry for that. You can see my back up was my wife's main lol.
 

Attachments

  • IMG_20120903_141418.jpg
    IMG_20120903_141418.jpg
    20.2 KB · Views: 343
Last edited:

BJ43

Vaping Master
ECF Veteran
Verified Member
Nov 27, 2008
5,896
7,212
81
The other pics for you to see. It vapes great, I did have to undo the center post, reposition the wire so it would be over the air hole better, and tighten it down. This is my first SS wick, my first mod, and my second coil, cause the first one blew. It tastes great, I am down to the gross flavors from my sampler packs I started with, but the are bearable now. This will be great for long term tanking, and I got a Phoenix for dripping, (ya it bleeds to the top cause I didn't cover the second hole but no big deal to me, havent had any leak out the top yet). I will maybe try the U mesh for my other tank, when I have time.
View attachment 131811

View attachment 131812

View attachment 131813

View attachment 131815

Grr, ok blurry pic has a thumbnail still, sorry for that. You can see my back up was my wife's main lol.

Congrats on your setup, if you switch the extender from the (-) to the (+) it will make your center post the taller one and make it easier to reduce the long legs to the coil that can cause hot spots.
IMG_1548.jpg
 

nz1001

Senior Member
ECF Veteran
Verified Member
Jun 7, 2012
188
159
NY
... just back from vacation:2cool:
You'll likely get leak and/or pull it apart after several times twisting off the tube for repiring. I got few confirms the tape should be good, since it's around the base inside the tank.

...
nz1001, it looks like you used the brass colored connectors that were on the original wic, my question is what the point of those brass connectors are? Can I reuse them or must I find a supplier of them as well?
those are hand made. I learned from here:


You got a hot leg (resistant wire between the wick and post, is too far apart) which will produce burnt metal taste and will pop soon. That's why I use none-resistance silver wire as the vedio shown. 30 Gauge Round Nickel Silver Craft Wire - 150 ft: Jewelry Making Supplies | Wire Jewelry | Wire Wrap

BTW, you can bend the pin/wick before torch, it will stay that shape.
Also, you can wrap a thin layer of cotton (by dapping the wick into a cotton ball - credit to some fellow members here) around the SS wick where the coils will be applied. It'll prevent short circuit, similar to cig paper trick.
I recommend read all recent posts about rebuildables... it'll be lots learning, and fun.

Thx. N
 
Last edited:

Hydrophoid

Full Member
Aug 11, 2012
51
20
Clarksville, TN
Thanks,

I did notice the metal taste, I figured it was the kanthal taste I read about, and it would burn off. I will move the extender to the center post once this one blows, my set up is in essence that way cause I have the bottom leg under it any how.

I will look into the cotton wick for my next rebuild.

Thanks for the replies, all good advice.
 

Hydrophoid

Full Member
Aug 11, 2012
51
20
Clarksville, TN
Go for it, it is really easy. The hardest part (for me anyway) was rolling the coil, which only took 2 tries to get decent. I noticed a really scratchy TH when I first tried it. Maybe it was the wick fibers, or maybe it was something else. After the SS wick, it has been a much smoother vape.

It still gives off a metal taste, but that is because I kept the brass extender on the outside post instead of moving it to the inside, and I am not great at wrapping coils yet. Even with the taste it is a much better vape.

On a final note, I am not completely sure it was the wick causing the scratchy throat hit, I got a Phoenix at the same time I ordered this tank (they were really cheep) and it has a fiber wick also. It is currently the best vape I got, and even though it is a pain to drip all the time, I put up with it for the flavor difference. Its just a good think I get a full drive home off one fill.

Keep us posted on your results or if you have questions.

Final note and it may be just me, but that plastic tank is on there real tight, I broke an ego twist pulling the tank off the base. It pulled the 510/ego head mount off the twist, pulled the bat out, and broke a bunch of wires. So be careful when you take the tank off.
 

jralabate

Super Member
ECF Veteran
Verified Member
Jul 10, 2012
925
987
40
Nampa, Idaho
www.about.me
so i did a NEW mod on mine. I took out the + post top and bottom and replaced it with a small nail(like a Genesis Line). put a air hole in the side of the tank. Drilled out the wick holes. I dont have any SS mesh but If i can find some it will be sweet. It vapes like crazy tho. If anyone wants pics just ask.
 

Hydrophoid

Full Member
Aug 11, 2012
51
20
Clarksville, TN
An important factor is the location and distance of the airhole in relation to the coils. There should be nothing in the way, and every mm counts.

I think I will try to do a U shaped wick next, someone said if I cook my SS after I bend it it will hold the shape. I have been neglecting this tank and using my Phoenix mod (Silica wick), which should allow for a really close air inlet to wick relationship. Ill keep you all posted, although I am almost out of juice and some more home brew will have to be first priority. I got 2 tanks, and right now I dont use any of em so I may as well try it out and see what I get.
 

Hydrophoid

Full Member
Aug 11, 2012
51
20
Clarksville, TN
well here is a pic

IMG_20120907_132918.jpg

Is the nail held fast or is it loose? I may check this one out. I was just trying to think how I would get my wick closer to the intake hole (maybe we should call it the carb?).

I assume that dot of silver is a closing off the old intake hole? Is it smooth? Maybe I should do something like this, to keep the juice from running down out the carb.

Just a thought but if you can take out the posts all the way, why not put a spring, like the ones they use in electronics kits, so you could just bend the spring, load in a new coil and go. Would allow for all kinds of flexibility in coil placement.

I will have to look into this after I get a batch of juice done.
 
Status
Not open for further replies.

Users who are viewing this thread