
So that's where the magic happens....awesome!That's the one I have.. The LMS 3990. I also have the high speed option for 5k contemplating a flood system for coolant.
View attachment 455348
Tight quarters but I get a lot done here.
You are using an out of date browser. It may not display this or other websites correctly.
You should upgrade or use an alternative browser.
You should upgrade or use an alternative browser.
BOTTOM FEEDERS= a place for everything modified and/or custom made
- Thread starter turbocad6
- Start date
- th_trl_thread_readers 0
- Status
- Not open for further replies.
all caught up wow this moves ... but i like what i see
- Deleted by Unforeseen
- Reason: Posting Against ECF Supplier TOS
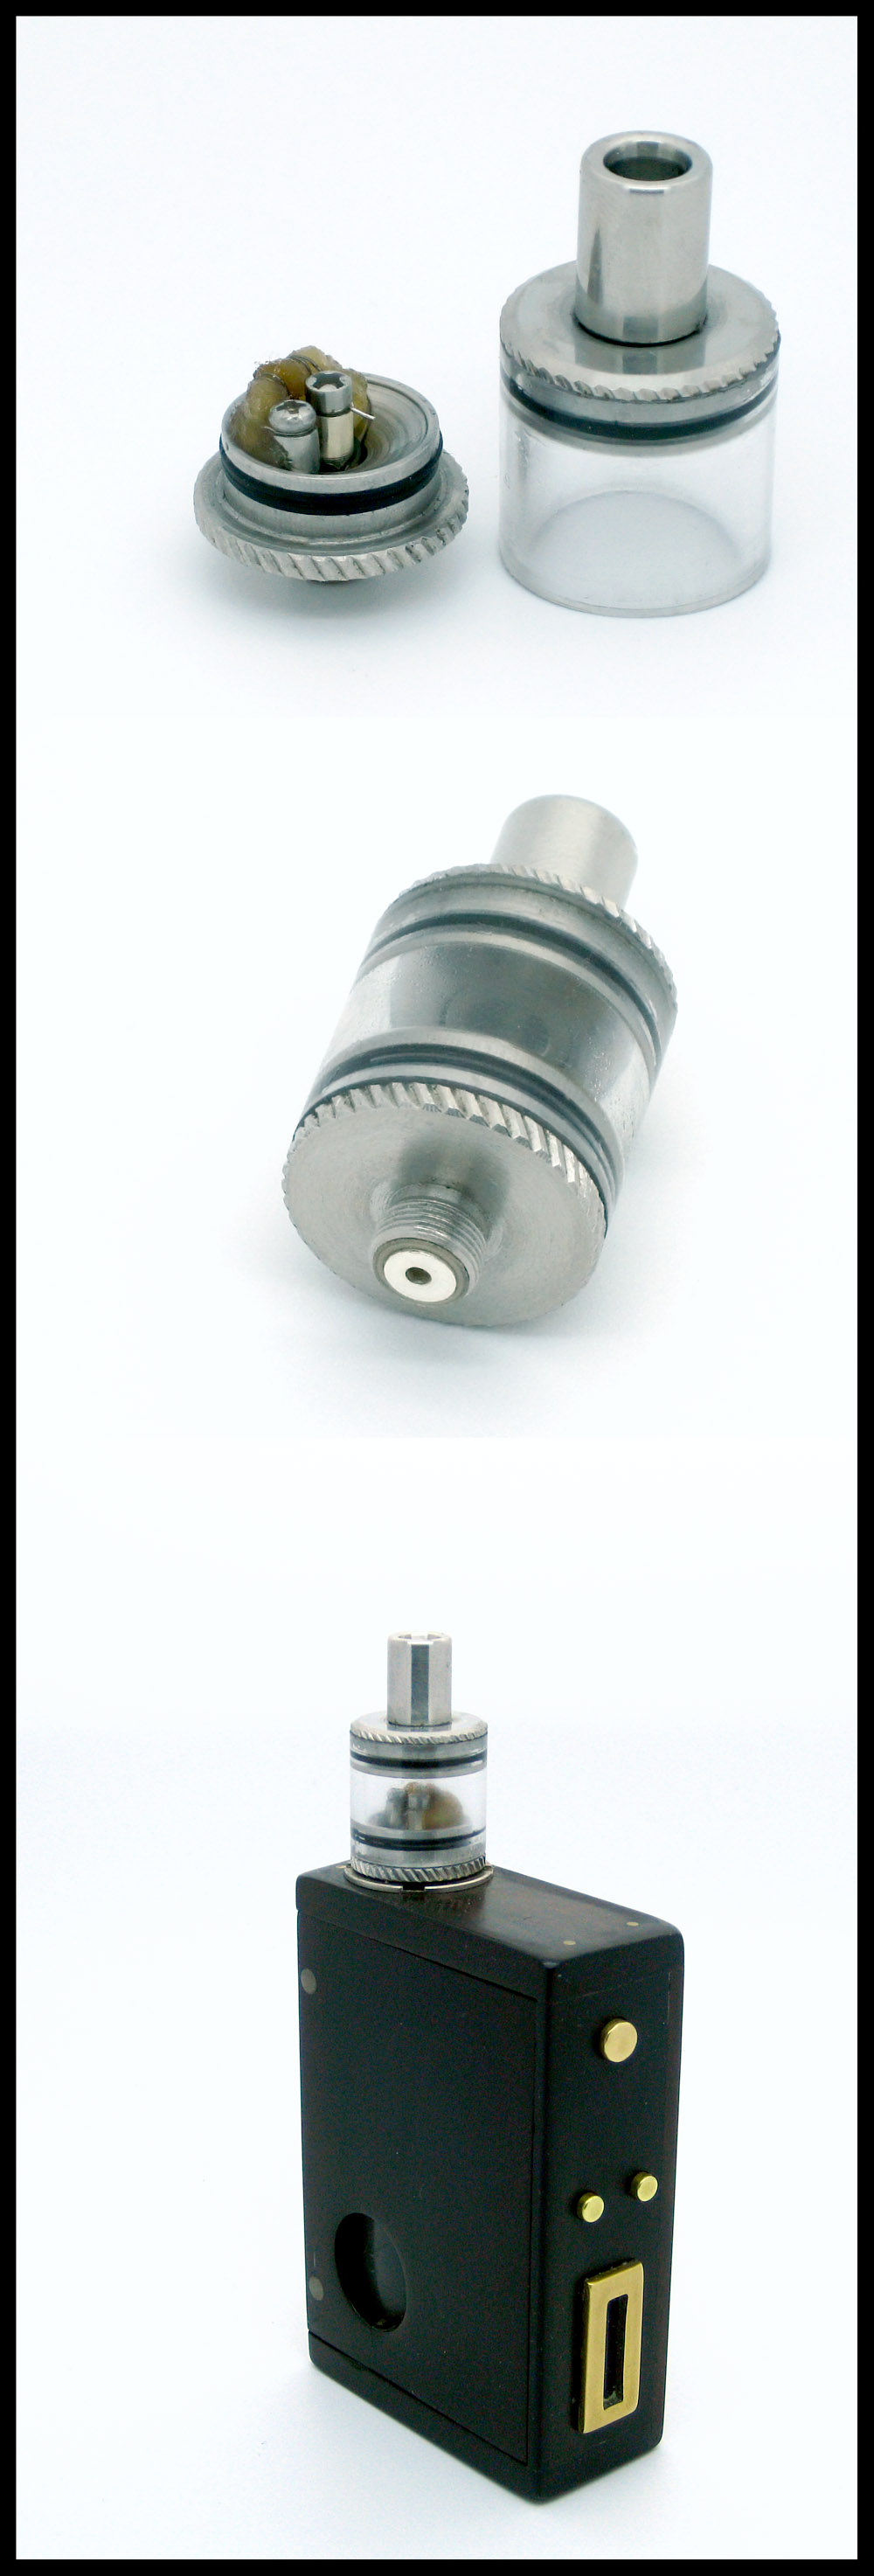
One more to add to the flock of custom BF attys,
this one is machined from two MMV DID bases (I still have one DID intact for sentimental reasons as it was the first atty I ever bought after the Startdusts etc).
I did a nice deep curve dish for easy draining and the piece de resistance, is the sterling silver center post, that was easy to machine the main section, but a nightmare to tap the M2 thread for the post screw, worth the effort though, and installed with a custom made peek insulator.
The body is made from one of those many extra plastic tanks I ordered from the last AGA-T COOP we had many moons ago here in OZ, resistant to my menthol juice, and although I keep my coil away from the edge, seem resistant to temperature also, imparts no negative smell or taste.(plus I have lie four more to use if I want to experiment with different size chambers or they get broken or scratched etc.)
It is the same external size as an IGO-L, has a nice small chamber, a 1mm airhole and is see through! Win Win Win etc, I'm happy with it anyway")
Not so much with the pictures, but I am too rushed today to worry.
this one is machined from two MMV DID bases (I still have one DID intact for sentimental reasons as it was the first atty I ever bought after the Startdusts etc).
I did a nice deep curve dish for easy draining and the piece de resistance, is the sterling silver center post, that was easy to machine the main section, but a nightmare to tap the M2 thread for the post screw, worth the effort though, and installed with a custom made peek insulator.
The body is made from one of those many extra plastic tanks I ordered from the last AGA-T COOP we had many moons ago here in OZ, resistant to my menthol juice, and although I keep my coil away from the edge, seem resistant to temperature also, imparts no negative smell or taste.(plus I have lie four more to use if I want to experiment with different size chambers or they get broken or scratched etc.)
It is the same external size as an IGO-L, has a nice small chamber, a 1mm airhole and is see through! Win Win Win etc, I'm happy with it anyway
Not so much with the pictures, but I am too rushed today to worry.
Looks like you're taking to that lathe like a duck to water, I'll ask you for some tooling and methods tips if we ever meet Just love those dark wooden and brass box mods you make...
Just love those dark wooden and brass box mods you make...I've found the lathe to be awesome for tapping center posts (though I haven't done an M2 yet). After I've drilled it, I chuck the tap in the tail stock and slide it up to the center pin leaving it unlocked. And while applying 2 fingers worth of pressure (or about 10 shekles) I hand turn the lathe and watch it suck the tap in...occasionally back spinning it to clear the flutes of the tap...probably "not" the way to do it but its worked every time.
Thanks Ian, it was intimidating at first using the lathe, but I have pretty much done it all before with the most basic of tools and my pillar drill, the lathe take a tenth the time and energy and is a fair bit more accurate LOL.Looks like you're taking to that lathe like a duck to water, I'll ask you for some tooling and methods tips if we ever meet
I just have to think it and the lathe shows me how, seems really intuitive.
As a long term loan from a friend in my home town it came with all sorts of tooling, so i have just to dip into the box to find the part that looks like it will do the job and try it out, a real godsend, as I would have struggled to work out what to buy for a lathe i bought new without any tooling on board with the deal. I'm certainly getting a feel now for what i need and works for my applications however green i might be with all things lathe.
Hi Quigs, I did use the lathe tapping the M2 similarly to as you describe, except i gently turn the tail stock chuck,however there was very little in the way of spinning, more like gentle nervous turning, the taps I ordered, said they were HSS, but when they arrived they had "carbon" etched on the sideI've found the lathe to be awesome for tapping center posts (though I haven't done an M2 yet). After I've drilled it, I chuck the tap in the tail stock and slide it up to the center pin leaving it unlocked. And while applying 2 fingers worth of pressure (or about 10 shekles) I hand turn the lathe and watch it suck the tap in...occasionally back spinning it to clear the flutes of the tap...probably "not" the way to do it but its worked every time.
The actual cutting (clockwise) motion is easy to a point, something about the silver at that gauge of tap, it just hates being wound back to knock off the burrs, I can wind it in a full turn with hardly any resistance, then when i wind back out it jams up a treat, followed by gentle rocking back and forth for a fair while before I can wind her out and head back in, I was maybe being over cautious considering it was a carbon steel tap, but having broken a HSS tap off in another silver center post I refuse to repeat that experience, especially seeing as this silver post started as a 4mm OD and 1.5mmID piece of tubing, not cheap!, any how, the result was success, even if it did take maybe 20mins of careful work. It was one of those projects that every operation took much longer than expected, but i persevered took the time and patience needed, and everything turned out perfectly without breakages, lost parts, or compromises along the way.
Last edited:
it just hates being wound back to knock off the burrs...
Ya, copper is the same, won't be making any more of those any time soon
Ya, copper is the same, won't be making any more of those any time soon
Hey sv, was it a straight fluted tap or spiral, the spiral ones are much better at reversing......
It was fluted, didn't know you could get spiral at M2?Hey sv, was it a straight fluted tap or spiral, the spiral ones are much better at reversing......
My M3 is a spiraled plug, not that it made much difference with the copper, may as well try and thread a piece of snot, glad I'm not a big coil changer, stripping that copper center pin is not a question of "if" but "when"...I've gotta chuck that silver tube one of these days, I just want to get making them down first (copper, naval brass and SS is cheap) ...but I get what you're saying, when I look at the cutter on my M3, that's a lot of stuff going on on such a small tool.
But I will say, in alum. or brass, the spirals are a nice tap compared to the fluted, a lot less thread damage...it would be so much easier if Rapid Tap tasted good
But I will say, in alum. or brass, the spirals are a nice tap compared to the fluted, a lot less thread damage...it would be so much easier if Rapid Tap tasted good
Does anyone know what the thread size and pitch is on the bottom end of the Fat dady V4 510?, I know the top is M7.5x0.5 but the bottom thread is larger by a smidgen. I'm playing with the idea of making some modifications to the 24 units I have sat at home
The FD V3 is M10.1for sure V4 I don't know
I have done quite a few FD V3 installs 9mm drill bit 10.1 tap
I have done quite a few FD V3 installs 9mm drill bit 10.1 tap
I'm fairly sure the fd is M10x1.5?
Yep, my mistake, the varitube is M10 x 0.5 FDV3 M10 x 1. Not sure about the V4 though?
Sorry should have clarified I mean internal thread.
Stealthvape have come out with a new 510, not sure if its of interest but thought I'd post in case...it looks fairly short in height.

Yep, my mistake, the varitube is M10 x 0.5 FDV3 M10 x 1. Not sure about the V4 though?
FDV4 is M10x1
Ok I'll rephrase. The internal thread on a FD V4 starts off as a standard 510 thread of M7.5x0.5. Then the internal thread changes halfway down to a larger one. This is the threaded section that receives the white plasic insert. The insert should be made of peek IMO and I want to get the thread size Of this part. It is different with the V3 as that has a 7.5x0.5 all the way.
Ok I'll rephrase. The internal thread on a FD V4 starts off as a standard 510 thread of M7.5x0.5. Then the internal thread changes halfway down to a larger one. This is the threaded section that receives the white plasic insert. The insert should be made of peek IMO and I want to get the thread size Of this part. It is different with the V3 as that has a 7.5x0.5 all the way.
Oh ...., I hadn't look that close. I just assumed it was 7mmx.5mm all the way through.
I need that thread dimension too. I have plans to replace the spring loaded core with a DIY core that is screw tight.
Edit: It looks like 8mmX.5mm.
Edit: edit: For my plan, I was going to be using the plastic insulator. The outer threads of the insulator and the lower threads of the 510 "appear" to be 8mmx.5mm. The inner theads of the insulator and the outer threads of the core "appear" to be 6mmx.5mm. I may have a better idea than my original plan now. I had ordered a 6mmx.5mm die. So, I'll be able to confirm those threads when it arrives.
Last edited:
- Status
- Not open for further replies.
Similar threads
- Replies
- 4
- Views
- 1K
- Replies
- 10
- Views
- 5K
- Replies
- 5
- Views
- 2K
- Replies
- 6
- Views
- 1K
- Replies
- 10
- Views
- 2K
Users who are viewing this thread
Total: 2 (members: 0, guests: 2)