
Ever wanted to rebuild your Atlantis coil instead of tossing it and buying a new one? Here's how I rebuild mine. Turns out they are quite easy to do and work great. I have been building my own coils for a long time and I've been asked how its done by several people so I made a "how-to".....sort of. If you've built an rda, that'll make this a very easy task to accomplish.
first, yank the old one apart. Pull out the metal stopper on the bottom and the white O ring. Be careful not to damage the little white O ring because you'll be reusing it, This is what separates the positive and negative leads of your coil. Set the O ring and metal plug to the side. Be sure to pull out all of the old, cruddy cotton and kanthal.

I'm gonna make a twisted 26g... so, here we go. If you want to wrap a regular coil that's fine, skip these steps of twisting the wire and just proceed to wrap your coil..

Here's the end result. (I'm showing 2 pieces. ) Just keep twisting till the end breaks. Again, if you wanna make a regular coil instead of a twisted one....skip this part.

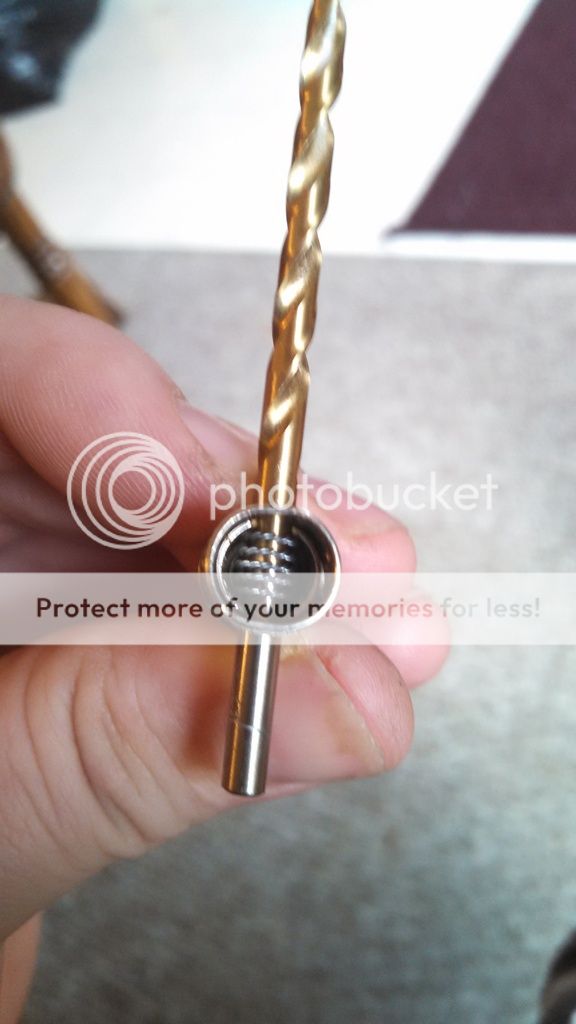
A 7/64 drill bit is the size of the stock hole on the atlantis coil housing. I decided to drill one out to 5/32. it didn't seem to make that much of a difference to me.

wrap your coil and stick it in the Atlantis coil housing. Make sure the coil does not touch the sides. then slide the drill bit back through ( like this ) to hold the coil in place while you put the white O ring and metal plug back in. There is a small "nub" on the white O ring, make sure you line that up with the notch in the coil housing. You'll see it. This is also usually where I fold over the negative lead.
now put your the rubber O ring and .... plug back on. one lead from your coil goes through the middle of the white ring and one goes on the outside. Pull them snug and then pop the steel plug back in. Have a look at the coil and make sure it looks the way you want it. Then snip off the excess wire and screw it back into the base. Make sure you use an Ohm meter to test for shorts and achieve your desired ohms. When you put the cotton in, this will help the coil from moving, you want the cotton snug but not super tight. Too tight and it wont wick properly.

Slide some cotton through, snip off the extra ,wet it with some juice and your good to go. Now all you need to do is yank out the old cotton once a week or so, do a quick dry burn, then rewick with cotton and your rebuilt coil will be just like new again. Enjoy.

first, yank the old one apart. Pull out the metal stopper on the bottom and the white O ring. Be careful not to damage the little white O ring because you'll be reusing it, This is what separates the positive and negative leads of your coil. Set the O ring and metal plug to the side. Be sure to pull out all of the old, cruddy cotton and kanthal.
I'm gonna make a twisted 26g... so, here we go. If you want to wrap a regular coil that's fine, skip these steps of twisting the wire and just proceed to wrap your coil..
Here's the end result. (I'm showing 2 pieces. ) Just keep twisting till the end breaks. Again, if you wanna make a regular coil instead of a twisted one....skip this part.
A 7/64 drill bit is the size of the stock hole on the atlantis coil housing. I decided to drill one out to 5/32. it didn't seem to make that much of a difference to me.
wrap your coil and stick it in the Atlantis coil housing. Make sure the coil does not touch the sides. then slide the drill bit back through ( like this ) to hold the coil in place while you put the white O ring and metal plug back in. There is a small "nub" on the white O ring, make sure you line that up with the notch in the coil housing. You'll see it. This is also usually where I fold over the negative lead.
now put your the rubber O ring and .... plug back on. one lead from your coil goes through the middle of the white ring and one goes on the outside. Pull them snug and then pop the steel plug back in. Have a look at the coil and make sure it looks the way you want it. Then snip off the excess wire and screw it back into the base. Make sure you use an Ohm meter to test for shorts and achieve your desired ohms. When you put the cotton in, this will help the coil from moving, you want the cotton snug but not super tight. Too tight and it wont wick properly.
Slide some cotton through, snip off the extra ,wet it with some juice and your good to go. Now all you need to do is yank out the old cotton once a week or so, do a quick dry burn, then rewick with cotton and your rebuilt coil will be just like new again. Enjoy.
