Protank MicroCoil Discussion!!

Status
Not open for further replies.

Damaurian

Full Member
Apr 28, 2015
48
17
Fernley, Nv
Haven't bought or tried one yet. Can't find anyone vaping one! So I can't say what it vapes like but I suspect it's awesome with the right build. Been my experience slim tanks kick it on both flavor and production. You don't have the RBA option. But the OCC is very rebuildable. Easier in many respects than the prior Protank assemblies. So for those holding on to their Protanks, I have, it is a viable option for low wattage flavor. Again, with a density build which we know how to get right here.

Insofar as power, I've vaped 2.5mm and fat 2.78mm winds on the SubMini at 9W for a very satisfying cool vape. I've no doubt the Nano can as well. The increased airflow will make warmer temp's a lot more productive and palatable to a great many of us who enjoy the low-wattage spectrum.

If you think you might enjoy more this in future the Mini is a great platform.

Good luck D.

:)

p.s. You may be able to find my pics earlier on the twisted lead parallels for the Subtank. Tensioned micro's in this tank are phenomenal. Excellent in a PT, outstanding with this much airflow. I'd say easily a 30% production difference over a standard coil BUT with an added richness of texture and flavor density the extremely airy factory builds lack. You'll just have to make one to see it.

Well... I caved in and purchased the Sub mini. The juice capacity of the nano was not going to sate my needs. Plus, I've heard that the Subtank series burns through juice easily.

The fact that my Mini is coming with an RBA deck is definitely worth it in my eyes. I think I'll try my hand at winding a dual-coil out of a single strand of kanthal...or would that not work? Maybe what I saw on google images was two seperate kanthal coils opposite the other.

Oooooweee I'm excited! I even ordered a new flavor of juice from vista vapors(blueberry muffin) just for the new tank. Hopefully that with the higher airflow and OCCs will take my vaping experience to a higher level. I will continue to use my PT3, as a back-up and probably my on-the-go tank. So, I'll definitely be putting your advice concerning PT MCs to good use.

Thank you Mac.
 
  • Like
Reactions: MacTechVpr

MacTechVpr

Vaping Master
ECF Veteran
Verified Member
Aug 24, 2013
5,723
14,401
Hollywood (Beach), FL
Well... I caved in and purchased the Sub mini. The juice capacity of the nano was not going to sate my needs. Plus, I've heard that the Subtank series burns through juice easily.

The fact that my Mini is coming with an RBA deck is definitely worth it in my eyes. I think I'll try my hand at winding a dual-coil out of a single strand of kanthal...or would that not work? Maybe what I saw on google images was two seperate kanthal coils opposite the other.

Oooooweee I'm excited! I even ordered a new flavor of juice from vista vapors(blueberry muffin) just for the new tank. Hopefully that with the higher airflow and OCCs will take my vaping experience to a higher level. I will continue to use my PT3, as a back-up and probably my on-the-go tank. So, I'll definitely be putting your advice concerning PT MCs to good use.

Thank you Mac.
Stay excited. It's a great tank. One of the best I've ever tried of any kind. I'd start with a fairly bad-a** straight wire single with a chunky wick to get ya vapor with some density. Real easy to do on this rba because of the sickeningly simple trap screw post arrangement Kanger was wise enough to deploy on the Mini bra. They really thought it through from the vapers viewpoint on several counts particularly airflow balance. Whatever you like…dry/hot, wet/cool and all twixt your gonna be able to get to on this one. What I and others cover here is using strain to get there makin' the coils bulletproof to shorts and hotspots at maximum output.

Curious? Stick around. Meantime enjoy the OCC and congrats.

We'll help you round up what you need goin forward.

Good luck.

:)

 
  • Like
Reactions: Damaurian

Damaurian

Full Member
Apr 28, 2015
48
17
Fernley, Nv
Stay excited. It's a great tank. One of the best I've ever tried of any kind. I'd start with a fairly bad-a** straight wire single with a chunky wick to get ya vapor with some density. Real easy to do on this rba because of the sickeningly simple trap screw post arrangement Kanger was wise enough to deploy on the Mini bra. They really thought it through from the vapers viewpoint on several counts particularly airflow balance. Whatever you like…dry/hot, wet/cool and all twixt your gonna be able to get to on this one. What I and others cover here is using strain to get there makin' the coils bulletproof to shorts and hotspots at maximum output.

Curious? Stick around. Meantime enjoy the OCC and congrats.

We'll help you round up what you need goin forward.

Good luck.

:)


That's a beautiful coil there man! I'm curious...Since I've never seen an rba deck up-close. Do the leads wrap around the screws for xtra leverage of do they just get wedged underneath them?
 

MacTechVpr

Vaping Master
ECF Veteran
Verified Member
Aug 24, 2013
5,723
14,401
Hollywood (Beach), FL
That's a beautiful coil there man! I'm curious...Since I've never seen an rba deck up-close. Do the leads wrap around the screws for xtra leverage of do they just get wedged underneath them?

Leads normally trap in holes drilled in posts. Look at some RDA/RBA's it's an open screw you need to wrap around. Yeah, it can be a mechanical problem. You can use leverage with post holes/screws. Sure. But real care is required not to deform your wind. May not matter much if it's eccentric in the first place. It's behavior might be marginal anyway. But for a good performing coil symmetry and balanced strain are vital. That's the convo here D. How to do that and get a great vape repeatedly, repeatably. Good tools and that includes forces applied as you say, like leverage do the heavy lifting. We don't have to reinvent the wheel every time.

Thanks for the nod on the coils. It's based on the tensioned microcoils discussed here. A basic one will give you a solid dependable vape. Once you have strain as a tool you can master any circuit. Look up pin vise on this thread and you'll find lots of notes on how to use it to get there as well as related parts. For the Sub, I'm winding 2.78, 3.0 + 3.2 mm. Ordinary bits will work in a pin vise fluted side in so cheap or used bits are fine. And you wind directly off a standard spool using the edge as a fulcrum and pivot point to guide and maintain tension on the wire.

There it is. Good luck.

:)

p.s. Below an example of essentially a dual coil, twisted lead center post consisting of two tensioned m.c.'s. A variety of size and performance configurations can be adapted to the OCC. The earlier trio are twisted lead parallels which conform precisely to the post spread for the Subtank RBA. Search for twisted lead for tools and technique on this thread.


full
 
  • Like
Reactions: Damaurian

Damaurian

Full Member
Apr 28, 2015
48
17
Fernley, Nv
You were right Mac! This tank is amazing :D.

Only cons I can come up with are how it threads onto my iStick 30w. Also, all these videos shot with Macro lenses made me think I was cutting the right width of OC wick lol. Man, oh man I dun goofed and brought the 1.2 ohm coil down to 0.7 because I applied too much tension when wicking it. Any suggestions on a good baseline wattage for that
resistance?
? image.jpg
 
Last edited:
  • Like
Reactions: MacTechVpr

MacTechVpr

Vaping Master
ECF Veteran
Verified Member
Aug 24, 2013
5,723
14,401
Hollywood (Beach), FL
You were right Mac! This tank is amazing :D.

Only cons I can come up with are how it threads onto my iStick 30w. Also, all these videos shot with Macro lenses made me think I was cutting the right width of OC wick lol. Man, oh man I dun goofed and brought the 1.2 ohm coil down to 0.7 because I applied too much tension when wicking it. Any suggestions on a good baseline wattage for that
resistance?
? View attachment 460555

Sweet. The tank is designed for I think 7W-30W operation. Most folks once they get accustomed to the heat of the factory wind tend to find vapor and flavor towards the high side of the power range (>22.5W). Take a look at Mod range | Steam Engine | free vaping calculators which gives the specs on your APV. I'd prolly shoot for the median and be satisfied with your .7Ω. Only thing is I don't know how you wound it. Makes a diff. Did you use the factory coils? Did you disfigure it wicking? Sounds like. If so, don't be surprised if that short will go hot on ya. Check the wind and make sure you're not contacting turn-to-turn if you do start getting dry hits. Then make sure the turns are as neatly separated as possible and leads if you look down into the assembly are not touching the walls. Gently center the coil until not.

Let's get you tensioned bro.

The parallel's above put out like a 25W set at 17.5W with very dense vapor. So much so that I run the single slot wide open with a wide open AFC drip tip. Occasionally I'll close up when I chain short bursts. You'll discover a vaping style and power setting that will suit you. My approach is to recommend the median then wiggle the line from there.

Good luck D and tell me when you're ready to try tension…or shoot us your wind! :D
 
  • Like
Reactions: Damaurian

Damaurian

Full Member
Apr 28, 2015
48
17
Fernley, Nv
Maybe I was mistaken...I think the latest batch of Sub minis comes with a sub ohm coil on the RBA deck? I've heard that people get them straight out the package ranging from 0.5 -0.7 .

When I read the specs on the MVS store I probably just misunderstood which coils were which. I see the two pre-wicked OCC coils are at 1.2 and 0.5. When I opened it I immediately threw in the RBA because I wanted to get comfortable with it and see the actual scale and compare it to how its displayed in videos and pictures.

I don't currently have any wire to wrap my own coils or even anything suited for wrapping. All I have available is atm is my wife's crocheting hook which is anodized alluminum with a diameter of 3.25mm I believe. I know that it didn't fit through the spare coil in the bag of o-rings and screws. Is 3.25 too big of an ID? I ran the numbers through steam-engines calc and it said I'd need about 6 wraps of 26g kanth to reach my desired resistance of 0.9.

Also, I've looked at a few coil jigs. Mainly the master coil jig kit on amazon for around $8. Have you has the chance to use one of these jigs?

I guess I'll go order some wire right now and hopefully in a few days I'll either be asking for more advice or I'll be posting pics of my first self wrapped coils.

One more thing! What can be done about the popping when I go to take a draw? My juice blend is 70/30 PG dominant. Could that be the culprit?
 
Last edited:
  • Like
Reactions: MacTechVpr

MacTechVpr

Vaping Master
ECF Veteran
Verified Member
Aug 24, 2013
5,723
14,401
Hollywood (Beach), FL
Maybe I was mistaken...I think the latest batch of Sub minis comes with a sub ohm coil on the RBA deck? I've heard that people get them straight out the package ranging from 0.5 -0.7 .

When I read the specs on the MVS store I probably just misunderstood which coils were which. I see the two pre-wicked OCC coils are at 1.2 and 0.5. When I opened it I immediately threw in the RBA because I wanted to get comfortable with it and see the actual scale and compare it to how its displayed in videos and pictures.

I don't currently have any wire to wrap my own coils or even anything suited for wrapping. All I have available is atm is my wife's crocheting hook which is anodized alluminum with a diameter of 3.25mm I believe. I know that it didn't fit through the spare coil in the bag of o-rings and screws. Is 3.25 too big of an ID? I ran the numbers through steam-engines calc and it said I'd need about 6 wraps of 26g kanth to reach my desired resistance of 0.9.

Also, I've looked at a few coil jigs. Mainly the master coil jig kit on amazon for around $8. Have you has the chance to use one of these jigs?

I guess I'll go order some wire right now and hopefully in a few days I'll either be asking for more advice or I'll be posting pics of my first self wrapped coils.

I would avoid the coiler jigs. They do not tension. You will have to do a heck of a lot more pulsing and compression to get these tight and properly oxidized. Search for pin vise on this thread for a cheaper alternative that actually makes a microcoil, if that's what you're after.

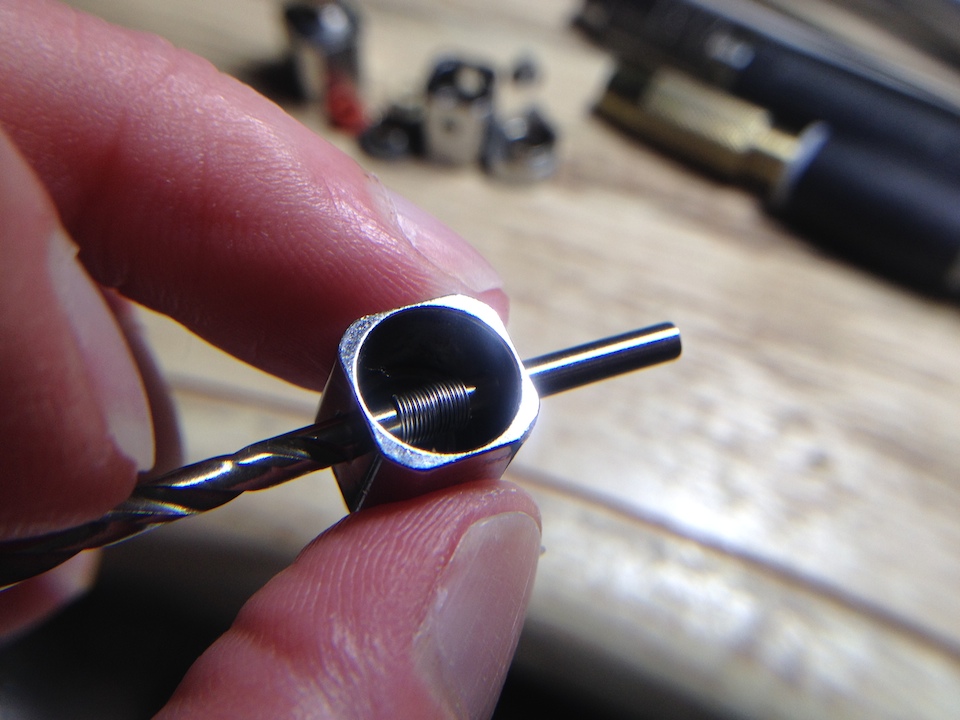
I'm winding 3.175mm (1/8") reaming out the OCC holes with a pin vise and drill bit. But a standard 7/64" drill bit will fit nicely in the stock ~2.8mm holes. Def should wind and stabilize the coil during the set (keep it on the bit). This will prevent skewing whether an open or m.c. wind. The 7/64" is the trio parallel pictured above. A good starting point for your device might be…26 AWG, 9/8, 2.778mm i.d., LL=14mm, t.m.c.=1.2375 for good coverage area. This will give you enough density to be able to open up the airflow without diffusing the vape too much (both volume and flavor). It's what I'm using as a baseline comparison build right now.

A picture of a twisted lead center post dual coil...29AWG TLCP, 9/8, 2.778mm i.d., LL=14mm, t.m.c. = 1.287Ω…to demonstrate stabilization in the OCC…

full


I'm also looking at 25 AWG which is closer to the factory wire diameter and will prolly be doing some tests and suggestions on this as well in future.

Good luck and chime in with any questions or pics of your own.

:)
 
Last edited:
  • Like
Reactions: Damaurian

Damaurian

Full Member
Apr 28, 2015
48
17
Fernley, Nv
How do you use a pin vise exactly? Put it in a drill chuck and wind the kanthal around it? Also, how do I remove the caps from the top of the OCC heads? The rounded corners and tiny size make it difficult for my sweaty hands xD!

I've seen the rip trippers vid where he used the screw driver provided to stabilize the coil and center it in the occ head. I may take that route, plus I'm strapped for cash and a set of drill bits would be more useful to me if I actually owned a drill. I will keep that in mind though when I get to tinkering with the OCC heads.


Thanks again Mac. :D
 

MacTechVpr

Vaping Master
ECF Veteran
Verified Member
Aug 24, 2013
5,723
14,401
Hollywood (Beach), FL
How do you use a pin vise exactly? Put it in a drill chuck and wind the kanthal around it? Also, how do I remove the caps from the top of the OCC heads? The rounded corners and tiny size make it difficult for my sweaty hands xD!

I've seen the rip trippers vid where he used the screw driver provided to stabilize the coil and center it in the occ head. I may take that route, plus I'm strapped for cash and a set of drill bits would be more useful to me if I actually owned a drill. I will keep that in mind though when I get to tinkering with the OCC heads.


Thanks again Mac. :D

The OCC unfortunately is an advanced build. The RBA would be a better start to getting the basics going. But to answer your question, I cut up some old dish wash gloves for some thin rubber. You want to protect the thin metal over brass of the OCC assemblies. They chip and scratch easily. Then I use a small vice grips to hold the body and lightly rotate the top cam with a small pliers or needle nose. Likewise with some thin rubber over the cap. It's not threaded, a pressure fit. Once you break the friction holding the cap it comes off easily. To reinstall it or the assy bottom cover (same) you'll have to line them up and gently tap them back in. I seldom remove the bottom.

full


I find the OCC easier to work with once you get over the fitment issue with the cap. Lot's more room to work with and lead termination is just as easy. However, it is a design challenge. We need to change a lot of our assumptions about what may work. When we do, this platform is capable of substantial power and vapor density when considering what it needs and can handle. Such as the dual-coil twisted lead center termination above.

Basically you rotate the pin vise with the bit in it wire secured to the collet and rotate. A basic desc below. Start slowly and gradually add tension. You will see the wire line up, then tighten. A bit beyond that but not too much. Run into trouble let me know. Always glad to help.

Good luck.

:)

...The basic idea is to hold the coil upright in one hand resting on a flat surface and turning the vise grips consistently while it lays on the edge of the spool. Setting it on the edge provides an incredible lock of stability between the point of wire originating at the spool and the point where it's being strained onto the bit. A relatively slight pull in the direction away from the spool with the winding hand using the thumb to support the pin vise is usually all that's needed to stretch the wire. It is that short section of wire between bit and spool over which you are imparting the exact control of tension. Sort of like stretching a rubber band. And as you twist the vise it's that level of strain that's being recorded in the metal's state, a sort of memory if you will of it's own geometry as it was wound. It will always want to remain that coil. Is is this which nature is allowing us a mastery of, the closest proximity of objects. And it's tension (strain) which gets us there….
 
  • Like
Reactions: Damaurian

MacTechVpr

Vaping Master
ECF Veteran
Verified Member
Aug 24, 2013
5,723
14,401
Hollywood (Beach), FL
Lifted from the thread — The end of microcoils?

Why a Tensioned Micro Coil?

A t.m.c. (tensioned micro coil) presents the tightest contact possible for electrical pulsed oxidation of KA1 wire coils. With closest turn-to-turn proximity it is then feasible to obtain the most consistent oxidation possible. Enough to support high power output without shorting. When wound in a uniform state of tension end-to-end so as not to introduce skew or other strain imbalance it will evidence no hot spots whatsoever and will respond to pulsing quickly to an insulated state for low power. Continued ascending low voltage pulsing will materially enhance insulation discernably adding to the practical power handling capacity of the wind. A deep uniformity of insulation is entirely possible as evidenced by this photograph…

full


In a sense the very geometry of a t.m.c. serves as an important indicator of distorting strain in our winds and their set (termination).

I can think of no better baseline or metric than to teach new vapers how to perfect the balancing of strain in our coils to ensure consistent performance and temperature. We effectively mitigate thermal variation in our winds and we can more practically estimate mean temperature operating conditions. As well enjoy the benefits to our vape of a stable complete circuit.

Good luck all!

:)
 
  • Like
Reactions: Damaurian

MacTechVpr

Vaping Master
ECF Veteran
Verified Member
Aug 24, 2013
5,723
14,401
Hollywood (Beach), FL
Thanks for that excerpt. I wonder if using some sacred geometry in coil building would yield good results.
Has anyone tried a flower/tree of life coil? Or a vesica pisces coil? Or is the circle pretty much as good as it gets in concerns to how electrical current travels through resistance wire?

LOL, funna that. Actually I have seen examples of the vesica on ECF and simlar. Only…how do ya wick the darn things. And a lot of the stuff here certainly do look like ToL attempts. Lot of good picture threads here. Sendin' ya somethin'.

G'luck.

:)
 
  • Like
Reactions: Damaurian

Damaurian

Full Member
Apr 28, 2015
48
17
Fernley, Nv
I'm waiting on a spool of 26g A-1 and some organic cotton balls. I opted for those instead of KGD because the best priced kgd on amazon ships from Japan and I couldn't see myself waiting that long since I've only got the 1 pad provided with the subtank. I'm certain I could probably get my hands on a pin vise through my Mom's husband. Plus, all the drill bits I'd need.
 
  • Like
Reactions: MacTechVpr

MacTechVpr

Vaping Master
ECF Veteran
Verified Member
Aug 24, 2013
5,723
14,401
Hollywood (Beach), FL
I found organic cotton superior in flavor for some tobacco vapes. But KGD beats it for flow (output) with a few exceptions. You'll be pleased with the OC. The 26g should be a good all-around wire for drippers and tanks with good airflow. And it's still relatively easy to wind with tension. Wise decision. LMK on what I sent if helpful. G'luck. :)
 
  • Like
Reactions: Damaurian

Damaurian

Full Member
Apr 28, 2015
48
17
Fernley, Nv
I found organic cotton superior in flavor for some tobacco vapes. But KGD beats it for flow (output) with a few exceptions. You'll be pleased with the OC. The 26g should be a good all-around wire for drippers and tanks with good airflow. And it's still relatively easy to wind with tension. Wise decision. LMK on what I sent if helpful. G'luck. :)

I chose the 26 because it seemed popular with both the RBA and OCC heads for subtank users. Hopefully the cotton I ordered is in fact organic and free of chlorine as they say. I don't wanna spark up and get a lungful of unwanted chemicals. What does LMK mean by the way?
 
Status
Not open for further replies.

Users who are viewing this thread