
You are using an out of date browser. It may not display this or other websites correctly.
You should upgrade or use an alternative browser.
You should upgrade or use an alternative browser.
DNA 200 Watt
- Thread starter MegaVap
- Start date
- th_trl_thread_readers 0
- Status
- Not open for further replies.
I fully understand why you feel that way, but for me half of the fun is figuring out the design and building my own mod. I enjoy the challenge.
I agree and I love that as well but I dislike the fact that we need to use LiPo batteries just because they wanna have a big marketing stunt about it handling 200W, when we don't need it. LiPos are not new but we don't have experience using them in vaping and I have very little knowledge of them, and while this actually what excites me most of the time (learning new things), when it comes to safety I'm more reserved. I just don't think this is worth it.
Well I have been thinking about lipos and honest I think we overreact abit.I agree and I love that as well but I dislike the fact that we need to use LiPo batteries just because they wanna have a big marketing stunt about it handling 200W, when we don't need it. LiPos are not new but we don't have experience using them in vaping and I have very little knowledge of them, and while this actually what excites me most of the time (learning new things), when it comes to safety I'm more reserved. I just don't think this is worth it.
I mean these batteries are used in RC helicopters and RC race cars. these thing are beaten and beaten and most come out fine. so I think that a handheld device should be fine.
lol. Just saw a post from someone in another sub-forum about some crazy dude vaping with a computer! You are (in)famous!!!
Yay, I've always wanted to be infamous
")
Hahaha a. Way to go Tom!
So, how went the soldering?
Well. It was.. interesting
Started out really great, then become an enormous pain. Here's the end result:510, you can't really see the solders because I shrink wrapped it. This was pretty easy, perhaps mostly because I didn't have to use a soldering iron at all. Two videos I watched on fitting Fat Daddy 510s suggested using a torch, which I did, and that was so nice and easy. This part I really enjoyed

Board. You see that red B+ wire in top right? That looks pretty neat? That was the first wire I soldered. Not just the first wire on this board. That's literally the first wire I've ever soldered with a soldering iron. It kind of went downhill from there

I did the B+ and B- and at first they both looked like the B+. Pretty neat and tidy. I pre-tinned them lightly, with just a little solder on the underside that was going down onto the pad and not much on the top, exactly like you see the red wire. The reason B- now looks messy is that later, when I was nearly finished, it broke off while I was trying to plug the USB cable in. It took two further attempts to get it to stay on.
Output and Ground were a huge pain. Those are the 14G wires which as you predicted were much harder. Once again the red wire (OUT - you can't see it's red because of the black shrink wrap at the end) went on at the first attempt - although it took me about 30 minutes to do that first attempt. Then again the black wire fell off about three times. That's why the red wire has heat shrink and the black doesn't - they both had it on at first but then when the black fell off (actually while I was in the process of heat shrinking it, the shrinking caused the wire to flex and broke off the solder joint) I forgot to put heat shrink back on for the second (and third) attempts at getting it on. The only reason either of them needed heat wrap was I over exposed the cable a bit. Probably should have just re-cut the wires
I pre-tinned all wires first, and that wasn't so bad. It was the soldering to the board I found tricky. Perhaps because I was tentative - soldering a wire to a wire is fine because if it goes wrong, no big deal. Here I was constantly worried I was going to fry the board or slip and break something off. I would say I spent a total of one hour fiddling with my Helping Hands - as in 60 minutes, on and off, just constantly adjusting and re-adjusting the arms and the clips and the base, trying to get them to hold the board and the wire in exactly the right place, with the wire pressed against the board at the right angle such that I could just apply the soldering iron and feed a bit more solder on. That wasn't so fun
The damned things would not stick down to the wooden board I was working on, no matter how much sticky stuff I used on their bases. So nearly every time I'd adjust their arms/clips, the whole base would move and shift everything out of alignment.I probably obsessed a bit too much at getting the Helping Hands to hold the wire just right against the board and that added a lot of time. Though one time I did try without the Hands and that didn't work at all. I needed the wire held in place so I had my own two hands for solder and iron, as just the pre-tinned solder on the wire didn't seem enough to get a good joint.
So anyway. I could wish it all looked a bit neater. But the wires are pretty strongly joined this time, and the board works, so I'm happy
The next job is to attach the battery balance charging port, so I can use battery instead of PSU. Also I plan to cut down the two input wires, B+ and B- and put a JST plug on the end. I bought some two-pin JST plugs. My Lipo already has a JST plug on the end of its two wires. So I figured I would put the same JST plug on the end of the two wires coming from the DC PSU. Then the two wires from the board, B+ and B-, would be short and end in a female JST plug.
Then I could choose to use either the Lipo or the PSU, simply plugging either one into the JST plug coming off the board, and thus easily switch from battery to PSU at any time with no future soldering. Or indeed, putting in a different Lipo in future.
The PSU is good in that it never needs charging of course. But a downside is that its fan is constantly on - the advert was misleading in that respect, it seemed to say the fan only came on at elevated temperature but in fact it's always on and is a bit loud. So would be nice to have a Lipo option. Not to mention to eventually enable some portability.
Last edited:
Well I have been thinking about lipos and honest I think we overreact abit.
I mean these batteries are used in RC helicopters and RC race cars. these thing are beaten and beaten and most come out fine. so I think that a handheld device should be fine.
The oldest of these Mods is almost 2 years old now. Havent had a lick of problem out of any of them. I even gave the purple ones to the Woman I love, thats how confident I am in the tech, I just warned her not to try and retrieve it if she dropped it in the toilet or in the sink.
My very first LIPO Mod, its a DNA20.


.
All of the Mods shown above last me 3-5 days, and her over a week!
Shown below next to a Vamo for size comparison.

My thoughts on LIPOs:
Mike n Tibs DNA Mods! | Page 77 | E-Cigarette Forum
Last edited:
The biggest safety issues with LiPo is the person using them. If you are well educated with lipo and lipo safety then it will be fine. Its required to use lipo because its the only thing that can keep up unless you use 3x 18650s which makes for a monsterous mod. Its not a marketing stunt. This is like the 3rd mod that can do TRUE 200w. 2 of them use LiPo batteries. The other uses 3 18650s. Just because we dont need it now doesnt mean they shouldnt have made it. If they build it then the atomizers will come that use it. If thats all a problem then maybe this isnt the product for you and you should maybe check out the other devices out there. Dont try and say its a marketing stunt when a company tries to make a product that does what its claimed to do and stands behind it.I agree and I love that as well but I dislike the fact that we need to use LiPo batteries just because they wanna have a big marketing stunt about it handling 200W, when we don't need it. LiPos are not new but we don't have experience using them in vaping and I have very little knowledge of them, and while this actually what excites me most of the time (learning new things), when it comes to safety I'm more reserved. I just don't think this is worth it.
For soldering on a circuit board, you don't need to feed solder wire, just the solder that you used to tin the wire and contact. Flux helps a lot. I use Kester 951 no-clean flux. It's like a clear liquid I use in a needle tip bottle.Yay, I've always wanted to be infamous
Well. It was.. interesting
510, you can't really see the solders because I shrink wrapped it. This was pretty easy, perhaps mostly because I didn't have to use a soldering iron at all. Two videos I watched on fitting Fat Daddy 510s suggested using a torch, which I did, and that was so nice and easy. This part I really enjoyed
Board. You see that red B+ wire in top right? That looks pretty neat? That was the first wire I soldered. Not just the first wire on this board. That's literally the first wire I've ever soldered with a soldering iron. It kind of went downhill from there
I did the B+ and B- and at first they both looked like the B+. Pretty neat and tidy. I pre-tinned them lightly, with just a little solder on the underside that was going down onto the pad and not much on the top, exactly like you see the red wire. The reason B- now looks messy is that later, when I was nearly finished, it broke off while I was trying to plug the USB cable in. It took two further attempts to get it to stay on.
Output and Ground were a huge pain. Those are the 14G wires which as you predicted were much harder. Once again the red wire (OUT - you can't see it's red because of the black shrink wrap at the end) went on at the first attempt - although it took me about 30 minutes to do that first attempt. Then again the black wire fell off about three times. That's why the red wire has heat shrink and the black doesn't - they both had it on at first but then when the black fell off (actually while I was in the process of heat shrinking it, the shrinking caused the wire to flex and broke off the solder joint) I forgot to put heat shrink back on for the second (and third) attempts at getting it on. The only reason either of them needed heat wrap was I over exposed the cable a bit. Probably should have just re-cut the wires
I pre-tinned all wires first, and that wasn't so bad. It was the soldering to the board I found tricky. Perhaps because I was tentative - soldering a wire to a wire is fine because if it goes wrong, no big deal. Here I was constantly worried I was going to fry the board or slip and break something off. I would say I spent a total of one hour fiddling with my Helping Hands - as in 60 minutes, on and off, just constantly adjusting and re-adjusting the arms and the clips and the base, trying to get them to hold the board and the wire in exactly the right place, with the wire pressed against the board at the right angle such that I could just apply the soldering iron and feed a bit more solder on. That wasn't so fun
I probably obsessed a bit too much at getting the Helping Hands to hold the wire just right against the board and that added a lot of time. Though one time I did try without the Hands and that didn't work at all. I needed the wire held in place so I had my own two hands for solder and iron, as just the pre-tinned solder on the wire didn't seem enough to get a good joint.
So anyway. I could wish it all looked a bit neater. But the wires are pretty strongly joined this time, and the board works, so I'm happy
The next job is to attach the battery balance charging port, so I can use battery instead of PSU. Also I plan to remove and re-solder the two input wires, B+ and B-. I bought some two-pin JST plugs. My Lipo already has a JST plug on the end of its two wires. So I figured I would put the same JST plug on the end of the two wires coming from the DC PSU. Then the two wires from the board, B+ and B-, would be short and end in a female JST plug.
Then I could choose to use either the Lipo or the PSU, simply plugging either one into the JST plug coming off the board, and thus easily switch from battery to PSU at any time with no future soldering.
The PSU is good in that it never needs charging of course. But a downside is that its fan is constantly on - the advert was misleading in that respect, it seemed to say the fan only came on at elevated temperature but in fact it's always on and is a bit loud. So would be nice to have a Lipo option. Not to mention to eventually enable some portability.
You should throw out your cell phone because that will blow up in your face.I agree and I love that as well but I dislike the fact that we need to use LiPo batteries just because they wanna have a big marketing stunt about it handling 200W, when we don't need it. LiPos are not new but we don't have experience using them in vaping and I have very little knowledge of them, and while this actually what excites me most of the time (learning new things), when it comes to safety I'm more reserved. I just don't think this is worth it.
For soldering on a circuit board, you don't need to feed solder wire, just the solder that you used to tin the wire and contact. Flux helps a lot. I use Kester 951 no-clean flux. It's like a clear liquid I use in a needle tip bottle.
Hmm OK, I did try that but I found it hard to get a good connection. Latterly, the only time I started to get a solid joint is when I also fed in a little more fresh solder - which I would try and feed down near the underside of the wire, right near the pad. But now you mention it, I think that one neat wire - the B+, the first one I did - I didn't add any extra solder, just heated the pre-tinned amount until it stuck.
But I didn't use separate flux, just the resin core of my 60/40 solder. I do have some separate flux already.
So next time should I put a little on the pad and then just heat up a pre-tinned wire on the pad and it should stick?
Oh, and I didn't specifically pre-tin the contact pad - that's probably another problem. Most of the time it did end up with some solder on it, because my first attempt to attach the wire would fail and would leave some solder behind. But I didn't put any on there deliberately before attempting the joint. I guess that's why I needed to feed more in most of the time! I had thought the pre-tinned solder on the wire would be enough, but I guess not.
You should throw out your cell phone because that will blow up in your face.
Love the attitude mate, it's what got us to clueless idiots almost blowing their heads with low-ohm 26650 mods that vent.
In a regulated mod?Love the attitude mate, it's what got us to clueless idiots almost blowing their heads with low-ohm 26650 mods that vent.
Stupid people do stupid things.
The biggest safety issues with LiPo is the person using them. If you are well educated with lipo and lipo safety then it will be fine. Its required to use lipo because its the only thing that can keep up unless you use 3x 18650s which makes for a monsterous mod. Its not a marketing stunt. This is like the 3rd mod that can do TRUE 200w. 2 of them use LiPo batteries. The other uses 3 18650s. Just because we dont need it now doesnt mean they shouldnt have made it. If they build it then the atomizers will come that use it. If thats all a problem then maybe this isnt the product for you and you should maybe check out the other devices out there. Dont try and say its a marketing stunt when a company tries to make a product that does what its claimed to do and stands behind it.
I'm sure if you poll people in this thread about their needs you would be surprised, and don't forget that the people roaming these boards are much more extreme than your average user.
Also I do consider it a marketing stunt when they said in the past that they weren't interested in making a 200W mod. And yes this isn't the device for me. What I want is an updated DNA40 device that isn't plagued with glitches and the same features with the DNA200; primarily the ability to calibrate the TCR and anything added is welcome.
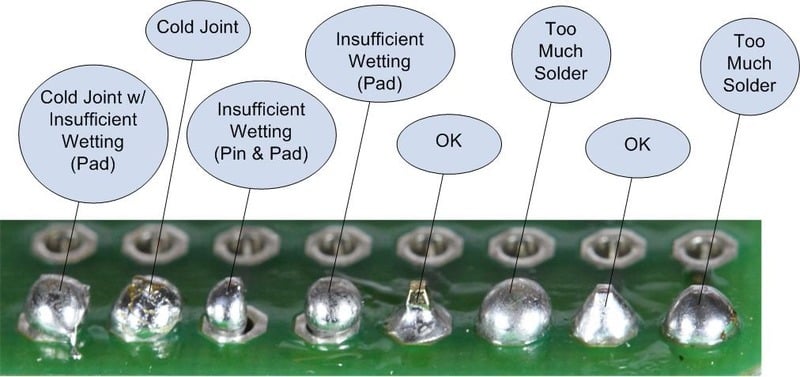
A lot of this has to do with what you're soldering. For your B+, I would tin the wire as usual, then put a small drop of flux on the board and then place the wire on top. Heat it with the soldering iron until the solder flows to the contact on the circuit board. It shouldn't take more than 3-4 seconds. Once you take the iron away, hold the wire in place for a few seconds longer for the solder to cool and harden.Hmm OK, I did try that but I found it hard to get a good connection. Latterly, the only time I started to get a solid joint is when I also fed in a little more fresh solder - which I would try and feed down near the underside of the wire, right near the pad. But now you mention it, I think that one neat wire - the B+, the first one I did - I didn't add any extra solder, just heated the pre-tinned amount until it stuck.
But I didn't use separate flux, just the resin core of my 60/40 solder. I do have some separate flux already.
So next time should I put a little on the pad and then just heat up a pre-tinned wire on the pad and it should stick?
Oh, and I didn't specifically pre-tin the contact pad - that's probably another problem. Most of the time it did end up with some solder on it, because my first attempt to attach the wire would fail and would leave some solder behind. But I didn't put any on there deliberately before attempting the joint. I guess that's why I needed to feed more in most of the time! I had thought the pre-tinned solder on the wire would be enough, but I guess not.
Here's a great pic showing good and bad solder joints.
What glitches are you "plagued" with on a DNA40?I'm sure if you poll people in this thread about their needs you would be surprised, and don't forget that the people roaming these boards are much more extreme than your average user.
Also I do consider it a marketing stunt when they said in the past that they weren't interested in making a 200W mod. And yes this isn't the device for me. What I want is an updated DNA40 device that isn't plagued with glitches and the same features with the DNA200; primarily the ability to calibrate the TCR and anything added is welcome.
That's what I was wondering. I have two. One screen glitches every once in a great while, but it vapes like a dream. The other one works flawlessly.What glitches are you "plagued" with on a DNA40?
LiPos are not new but we don't have experience using them in vaping and I have very little knowledge of them, and while this actually what excites me most of the time (learning new things), when it comes to safety I'm more reserved. I just don't think this is worth it.
Some of us have used and have years of experience with LiPo's in vaping devices. Battery safety is important no mater what you use. I, for one, am just as comfortable with LiPo's as with any other.
It wasn't that many years ago when NiCads were the end of the world
A lot of this has to do with what you're soldering. For your B+, I would tin the wire as usual, then put a small drop of flux on the board and then place the wire on top. Heat it with the soldering iron until the solder flows to the contact on the circuit board. It shouldn't take more than 3-4 seconds. Once you take the iron away, hold the wire in place for a few seconds longer for the solder to cool and harden.
Here's a great pic showing good and bad solder joints.
Awesome, thanks very much!
When you cut the lipo wires......BE SURE to only do one at a time.... Your think that would be obvious, but seems to be a common mistake
hoorah.
and then I realised the box is way too high/thick can't even fit my hand around it. don't know if there is a hammond that is the same dimensions but just less thick. So I will probably have to cut off a chunk of the box so I can atleast hold the damn thing.
Got a general idea how to make cabling work. probably going to shorten the positive and negative leads on the lipo itself. not sure how safe it is to redo that but eh.
I STILL have no ........ idea how to fit/mound the chip. especially how I am going to get the screen to sit properly.
When you cut the lipo wires......BE SURE to only do one at a time.... Your think that would be obvious, but seems to be a common mistake
To avoid the risk of shorting them together?
- Status
- Not open for further replies.
Similar threads
- Replies
- 0
- Views
- 750
- Replies
- 0
- Views
- 615
- Replies
- 9
- Views
- 730
Users who are viewing this thread
Total: 2 (members: 0, guests: 2)