How To Build The Turbo Coil Winder

Status
Not open for further replies.

IDJoel

Vaping Master
ECF Veteran
Verified Member
Feb 20, 2015
3,459
11,930
61
Boise, ID
I normally would build my own twister with SS wire or music wire. the only reason I used paperclips here was to make it easily obtainable and workable by hand so anyone could do it. some people may have a problem bending the wire with pliers or a bending tool. the paperclip I used was bendable by hand and it does add a bit of springyness to the handle assy in use which isn't bad at all really. it was a large paperclip but not the really big heavy jumbo ones. I bought those too and it would be stiffer but harder to shape and would need to be cut so I went with the smaller one.

if you can bend and cut the heavier wire then by all means, make it heavier, but it does function fine even with the hand bendable "large" paper clips

Awesome! I am first, and formost, lazy! If I can learn from someone else's experience, and avoid the pain of "trial and error," I am all for it. I have zero experience working with stainless steel wire (or where I might even start to look for it locally) and even less of a clue at your mention of "music wire."
I am caught (as I imagine many here are) between the desire of wanting to do it right (best) and doing it now ("I want it now!" said Veruca salt {ref. "Willie Wonka"}).
:D
Thank you yet again!
 

IDJoel

Vaping Master
ECF Veteran
Verified Member
Feb 20, 2015
3,459
11,930
61
Boise, ID
Ok... finished my first twister jig (a 1.5mm) and wrapped my first coil. All I can say is WOW! :w00t: 
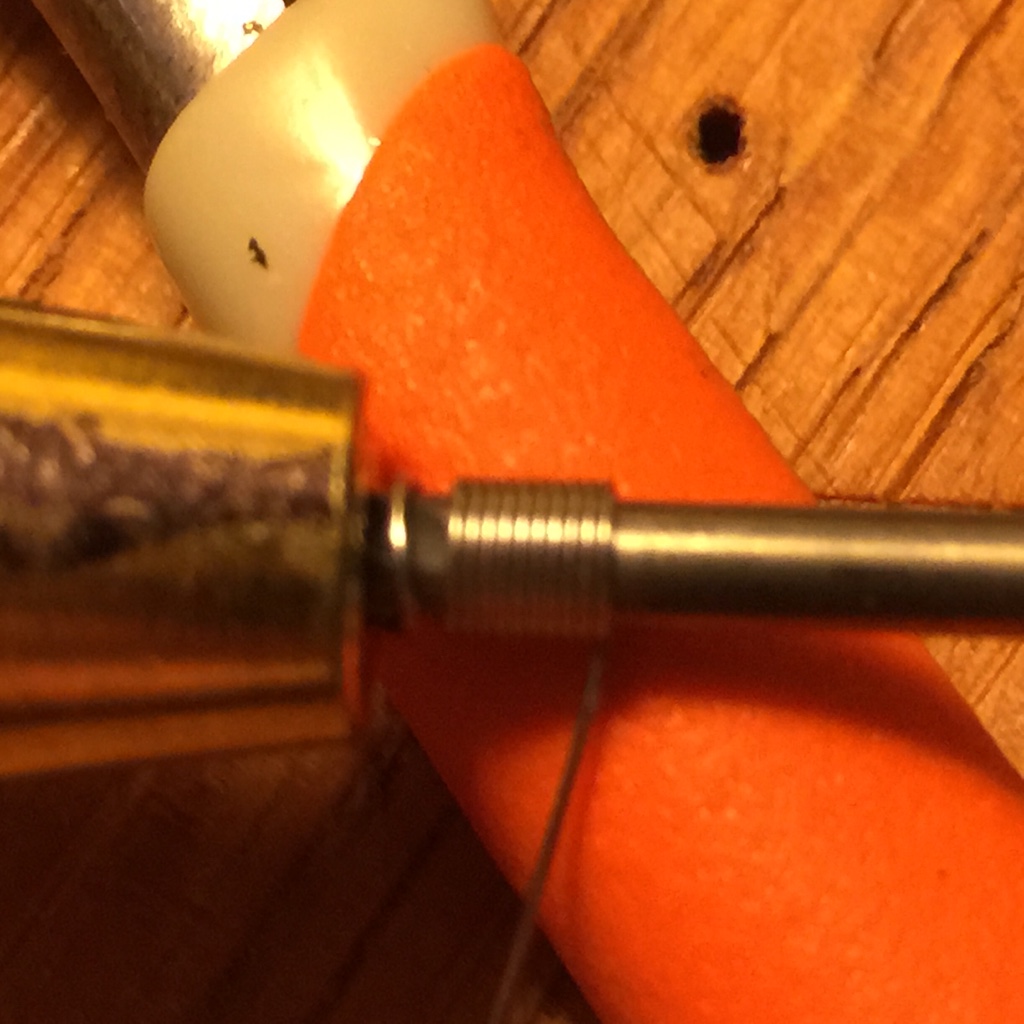
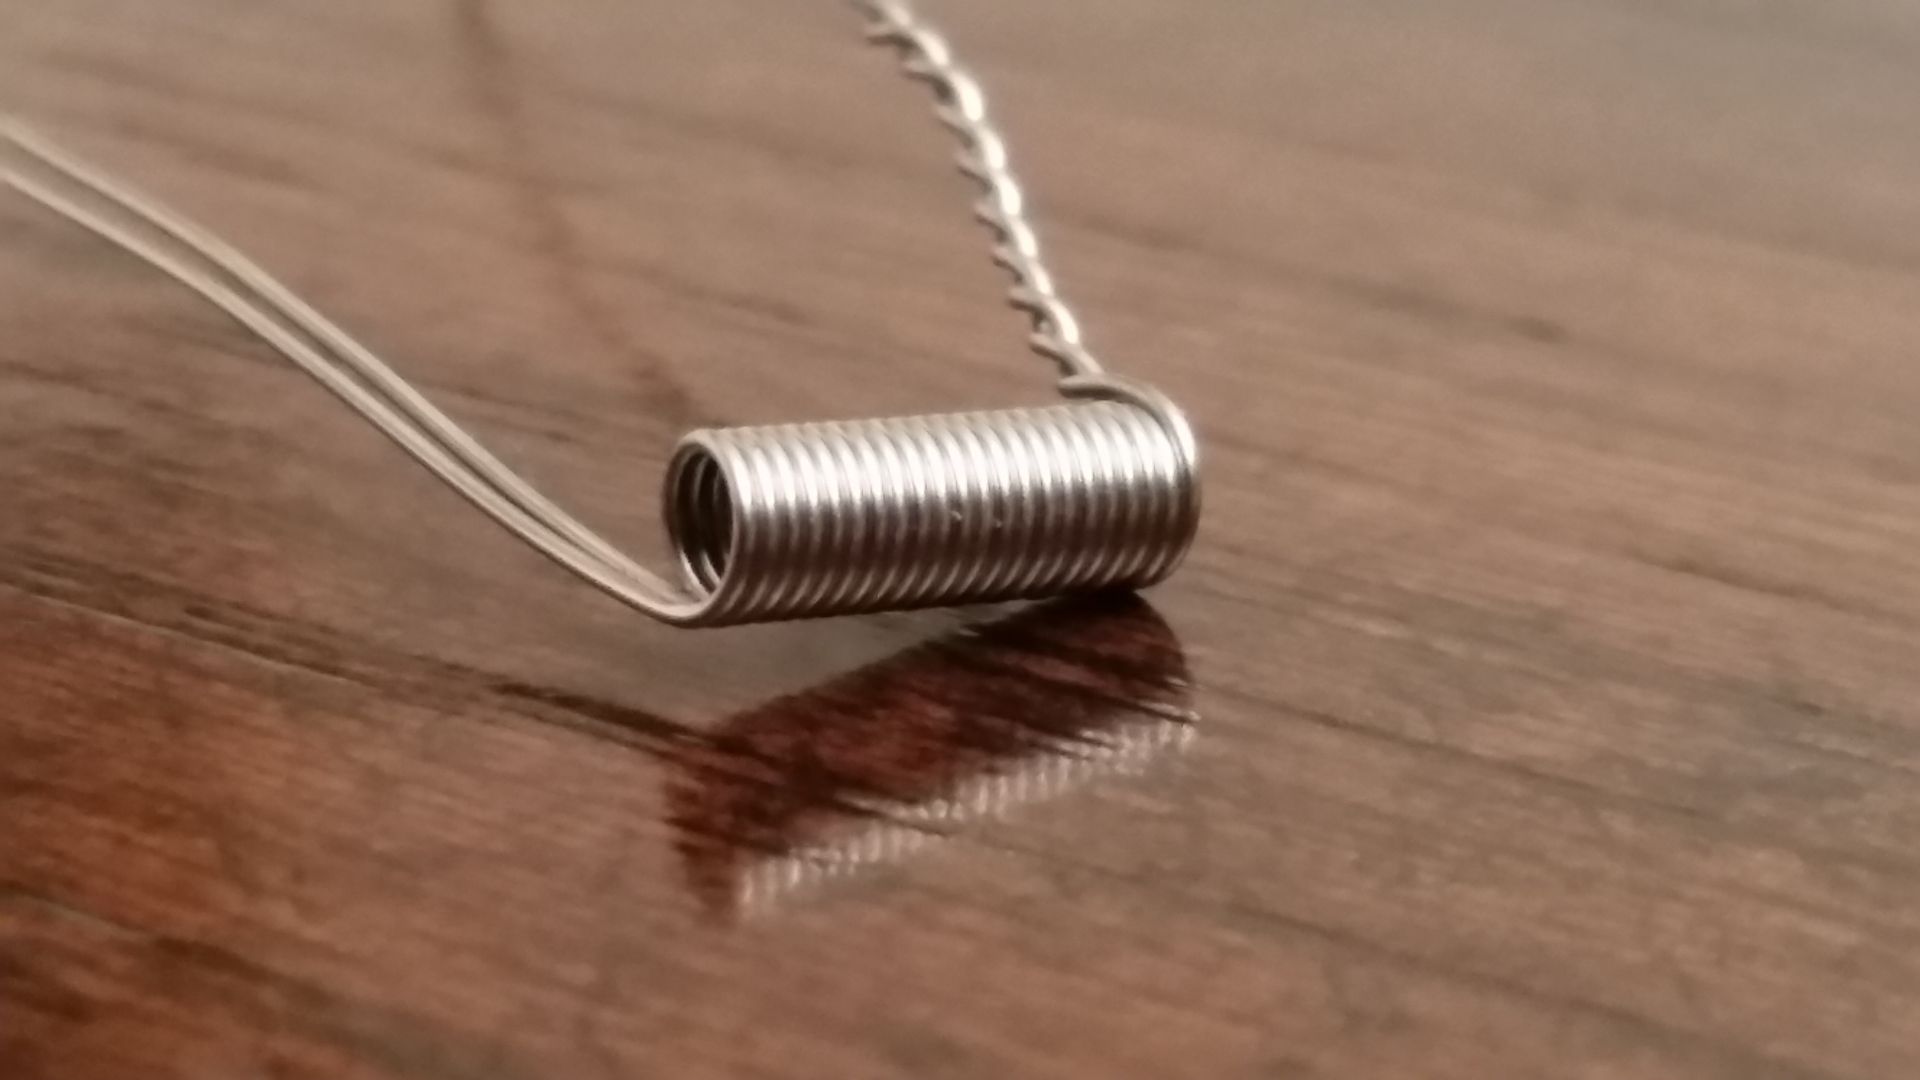
Completely as advertised! I heeded turbocad's advise about keeping a backward angle (in relation to the rod) with the wire, and a gentle pressure into the side of the eraser and got a perfect 12 wrap coil. I only meant to wrap 10 but it was so easy I got carried away. So I peeled off 2 wraps, mounted it on a subtank mini base, and gave it a quick pulse. For the first time in my coil wrapping experience; I got a perfect, even, uniform glow across the entire width of the coil right out of the gate. Resistance reads 1.22 ohms (only .02 ohms different than Steam Engine's calculation of 1.24 ohms for a 10/9 wrap of 28 AWG). I have NEVER wound a coil under S.E.'s calculation before. It has always been over due to the "springy-ness" of the wire and the coil expanding around the mandrel once I stopped wrapping. My normal result has been +.2ish ohms wrapping w/o tension.

I followed the oxidizing example, wicked it, vaped it, and... I LIKE IT! It does seem to vape more evenly. Each time I draw, it seems to be more uniform, from draw to draw. I can't comment as to what, if anything, it does for flavor yet as I filled the tank with unflavored. Now I need to learn how to wick it for optimal performance (somehow I can't seem to avoid those dry hits from time to time).

On a side note; my biggest concern, during the build, had to do with the pliers/clamp. After I assembled it per turbocad's directions; I was worried that there would be too much friction on the coil as to prevent the jaws from gripping the wire as it enters the pliers. Surprisingly that was not the case. If anything, there was less friction than I anticipated. It wound so smoothly, that while I was winding, I kept squeezing harder and harder intentionally trying to "stall" my ability to rotate the jig; and I was unable to. Perhaps, as I use it more (and the leather compresses a bit more at the jaw contact points) I will be able to grab more firmly. But first impressions are extremely positive.

Disclaimer: I did deviate twice, during the assembly, from turbocad's first video. #1) I used a #1 butterfly clamp (the type that looks a lot like a pretzel with more acute corners) for added rigidity. I did this after turbocad's earlier reply. I Had first tried using a "jumbo" sized normal paper clip building along with the video. I paused the video and decided to see if I could duplicate the bends (by hand) with the small butterfly and I was indeed able to. So, for the added stiffness, I used that one in my initial build. (After using the twister; I don't believe this added stiffness is required... it really is smooth.
#2) My local Micheal's didn't have the leather so I bought a $6 pair of "full grain" work gloves from Harbor Freight (along with the pliers, drill bits, super glue,and epoxy putty. The rest I found at Staples). At first I was concerned the glove leather was not thick enough but when I got it glued into the pliers I was afraid it was too thick. Wad-do-u-know? It was just right <"ta-DA!">. I'm actually hoping the leather will compress a bit more, at the jaws, with use and give me the ability to pinch the wire a little more. Also, I did make a point to by gloves that had the "slick/almost polished outside" with a "softer/almost fuzzy inside" with the thought that the smoother outside would wear better/last longer. I'll see if this thought has any merit.

Bottom line: If this has any appeal to you; try it. I think you will be pleased.

My thanks to turbocad6 and everyone who has invested thought, time, effort, and resources finding a usable method, and more time, and effort to share their findings with me. If you ever come to Boise; I'll buy you a beer! :toast:
 

turbocad6

Unregistered Supplier
ECF Veteran
Jan 17, 2011
3,318
16,450
brooklyn ny
yeah the rubber really does conform easily enough that it doesn't grab the coil too tight, the pinch of the cutting edge of the clipper winds up being the main source of the tension, the eraser compression is just to guide the coil into line.

a glove should be a good donor for the leather. thin leather seems to work fine here, I'd almost say the thinner the better up to a certain point but I've seen slightly less than thin still work well too. glad to see it works out for you and yeah, for some reason once you start spinning the handle you just seem to want to keep on going and going and making super long coils :) I usually wind up making much longer than I need to start with :)


I usually start out with something like this

20150601_020334_zpsxxzcuofq.jpg


to end up with something like this


20150601_020826_zpsplinvfrj.jpg
 

AllPepperS

Super Member
ECF Veteran
Verified Member
May 31, 2014
824
2,924
77
Palm City, FL
Well, I finally got my nippers done today and I practiced a bit and I got it :banana: Took me a while to remember all the steps and for me the key one was remembering to put some pressure on the twister into the nippers, but if you don't push you get very good spaced coils (those work too in certain situations. I have been putting this off since I didn't manage to get any steel stick or the like. I have a little twister that is very much like your (Turbo's) original you did way before this. It won't let me upload for some reason so maybe I can put them up from Tapatalk later. My twister is a bit very simple. Since I got the hang of it I have also used a couple of the Gizmo wires(not in the Gizmo) and it worked great in combo with a pin vise. I have drill blanks so the pin vise was kinda exciting because of the ease of changing mandrel sizes. I usually use around 2mm and 2.5 so I am going to use the one set of nippers for those sizes and make another set up for larger wire.

Anyway, Happy 4th and thanks again Turbo, Mac, SX and everybody's input in several threads this really defines it and puts the finish on it for me.... and I can do it all again with consistency. :thumbs: I will try to get pix up at some point. I'm just happy to get the winding down :)
 

IDJoel

Vaping Master
ECF Veteran
Verified Member
Feb 20, 2015
3,459
11,930
61
Boise, ID
Can anyone think of an alternative to the leather or is it a must?

Is it feasible to use synthetic chamois cloth instead of leather?

"Some" resistance from the stiffness of the leather is desirable (to create the additional friction and forming of the coil as it is wound... I was surprised at the lack of resistance added by the eraser). Saying that; I used the cuff of a leather work glove that was quite soft and supple, and when I got it glued into place, I thought "this is way too thick. Its never going to work." If anything now, after winding a couple of dozen coils, I wish it was a touch more resistant.

My biggest concern for any leather substitute is durability. The greatest (most beneficial) point of tension is where the jaws of the pliers make contact (in effect; pinching the wire as it enters the pliers to the coil spindle). I would be worried about the material at that point being worn down due to heat and friction. I (am guessing) the soft/"fuzzy" nature of chamois-type materials will be less durable. Harder, yet thin and pliable materials, (again I am guessing) would last longer and do a better job. Perhaps something like the leather uppers from an old pair of dress shoes? (Hmmm. I may have to go check out my local thrift store...) :)

The nice thing about this build turbocad6 has shared with us is that it is a basic, inexpensive, functioning, starting point for the rest of us to use and adapt as best suits our needs. If, you have some chamois material you are willing to "commit to the cause," give it a try. And let the rest of us know how it works out. You might have found the next best thing to bubble gum. And, if not, you simply peel of that experiment, and move on to the the next idea. The rest of the pliers build remains in tact and usable.

Please let as know what you find out.
 

AllPepperS

Super Member
ECF Veteran
Verified Member
May 31, 2014
824
2,924
77
Palm City, FL
I was trying to think yesterday if there was perhaps a material that might be good for twisted wire but came up empty. But if you have the nippers the experimenting isn't too hard since the idea is pretty easy. I redid the interior of my Mini a few years ago and for some reason kept the leather from the armrests so I have a good supply of leather. I actually think the leather is probably best and making up a couple of different nipper sets may be the way to go. It's all rather inexpensive (except maybe the leather) and can be redone fairly easily. I just can't quite come up with a material (at the moment) that would be as durable as decent quality leather. But that doesn't mean we can't try something else.

I watched the videos over and over stopping it at spots, especially the set up to twist parts and finally got what worked consistently for me and that was making sure the twister part with the wire started on it was low in the nippers and I had good pressure on the jaws and remembered to apply the bit of pressure on the twister to the nippers. To me it's obviously putting tension on the wire, the coils have a different look, they look flatter and very even, extremely tight and almost molded. Just try pulling one apart. I was using 28g for my experimenting. The coil was o solidly built that they didn't deform when mounting (the root of destruction of the perfect coil). Not saying bending legs is dead at all, just didn't need to be done as much.

I would like to post some pix but will have to try on my phone since it keeps telling me my pix are too large :oops: oh well. Anyway I am looking forward to trying some different types of coils with this that I might not have otherwise tried :)
 

IDJoel

Vaping Master
ECF Veteran
Verified Member
Feb 20, 2015
3,459
11,930
61
Boise, ID
Here's a pic on my funky little twister and one on the pin vise

8173372f7712aab9de4dbf652f6c91b7.jpg


Tapatalk [emoji252]

I love the use of the bottle tip for a stop. I haven't been satisfied with MY ability to mold the putty to get a stop that is square and not chew up the eraser/leather on the tensioning pliers. Great functional and economical solution. Terrific ingenuity!
I'll be trying this one. Thank You! :thumb:

By the way; what material did you use for the pin/twister itself?
 

IDJoel

Vaping Master
ECF Veteran
Verified Member
Feb 20, 2015
3,459
11,930
61
Boise, ID
I have zero experience working with stainless steel wire (or where I might even start to look for it locally) and even less of a clue at your mention of "music wire."

Just a follow up for anyone who might peruse this thread; I happened to stumble across "music wire" at a local hobby store that caters to the adult RC/train crowd. I was looking for more cost effective alternative to drill bits. And right there, with the brass and aluminum rods and tubes, was a selection of music wire. It was priced at about half the price of it's brass or aluminum counterparts ($/foot). After I found it, I went home and did some research, and found it described as "music wire is a reliable, high-tensile, high-carbon steel wire most commonly used in springs because of its ability to withstand repeated loads and high stress while still retaining its resiliency and elasticity."
This is priced right for those who are looking to create a single piece coiling rod similar to those that come with the Coil Gizmo. The caution might be that due to the resilience/springiness of the material; it may be more difficult to bend into your desired shapes (maybe turbocad6 can jump in here with some tip/tricks on working w/music wire). If you are simply going to cut it up into drill bit lengths and use it in turbocad's "twister" design; then you will likely have enough to make a dozen copies for less than two bucks.
 

AllPepperS

Super Member
ECF Veteran
Verified Member
May 31, 2014
824
2,924
77
Palm City, FL
Yeah, that's the stuff . I found mine at Lowes and I have a cheap wire bender on my work bench. If the rod is very thick I would think you would need to heat it a bit to bend.

The funky twister is a fat coat hanger that measures 5/64 ths. Also the pin vise is pretty inexpensive and you can change out the bits (pieces of piano wire easily). The key is the nippers [emoji2]


Tapatalk [emoji252]
 

IDJoel

Vaping Master
ECF Veteran
Verified Member
Feb 20, 2015
3,459
11,930
61
Boise, ID
Yeah, that's the stuff . I found mine at Lowes and I have a cheap wire bender on my work bench. If the rod is very thick I would think you would need to heat it a bit to bend.

The funky twister is a fat coat hanger that measures 5/64 ths. Also the pin vise is pretty inexpensive and you can change out the bits (pieces of piano wire easily). The key is the nippers [emoji2]


Tapatalk [emoji252]

That's one beefy hanger!
I've been on the fence with the pin vice, I like the flexibility of easy bit changes but can't see the leverage benefits of the "twister." (Looks like "quarter turn and re-grip, quarter turn and re-grip, repeat as needed. Twister seems so much more logical... crank, crank, crank. OK,; I'm done.)
 

AllPepperS

Super Member
ECF Veteran
Verified Member
May 31, 2014
824
2,924
77
Palm City, FL
With the pin vise it's a matter of some practice, I can go continuously and I have a mark on the nose so I can count the wraps. The leverage is the same as far as I can see. You do know the pin vise will rotate easily. The end (of the in vise) in your hand stays firm and you sorta just move it with your fingers and it rotates (very bad explanation, sorry) Twisting is easier but I haven't had the time to make up other sizes and the pin vise lets me cheat :rolleyes:. I bent the hanger with vise grips. I really don't use too any different sizes for coils but that could change. 5/64, 3/32, 7/64 and some 1/16 for my little attys and parallels are on the radar now.

But the pin vise will sit right down in the nippers just like the twister and you can twist, twist, twist, with a little practice :) Just thinking of options since I already had a pin vise and a Gizmo for cranking. The key is still the nippers, that's the brilliant part (to me anyway)
 

turbocad6

Unregistered Supplier
ECF Veteran
Jan 17, 2011
3,318
16,450
brooklyn ny
AllpepperS that's awesome, I really like the idea of the dripper nub as a stop. personally I have always done mine with music wire and SS welding wire bent as a one piece spinner, main reason I switched to the drillbit here was so this is doable even without any tricky bending and so you can easily get the sizes you want... your average lil ole lady don't have a wire bender on there workbench, you're def the exception here but it's awesome to see this doing something for you :)

I've been really busy so any development here has been slow but I've been playing with possible improvements, namely trying to make one clamp that will be equally effective at all sizes without stretching out the rubber. I tried this larger clamp with the same rubbers but def not doing it, because of the larger opening the rubber doesn't compress enough, going to need something with a higher durometer rating than rubber erasers, still working on trying to get this to where I want it to be

20150708_120503_zpsjou1jk9u.jpg
 

turbocad6

Unregistered Supplier
ECF Veteran
Jan 17, 2011
3,318
16,450
brooklyn ny
yes I've built these from vice grips and channel locks and pliers and I tried a bunch of different things here but the curve of these jaws on the end nipper are just the best reasonable compromise that requires no grinding or notching of the pliers...

keep in mind that personally I don't really "need" to use any of these clamps, I still do much of my wrapping by pinching it in my fingers. I just needed to make a coil in my office where the only tool I have is this:

20150708_151256_zpszaxhggh0.jpg


still very effective for me, the clamp is really a luxury but probably very necessary for many others here really and def the thing that makes this usable for almost anyone :)
 

AllPepperS

Super Member
ECF Veteran
Verified Member
May 31, 2014
824
2,924
77
Palm City, FL
Turbo, that's where my funky twister came from and I did use it pinching with my fingers. It worked but I still have a ridge in my thumb from it. :D I made up another set of nippers for the larger size coils and heck, might even make up another for twisted since it will get ripped up but hey, easy enough to redo. They are just too easy to make and my fingers are much happier :thumb: The nippers just simplify everything.
 

TX Foilhead

Super Member
ECF Veteran
Verified Member
Well looks like my question was almost answered before I asked so now I've got some others too.

I've been playing with some 32ga twisted and it's not working with the pliers, before that I was doing single and parallel coils with 28ga. With all the practice a learning I probably have 50 coils or so on my original pliers now, when should I change out the leather and the rubber? Is there anything special I need to do to make the pliers work with the twisted wire?

Got a Challice III on the way so I'm trying some different things because it sounds like what I'm used to building isn't going to fit.
 
Last edited:
Status
Not open for further replies.

Users who are viewing this thread