Building Custom Pipes

Status
Not open for further replies.

Mstr Mashnst

Unregistered Supplier
ECF Veteran
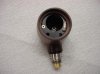
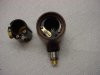
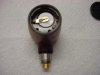
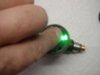
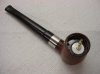
Part two is installing the battery case into the pipe. It just slides right in and has a nice clean look to it, unlike my first try. You can touch the touch pad connection and B+ at the same time and see if the green light comes on. This proves that the circuit is working. Adjusted the center post for the cart and installed the mouth piece. It works good and looks good, I think.:vapor::vapor::)
 

Attachments

  • New Pipe 24 007.jpg
    New Pipe 24 007.jpg
    21.9 KB · Views: 69
  • New Pipe 24 008.jpg
    New Pipe 24 008.jpg
    21.5 KB · Views: 67
  • New Pipe 24 012.jpg
    New Pipe 24 012.jpg
    21.9 KB · Views: 69
  • New Pipe 24 013.jpg
    New Pipe 24 013.jpg
    19.6 KB · Views: 85
  • New Pipe 24 015.jpg
    New Pipe 24 015.jpg
    21.2 KB · Views: 72

Mstr Mashnst

Unregistered Supplier
ECF Veteran
I was able to spend most of the day vaping the new pipe. Ran through five batteries and filled the tank six times. Running no nic in the juice so I can walk a straight line. Not once did the circuit get hot. I got the plastic over the coil very warm once. Going to just enjoy this one for awhile. The rest of it's life is going to be right here by my chair. Tomorrow I start a new one with some changes. The battery is too hard to get in and out. The battery case needs to be a little higher so you can push the battery down below the edge of it. That way you can slide the B+ contact over the battery without it hitting the side of the battery. The touch pad on the bowl is to small. It's hard to find at times and if you don't have your finger all the way on it, the pipe won't come on. The last thing is, I still don't like the battery cap. To many sharp edges and corner in it. It needs to be smooth and flow with no 90 degree angles. I'll work on that. I think that's it, later.:D
 

Mstr Mashnst

Unregistered Supplier
ECF Veteran
Dang that looks nice. I'd like to see more pictures.

There's a lot more to come. Worked all day on a new battery cap design. Tomorrow I'm going to start work on package presentation and see how the new cap looks on the pipe. Is the pipe in your avatar one of yours?
 

Mstr Mashnst

Unregistered Supplier
ECF Veteran
Lovely! What a pleasure watching this design come together :)

Is this a fixed volt design?

Thank you, The circuit is not fixed voltage per say. It does have a cutoff high voltage with a fresh battery by design. Then it just starts acting up when the battery voltage gets low. By then the tank is dry. So, fill the tank change the battery is how it is working for now. One of the small problems I"m finding is skin cells build up on the mouth piece. If you don't clean the mouth piece every day, it will block the circuit. Who would of thought but, cleaning is good.
 

Mstr Mashnst

Unregistered Supplier
ECF Veteran
The new cap is done and on. I've spent more time and lose of sleep over this cap, then any other part. Turned out that simple is the best way. The cap just works like butter. Bow my head-------it was the wife's idea. Moving on, spent time in the vape shops today, talking to owners and customers. Everyone wants to have them in thier stores as soon as I roll out the finished product. Got a lot of feed back and see where some more changes need to be made. On to pipe #2 with upgrades and all new molds.:)


Mstr Mashnst

Unregistered Supplier
ECF Veteran
First thing on the list was the pipes mouth piece. It needed to fit a Mini Pro-tank and a few others. The lead into the stem was to big and last, the bite needed to be flatter. Turned out the insert and the mold plug on the lathe. Tomorrow I'll throw them both in the mill and remove everything that doesn't look like a mouth piece for a pipe or, what shouldn't be there. That's technical machinist talk right there. Have a good evening.:)


NewPipe26001_zps2a76203e.jpg
[/URL][/IMG]


NewPipe26002_zpse9e26baa.jpg
[/URL][/IMG]
 

Mstr Mashnst

Unregistered Supplier
ECF Veteran
Very nice looking. I picture someone from the 50's smoking one of these.

Generally I prefer a bent pipe; any chance that you're planning to make one of those as well?

Yes I will be making the bent pipe after I get the bugs worked out of this one. You will see it come to life right here on this thread. How cool is that.
 

Mstr Mashnst

Unregistered Supplier
ECF Veteran
Excellent! A bent pipe with a curved mouthpiece is just what I love; with your skills I can't wait to see how you do it!

Speaking of which; would you stick with just the straight mouthpiece, or could we possibly see a curved one in the future as well?:drool:

As time goes on there will be new pipes and styles released. As the company grows so will the lines of pipes. Some where in there I'm sure there will be a pipe with a small curve in the mouthpiece. The full bent pipes will be just that.

The clean lines on the new cap are much more in line with this pipe than the original. Your wife has good taste :)

It's great watching this project take shape. I hope this does well in your local vape stores!

Everything takes shape at it's own speed. That's the fun of proto-typing. The wife has had two good ideas on this project. Most of the time she just stays out of the shop. For some reason she has taking an intrest in this pipe project.
 

Mstr Mashnst

Unregistered Supplier
ECF Veteran
Finished the new mouth piece plug for the mold. Made the changes in it that I had talked about. The bite end is a little larger then the first one. I found that the other one didn't have enough meat on it for clean up. I had to be very careful removing the flashing. Tomorrow I'll get started on the new mold and should pull a part next week.

NewPipe27001_zps8a30a22c.jpg
[/URL][/IMG]

NewPipe27002_zps72ee8ba6.jpg
[/URL][/IMG]


NewPipe27a001_zpsa146937c.jpg
[/URL][/IMG]
 

Mstr Mashnst

Unregistered Supplier
ECF Veteran
Casted the first half of the new mouthpiece mold and saw that there was a small hump half way down the piece. Not that it was a hump per say but, it looked like a hump. Can't have that so, I put it to the belt sander and took it off. Then reshaped it and buffed it out. Will recast it tomorrow. Also finished the new battery case mold. Now you can push the battery down past the edge of the case. The B+ tab will now slide right over the battery. It was a small thing but, people notice things like that. Made a change to the PCB too. Going to make one more change to it.

NewPipe27003_zps8bc550af.jpg
[/URL][/IMG]

NewPipe28001_zps203d1964.jpg
[/URL][/IMG]

NewPipe28002_zps9a5dad14.jpg
[/URL][/IMG]

NewPipe28003_zpsfb5880d8.jpg
[/URL][/IMG]

NewPipe28005_zps39b516cf.jpg
[/URL][/IMG]
 

Mstr Mashnst

Unregistered Supplier
ECF Veteran
The new stem mold is done. Tomorrow afternoon I'll cast a new part if I get a new locking ring made for it. Today I worked on changing the adaptor so I can use the Protank. Have to do the adaptor first and then the locking ring. Had to go to sharper thread aswell as some other improvements in the adaptor. Caught a chip in the inside bore of the first one I did. It's ok. just left a little scar. If it is ok I'll send this one to you Cavediver, will go out next week. It has the adjustable center and I left the locking pins off of it. Have fun.:)
 

Attachments

  • New Pipe 29 002.jpg
    New Pipe 29 002.jpg
    22.5 KB · Views: 39
  • New Pipe 29 001.jpg
    New Pipe 29 001.jpg
    21.9 KB · Views: 34
Status
Not open for further replies.

Users who are viewing this thread