
^^ good. Bt do the firing pin first upside down on the bar. Then deal with the atomizer. Imo. Much easier
Not Following you?
^^ good. Bt do the firing pin first upside down on the bar. Then deal with the atomizer. Imo. Much easier
Not Following you?
He means attach the button screw and button side first, then do the the positive pin and bottle side next. I too find that easier, because it can be attached looser and is easier to fiddle with to move the spring-bar out of the way.
...
")
He means attach the button screw and button side first, then do the the positive pin and bottle side next. I too find that easier, because it can be attached looser and is easier to fiddle with to move the spring-bar out of the way.
For reference, I managed to snap the head off the positive pin/bottle screw, so I'm using a Fat Daddy Vapes M2.5 squonk pin - I had to file the head down to ~1.5-2mm, and take ~3mm off the threaded section. Because the head on this is slightly longer than the standard screw, I've had to use the large white/clear O-ring on the main 510 seat. Also, rather than file the threads off further, I used the small plastic shim on the positive pin screw that are supplied in the box, in order to allow the bottle to screw on tight (the threads only go so far into the bottle cap).
I've just rebuilt the switch, and here's my method to maximise the strength of the connections while still having a smooth button:
1) Make sure the 510 seat (the main housing that holds the 510 threads) is screwed in tight. If your atty's pin is too long, you can take this off and place the white/clear O-ring on as above.
2) Take the button screw, and layer on the spring-bar, then O-ring (the small black one that fits snug), then insulator. Place this through the hole, then thread the button on. Do this loosely just to hold them together while giving plenty of movement in the spring-bar, so you can swing it to the side
3) Place the positive pin through the 510 hole and either push something in there to hold it in, or, simply screw on an atty. Layer on the small optional shim (if using), then the wide insulator. Swing the spring bar over and put this on, then attach the bottle loosely.
4) Remove the atty, and tighten both sides a little at a time. Be aware of the spring bar, make sure it isn't getting pushed to the side as you tighten. If it starts to, just wiggle the bottle cap a little to move it back. Tighten to where you feel comfortable, but definitely not too much, as someone else in this thread broke the button and I managed to snap the head off the positive screw.
The reasoning for each layer is as follows:
Button screw: The spring bar goes first (from the head outwards) because you want this to be touching the head of the screw. The O-ring goes second because you want it to apply tension to the spring bar against the head. The insulator is obviously necessary, but if you place the O-ring after this, the insulator is trying to flatten out against the spring bar, which actually pulls the button down and reduces the button travel.
Positive pin: The shim (if using) goes first (from atty-to-bottle) because you want the insulator to go next. It goes next because the wide shape of the insulator helps to hold the spring-bar flat which pushes the button upwards (kind of inverse to the other side). The spring-bar goes last A) so that it's insulated, obviously, and B) so that it is in contact with the bottle-cap, which helps the connection.
Using this, I measure a voltage drop of 0.0453V with a 4.00V battery, 3.547V across a 0.19 ohm coil. I polished the mod 4 days ago, and this is better than my black rhodium/copper Limitless mod clone, and sliiightly better than my copper Stingray X clone, both after a fresh polish.
I think it is Easier for me to get the Bottle Side Going First. Then the Button. Then Tighten the 510 Pin. But there are Lots of ways to Skin a Cat.
NOTE: No Cats were Hurt during the Reassemble of the Coppervape BF Mod.
The issue with doing it this way is the tiny o ring on the button side that sits underneath the bar. You didn't happen to lose this did you ? It's a real
Pain to
Me to have to try and slide that tiny thing around and line it up. That's why I built it upside down and the button side first. Fwiw. Not saying you're wrong or even my way is better. Just explaining why. And curious if you're missing the o ring which would make rebuilding the other way much easier.
I'm probably just clumsy and you find it simple to get that tiny o ring in place.
How did you file the pin ? I'm not very good with this stuff. Not because of s lack of inclination. I just haven't spent much time doing fielding with these things. Due to this aluminum mod I learned how to refinish and now I've refinished w couple pieces that look great. So if you can tell me if you used a dremel or whatever is appreciate it.
Also how do
You measure voltage drop. Is like to get hard facts in my mods. A couple I have seen much better / worse than Others. And does it help to leave a slightly coats finish on contact points ? Was this voltage drop on brass or aluminum ? Black or white ?
For tightening the screw a god guideline not to over tighten. Push it down. Tighten until the screw Just goes flat. No more than half a turn past that. The bar chases the screw to sit at an angle when the button is depressed if you're not tightening enough. And more creates longer brow and risks breakage.
Thanks for your help! Great post.
Does anyone know the the size of that "little" oring ... they're so small, it wouldn't be a bad idea
to have some spares.
Thanks @zoiDman
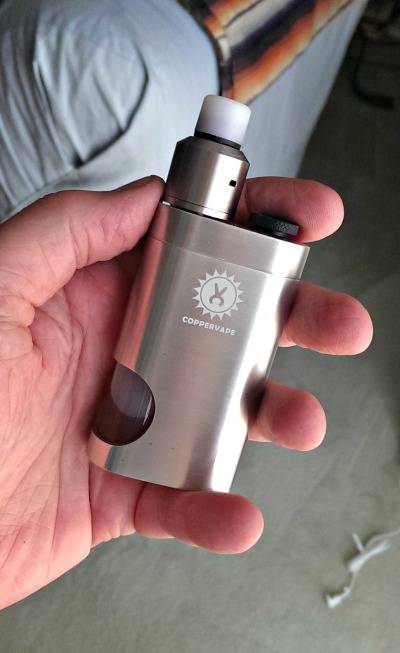
Hand check Coppervape which arrived a few minutes ago. Popped on the NarDA I'd already built (haven't tried the included atty yet) and it's working great. Already love it.
That is Exactly what I use. Only mine is Black.
How does the Finish Feel?
Finish is great. Edges a bit sharp only around the bottle opening, but that can be easily fixed. Can't believe how nice it is for the money.
Yeah. I was kinda Blown Away when I got mine. And although it Hoped it would be Nice, it FAR Exceeded my Expectations for a 30 Dollar Squonk Mod.
Totally agree.
My guess is that included atty is not going to be so great with the bottom air open. The air ports on the deck are kinda short and I expect easy leaking. No matter. Probably works fine with side air. But if I ordered today, I'd go for the mod only at $26. Ridiculously good value.
I kinda treated the RDA that came with the Coppervape the same way I treated the RDA that came with the DripBox 60w.
And that was if it Worked, Cool. But if it Didn't, No Big Deal. Because the Price for the Kit was so Inexpensive. The Kit Price was worth it for the Mod Alone.
I'm about 3 Heart Beats away from Buying a Silver Coppervape on FT. I don't Need it, I have two Black Ones. But for 26 Bucks?
The Silver Looks Killer with a NarDa.