Status
Not open for further replies.

renderwerks

Unregistered Supplier
ECF Veteran
Jun 20, 2009
725
684
SoCal - The IE
Hey Everyone-

Well, I've been busy in the shop with the Major Wood Holder. I have a few more pics:
26826582035_159a0fb64e_c.jpg

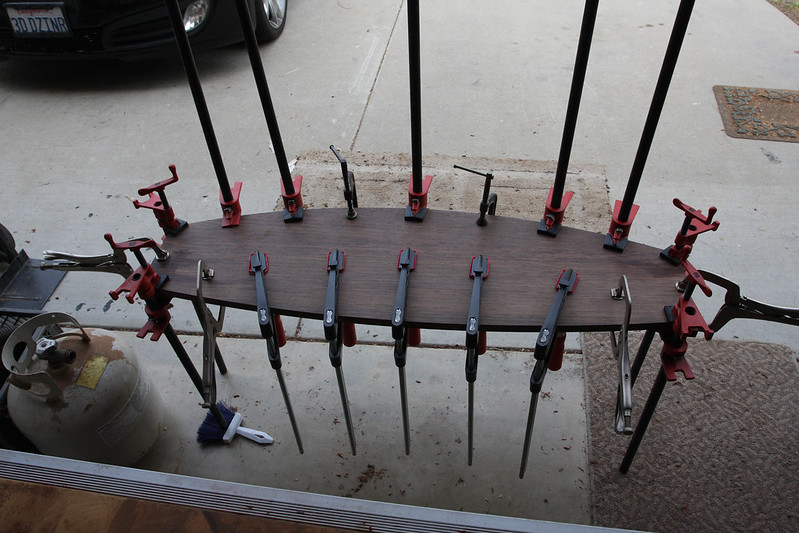
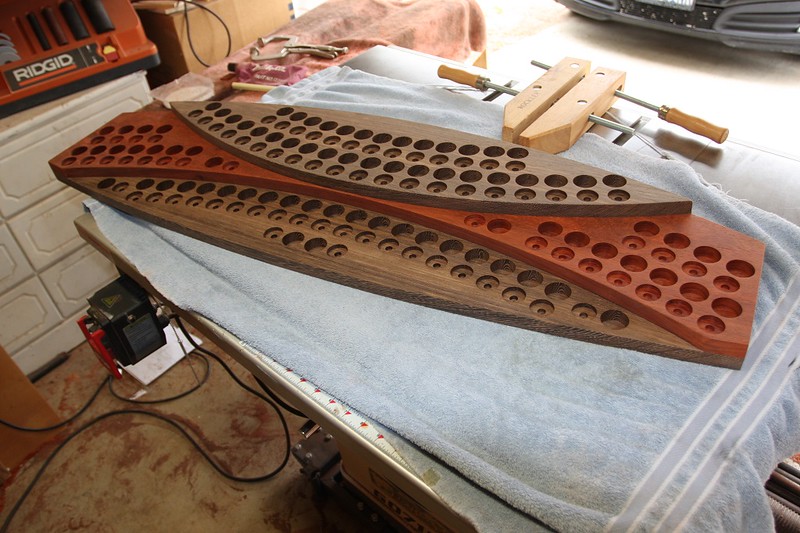
This is the clamp up of the bottom two layers - it's upside down in this shot. Took 20 clamps to properly compress the glue up.
26826582075_b477bdd40f_c.jpg

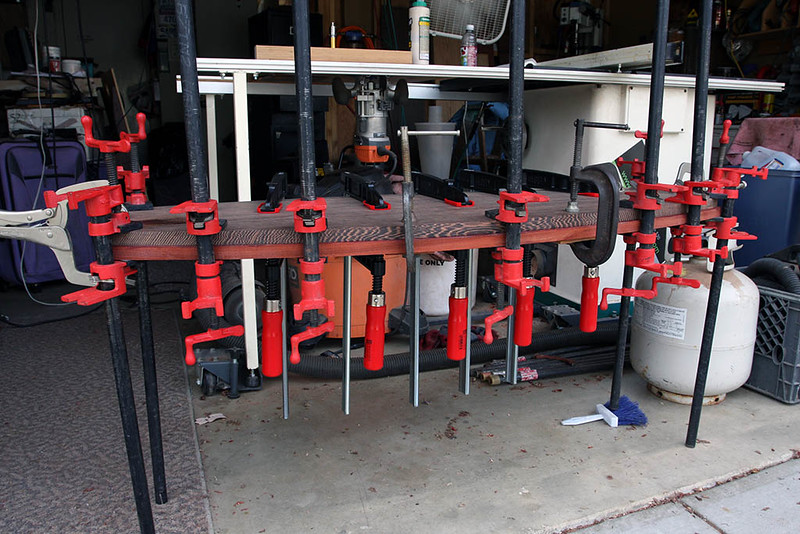
Here's another view of the same clamp up. Great looking edge grain on the Wenge. Hard to tell from this shot, but the Padauk (red) is hanging over the Wenge, and will be trimmed off.
26826581615_378aebdb5d_c.jpg

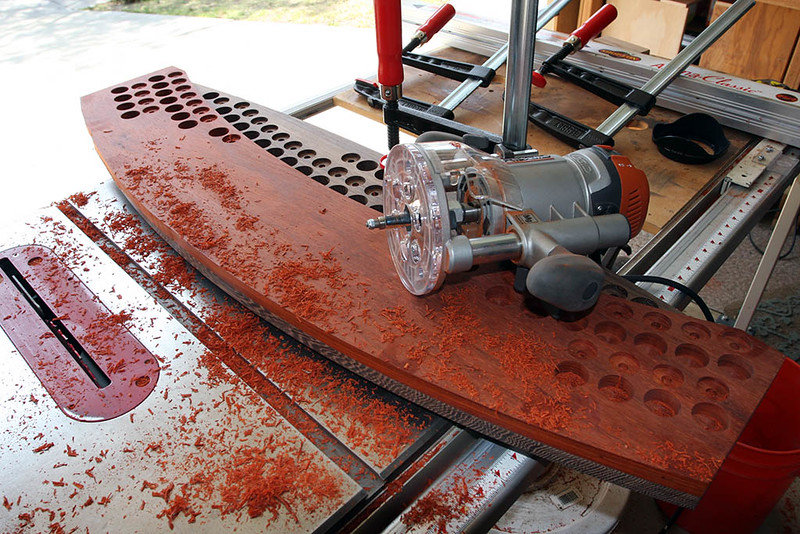
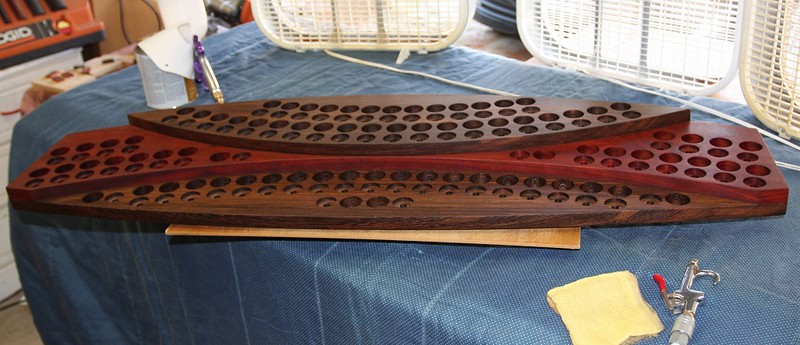
Here are the two pieces out of the clamps - right side up. Trimming the Padauk flush with the bottom layer of Wenge. A little sanding of the trimmed edges, and it's ready for the third and final piece.
26826581475_b0b98b5f3f_c.jpg

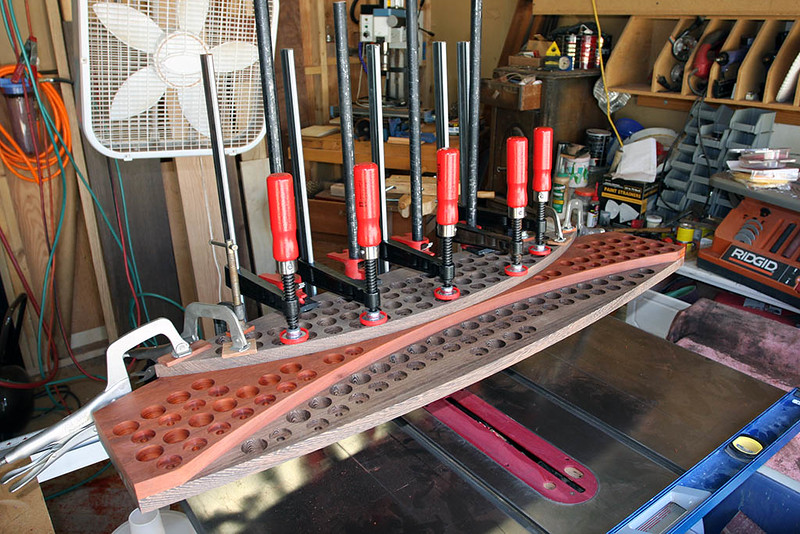
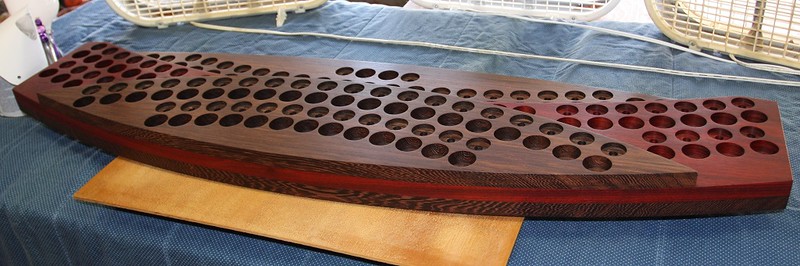
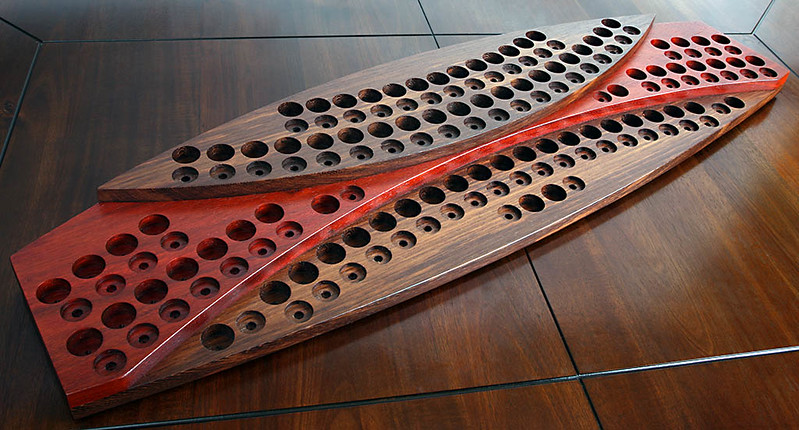
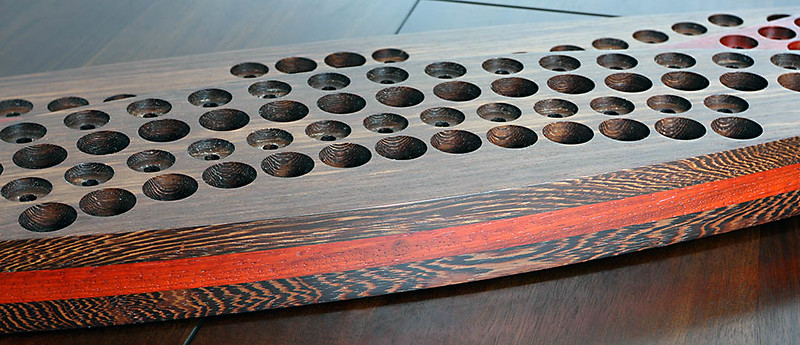
The last piece glued and clamped in place. Once out of the clamps, one more trim across the back & some sanding - the fabrication and assembly are complete! Tomorrow it will get it's soak in oil finish then about three days to fully dry before start of the clear coats. Big holder.
26759358681_b6c21d511f_c.jpg

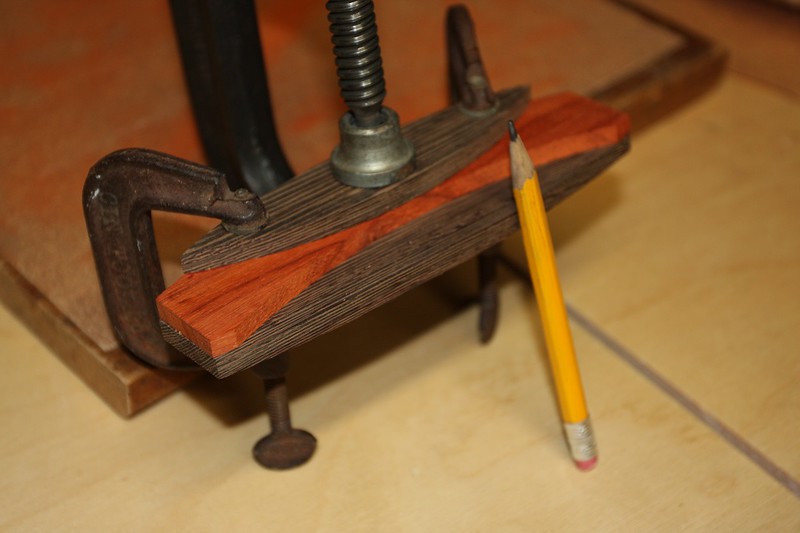
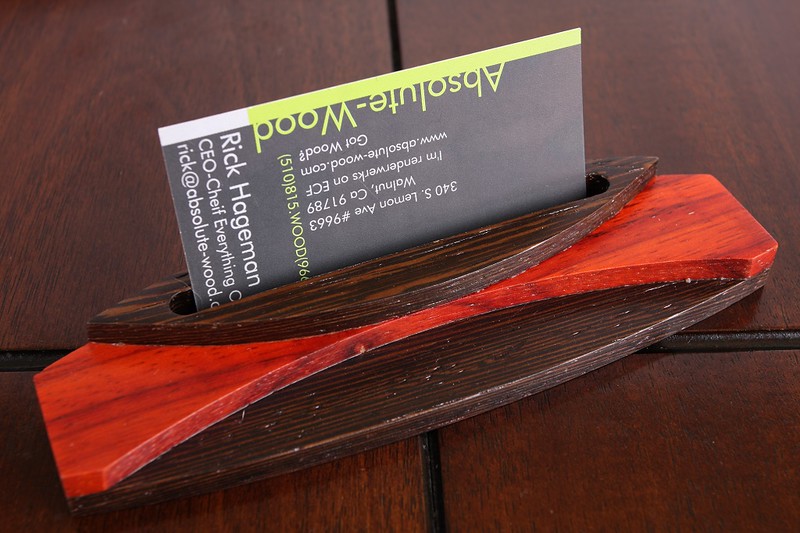
Some holders, however, aren't so big at all... :D Not much bigger than a business card...

Rick
 

renderwerks

Unregistered Supplier
ECF Veteran
Jun 20, 2009
725
684
SoCal - The IE
Hey Vapers-

Howz everyone coping? Stick with it - we're no longer fighting a ghost, we have our enemy's plans now. We finally know what we're fighting, so it can really start. Head's up proud!

How about something more fun to look at? A giant holder in the final stages - ready for finishing:
26876820802_74220c0dd9_c.jpg

I neglected to shoot any pics during the application of oil (usually pretty boring). I made a temporary 3" tall frame big enough to set the holder in, lined it with landscape plastic, and poured a can of oil finish in before setting the stand in it. "Basted" it for about an hour (@90 degrees ;) )with a turkey baster. Took about 1/2 hour just to wipe it down!
26876820982_b27a205741_c.jpg

Oiled up and ready for Clear Coat. This is the stepped side of the holder. I use a Polyurethane product that is actually a floor finish - I don't walk on the stands though...
26876821042_a78ded0c0b_c.jpg

A view from the "built up" side. Several coats of clear will be applied with super fine sanding between the coats. As many as 10 coats of clear will be applied.

Well, I'm off to the shop again, sanding and shooting! Talk again in some days-

Toots,

Rick
 

renderwerks

Unregistered Supplier
ECF Veteran
Jun 20, 2009
725
684
SoCal - The IE
Hey All!

Hope you had a great weekend. I have finished pics of the "giant" holder. It's ready to hit the mailways to it's new owner.


27163404456_368271906a_c.jpg

Didn't shoot a pic, but on the bottom it has a strip about 3" wide around the perimeter that is flocked black.

26590748004_5f27c1a6d4_c.jpg

A closer view of the built up side - nice edge grain on the Wenge. All the holes removed several pounds from it. It ended up weighing about 22-1/2 pounds as seen here (empty).

My customer doesn't know it, but when they open their box, there is a small surprise in there for them:


26591253764_b874842774_c.jpg

CAD drawing makes this easy. I just took the original drawing and asked the program to scale the holder to an overall length of 6". The actual thickness of each piece would only be 1/16" to match the scale, but was made with 1/4" strips for practicality. Took less than 1/2 hour to make it. An old, reject business card used -

That's it for this project - well, I made another scaled copy of the holder drawing, this one will be 15" long and hold a variety of items. I just cut the raw parts for it just now. Same woods and thickness as the big holder.

Rick
 

renderwerks

Unregistered Supplier
ECF Veteran
Jun 20, 2009
725
684
SoCal - The IE
Hey-

Well, the 15" holder is nearly done - flocking to do. Some rework has reared it's ugly head...

But, I'm starting on a new adventure - I'll give you a hint

Just bought a DNA75 chipset, now I'm looking at button pushers, figured wood & burl, damascus plate...

Not sure where this will lead, have to give it a try after the designs are done-

Rick
 

renderwerks

Unregistered Supplier
ECF Veteran
Jun 20, 2009
725
684
SoCal - The IE
I'm going to close this thread (duplicate thread here) and replace it with another thread for Design. I'll copy this last post to start the new thread -

The new thread is here.

Well, been busy designing at my 3D Workstation-

27988122285_259f11c6d8_c.jpg

Stainless Steel Faceplate & Buttons shown.
27948759286_4ea9233dd0_o.jpg

View of the PV "chopped" in half, exposing the inner structures.

Modeled in a single block of Oak for the moment. All USA parts, US designed and manufactured.

I have partnered with a good friend of mine who was an electronics tech in the Coast Guard. His specialty was circuit board and micro-electronics soldering - perfect for this purpose.

The parts used include the Evolv DNA75 chipset with temp control & much more, a Fat Daddy's 510 Woody connector and a Keystone battery sled.

Part of the design includes a handful of 3D Printed parts including the chipset mount/button pusher; the battery sled holder & the Faceplate.

So far, I've created three different Faceplates. A flat, featureless basic Face; a flat version "Ohm" Faceplate (shown above), and a Faceplate with a contoured surface that provides a buildup around the buttons to prevent accidental firing:
27704081290_476fbfe74b_c.jpg

The Faceplates (and buttons) will be available in Plastic, Stainless Steel & Brass (shown above).

This MOD is the first design - a single 18650 DNA75 made as reasonably small as possible:
1-1/4"w x 1-5/8"d x 4-3/8"h. The battery access door is on the edge opposite the Faceplate, slides open and closed, and uses magnets to hold the closed position.

I have an animation of the complete PV coming apart & it shows the door sliding out. For whatever reason, I can't post it - I get an oversized graphic saying something about a capcha, but can't seem to get past it. It's on Flickr here.

An raytraced frame from the animation:
27988089385_ce25b6920d_c.jpg

The doors are cut from the block early in the production process, so they will match the grain when in place. Three different versions of the bodies will be produced - single species solid block; multi-layered, multi species laminated blocks (like our vape stands); and stabilized wood/resin blocks similar to:
s-l1600.jpg

This is from one of my favorite sellers on FleaBay.

As said, this single 18650 version is the first design. A very similar dual 18650 version with the sliding door on the side is currently on the drawing board. A third, Side by Side style is also in my head and waiting to be designed after the dual battery MOD is designed next.

Also considering looking into 26650 possibilities too. Well, whatever I can finalize designs on and have available for order by August 8th...

I still have to order some 3D printed parts to test out sizing and looks before we can build the initial test units. Need to test machining methods and work out proper order of operations, etc...

They will actually be two DNA40's from dis-assembled new PV's (bought for this) and one with a new DNA75 chipset. Probably one in single species with a plastic faceplate, multi lamination version, and I have a pretty cool purple, blue, slate and orange piece of stabilized maple burl I will probably utilize for one of them.

Sorry, but the three test units already have been assigned for local evaluation.

Pricing has not been determined yet, but should start out under $200, possibly less - for a DNA75 MOD that is 100% US made, parts and labor ;)

I've even been playing around modeling some custom fire buttons, too...
27704080980_f78979b46d_c.jpg


More updates as they happen-

I'm going to close this thread and replace it with another thread for Design. I'll copy this last post to start the new thread -

Rick
 
Last edited:
  • Like
Reactions: Jim-
Status
Not open for further replies.

Users who are viewing this thread