
You are using an out of date browser. It may not display this or other websites correctly.
You should upgrade or use an alternative browser.
You should upgrade or use an alternative browser.
Making an Atomizer Coil 101 (Actual Working Methods Only)
- Thread starter Vaporer
- Start date
- th_trl_thread_readers 0
- Status
- Not open for further replies.
I normally replace the factory wire with 26ga enameled wire.
Most plastic type insulation wires are to big to go through and carry the current.
Even the wire they use can be tough to shove up and grab. It almost seems like the insulation swells or softens. The seem to have a source of a very thin insulated wire.
It's possible to drill it if you could find a drill in diamond or carbide tipped. Gonna be expensive. To me, changing to enameled wire is easier.
This subject is going to be addressed when doing individual models.
I realize I'm responding to an old comment, but this may be of interest to some of you... You can easily enlarge the holes in the ceramic cup with tapered diamond drill bits. A 10-pack of these on eBay can be had for $7.95. I've used these many times.
Hey Vaporer,
Man have I been busy assisting on working on the tubejuice feeder,
http://www.e-cigarette-forum.com/forum/modders-forum/96580-tube-juice-feeding.html
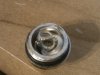
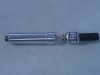
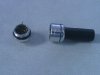
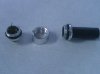
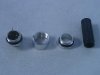
Anyheeew I got an idea for building an atomizer for it, here are the results. This thing is work fantasticly!
Here are some pics.
Dan
Man have I been busy assisting on working on the tubejuice feeder,
http://www.e-cigarette-forum.com/forum/modders-forum/96580-tube-juice-feeding.html
Anyheeew I got an idea for building an atomizer for it, here are the results. This thing is work fantasticly!
Here are some pics.
Dan
Attachments
Looking good Dan.nice work.
Have you tried the nichrome 80 yet?
I got mine today so I dont have any protos made up yet for anything.
They should do better.......I just dont like the iron factor at that %.
Seems its asking for premature failure when a non iron type is easily available.
Seems its time to start looking outside the "box"..................
Only so much can be done with certain materials.
Looking good Dan.nice work.
Have you tried the nichrome 80 yet?
I got mine today so I dont have any protos made up yet for anything.
They should do better.......I just dont like the iron factor at that %.
Seems its asking for premature failure when a non iron type is easily available.
Seems its time to start looking outside the "box"..................
Only so much can be done with certain materials.
Nope not yet have been looking for a good source to get some 34ga from, will have to do some serious looking and find a good ohms rating for 1.25" = 2.3ohms.
Where did you get yours from, I just ordered som from PNJ, I definantly agree that the 80 should last longer.
Dan
Last edited:
Yea, I ordered 36, 34 & 32ga from them.
2.3ohms in 1.25" is gonna be tough in 34ga. PJN 34ga is 1.38ohm/in. So, 2" will give you 2.77ohms.
Taking into account the soldered portion it looks like abt 1 3/4" will be close. You could do the coil dia a little bit larger and make that work. IMO.
Since most values are industrial standards, I doubt you'll find very little diff from diff manufacturers. Considering gauge being true size and the 80/20 ratio kept.
Dan, 35ga NiCR 80 shows 20.72 ohm/ft. 1.25" would be 2.157 ohms. Pretty close and little extra length is needed for your specs.
Pelican Wire Company
There is a supplier on ebay that has it $3.49 for a 30ft spool with free shipping. They show 232ohm/m ? I hope thats a misprint cause that is way off!
Pelican Wire Company
There is a supplier on ebay that has it $3.49 for a 30ft spool with free shipping. They show 232ohm/m ? I hope thats a misprint cause that is way off!
Yea, I ordered 36, 34 & 32ga from them.
2.3ohms in 1.25" is gonna be tough in 34ga. PJN 34ga is 1.38ohm/in. So, 2" will give you 2.77ohms.
Taking into account the soldered portion it looks like abt 1 3/4" will be close. You could do the coil dia a little bit larger and make that work. IMO.
Since most values are industrial standards, I doubt you'll find very little diff from diff manufacturers. Considering gauge being true size and the 80/20 ratio kept.
So far I've only used 36. Do you see any advantages with 34 and 32? Does it hold up better?
Haven't been on much sorry.
The heavier ga should last longer and be more durable overall. The problem arises with needing the longer length and where to put it all withoout shorting the coil. At least in a standard atty. The 801 by far has the most room of the standard ecigs unless you cross over into the G120 and the other cigars.
I do have a couple theories I'd like to try and prove or disprove.
Winters coming so I should have more time.
I get 30 feet of 80/20 from this guy on ebay for 2.09 buy it now (that's shipping included)
mikes electronix items - Get great deals on Business Industrial, Electronics items on eBay.com!
went with 36g, will eventually try 34 and 32g... he sells regulators and odds n ends too")
I know the last reply post is over a month old, but every lil link helps
mikes electronix items - Get great deals on Business Industrial, Electronics items on eBay.com!
went with 36g, will eventually try 34 and 32g... he sells regulators and odds n ends too
I know the last reply post is over a month old, but every lil link helps
Haven't been on much sorry.
The heavier ga should last longer and be more durable overall. The problem arises with needing the longer length and where to put it all withoout shorting the coil. At least in a standard atty. The 801 by far has the most room of the standard ecigs unless you cross over into the G120 and the other cigars.
I do have a couple theories I'd like to try and prove or disprove.
Winters coming so I should have more time.
Vaporer, I just want to thank you for your well detailed post. with out them I wouldn't have even tried rebuilding atties.
I cant wait for your theory discussions. :>)
I have one question, what type of wire do you use that connects to the brass fitting up to the nichrome wire?
I use the red enameled wire from the 3 pack at Rat Shack.
The green is heavier & fits, but the enamel comes off mine easily. It may be old.
The ceramic can scrape it off so you need to measure for a short from the mesh near the cup bottom.
I prefer to make an area in the mesh bigger than the hole in the cup so it cant short.
I have hobby drills and a pin vice to hold them. Its in my tutorials. You can rip the dead coil out, drill the old wire out right down through the mesh, make the area bigger in the mesh where the drill came through and insert the new wick & coil. Takes a little practice, but the mesh never needs to be removed doing that.
You can feed the coil in from the top with the leads and pull the one side under the bridge if careful. then just raise the edge of the bridge mesh to tuck the wick tail.
I use the red enameled wire from the 3 pack at Rat Shack.
The green is heavier & fits, but the enamel comes off mine easily. It may be old.
The ceramic can scrape it off so you need to measure for a short from the mesh near the cup bottom.
I prefer to make an area in the mesh bigger than the hole in the cup so it cant short.
I have hobby drills and a pin vice to hold them. Its in my tutorials. You can rip the dead coil out, drill the old wire out right down through the mesh, make the area bigger in the mesh where the drill came through and insert the new wick & coil. Takes a little practice, but the mesh never needs to be removed doing that.
You can feed the coil in from the top with the leads and pull the one side under the bridge if careful. then just raise the edge of the bridge mesh to tuck the wick tail.
wonderful I got the three pack from radio shack.
I got all of my supplies today, I already did it twice. The first time it worked for a second then stopped, I moved the wires and it worked again for a second then I couldn't get it to work again.
I just got done redoing it and it is not working at all.
I believe I am not getting a good connection with the wires to the brass fitting.
How in the world are you able to solder in such a small area? Do they make a wire adhesive because the soldering for me in such a small area is not working out. I really want to make this work an as of now I am losing hope

When connecting the wires to the brass fitting, does one wire have to be connected to the little brass tube that runs thru the middle of the 510 brass fitting, and the other wire on the outer brass tube "outer from the middle tube that runs up thru the whole brass fitting.
Thanks for the help Vaporer
Jon
HobbyTown USA carries Nichrome wire (used in their hotwire foam cutters)...I don't know what gauge it is (the package doesn't say) but i'm about to head up there and find out...if it's usable, that might be a great "emergency option" if folks need nichrome quickly. They sell it in 4 ft packages.
Check your local hobby shops...chances are if they have a decent selection of supplies for model rocket builders, they would have nichrome.
I hate waiting for the mail.
Check your local hobby shops...chances are if they have a decent selection of supplies for model rocket builders, they would have nichrome.
I hate waiting for the mail.
- Status
- Not open for further replies.
Similar threads
- Replies
- 432
- Views
- 97K
- Replies
- 20
- Views
- 2K
- Replies
- 125
- Views
- 19K
Users who are viewing this thread
Total: 2 (members: 0, guests: 2)