
You are using an out of date browser. It may not display this or other websites correctly.
You should upgrade or use an alternative browser.
You should upgrade or use an alternative browser.
- Status
- Not open for further replies.
I get 3-4 days - so half a week is more correct.

6000mah = 93x47x18mm. That's gonna need a big case to fit the batt and all the circuitry. But will be great to go a week without needing a charge.
I get 3-4 days - so half a week is more correct.
6000mah = 93x47x18mm. That's gonna need a big case to fit the batt and all the circuitry. But will be great to go a week without needing a charge.
This is going to be my attempt to get in a 4.25"x2.25"x0.875" enclosure http://www.e-cigarette-forum.com/forum/battery-mods/366025-dna20-wood-metal-box-5.html#post8278074
Nice. I just picked up one of your Mini Milo boxes at Madvapes. I like the shipping option better from them instead of going to the other place. Plus it just made sense since I was getting the switches from there also.
Nice. I just picked up one of your Mini Milo boxes at Madvapes. I like the shipping option better from them instead of going to the other place. Plus it just made sense since I was getting the switches from there also.
Nice find Skyway! Let me know if that case has a slope to it like the Hammond case.
If it does, what I did to get the connector so that an atty/carto sits straight up instead of tilted, is I reamed the connector hole just an unch bigger and that let me wobble the connector so I could adjust it to a slight tilt as the epoxy was drying. The finishing washer sits flush on the top of the case, but the connector itself is on a bit of a tilt. I thought it better for the connector to be a bit on a tilt than the atty/carto. You really can't see that the connector is a bit tilted cuz it sits down into the finishing washer while you can really see if an atty or carto is tilted.
I also had to dremel a bit into the side of the case where the DNA board is seated to get the width of the board to fit. And like I said in my post, I had to dremel some more depth to the case by dremeling the bottom of the case for more depth. Be careful and don't go too deep - you just need a mm. And I didn't use the clear mounting tape to adhere the batt to the board or the display to the DNA board as I did in Milo cuz that added to the depth too. I dabbed a tiny bit of clear epoxy to the back of the display and held the display in place on the transducer of the DNA board til the epoxy dried. And the board just rests on top of the batt, it's not adhered to it with mounting tape like with Milo.
Good luck!
I noticed on the Mouser site that there were two listed. You got the one without the key ring attachment. I am getting the one with the key ring attachment. It is no big deal though since the hole for it is centered on the top where I would either be putting the atty connector or a venting hole in the bottom. The size is almost exactly the same.
Your outside height is .67 and the one I got is .79. Maybe it makes up for the slant you were referring too.
It is the 1551KRBK.
Your outside height is .67 and the one I got is .79. Maybe it makes up for the slant you were referring too.
It is the 1551KRBK.
Looks like the one I picked up also has the slanted edges. I think I am going to eat the slant though. Not sure I want to do much shaving. If I can find something to make the circular shaving I might. I think I am also going to go with an ego connector also. This way, if someone wants to try out the device with something odd like a clearomizer or a Kangar, it is possible to do. I have a nice center adjustable post ego connector I can use. I will use a tank ring when using my carto tanks.
Only thing I am waiting on is the batteries and Madvapes accidently only sent me one switch instead of three.
*edit- I decided to take your advice, I used an engraving tip on my dremel and shaved a smooth section half way around the upper end of the incline of the side of the box where the connector goes. It will now sit straight up and down. It was rather easy to do after actually trying it.
Last edited:
Look ma... no bubbles!
I got the black tint paint yesterday and painted the lid cover - 3 coats - and let it dry overnight. Easy peasy!
I got the tint paint here... Transparent Black Window Tint
I also replaced the screws that came with the case with black switch plate screws.
I got the black tint paint yesterday and painted the lid cover - 3 coats - and let it dry overnight. Easy peasy!
I got the tint paint here... Transparent Black Window Tint
I also replaced the screws that came with the case with black switch plate screws.
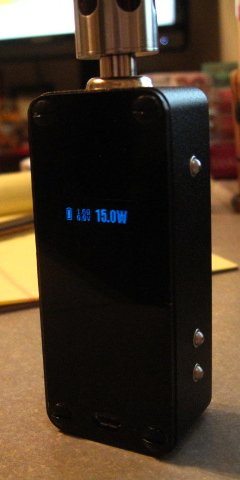
Wonderful....mamu......15 watts??? way to high for me.........lol..........
Boy Mamu, your knocking these out like there's no tomorrow. Bet you can do them blind folded by now.
Looks spectacular. Did ya paint the inside or the outside?
Looks spectacular. Did ya paint the inside or the outside?
Boy Mamu, your knocking these out like there's no tomorrow. Bet you can do them blind folded by now.
Looks spectacular. Did ya paint the inside or the outside?
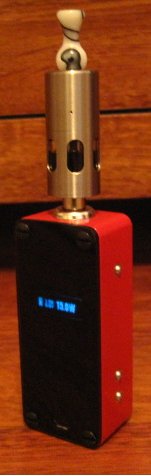
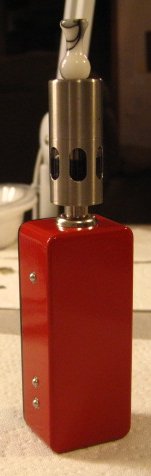
I'm currently making a RED BARON Milo.
I painted just the inside of the lid cover. It's nice with it on the inside so that the finish is protected and I won't have to worry about chips or scratches on the paint. It turned out really pretty - it has a mirror finish look to it.
A nice set of finishing touches to a spectacular mod. (The silver screw heads always bothered me, glad to see them go).
If you ever want to build another, or sell that one, you know where to find me.")
If you ever want to build another, or sell that one, you know where to find me.
I have meant to ask. I picked up both the thin plastic and the thicker plastic from Home Depot. Which one are you using on yours?
I have meant to ask. I picked up both the thin plastic and the thicker plastic from Home Depot. Which one are you using on yours?
Either would be ok as a lid cover, but I bought the 2.4mm Lexan and am using that.
this is awesome. I've never done a box mod before but the DNA 20 makes me want to. I can't wait to get this going, just gotta wait til february
O, I forgot to ask, would 18650 batteries work in this type of setup? or are those batteries you are using the ones you would want to use with this kind of rechargeable device?
Last edited:
Red Baron Milo...
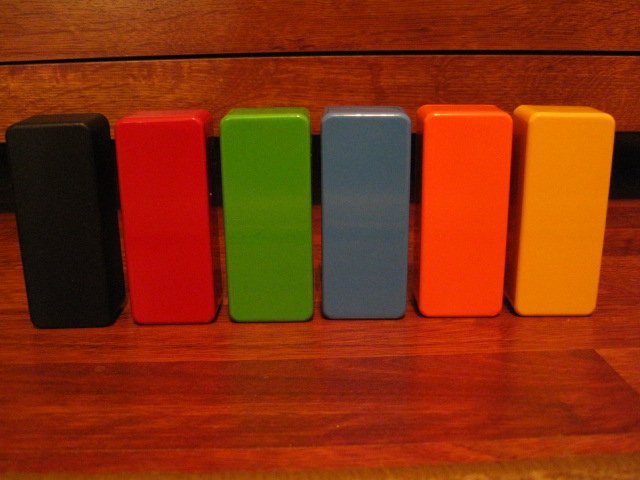
Future Milo mods
I found 200g of these tact switches at half the price that madvapes sells the 100g and 300g for... C&K Components KSJ0M21180SHLFT
Future Milo mods
I found 200g of these tact switches at half the price that madvapes sells the 100g and 300g for... C&K Components KSJ0M21180SHLFT
- Status
- Not open for further replies.
Similar threads
- Replies
- 8
- Views
- 4K
- Replies
- 34
- Views
- 38K
Users who are viewing this thread
Total: 2 (members: 0, guests: 2)