Milo-DNA20D mod step-by-step how-to

Status
Not open for further replies.

Lhartman89

Ultra Member
ECF Veteran
Verified Member
May 9, 2012
1,251
1,068
Canal Winchester, Ohio
See post #21

Mamu,

So if I am using 3 cells in parallel then I should still only use 2 fuses or can I use 3? I read post 21 and that is what I am getting as you said that using two fuses is to cut the resistance in half so that it doesn't affect the resistance from the batteries to the chip.
 
Last edited:

mamu

Ultra Member
ECF Veteran
Verified Member
Mar 29, 2009
2,551
1,523
IN USA
Mamu,

So if I am using 3 cells in parallel then I should still only use 2 fuses or can I use 3? I read post 21 and that is what I am getting as you said that using two fuses is to cut the resistance in half so that it doesn't affect the resistance from the batteries to the chip.

If you want to cut the resistance of the fuse in half, you only need 2 fuses in parallel, no matter how many batts.

When using 3 fuses, keep in mind that although the resistance will be decreased by a factor of 3, the trip current will increase by a factor of 3.

If you're going to use 3 fuses, the drawing at the top looks correct, although I solder the fuses' legs together in parallel first and then connect one leg set to the positive batt and the other leg set to the positive input of both charging and converter boards.

The drawing at the bottom is ok if you're using a charging board that already has fuse protection, else you have no fuse protection going from the batt to the charging board. But most charging boards already have overcurrent protection and if you have no output at the charging board I don't think there will be a problem. I'm not sure though as I'm still learning about fuses too. :laugh:
 

Lhartman89

Ultra Member
ECF Veteran
Verified Member
May 9, 2012
1,251
1,068
Canal Winchester, Ohio
Ok, that answers my question but in that case if I use 3 fuses that you used. The trip current would go up to 15.3A! So I might just go to two fuses. I was going to solder one of the legs of each fuse to each cell then solder the other legs together and connect them to the charging board. I went back and looked at the board and it has a battery in + and - and then a power in + and - so it would go in between the chipset and the batteries. Thanks for the response.
 

mamu

Ultra Member
ECF Veteran
Verified Member
Mar 29, 2009
2,551
1,523
IN USA
mamu from the pic I saw the PTC you used was the larger ones that look kind of like caps. Just wanted to show you the ones I used in my last build they are a little smaller, well they're flat as a piece of paper really. PTC They may save you some room in one of your tiny stealth vapes :D

oh... tiny. :laugh: Thanks for the link, mre. I'll pick some up.
 

Lhartman89

Ultra Member
ECF Veteran
Verified Member
May 9, 2012
1,251
1,068
Canal Winchester, Ohio
Yea, they are very very tiny. I have some and they are small. Here is a pic of one on my finger tip.

IMAG0569.jpg

I finally finished my lavatube box mod. I went with the 2 cell 2 fuse setup and wired the charger after the fuses. Seems to be working out great and it is actually firing my 1.0 ohm RBA whcih my eVic won't. I have to have something to press the buttons but otherwise it works great. Thanks for the inspiration mamu!

IMAG0574.jpg IMAG0570.jpg IMAG0572.jpg IMAG0573.jpg
 
Last edited:

tmassey

Senior Member
ECF Veteran
Aug 31, 2012
133
61
texas
this one is still a work in progress. its a milo build using an 18650. I ordered my batteries like a month and a half ago and still have not recieved them so i threw this together. in this build i had room for a horn button which i prefer to the tactile switches. As of right now everything is tacked in place with hot glue not epoxy,the battery is taped in not soldered my end product will have my 2600 mah 18650's and the final product will have an ego connector and i stilll need my lexan door but its a work in progress. just wanted to post it up thought some of you might be interested in it. photo(8).jpg photo(12).jpg
 

breaktru

Vaping Master
ECF Veteran
Verified Member
this one is still a work in progress. its a milo build using an 18650. I ordered my batteries like a month and a half ago and still have not recieved them so i threw this together. in this build i had room for a horn button which i prefer to the tactile switches. As of right now everything is tacked in place with hot glue not epoxy,the battery is taped in not soldered my end product will have my 2600 mah 18650's and the final product will have an ego connector and i stilll need my lexan door but its a work in progress. just wanted to post it up thought some of you might be interested in it. View attachment 188163 View attachment 188164

Nice work "T". well done
 

mamu

Ultra Member
ECF Veteran
Verified Member
Mar 29, 2009
2,551
1,523
IN USA
There's a few tips that I learned along the way with building Milo mods.

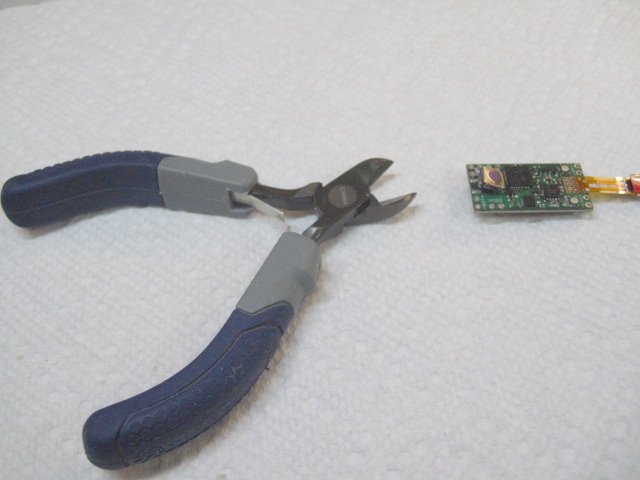
First, the easiest way I've found to remove the onboard fire button is to use wire snips and clip the 2 legs of the fire button closest to the edge of the board, then rock the button back and forth til the other 2 legs break away from the board. A LOT easier than de-soldering or dremeling the button off. :laugh:

clipper.jpg


And for the cover, I've been using a 0.118" piece of black transparent arcylite... you can buy a sample size for only a few bucks that will make 2 covers... no need for tinting paint or window tint film...
ACRYLITE® FF (extruded), sheet, Grey 7C026 GT

And for the screws, I've been using switch plate screws - much nicer than the ones that come with the case...
6-32 x 1/2 Black Switch Plate Screw

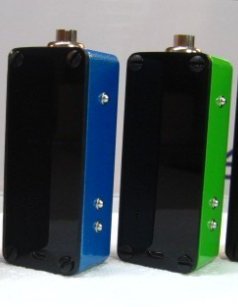
Purdy blue sparkle and green Milo mods :laugh:
bgm.jpg
 

bapgood

Vaping Master
ECF Veteran
Verified Member
Apr 16, 2012
4,426
6,599
43
Utah
charging is another story, i cant quite figure it out i get the red light indicating charging, but its just not charging. anyone else ever had a similar issue?

Did you start your DNA on fire? :D....Long story but on one of my DNA's I lost the connection through the DNA board, but the charger still works hooked directly to the battery.

Have you tried hooking the charger directly to the battery?

Also what type of battery are you using? I tried using the battery pack out of an itaste MVP that has some kind of protection circuit or something on it and the DNA charger wouldn't charge it, but would charge regular lipo cells.

I'm pretty sure I'm the epitome of mentally challenged sometimes and have done just about everything wrong with these as you can.

Anyway I can say that if you short the output of the charger while it is energized you end up with a fancy usb red led :D

It's easy to test the output with a meter, but I believe it needs to be disconnected from the DNA board or battery removed as I believe you will read the battery voltage at the charge terminals if memory serves.
 

mamu

Ultra Member
ECF Veteran
Verified Member
Mar 29, 2009
2,551
1,523
IN USA
LOL bap and retird - looks like we've all been there had that happen. :D

So... one of three things...
- funky batt... replace batt

- funky charging board... replace charging board

- funky charging connection at DNA board.. by-pass the DNA board's charging connection and connect the charging board + and - directly to the + and - batt connections
 

Chornbro

Ultra Member
ECF Veteran
Verified Member
Mar 30, 2011
2,631
649
38
VA/DC/MD Area
AWESOME thread... thank you, Mamu, for the awesome write-up and all of the Q&A you've done here and elsewhere in this section!!

Endeavoring on my first DIY mod, so I may have some questions for you along the way. I have an engineering background and I generally take to these things quite nicely. Plus, I'm a total geek and I absolutely LOVE to build things! After my Milo is done, I'll be vaping with a mod I built, on an atty I constructed, with juice that I've brewed. Pretty cool to think about considering I started with a 180mah manual button 510 in 2009 : P

I DIGRESS... Are these the batteries you used? http://www.ebay.com/itm/2x-25C-3-7V...adio_Control_Control_Line&hash=item3a66563ad5

$16 shipped... 3 weeks or so from Hong Kong. Any better options? I found some that looked almost identical to the ones in your PDF how-to, but they're only 20c

http://www.ebay.com/itm/2-X-3-7V-10...adio_Control_Control_Line&hash=item1e7c377e04

Can I trust these "straight from China" batteries in terms of safety and longevity?
 
Last edited:

dr g

Moved On
ECF Veteran
Mar 12, 2012
3,554
2,406
Paradise
AWESOME thread... thank you, Mamu, for the awesome write-up and all of the Q&A you've done here and elsewhere in this section!!

Endeavoring on my first DIY mod, so I may have some questions for you along the way. I have an engineering background and I generally take to these things quite nicely. Plus, I'm a total geek and I absolutely LOVE to build things! After my Milo is done, I'll be vaping with a mod I built, on an atty I constructed, with juice that I've brewed. Pretty cool to think about considering I started with a 180mah manual button 510 in 2009 : P

I DIGRESS... Are these the batteries you used? 2X 25c 3 7V 1200mAh LiPo Battery for Syma S006 S006 24 | eBay

$16 shipped... 3 weeks or so from Hong Kong. Any better options? I found some that looked almost identical to the ones in your PDF how-to, but they're only 20c

2 x 3 7V 1000mAh 1100mAh 1200mAh 20c LiPo Battery Double Horse 9074 9051 9009 | eBay

Can I trust these "straight from China" batteries in terms of safety and longevity?

If you are getting from Hobbyking they have a USA warehouse and the 2200mah are in stock there last I checked. You have to find the one that is marked USA warehouse. The 97mm is ONLY the grey foil area, the tabs are another ~10mm in length. But I believe you can fold them back along the pack to save some space; I would say 100mm is about as tight as you want to go for just the battery.

As for trusting these, there haven't been too many reports of well-built mods having problems with LiPo packs but they are inherently less safe than for example IMR batteries, and even ICR round cells because of their metal casing. The Groove's LiPo pack getting punctured was apparently the reason for the failures/fires.

As for whether Turnigy is a reputable brand, it is a low cost Chinese brand but it appears to be fairly well regarded. They do have the hobbyking contract which is apparently a pretty big thing. The RC guys run into their share of issues with Tunigies (and other LiPo brands) but their battery packs tend to see more physical abuse than ecigs would tend to see. For them, the hard case packaging makes sense, but even those can fail due to crash impacts.

In the end you are sacrificing some safety for price and power with any LiPo. But I believe most builders are at relative peace with that if they build well and put in their own safeguards (fuses, boards that have low voltage cutoff, chargers that work, etc.)
 
Status
Not open for further replies.

Users who are viewing this thread