Peppie's Black Bowl

Status
Not open for further replies.

Peppie

Super Member
ECF Veteran
Aug 11, 2013
477
526
Bonney Lake Wa, US of A
Thanks for the links duckie, I will read up on them.

I am not new to the failed attempts thing. I have been working wood for years and have a fire pit just outside the door of the shop that gets used quite a bit.

They say success is nothing but a string of failures.

As for your current project. IMO it does look a bit out of proportion. Are you able (on the next build) fit the kick into the circumference of the bowl?? As for the sheath fitting over the protank.....??????? Maybe use the mini version????

Thanks again.

Dave
 

duckie_44

Senior Member
ECF Veteran
Dec 13, 2011
239
279
DFW-TX
Ha!...."it does look a bit out of proportion"...You are too kind Dave..( It looks like crap).....

"fit the kick into the circumference of the bowel"; "mini version" done that http://www.e-cigarette-forum.com/fo...-all-makes-models-designs-70.html#post9935462

I was trying to see if I could fit a bigger tank in a shaft, and make it look half way good, no luck this time.....

Failures in woodworking, warms the soul, through winters cold hard nights.....I just made that nonsense up :?:

Best of luck on your pipe......

duckie.........
 

Peppie

Super Member
ECF Veteran
Aug 11, 2013
477
526
Bonney Lake Wa, US of A
Ha!...."it does look a bit out of proportion"...You are too kind Dave..( It looks like crap).....

"fit the kick into the circumference of the bowel"; "mini version" done that http://www.e-cigarette-forum.com/fo...-all-makes-models-designs-70.html#post9935462

I was trying to see if I could fit a bigger tank in a shaft, and make it look half way good, no luck this time.....

Failures in woodworking, warms the soul, through winters cold hard nights.....I just made that nonsense up :?:

Best of luck on your pipe......

duckie.........

LOL,
You are much better at working wood than you are writing poetry.

After reading an watching some of the links you provided. It seams my tinning and cleaning were non- existent. I think I will give it another practice round tomorrow before the troops arrive.
 

Peppie

Super Member
ECF Veteran
Aug 11, 2013
477
526
Bonney Lake Wa, US of A
Well I didnt get out to the shop on Turkey day. To much going on.

But I did make it out there to day after I watched the Dawg's beat up on the Coug's

My fuses were in the mail today, so I was able to fine tune the height of the battery chamber. I am so glad I left myself with plenty of wiggle room.

I spent a hour practicing my soldering. I figured out I needed to tin the parts prior to soldering the two together. Also the parts need to be stability held in place so I could work the gun a solder.
These may sound like no brainers to some... but to a newbie..........

A shot of the ring soldered to the lead wire.


Sometimes my camera doesnt post the pics I take to my photobucket (pisses me off)
Any way here is a shot of the fuse soldered and epoxied in place, along with the switch ring in place


I took a shot of the pipe firing a dripping atty, but it didnt transfer to photobucket.
So I know all is clear to put some detail work into the bowl.

I started by forming the top to the button switch


Next I will take time to make a jig to hold the bowl, so I can cut out the waste for the inlay.
 

Peppie

Super Member
ECF Veteran
Aug 11, 2013
477
526
Bonney Lake Wa, US of A
Thanks Cave,
Yea, I left plenty of room to coil up the solid wire that will tuck into the small neck.

The wire I have left on there at this time (I will cut it shorter) is about 4'' long on each lead. It all coiled up into the neck.

I think I will work on that connection to day, before the rest of the woodwork begins.
 

Peppie

Super Member
ECF Veteran
Aug 11, 2013
477
526
Bonney Lake Wa, US of A
So the idea here is to use this cap from a Segeli 8w to cover the 510 connector. I dont mind the 22mm diam of the cap cause I plan to use either a 19mm carto IBT or my Fogger, maybe typical dripper.


I cut a shallow dado around the neck so I could thread the cap on


And here it is screwed down tight


After I got the cap screwed down I was ready for a test vape. Well it vaped like it was intended to, BUT.......
The cap is not in the same plane as the 510 connector, so the atty does NOT sit flush with the cap when screwed down tight. DAMN!!
So I will revert to plan C-2.
I will have to fiddle with the neck, possibly dado out a larger groove so I can get the cap to sit properly.
I will have to sleep on this solution. I really want to fix this cause I have a $14 fuse epoxied to the bottom of the bowl. Not to mention the 12+ hours invested so far.
 

Peppie

Super Member
ECF Veteran
Aug 11, 2013
477
526
Bonney Lake Wa, US of A
Well I am sorry to say that photobucket has bit me in the A%$ (again)
I took some shots of the neck modding I had to do to get everything lined up and flush. As you guessed the pics are lost somewhere in cyberspace.

I must say that the neck coming off the bowl has caused me a huge amount of frustration.
You can bet your next paycheck that the next one will not be approached as this one was.

I am disappointed on how this pipe body turned out. The neck just dont flow into the bowl as I had envisioned. I can bring myself to throw it into the burn pile. It is still a useable mod that cost me some time, a fuse, a little wire, some brass rod, a switch, and a 510 connector.

So needless to say that I will not be doing any inlay work on this pipe. That will be on the menu for the next one.

Trying to get some new pics up for ya all.
Hang on.
 

Peppie

Super Member
ECF Veteran
Aug 11, 2013
477
526
Bonney Lake Wa, US of A
OK I got some pics to transfer
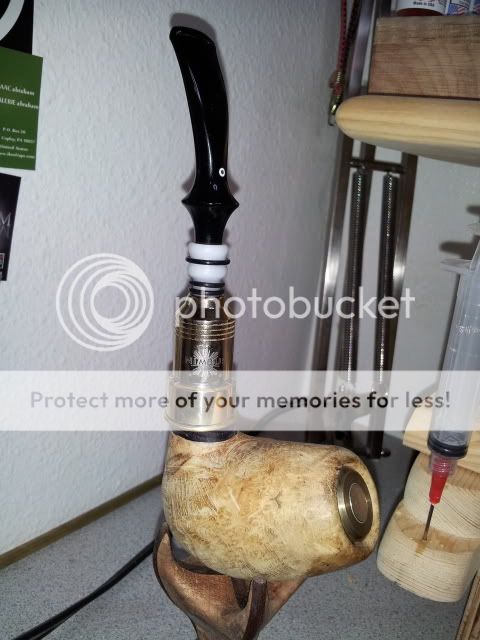
This is a shot of what I came up with to try to fix my poor execution of a smooth transition from the bowl to the neck to the cap.
I made an ebony washer and glued it to the necl


I modded an ego adapter cone and glued it to the inside of the brass cap. This was done to keep the cap in line with the 510 connector.


But as you can see the cap is a bit short. This came about because the washer was not consistent in thickness, and the shoulder that the washer was glued to was not in the same plane as the cap. So the bottom of the cap had to be sanded to create an equal gap all the way around the neck and cap

That is were the brass ring comes into play

 
Status
Not open for further replies.

Users who are viewing this thread