Protank MicroCoil Discussion!!

Status
Not open for further replies.

MacTechVpr

Vaping Master
ECF Veteran
Verified Member
Aug 24, 2013
5,723
14,401
Hollywood (Beach), FL
@mhertz
I find that with a tmc, I can get the same performance at a lower wattage. Let's say with a standard coil I run it at 30w. With a tmc I find I get similar vapor production, throat hit, and flavor running 16 or 17w. And I get longer wick and coil life.

Short Answer: More wick, more flow potential and power may be applied. More vapor, more flavor. Use a t.m.c., more efficiency and overall vaporization rate to make use of that thicker wick.

Lifted from the post Tensioned Micro Coils. The next step. | Post 1280 for more info.

Good luck all.

:)


MacTechVpr

Vaping Master
ECF Veteran
Verified Member
Aug 24, 2013
5,723
14,401
Hollywood (Beach), FL
Lifted from the thread...the "science" behind different coils | Post #11.

i'm looking to learn about the factors that affect different coil builds. off the top of my head i'm wondering about: air flow - under the coil vs directly hitting the coil, combining different wire materials like kanthal and nichrome to get the best of both,

are there any resources besides youtube out there? i don't know if i can handle another video where people just share their personal preferences.

also are there any real advantages to the intricate types of coils (like tiger or clapton and all of that) or is it just for hobbyists?

You get vaporization by way of an effective contact area with the wick. The more efficient that you make that in relationship to air and juice flow the more conversion you get. More actual vapor vs. diffusion, more flavor. Simple formula.

Thirty seconds to an outstanding repeatable baseline vape.


Everything else is fun. Meet ya there.

Good luck.

:)

 
  • Like
Reactions: f1vefour

MacTechVpr

Vaping Master
ECF Veteran
Verified Member
Aug 24, 2013
5,723
14,401
Hollywood (Beach), FL
That is one tightly wrapped contact coil.

Looks it, don't it? As you know tho I've always encouraged only enough strain to get past sticky. It's all about consistent uninterrupted (if possible) rotation I guess I was having a good day!

Nice to cya five. Hope the vape's trackin'.

:)

p.s. That's a 3.2mm 25 AWG wind btw. Something I had stubbornly believed not to be possible, i.e. maintain adhesion in Ø over 3mm with a hand wind.
 
  • Like
Reactions: f1vefour

corn flakes

Ultra Member
ECF Veteran
Verified Member
Dec 29, 2014
2,851
19,923
Brant County Canada
Here is a sum-up of the most pertinent validations I have made for KPT (addendum in bold) for your vaping pleasure…

32AWG, 7/6 1.75mm i.d. m.c. = 2.2Ω √
32AWG, 5/4 2mm i.d., loose m.c. = 1.85Ω √
30AWG, 11/10 1.75mm i.d., t.m.c. =2.35Ω √
30AWG, 11/10 1/16-1.58mm i.d., m.c. = 2.1Ω √
30AWG, 11/10 1/16-1.58mm i.d., m.c. = 2.1Ω √ [HASHTAG]#292[/HASHTAG] MrOcelot
30AWG, 11/10, 1.2mm i.d., t.m.c. = 1.8Ω √ Christopherja
30AWG, 10/9 1/16-1.58mm i.d., m.c. = 2.04Ω √
30AWG, 9/8 1.75mm i.d., t.m.c. =2.01 √
30AWG, 9/8 1.58mm i.d., m.c. =1.93Ω √
30AWG, 9/8 1.58mm i.d., t.m.c. =1.83 Ω √
30AWG, 8/7 1.75mm i.d. m.c. = 1.85Ω √
30AWG, 8/7 1/16-1.58mm i.d. m.c. = 1.81√
30AWG, 8/7 1/16-1.58mm i.d. t.m.c. = 1.73Ω √
30AWG, 7/6 1.75mm i.d., m.c. = 1.68 √
30AWG, 7/6 1/16-1.58mm i.d., m.c. = 1.57Ω √
29AWG, 10/9 1/16-1.58mm i.d., t.m.c. = 1.95Ω √
29AWG, 9/8 .07"-1.778mm i.d., t.m.c. = 1.73Ω√
29AWG, 9/8 1/16-1.58mm i.d., t.m.c. = 1.63Ω √
29AWG, 8/7 1.75mm i.d., t.m.c. = 1.52Ω √
29AWG, 8/7 1/16-1.58mm i.d., t.m.c. = 1.40Ω √
28AWG, 10/9, 2mm i.d., m.c.= 1.62Ω
28AWG, 9/8, 2mm i.d., m.c.= 1.49Ω
28AWG, 8/7 2mm i.d., m.c.= 1.3Ω
28AWG, 10/9, 1/16-1.58mm i.d., m.c.= 1.3Ω [HASHTAG]#1637[/HASHTAG] Jamie Bates

Click on any linked wind parameters for full details on Steam Engine.

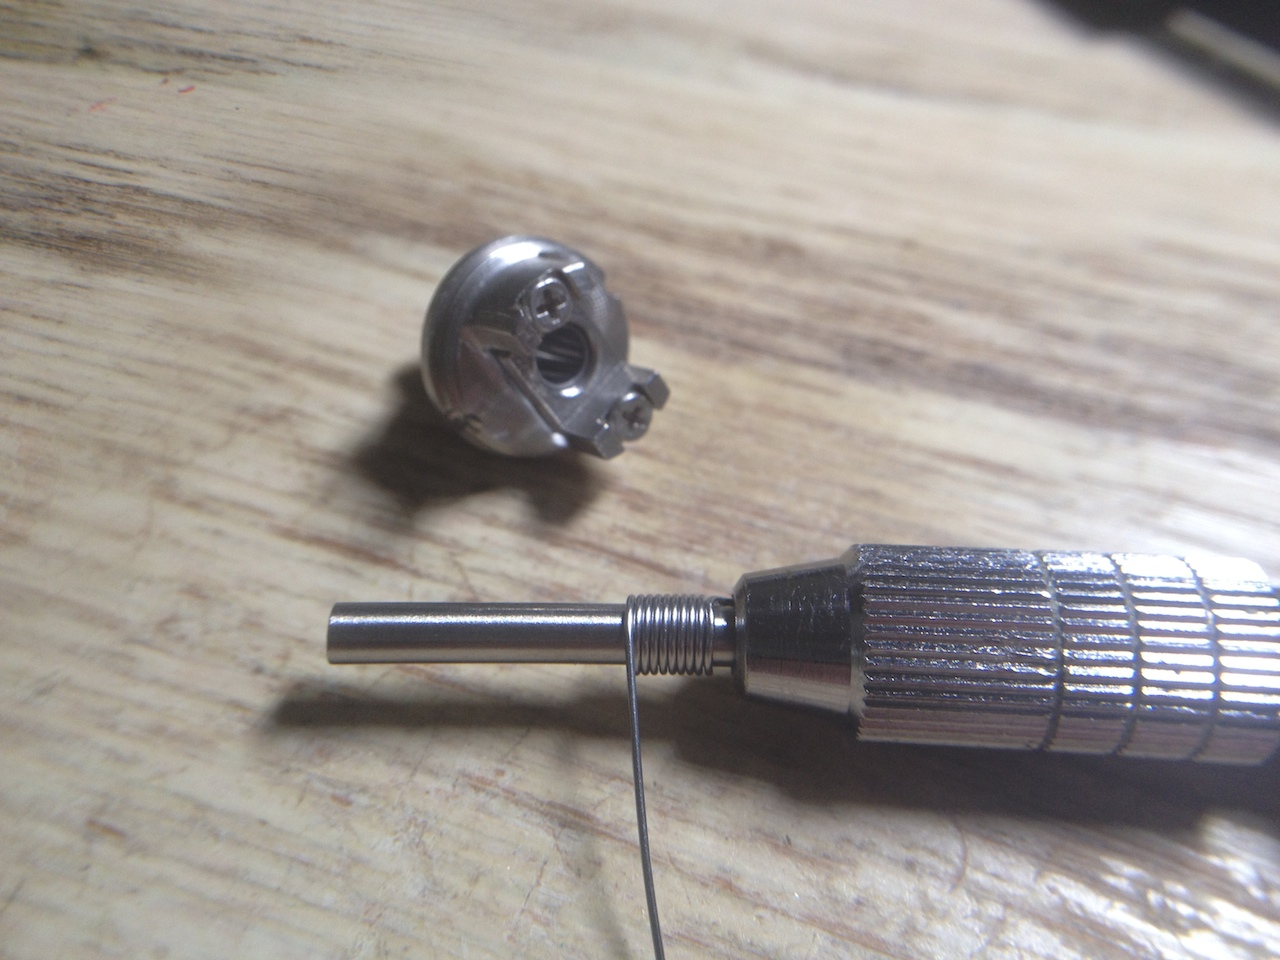
Some standard verification m.c. winds are included for perspective. All results were three times hit, verified on separate cargo-meters and variable in operation. Wire spec is Temco, Kanthal A-1. Nominal lead lengths typically noted on avg. are ~7mm(Neg)+9.25mm(Pos).

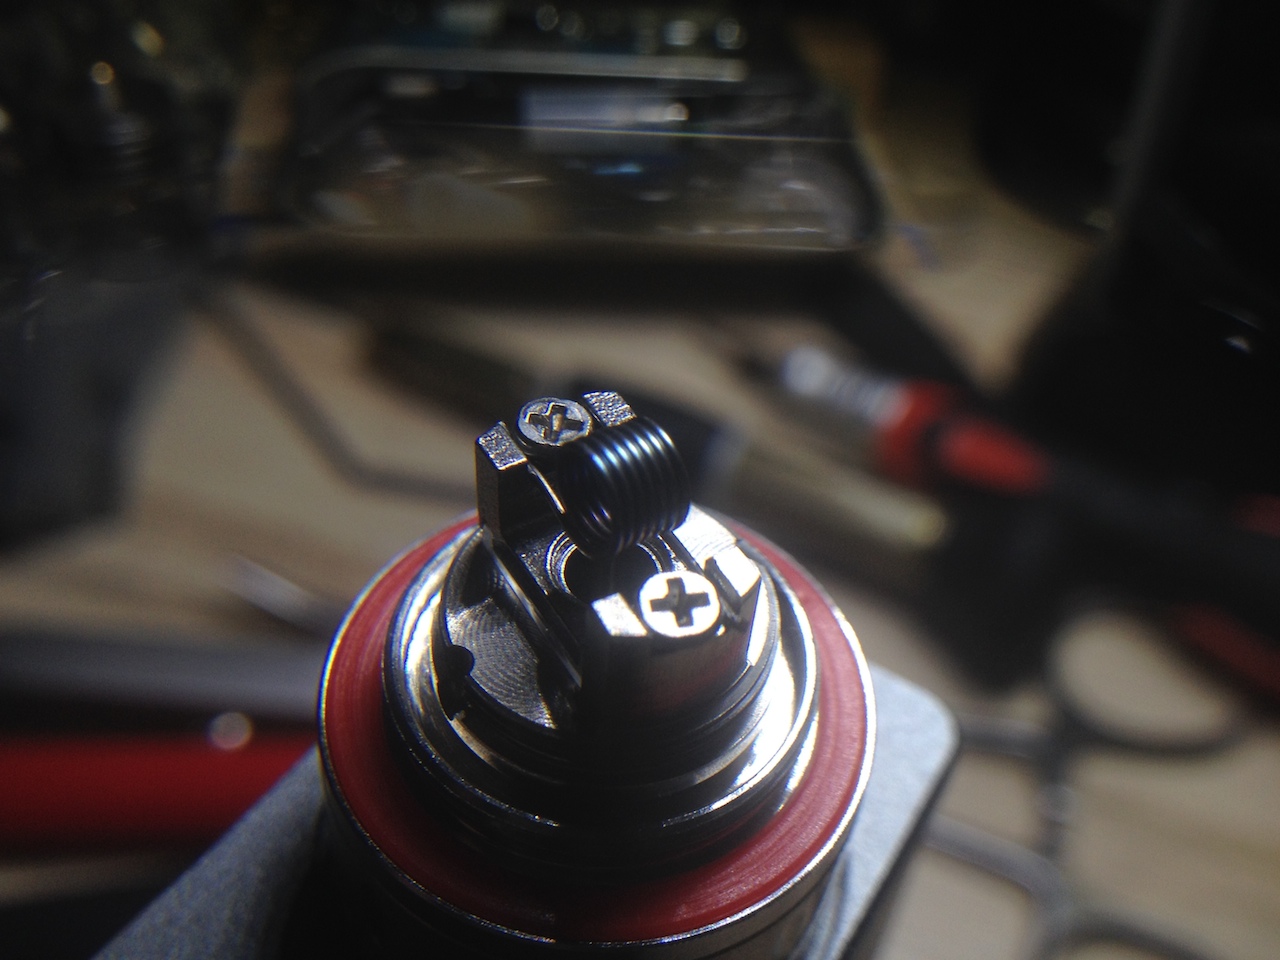
m.c.= conventional (hand or mechanically wound) contact coil
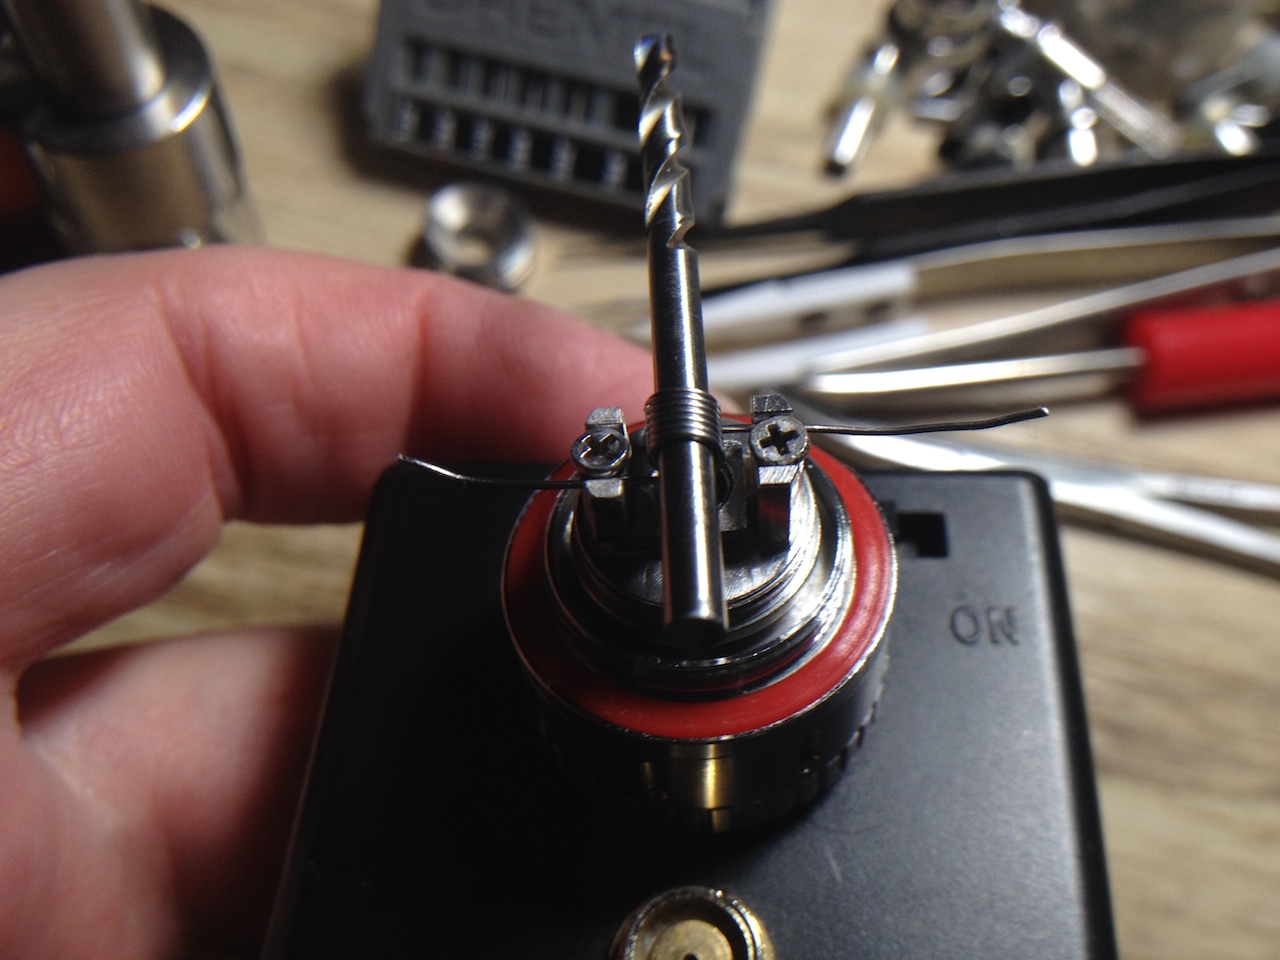
t.m.c. = tensioned contact coil
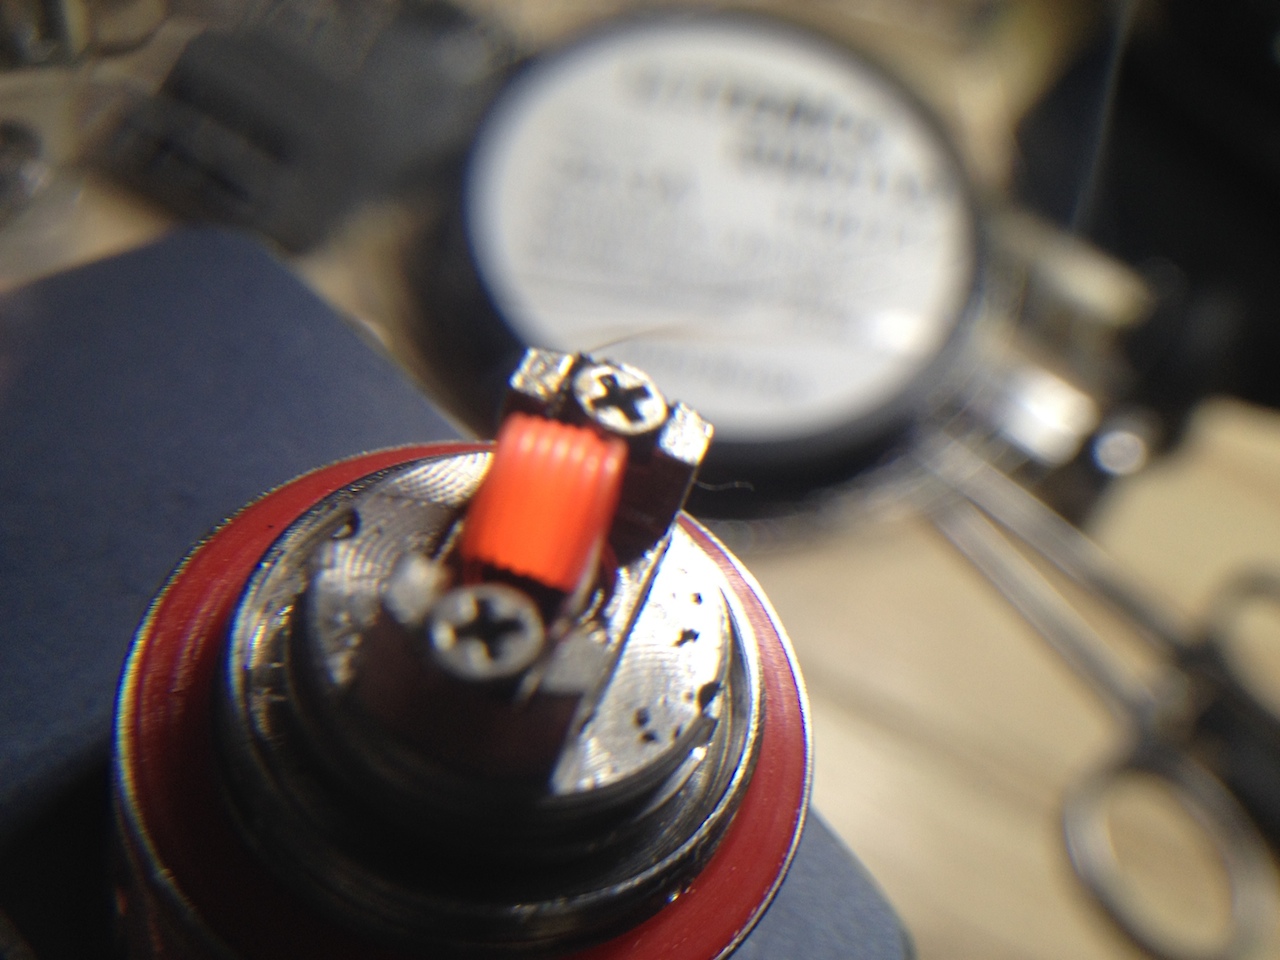
√ = verified (proofed, duplicated)

Your submissions would be helpful and appreciated. Please post or pm and I will validate (replicate) for this table as soon as possible.

(n.b. A mechanically wound coil is not necessarily tensioned. Preferably tension adequate to induce turn-adhesion must have been applied for its use to be inferred or reported. Not merely external heat or forming pressure. Thank you, as there will be resistance implications and its important to make the destination.)

Hope this info is helpful in targeting your temp sets. Let me know your validations please (or successful improvement so we can test it!).

Good luck all.

:)

Great info.

Is there a sweet spot I should be aiming for.
 

MacTechVpr

Vaping Master
ECF Veteran
Verified Member
Aug 24, 2013
5,723
14,401
Hollywood (Beach), FL
Great info.

Is there a sweet spot I should be aiming for.

Sorry haven't been on in a few days cf and thanks for the nod. Don't post my build results anymore as a guide on account of we have such great tools these days. And I suggest we build to that metric which I explain below.

If you're talkin' Protank (or sim clearo) about the middle of a 3.7-4.2v power range…or, 1.8-2.0Ω. There's a reason manufacturer's target certain resistance targets with their devices and coils. That should help as a good starting point for modern tanks as well.

For most legacy clearo's you're lookin' at a bit/wick slot width in the atomizer housing of about 1.8mm. So if you want to build and install on a common bit say a 1.75mm bit that's important. It limits how big your wind can get. A secure installation process means we keep the coil on the bit we wound on until termination is set. Best way to avoid wasting the fine work we just did. And that's a lot of the focus on this thread. A good part of that works in all rebuilding.

I recommend the largest coil/wick diameter you can get in to those conventional assemblies. This will provide the most power and juice flow possible. Then you need to give that as much air as you can. Like with dual airslot bases for the Protank series (or drilling out the three air holes to the max, 1/16" or 5/64" as I recall). Don't have any handy at the moment as I "loan" out a lot of these, lol, to new vapers. But I happen to be vaping a PT2 with a single slot that was buggy on a Sigelei. Turned out to be an out of spec coil assembly with too short threads so no making good contact in the base (no fire).

There's a great amount of info on this thread cf on just about every aspect of rebuilding. I've tried my damnedest to all my know how on using strain to mount and tension coils into a reliable repeatable vape. Lot's of tootie puffers around and will be prolly be forever as most of us enjoy that happy center above. Getting the best vapor density along with that using a tensioned micro is what we're all chasin'. Learning how to use Nextel ceramic fiber along with that getting weeks of dependable consistent flavor and power is heaven.

Here are a few of my favorite baseline builds for the typical clearo brought to you by Lars at steam-engine.com…

30AWG, 9/8 .070" 1.778mm, i.d. LL=14.5mm, t.m.c. = 2.152Ω
30AWG, 9/8 .070" 1.778mm, i.d. LL=14.5mm, t.m.c. = 2.01Ω
29AWG, 10/9 .070” 1.778mm i.d., LL=14.5mm t.m.c. = 1.72Ω
29AWG, 10/9 1/16" 1.5875mm i.d., t.m.c. = 1.586Ω


a formidable and comprehensive online tool for evaluating and refining the design and output of your coils. This a pin vise, some bits and 30 seconds will give you the repeatable stable circuit you're looking for. The rest of the process of installation to keep that great geometry you just spun is well described on this thread by others and myself.

Coming full circle on the sweet spot, there's the Mod range tab on steam-engine.com where you can look up the output specs for your variable mod. This may help you determine the best compromise for your atomizer resistance.

Good luck and give us a shout here if anything's unclear or you run into a snag.

Thanks for knockin'.

Good luck.

:)

 
Last edited:

MacTechVpr

Vaping Master
ECF Veteran
Verified Member
Aug 24, 2013
5,723
14,401
Hollywood (Beach), FL
Here's a Subtank build for you…

Know a lot of you rely on the clean and simple straight up build for our Kayfun's and the like. A good solid coil in the 16-25W range gets most of us there. And none can deliver power more efficiently or cleanly than a tensioned micro coil. I've heard the argument through the years but you can't make more vapor (or flavor) with less power. Getting the most heat along the linear surface of the wick available for vaporization...that is key to effective vapor production. As important to a Protank as it's siblings in the new Subtanks which truly shine with stable concentrated power…


The solid symmetry of a t.m.c. makes the best of the formidable RBA design of the Subtank but particular attention needs to be paid to the atomizer/coil geometry. There are some references earlier in the thread on the RBA deck characteristics and measurements if you search for Subtank, RBA. I've settled on a 25 AWG wind on a very standard 1/8" drill bit optimizing for maximum wick (flow) and power with KGD. This you may like if you want to max your vape in the nominal performance center for this tank.

25/7/3.175mm (1/8") @ 0.883Ω

Heat flux is a delightfully warm 177 mW/mm2 at 25W. I'm usually vaping between 19 and 25W comfortably on this build as the 3.2mm allows a generous helping of KGD. With or without modification of the RBA's channels it's splendid for tobacco. I have very slightly flared channels and notched the chimney for other varieties as I tend to prefer more overall vapor production. I haven't had to rely on the dual-slot airflow base with t.m.c.'s for this build (although usually run wide open). The Subtank makes great vapor production with a standard t.m.c. but oxidation at low voltage is essential. If your wind got to adhesion uniformly, typically 2-3 short bursts at 3.2-3.5V should get you this for oxidation...


Avoid long firing, higher wire temps and definitely the ceramic tweezer is not a forming tool. Do this and you'll avoid mangling the fine work that nature, strain and your good sense produced. Leave forming to the backyard mechanics.

All in all you've spent about 5 mins to a perfect build for this wonderful atomizer. And the result will have you still enjoying that consistent vape 4-6 weeks down the road as evidenced by this well worn example vaped on the high end of the power scale and beyond 25W…


As always, I'm here to help all an anyone trying to nail things down in these difficult times. I can only emphasize if you've been holding out learning to make stable micro's…now would be the time friends. It's all about stable consistent temperature. Has been all along for this tensioned micro evangelist. And the beat goes on. Hail us here on this thread on the Tensioned Micro Next thread for attention. If no one pipes in PM me directly.

Good luck all.

:)

p.s. You may find 25 AWG product from two sources I'm familiar with -> Kidney Puncher and Lightning Vapes. I can't attest to the quality as not TEMCO production that I'm aware of. TEMCO dropped 25 gauge from its lineup a while back for reasons unknown. These subs have been adequate for my own daily vape. Res values may vary however from my published numbers above. See supplier/s for pertinent values.
 
Last edited:
  • Like
Reactions: Brkdnc

MacTechVpr

Vaping Master
ECF Veteran
Verified Member
Aug 24, 2013
5,723
14,401
Hollywood (Beach), FL
Lifted from the thread...the "science" behind different coils | Post #11.


You get vaporization by way of an effective contact area with the wick. The more efficient that you make that in relationship to air and juice flow the more conversion you get. More actual vapor vs. diffusion, more flavor. Simple formula.

Thirty seconds to an outstanding repeatable baseline vape.


Everything else is fun. Meet ya there.

Good luck.

:)


MacTechVpr

Vaping Master
ECF Veteran
Verified Member
Aug 24, 2013
5,723
14,401
Hollywood (Beach), FL
On the subject of Hot Legs...

Contrary to popular myth you can have hot leeds even with a standard open wind. A good percentage of common clearomizer coils before current sub-Ω variety would fail this way. Yes, definitely faulty termination is the culprit. But marginal termination with bad wick contact, asymmetry, unbalanced strain can conspire to produce higher resistance in operation sending leads hot. Whether a spaced or contact coil turn coherence and balanced strain can virtually eliminate the phenomenon. Learning to build this way consistently will give you a marvelously productive and rewarding vape.

Good luck and a great Thanksgiving weekend.

:)


MacTechVpr

Vaping Master
ECF Veteran
Verified Member
Aug 24, 2013
5,723
14,401
Hollywood (Beach), FL
Lifted from the thread Can't see why some tanks, clear's, etc. make juice taste better than others | Pg2 | Post 30 to remind those 3Ts, EVOD and PT Mini users we're still here to help.

If all that is so then explain why a DIYed mix I make tastes better in an EVOD - yes an EVOD rather than a Protank 2 - both are with the same kangertech single 1.8 coil and vaped on the same gear at the same 3.7V?:blink: I have tried it over and over and it does not matter which Protank 2 I try it does not taste very good in them - weird huh??;)

The difference is all the above, the sum of all parts and specifically your juice. You find in the EVOD the most comprehensive expression of the juice's qualities, based ultimately...on the temperature and flow applied. In other words the correct balance of vaporization efficiency for that particular juice given the varying elements. Have had this same experience and observation myself regarding the EVOD and 3Ts. It's definitely easier to build for it than a Protank. Variations on the latter are more obvious. That's to say the basic clearomizer is more fault tolerant. Whereas the PT and now Subtanks are more precise and demanding.

Now the real important question is…how did you do it? Can you do it twice?


I introduced the principles of strain here on ECF to help users quickly duplicate precise wind and temperature results. A pin vise, some bits and 30 seconds will give you the repeatable stable circuit you're looking for. The rest of the process of installation to keep that great geometry you just spun is well described on the threads by others and myself…

Protank MicroCoil Discussion!! | E-Cigarette Forum
Tensioned Micro Coils. The next step. | E-Cigarette Forum


Give a shout on these threads for assistance. Some veteran subscriber will pop up or hail me. Always glad to help.

Good luck.

:)


aznnp77

Super Member
ECF Veteran
Verified Member
Aug 29, 2014
728
840
Virginia
I just wanted to say that I hope Kanger continues to make the protank and the single coil heads. What a great way for new vapers to get their first taste of rebuilding.

Very easy to do, very cheap, and takes less than 5 minutes to rebuild. Kanger should keep making these for the good of the vaping community. Unlike brands that intentionally make it difficult to rebuild for max profit reasons (ahem Aspire).
 

MacTechVpr

Vaping Master
ECF Veteran
Verified Member
Aug 24, 2013
5,723
14,401
Hollywood (Beach), FL
I just wanted to say that I hope Kanger continues to make the protank and the single coil heads. What a great way for new vapers to get their first taste of rebuilding.

Very easy to do, very cheap, and takes less than 5 minutes to rebuild. Kanger should keep making these for the good of the vaping community. Unlike brands that intentionally make it difficult to rebuild for max profit reasons (ahem Aspire).

I agree! And why I continue to support this thread along with a few vet's that still pop in. Still test build for personal use and show including new coil configurations using strain winding which I occasionally drop here. For those for which a low to moderate (15W) cool efficient vape with good vapor output is heaven…this is home base on ECF. The tech is applicable to many other makes of low power atomizers and high power RTD's or RBA's too. So a good place to start to learn how important symmetry and proper oxidation of Kanthal is. Which by the way is what a tensioned coil yields…a circuit that can be efficiently oxidized (insulated). That's where a lot more power can be derived and delivered efficiently to wicking.

Hail us if you need and thanks for the pit stop.

:D

Good luck and Happy Holidays.
 

aznnp77

Super Member
ECF Veteran
Verified Member
Aug 29, 2014
728
840
Virginia
@MacTechVpr I just put down my protank for about a month, but I'm probably going to pick it back up soon.

I vaped about 3.8-4 volts at 2.2 ohms, which was about 7-8 watts I think. That was the standard back then, and I think my coils would burn after 9 watts. Never understood how people could go to 15 on the stock insulators, but it's impressive that you could.

The OP should keep a tutorial sticky with pics and/or videos on the original post. Rebuilding sounds intimidating at first, but the cost savings is very much worth it to me, on top of the better flavor.
 

aznnp77

Super Member
ECF Veteran
Verified Member
Aug 29, 2014
728
840
Virginia
I don't know if this has been mentioned here, But you can use PT heads in the Aero tank If you stack two top washers on the stem of the head.

A while back there was a big debate on this. Personally, I would just get the aerotank heads and rebuild them as singles, experimenting with different sizes of flavor wicks, if using them at all.

I think a friend of mine tried the double cup technique on his protank heads and it didn't work.
 
Last edited:

TFL!

Super Member
ECF Veteran
Verified Member
May 27, 2013
710
1,013
Chatfield, MN, USA
A while back there was a big debate on this. Personally, I would just get the aerotank heads and rebuild them as singles, experimenting with different sizes of flavor wicks, if using them at all.

I think a friend of mine tried the double cup technique on his protank heads and it didn't work.
I have using the PT heads in 3 aero tank for about 4 months now and no problems.
 
  • Like
Reactions: MacTechVpr

MacTechVpr

Vaping Master
ECF Veteran
Verified Member
Aug 24, 2013
5,723
14,401
Hollywood (Beach), FL
Good for you. Glad it did if your tension winding. If not and that's workin' to your satisfaction @TFL! happy for ya. We need all the satisfied vapors to join in and help others in this community. Numbers matter and that's been what this project has been about for me.

Me, I get about double the life over a standard factory coil or standard spaced wind with complex juices and tobacco. Also denser and greater output with a strain wound contact coil. The important mechanical reasons along with the physics are well explored on this thread. Yes there has been criticism. However, I'd challenge those landing here to find the physical explanation for the alternatives. How you can get more vaporization from a spaced circuit wound over a broader wicking area? Simply, you can't. Not without goin' thicker wire and adding power. However, contact coils must be oxidized to be stable and that's what tension winding is all about. A simple technique even a green beginner can master usually within an hour that makes the coil considerably more stable and durable than a standard wind. In spades with a synthetic like Nextel. Then you can extend the performance out to many weeks, months in some instances, by dry burning with wick in place. For many of us that's huge allowing more choices in the juices and hardware we can reasonably maintain without extensive rebuilding.

Just a few thoughts and wish ya luck TFL.

Happy Holidays all.

:)

 
Last edited:

MacTechVpr

Vaping Master
ECF Veteran
Verified Member
Aug 24, 2013
5,723
14,401
Hollywood (Beach), FL
Good goin TFL glad you're enjoying it. I'm a t.m.c. addict, obviously. But I still do spaced winds, twisted for some stuff. Always will recommend learning how to use strain for new vapers for the reliable vape of course. Know there's a lot of people enjoying the easy wind. Know a lot of you pass it on successfully to others 'cause I run into 'em, some contact me on the outside. Standing offer to help any comers with help on the wind mechanics or perfecting oxidation. I'm a PM away if I can be of any assistance or hook you up with a partner. Thanks very much for the feedback T. A great Holidays to you and yours.

Good luck.

:)
 
Last edited:
  • Like
Reactions: karlmetz

JJOOHHNN

Vaping Master
ECF Veteran
Mar 19, 2013
3,705
5,156
USA
Wow, this is a long thread. I will come back and read from start to finish the weekend following Christmas.

It has probably already covered in this thread but I have a couple of questions.

1. How many times would you say on average these can be rebuilt?

2. I understand that some of the new heads are more difficult or impossible to rebuild? I want to accumulate enough to rebuild by buying new ones that I can use and when I have a fair number of them start trying to see if I can rebuild them. Which ones should I avoid buying or which one should I be buying? I will be wanting to build for the Aerotank Mini and Protank 3. I am currently using ones intended for the Protank 2.
 
Status
Not open for further replies.

Users who are viewing this thread