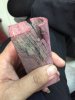
This is my first time sending my design out for machining. I got a call from my machine shop saying my stab wood has cracked and a piece has broken off. The shape of body was machined first and it cracked when a hole for the battery was being machined.
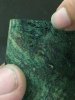
So I decided to drive there with another piece. This time we decided to try drilling the hole for battery first then work the body. It didn't crack! So work continued the next day, machining out the area for the chip and wiring. Get a message from the shop, "bad news" followed by a photo of a hairline crack which wasn't even at the thinnest section. The thinnest area of the wood is 4mm.
Anyone else encountered this? Is stab wood just so brittle or do I have a bad batch of stab wood?