
Goos question... whats the biggest mandrel size too?
You are using an out of date browser. It may not display this or other websites correctly.
You should upgrade or use an alternative browser.
You should upgrade or use an alternative browser.
Tensioned Micro Coils. The next step.
- Thread starter super_X_drifter
- Start date
- th_trl_thread_readers 0
- Status
- Not open for further replies.
Nope it's not removable. He sent me a 2.4 mm too. It's just bent rod with a stop. That one would be one anyone with a wire bender and some determination could build.
No need for any screws, washers - that's the simplicity of it.
No need for any screws, washers - that's the simplicity of it.
I gotta get better at replying broNever got my pm I guess lol!
")
Would this be a starting point............or be modified for the job?I haven't put anything out there yet for making the spinner handle but I'll try to do that this weekend. I've already come up with an easy way for anyone to do it, just have to document it for you guys... the clamp will work with other things but other things will require you to go-stop go-stop etc, it may work ok too, but it works much better when you can spool it up in one shot

5-Size Vaping Coil Winding Jig Tool for RDA - Silver, Aluminum, 2.0mm + 2.5mm + 3.0mm + 3.5mm + 4.0mm Winding Rods - 3FVape
I'm not seeing why you couldn't use it with a Gizmo, you can go without stopping with that. But I would like to build the handle too. Bending the rod might be a challenge as my determination is only backed up by 110lbs and well over 65  . I do have a rod bender on my work bench though. I was just getting the pin vise down and the Gizmo before that
. I do have a rod bender on my work bench though. I was just getting the pin vise down and the Gizmo before that Would this be a starting point............or be modified for the job?
5-Size Vaping Coil Winding Jig Tool for RDA - Silver, Aluminum, 2.0mm + 2.5mm + 3.0mm + 3.5mm + 4.0mm Winding Rods - 3FVape
Oh, nice!
Looks like you could induce various tensions with that winder!
Would this be a starting point............or be modified for the job?
5-Size Vaping Coil Winding Jig Tool for RDA - Silver, Aluminum, 2.0mm + 2.5mm + 3.0mm + 3.5mm + 4.0mm Winding Rods - 3FVape
Yes, and yes. Tension is elongation. It might be possible for this config to add enough. Not in its present form or method of use tho don't think. But yeah, great effort here.
Ironically what I like about it most is the thumb's capacity to gauge tension is also a deficit here. Tests I did with learning winders showed that finger/hand pressure from straight wire (no spool) wasn't consistent. Even finger and hand hold failed for some. Hand/forearm strength was! I introduced hand tension winding with the aid of a forceps (or similar). It had to fix the wire at one point so that it could be pulled against from another. So combining the force of both forearms and hands made it reasonably easy. Think pulling a thick rubber band apart between thumb and index fingers. Now wrap the rubber band around both thumbs and pull apart. Retention makes strain much, much easier to apply. Finger holds are cumbersome. So I'd have to doubt most could apply sufficient drag force with a thumb alone. But this device is much more likely to wind more uniformly to the bit diameter and apply more even strain than a coiler.
The question remains…is it going to be close enough to optimal turn-to-turn contact to have the coil fire uniformly within one or two pulses? Or, are you going to see gaps and uneven strain every time? Dunno. Will vary with your thumb strength!
An interesting creative approach. Maybe if one of the t.m.c. vets could explain what the goal of a microcoil is to the developer…the aha moment could occur. It's not just form but function. To his/her credit it's not yet another straight knock-off of the pin vise rotation concept. Some props for imagination here. We'll call it a mini-Gizmo, I guess, and see how long it takes before there's a dozen versions of 'em comin' out of RoC without further explanation on its use.
Tell you what. I value ingenuity. I'd be willing to purchase one of these for testing. Not a dime though to anyone who rips him off. And the reason is simple. I'd love to see more of 'em invented.
Good luck all.Ironically what I like about it most is the thumb's capacity to gauge tension is also a deficit here. Tests I did with learning winders showed that finger/hand pressure from straight wire (no spool) wasn't consistent. Even finger and hand hold failed for some. Hand/forearm strength was! I introduced hand tension winding with the aid of a forceps (or similar).
I agree. I looked at this device some more and another thing I don't like about it is that both the gizmo and the wire are both hand held up in the air--I don't think I have enough coordination to make a good t.m.c. like that.
This coiler still seems like a better solution for me because it is attached to the tabletop--and I can use any size rod. I really only make 2.4mm ID coils nowadays--they just work in all my atties.
@super_X_drifter I made a bunch of coils with my Kuro coiler (1:1 Tobeco clone, with removable rod) and I have to confess that it doesn't get any easier--no magnifying glass, no LED lights, no sweat. I made several coils using 28 and 29 gauge kanthal in minutes and they all look perfect. I installed them and they needed but a few pulses (at low wattages) and a few gentle strokes to start glowing uniformly and brightly from the center. No hot legs, no pinching and squishing, no brutal force or high heat or multiple pulses...
I'm using one of them now in my K4 and I honestly can't tell the difference between a Kuro coil and my old tensioned coils, which can only mean one of two things: either the Kuro is as good as any other method (just much easier and faster) or my tensioned coils were never really any good. I suspect the latter.
To be continued.
Last edited:
I agree. I looked at this device some more and another thing I don't like about it is that both the gizmo and the wire are both hand held up in the air--I don't think I have enough coordination to make a good t.m.c. like that.
This coiler still seems like a better solution for me because it is attached to the tabletop--and I can use any size rod. I really only make 2.4mm ID coils nowadays--they just work in all my atties.
@super_X_drifter I made a bunch of coils with my Kuro coiler (1:1 Tobeco clone, with removable rod) and I have to confess that it doesn't get any easier--no magnifying glass, no LED lights, no sweat. I made several coils using 28 and 29 gauge kanthal in minutes and they all look perfect. I installed them and they needed but a few pulses (at low wattages) and a few gentle strokes to start glowing uniformly and brightly from the center. No hot legs, no pinching and squishing, no brutal force or high heat or multiple pulses...
I'm using one of them now in my K4 and I honestly can't tell the difference between a Kuro coil and my old tensioned coils, which can only mean one of two things: either the Kuro is as good as any other method (just much easier and faster) or my tensioned coils were never really any good. I suspect the latter.
To be continued.
Thanks for that. Been there. Done that too. <shrug>
First fire to slightly preheat the wind at lowest voltage at a very dull dark red. Second usually brings center to a red almost yellow which should be cut off by then. Usually be third pulse temp's gone even end to end. If the first was held just a tad two long, the second pulse. Then continued low voltage pulses of increasingly longer duration. So 3-6 for thin wire. More if thicker wire…when adhesion has been arrived at. Honestly no tellin' if you got to heat wire enough to form by compression. That's the rub. Why I can't endorse coilers even if I wanted to.
When I first started through the Fall of 2003 I was laying the groundwork with forceps tensioned and torched micro's. Still skeptical of my own evaluations of strain winding with a pin vise I continued my less expansive tests for my own builds. I had a lot of trouble with those until I appreciated the importance of gradual low voltage oxidation. Even after my introduction of PV winding early '04 there was some backtracking (as I kept getting fails with higher power). And I paid the price having to repeat experiments to get the low voltage sequences down. Unfortunately I have no way to instruct folks how to revert to early oxidation development after higher voltage is applied. If gaps are present, if forming did not fill those gaps and the coil/s are unbalanced…it's too late. You must then continue to complete a formed microcoil with higher voltage.
With a coiler one must apply enough heat as to be equivalent to the cold method of inducing plasticity to the wire represented by tension winding. In both instances a certain amount of heat energy must be imparted. With strain it's internal, with forming it must be necessarily higher and external. However, with strain you produce elongation, forming not. The threshold of adhesion is the elastic limit beyond which you arrive at strain of the wire. Not merely deformation but internal dislocation. This helps normalize the internal stresses already present in the wire itself. So to my understanding it is a combination of forces and criteria not present in forming at all that result in faster more uniform oxidation and so improvements to wire efficiency. In other words, it's not likely to be achievable by forming (as we do it).
It's a matter of both form and function Katya. You're doing just fine. I can only suggest your not giving up on the idea but returning back to it as I did variously with a fresh conviction. We know the zone is there and it's a pretty broad highway. Lay the right foundation and it's maglev high speed rail.
Good luck.
p.s. Not sayin' this applies…but funny thing about preconceptions. One of them, an obstacle for me, had more to do with how much tension winding seemed like knitting, something I took up alongside my wife expecting our first. Hey, don't laugh. It's a stress reliever! But I guess the stress part I was relieving kind of hung with me more than I realized, along with a subtle reticence to re-live it. Seems I got over it thankfully; but, it took a few attempts.
Last edited:
Hey, don't laugh. It's a stress reliever! But I guess the stress part I was relieving kind of hung with me more than I realized, along with a subtle reticence to re-live it. Seems I got over it thankfully; but, it took a few attempts.
I'm a knitter too--I'm not laughing at all. My question is which is preferable--an imperfect tensioned coil or a perfectly uniform formed coil. Still working on it. Form and function is my middle name. Give up? Moi? Ain't gonna happen.
Cooking and knitting.
You see I got that whole tension thing right away, instinctively. I used to knit--in my previous life.
You can always tell a homemade sweater from a machine knitted one--only machines can keep yarn tension consistent throughout the entire project.
I'm a knitter too--I'm not laughing at all. My question is which is preferable--an imperfect tensioned coil or a perfectly uniform formed coil. Still working on it. Form and function is my middle name. Give up? Moi? Ain't gonna happen.
Regrettably both share the same indelicacy; irregularly insulated contact can go hot in operation. For the tech reason others and I have noted (breakdown voltage). Not venturing into the metallic downside or the vagaries of which have been so much dissected of late. It sours the vape, I'll just say. For both ill-formed winds performance may seem to go exceedingly well (vapor output) or disappointingly falter (slog and bog). But either way they're both strained and badly. So not the knit, nor texture of warmth we're looking for. Strain always is, good or bad.
The better crafted question here might be — What helps me best get the wire to a point of most uniform oxidation? The work is the work. The vape, the end and the tell of the tape.
A great many over the past decade have adapted to the technology rather than having the opportunity for it to serve them. It's an industry now catering to that perceived preference. Thank goodness for the micro. It is possible now with some wire knowledge to better achieve both density and production. Taught a lot of dexterous digits to do the dandy which for a time eluded me too. It would seem that for you and me both, it takes a bit more effort.
BTW, I sucked at knitting (but I did enjoy darning a lot).
Good luck.
p.s. Spoken as I tootie chain a paired set of SIG vMax Provari style with an 18490 batt, on KPT2's profiling a NET recipe of my own concoction usin'?…the miserly 1.8Ω t.m.c. @12W. Got scores of 'em, the old reliable. Might as well use 'em.
Last edited:
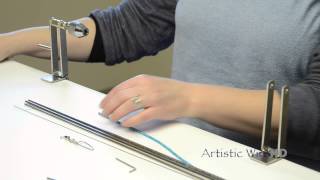
haven't had much time, I'll answer some later but I wanted to show russ how I use this, this video should be a redo but I know russ is anxious to do his video and I just wanted to show him how I clamp it so I'll throw this here for now, I'll try to do a dual p tonight, as I was starting to in this video my son came home with his girlfriend so I paused it and then winded up exiting the camera app ending the video so it's not good but it's something for now
Don't know what happened to that vid, can't do anything on my phone ill fix it later
In the mean time today i picked up the stuff needed to finish putting the whole tutorial together for the spinner, Gonna try to video the whole thing tonight.
In the mean time today i picked up the stuff needed to finish putting the whole tutorial together for the spinner, Gonna try to video the whole thing tonight.
I just video'd a tutorial to building the whole turbo winder setup, the clamp and the spinner handle. for those worried they don't have the hand to eye coordination or won't be able do this I really made it so simple that it should even be little ole lady approved I doubt anyone will say they can't do this once you see it, and trust me it's worth the effort to gather up these few inexpensive items and put one of these together, still need to splice the video together and upload it but here's a few preview shots of the spinning handle build
I can't think of anyway to do this easier, I think anyone should be able to bend a paperclip and kneed up a dab of clay like substance and cut an empty plastic bic pen shell in half, I used a drill bit because it's a great mandrel and you can do multiple sizes with this one simple method, also you can get an extra drill bit or 2 to use for coil mounting mandrels. my tutorial will explain each step but here's a series of photo's showing the steps


I doubt anyone will say they can't do this once you see it, and trust me it's worth the effort to gather up these few inexpensive items and put one of these together, still need to splice the video together and upload it but here's a few preview shots of the spinning handle buildI can't think of anyway to do this easier, I think anyone should be able to bend a paperclip and kneed up a dab of clay like substance and cut an empty plastic bic pen shell in half, I used a drill bit because it's a great mandrel and you can do multiple sizes with this one simple method, also you can get an extra drill bit or 2 to use for coil mounting mandrels. my tutorial will explain each step but here's a series of photo's showing the steps
With you so far...
Appreciate the amount of time you are putting into this Turbo. So you are just setting different mandrel sizes in the steelstick. OK, easy enough. You think that will hold over time with the tension applied?
On your own mandrel, are you using a drilled out bit stop?
Hope I can get to this pretty soon, that life stuff keeps getting in the way, but the Pin vise is doing it for right this minute...
On your own mandrel, are you using a drilled out bit stop?
Hope I can get to this pretty soon, that life stuff keeps getting in the way, but the Pin vise is doing it for right this minute...
Pin vise for the win. But hands got all crampy!
Got fed up of making parallel work neatly. This method is way better and more stable. Dunno what you call it.

Got fed up of making parallel work neatly. This method is way better and more stable. Dunno what you call it.

hey allpepper, yeah I'm using a drillbit as the mandrel and setting it in steelstick. this spinning mandrel handle setup should last a really long time, the steelstick really gets hard as steel, once it's set up I don't see it ever breaking loose or anything, should last years no problem
mac, a word for you on preconceived notions....
check out this 2006 cadillac DTS, it's a one owner virgin with 47k miles on it, I just picked it up last week for $900 and there is absolutely nothing wrong with it, runs drives and looks brand spankin new.

now you may ask why I got it for only $900 and why I'm even bringing this up here. well because the whole reason why I got this car for only $900 is simply because of a preconceived notion on the part of the caddy owners mechanic...
you see, this guys mechanic thinks he knows all about northstars, he knows that they are prone to head gasket failures and he has even mentioned to the vehicle owner several times through the years "oh, be careful these northstars are known to be nightmares when it comes to head gaskets"... so one day the caddy dude is driving along and his temp gage starts to rise... being the kind of guy he is, he right away stops everything and runs straight to his mechanic... mechanic says "ahhh, I told you man, I hope it's not the head gaskets but it probably is. I'm going to try changing the thermostat and see but it's probably the head gaskets".
the mechanic goes and puts a new thermostat in, checks the system for leaks, fills it up and starts to warm the car up to check it... as the car is warming up it starts bubbling from the overflow, spitting out fluid, every time he tries to fill it more it just starts bubbling and spitting from the overflow, after one or 2 times seeing this he says that's it, head gaskets... calls the customer and gives him the bad news... tells him it's going to cost like $6k to fix it, guy was so disgusted that he dumped the car for next to nothing and ran out and bought a new cts....
now the moral of the story is, there was actually nothing wrong with the head gaskets and not only that but the mechanic actually almost fixed the overheating by installing a new thermostat which was the original reason the gage started rising, the reason why he never even got far enough to realize this is his preconceived notion. me on the other hand I won't condemn something unless I can verify for myself without a doubt what the problem actually is... I bought it thinking yeah it might need head gaskets but then again it's def worth confirming the diagnosis before tearing into a monster job like that... well turns out the whole problem was that after changing the thermostat the northstar is a very finicky car to bleed, had he stuck with it and bleed it couple of more times he would have seen that the car was indeed fine.
a few hours work and some tinkering and a $16.99 gallon of dex cool and I gots me a mint caddy that's really worth over $10k for only $900. that mechanic really screwed this caddy owner big time and with no intention to do so.
preconceived notions suck, don't believe anything until you validate it yourself. I promise you that once you try this wrapper all of your preconceived notions will go out the window
mac, a word for you on preconceived notions....
check out this 2006 cadillac DTS, it's a one owner virgin with 47k miles on it, I just picked it up last week for $900 and there is absolutely nothing wrong with it, runs drives and looks brand spankin new.
now you may ask why I got it for only $900 and why I'm even bringing this up here. well because the whole reason why I got this car for only $900 is simply because of a preconceived notion on the part of the caddy owners mechanic...
you see, this guys mechanic thinks he knows all about northstars, he knows that they are prone to head gasket failures and he has even mentioned to the vehicle owner several times through the years "oh, be careful these northstars are known to be nightmares when it comes to head gaskets"... so one day the caddy dude is driving along and his temp gage starts to rise... being the kind of guy he is, he right away stops everything and runs straight to his mechanic... mechanic says "ahhh, I told you man, I hope it's not the head gaskets but it probably is. I'm going to try changing the thermostat and see but it's probably the head gaskets".
the mechanic goes and puts a new thermostat in, checks the system for leaks, fills it up and starts to warm the car up to check it... as the car is warming up it starts bubbling from the overflow, spitting out fluid, every time he tries to fill it more it just starts bubbling and spitting from the overflow, after one or 2 times seeing this he says that's it, head gaskets... calls the customer and gives him the bad news... tells him it's going to cost like $6k to fix it, guy was so disgusted that he dumped the car for next to nothing and ran out and bought a new cts....
now the moral of the story is, there was actually nothing wrong with the head gaskets and not only that but the mechanic actually almost fixed the overheating by installing a new thermostat which was the original reason the gage started rising, the reason why he never even got far enough to realize this is his preconceived notion. me on the other hand I won't condemn something unless I can verify for myself without a doubt what the problem actually is... I bought it thinking yeah it might need head gaskets but then again it's def worth confirming the diagnosis before tearing into a monster job like that... well turns out the whole problem was that after changing the thermostat the northstar is a very finicky car to bleed, had he stuck with it and bleed it couple of more times he would have seen that the car was indeed fine.
a few hours work and some tinkering and a $16.99 gallon of dex cool and I gots me a mint caddy that's really worth over $10k for only $900. that mechanic really screwed this caddy owner big time and with no intention to do so.
preconceived notions suck, don't believe anything until you validate it yourself. I promise you that once you try this wrapper all of your preconceived notions will go out the window
- Status
- Not open for further replies.
Similar threads
- Replies
- 0
- Views
- 733
- Replies
- 9
- Views
- 1K
- Replies
- 102
- Views
- 10K
- Locked
- Replies
- 33
- Views
- 13K
Users who are viewing this thread
Total: 2 (members: 0, guests: 2)