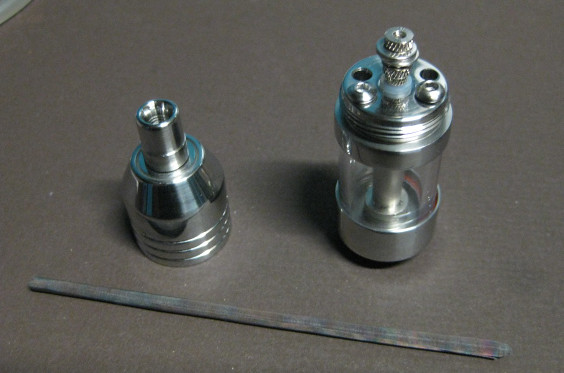
I recently got an AGA-T R/A and thought I'd give my thoughts about it. I'm not usually a first adopter, but for some reason this device really caught my eye. I'm glad now that I did get one soon as it was available at SVC.
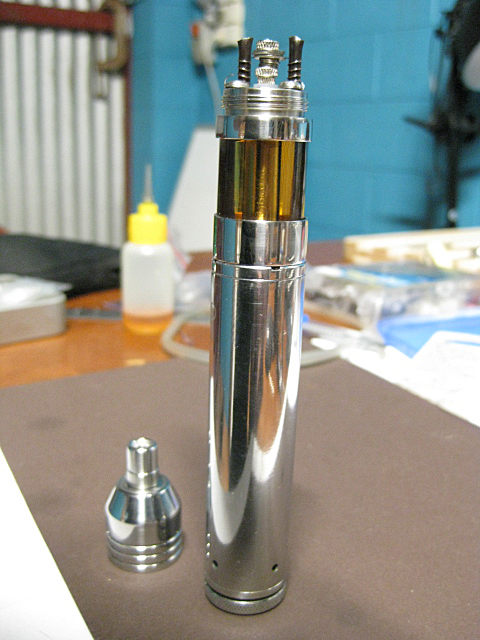
This is definitely the best made Chinese device I've owned. It is all Stainless and the fit and finish is great. I also liked the fact they included some extra parts just in case of damage or loss. I do have to be careful putting the top on so I'm glad I have an extra O-ring in case I damage the one already on the device, but putting a little juice or VG on the O-ring really makes things much easier.
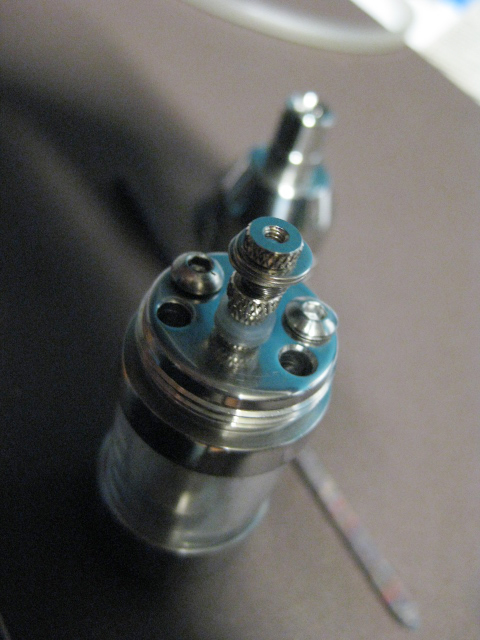
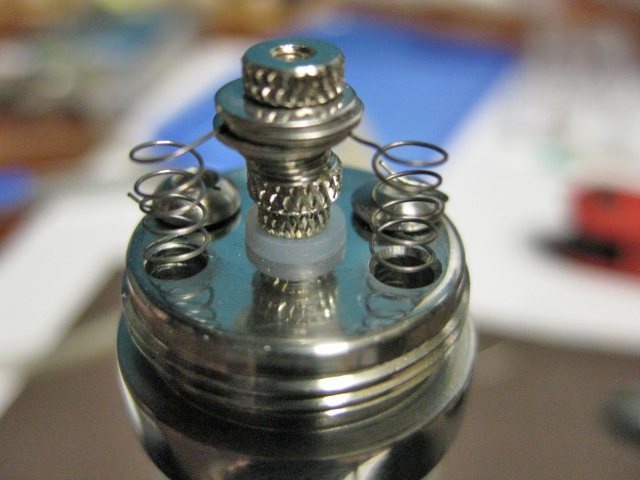
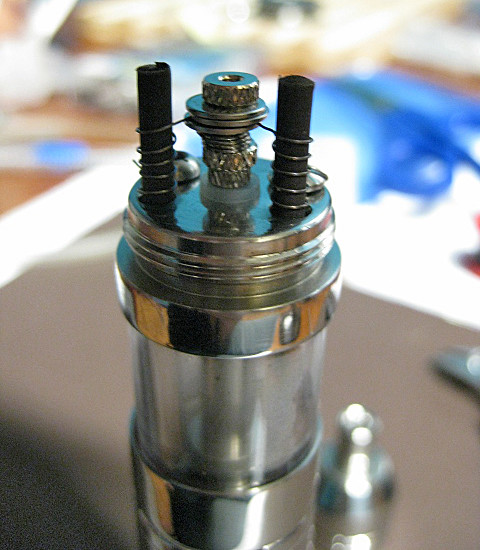
When I first got the device I had to take it completely apart just to see what was there. I was pleasantly surprised with how well everything fit. I put it back together and then debated whether to use the included wick or go right for the stainless mesh wick set up. I decided to go with SS wick and 32 AWG Kanthal resistance wire. At first I was concerned about the distance to the negative post, but then realized that I could use either of the two Phillips head screws for the neg end of the coil. I used the screw closest to the wick hole and am using the other one for filling. There is a slight bend in the wick where I attached it to the pos post. I made a wick roughly 43mm wide by 90mm long. It fits snug, but I did not have to fight to get it in the wick hole. The wick is a little "squishy" and has a small center hole. I do not use the drill bit method to make my coils preferring to directly wrap them right onto the oxidized wick. With this device, there is plenty of room to easily wrap the coil onto the wick. I made a 4/5 coil and it came out to roughly 1.3 ohms. Perfect for me and my Nimbus. Had to fiddle a little with the coil to get rid of two hot spots near the top, but I don't consider two hot spots a problem considering what I've had to deal with in the past. Once I was happy with the coil and wick setup, I put a little VG on the coil and set the Nimbus to 3.2 volts and fired up. Everything worked fine. Did that a couple of times and them removed the other screw and filled the tank. The hole is large enough to use an 18 gauge blunt needle -- nice.
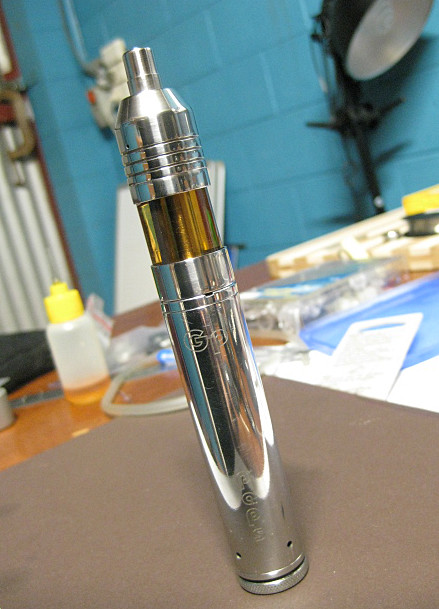
Wow..... right out of the chute it vaped like a charm. The vapor production is great and it heats up quickly. I tend to chain vape and the wick has no trouble keeping up. I also really like being able to see how much juice is in the tank so I know when to refill. It also makes lining up the air hole and wick very simple. I'm vaping at 3.4 - 3.7 volts and it is a nice and cool vape. I may in the future increase the size of the air hole in the top piece, but for now, it's working fine. I'm able to lay the PV on its' side with nary a leak.
Overall, this is the best R/A I have used to date. It is a touch on the heavy side, but I have not found it to be a problem at all. I am careful when picking up the PV and R/A. I usually pick it up by the knurled bottom piece to reduce any strain on the 510 connection on the Nimbus.
I would highly recommend this device to anyone considering a R/A. I especially would recommend it to someone who is somewhat new to R/A's because of the amount of room you have to work with on the head and the number of options you have to install the wick and coil. If you are worried about the size of the larger screw heads, you can always take a Dremel and slightly reduce the diameter of the screw heads. I can envision making a double or "U" wick set up and may give that a go when it's time to change the coil. But, as clean as the coil and wick are staying, that may be a while in the future.
Definitely give this device a good hard look -- it is worth every penny.
This is definitely the best made Chinese device I've owned. It is all Stainless and the fit and finish is great. I also liked the fact they included some extra parts just in case of damage or loss. I do have to be careful putting the top on so I'm glad I have an extra O-ring in case I damage the one already on the device, but putting a little juice or VG on the O-ring really makes things much easier.
When I first got the device I had to take it completely apart just to see what was there. I was pleasantly surprised with how well everything fit. I put it back together and then debated whether to use the included wick or go right for the stainless mesh wick set up. I decided to go with SS wick and 32 AWG Kanthal resistance wire. At first I was concerned about the distance to the negative post, but then realized that I could use either of the two Phillips head screws for the neg end of the coil. I used the screw closest to the wick hole and am using the other one for filling. There is a slight bend in the wick where I attached it to the pos post. I made a wick roughly 43mm wide by 90mm long. It fits snug, but I did not have to fight to get it in the wick hole. The wick is a little "squishy" and has a small center hole. I do not use the drill bit method to make my coils preferring to directly wrap them right onto the oxidized wick. With this device, there is plenty of room to easily wrap the coil onto the wick. I made a 4/5 coil and it came out to roughly 1.3 ohms. Perfect for me and my Nimbus. Had to fiddle a little with the coil to get rid of two hot spots near the top, but I don't consider two hot spots a problem considering what I've had to deal with in the past. Once I was happy with the coil and wick setup, I put a little VG on the coil and set the Nimbus to 3.2 volts and fired up. Everything worked fine. Did that a couple of times and them removed the other screw and filled the tank. The hole is large enough to use an 18 gauge blunt needle -- nice.
Wow..... right out of the chute it vaped like a charm. The vapor production is great and it heats up quickly. I tend to chain vape and the wick has no trouble keeping up. I also really like being able to see how much juice is in the tank so I know when to refill. It also makes lining up the air hole and wick very simple. I'm vaping at 3.4 - 3.7 volts and it is a nice and cool vape. I may in the future increase the size of the air hole in the top piece, but for now, it's working fine. I'm able to lay the PV on its' side with nary a leak.
Overall, this is the best R/A I have used to date. It is a touch on the heavy side, but I have not found it to be a problem at all. I am careful when picking up the PV and R/A. I usually pick it up by the knurled bottom piece to reduce any strain on the 510 connection on the Nimbus.
I would highly recommend this device to anyone considering a R/A. I especially would recommend it to someone who is somewhat new to R/A's because of the amount of room you have to work with on the head and the number of options you have to install the wick and coil. If you are worried about the size of the larger screw heads, you can always take a Dremel and slightly reduce the diameter of the screw heads. I can envision making a double or "U" wick set up and may give that a go when it's time to change the coil. But, as clean as the coil and wick are staying, that may be a while in the future.
Definitely give this device a good hard look -- it is worth every penny.
Last edited:
")