Rebuild to the new Vivi Nova,
needed,
vivi nova
32g kanthal a1
32 gauge nr wire
ody wick
kit

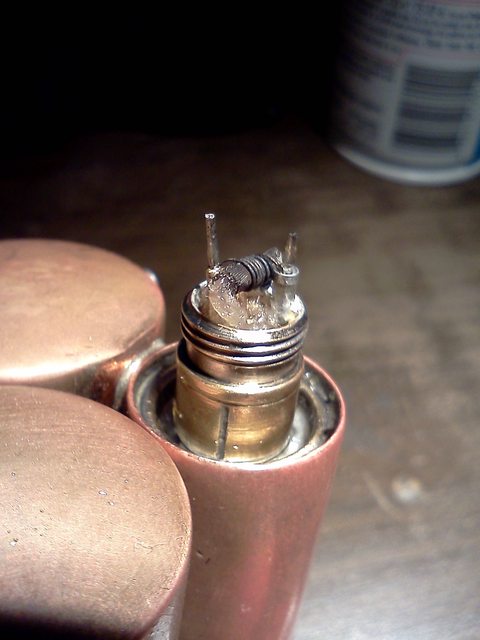
huge center pin stickout

pulled apart

bottom of coil head

you can see where the wires are grabbed on

didnt get a pic of this but to take coil out, you pull the center pin out just grab it with finger nail or tweezers and then pull rubber gasket out also remove silicone top gasket, there is a metal shim in there, dont lose it


this baffled me, no non resistant wire on the tails, this is a problem because the tails will glow since they are wrapped around nothing, burn and melt gasket and you will inhale melted rubber

cut two pieces of ody wick to the length of the stock wick

cut resistance and no resistance wire, i guess on this but if you have a multimeter you can check where you want you resistance

twist nr wire onto r wire


once twisted, twist the remainder of the nr wire onto the part you twisted first

cut excess off and get your two wick together and wrap around it leaving the two "twist knots" of wire at the ends, you wont need a paper clip this wick holds straight pretty good.

positiong wick in coil head and run wires out the bottom and wedge wick in there until it bottoms out on the wick channels


bend neg wire down and keep other in center. it is crucial your positive isnt touching the walls of the chamber, it will short out

slide positive throug gasket and push gasket into place making sure negative is getting smashed by it.

push center pin in to hold positive wire

trim excess wire

screw it onto vivi base and check resistance and for shorts


prime your wick and slide silicone sleeve with metal bushing in there (the one mentioned earlier)

fill

mount
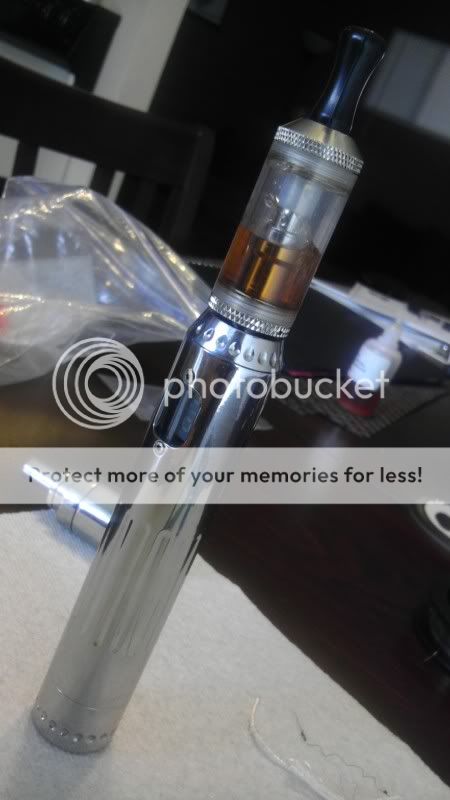
vape

in terms of vapor production, this one destroys the phoenix, in terms of wicking this one is lacking, anything close to 5 volts at 2.5 ohm will give you dry hits, 4.5 volt you will get 5-6 good hits then dry burns, 4 volts dry burns occasionally. overall i like it but i need to solve my dry burn problem. hope it helps, any questions feel free to ask
needed,
vivi nova
32g kanthal a1
32 gauge nr wire
ody wick
kit
huge center pin stickout
pulled apart
bottom of coil head
you can see where the wires are grabbed on
didnt get a pic of this but to take coil out, you pull the center pin out just grab it with finger nail or tweezers and then pull rubber gasket out also remove silicone top gasket, there is a metal shim in there, dont lose it
this baffled me, no non resistant wire on the tails, this is a problem because the tails will glow since they are wrapped around nothing, burn and melt gasket and you will inhale melted rubber
cut two pieces of ody wick to the length of the stock wick
cut resistance and no resistance wire, i guess on this but if you have a multimeter you can check where you want you resistance
twist nr wire onto r wire
once twisted, twist the remainder of the nr wire onto the part you twisted first
cut excess off and get your two wick together and wrap around it leaving the two "twist knots" of wire at the ends, you wont need a paper clip this wick holds straight pretty good.
positiong wick in coil head and run wires out the bottom and wedge wick in there until it bottoms out on the wick channels
bend neg wire down and keep other in center. it is crucial your positive isnt touching the walls of the chamber, it will short out
slide positive throug gasket and push gasket into place making sure negative is getting smashed by it.
push center pin in to hold positive wire
trim excess wire
screw it onto vivi base and check resistance and for shorts
prime your wick and slide silicone sleeve with metal bushing in there (the one mentioned earlier)
fill
mount
vape
in terms of vapor production, this one destroys the phoenix, in terms of wicking this one is lacking, anything close to 5 volts at 2.5 ohm will give you dry hits, 4.5 volt you will get 5-6 good hits then dry burns, 4 volts dry burns occasionally. overall i like it but i need to solve my dry burn problem. hope it helps, any questions feel free to ask