
OK folks, time for some results of my first round of new testing. I've been testing new techniques for applying patina. So far I've limited myself to only different chemicals (next step will be trying out different methods of applying those chemicals that I liked the results of)
*** WARNING ***
First off, I'd like to warn everyone that chemicals are dangerous. Many of the chemicals found here you will find either in your garage, under your sink, in your laundry and at your hardware store. THIS DOES NOT MEAN THAT THEY ARE SAFE. Chemicals come with warning labels on the bottles whose instructions you should read explicitly and follow any and all safety directions contained therein including but not limited to adequate ventilation, safety glasses and respiration devices. Some of the chemicals used in the following review were mixed in ways that YOU SHOULD NOT ATTEMPT even if you fully understand what will happen, have researched any safety precautions and understand the consequences of your actions. I nor ECF hold any responsibility for anything you may do to either yourself, others or property in attempting to recreate the results shown here
Now that I got that out of the way, basically use your common sense, do as much research as you can and stay safe. On with the show
In this round of testing I went through the following compounds: Hydrochloric Acid, Bleach, Ammonia, Paint Stripper, Vinegar, Napthalene, Camphor and a couple of combinations of those. Some of them did nothing (Camphor and Napthalene for instance) some took a very long time to show any kind of change (Paint Stripper for instance) and some were very interesting (Hydrochloric acid and Bleach)
I do plan on making a video once I get my Zachary Method down to where I want it but for the minute, here are the results of this round of testing.
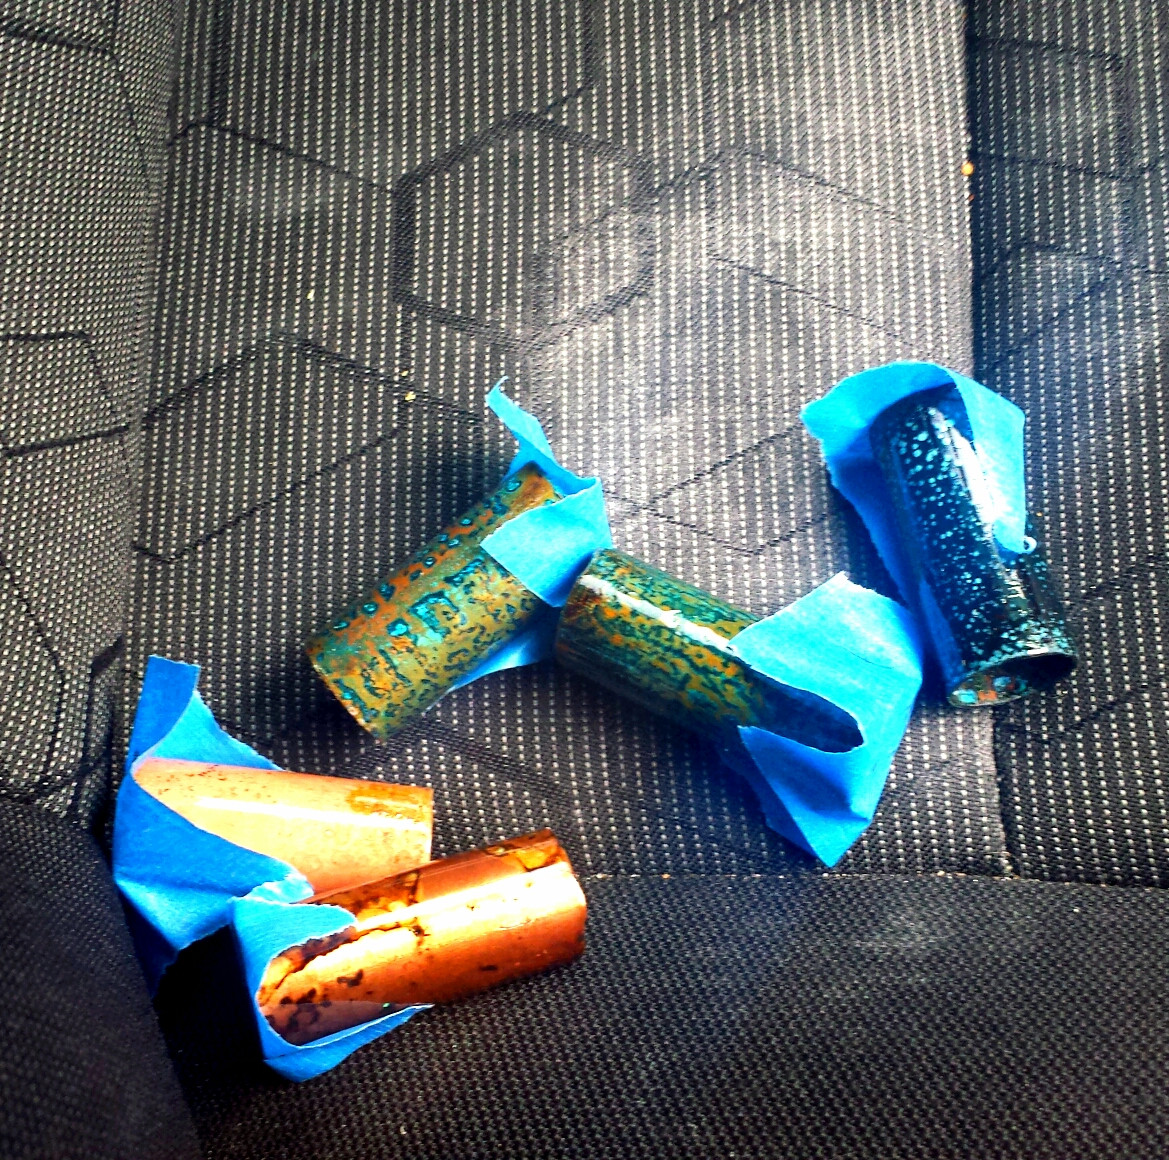
Not wanting to waste my good polyurethane or good copper mods, these were all made from approx 1.75" (4cm) lengths cut from a pipe of 0.75" (approx 19mm) diameter copper tubing from the hardware store and clear coated once finished with some cheap clear gloss enamel paint I bought specifically for testing purposes. They were first sanded with a 100 grit sanding block until all imperfections were ameliorated and any surface coatings had been removed. That's when the fun began.
Placed into individual small fuming chambers, the bases of which had already been filled to approx 0.25" (5-7mm) of the corresponding chemical and strung up with some kanthal wire. They were shaken to coat the entire copper tube with the substances and left for a couple of hours, at which time they were shaken again. They were then left overnight. The actual times of each one varied a little as well as what was done after their initial fume but I'll outline that as I go along.
First up, a group shot of them all finished
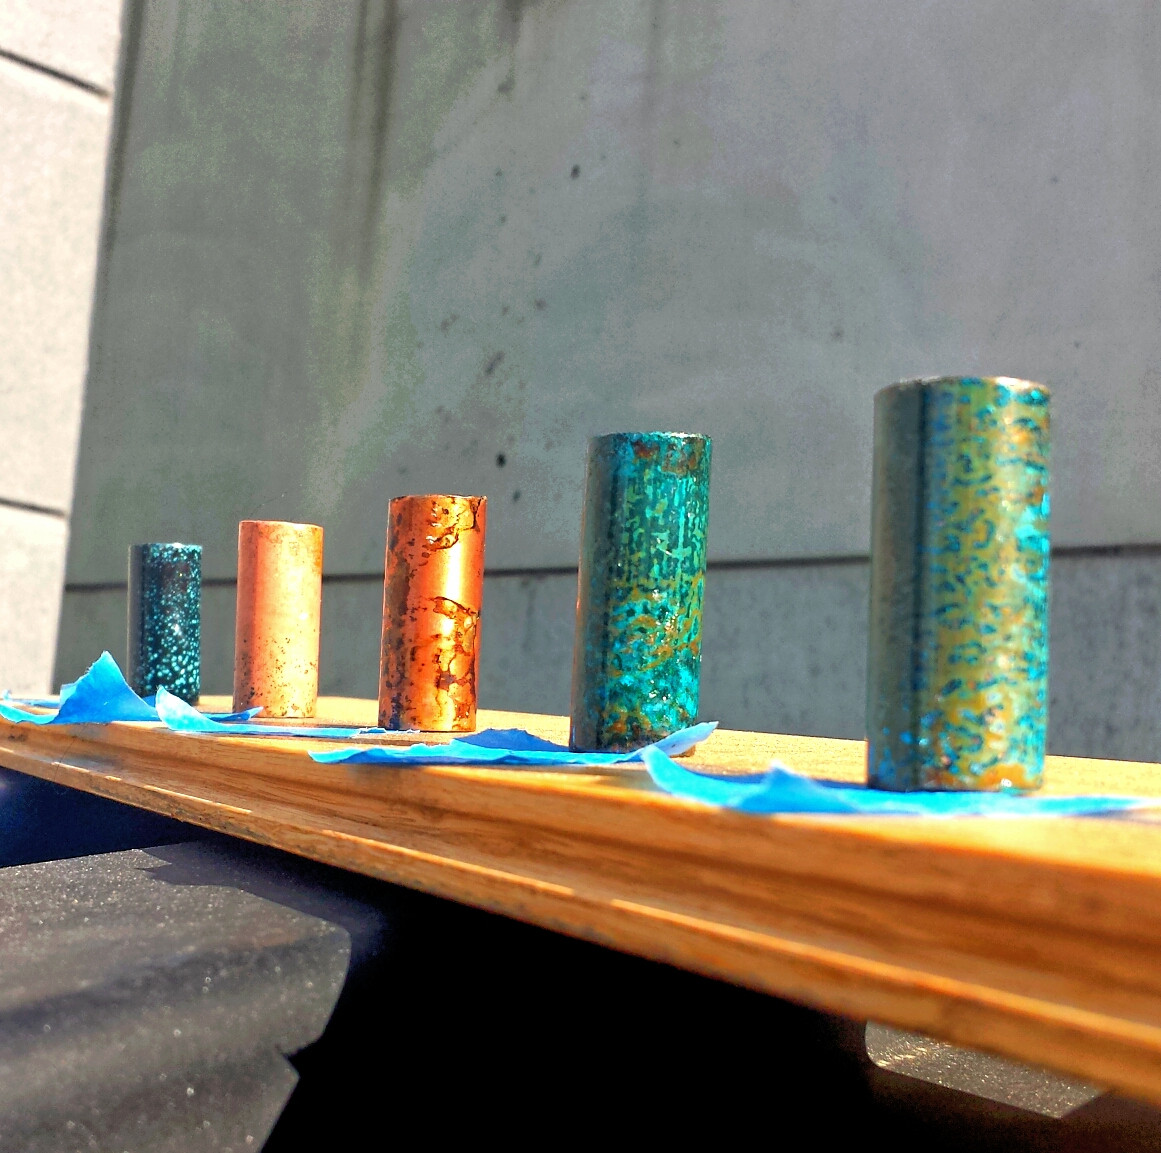
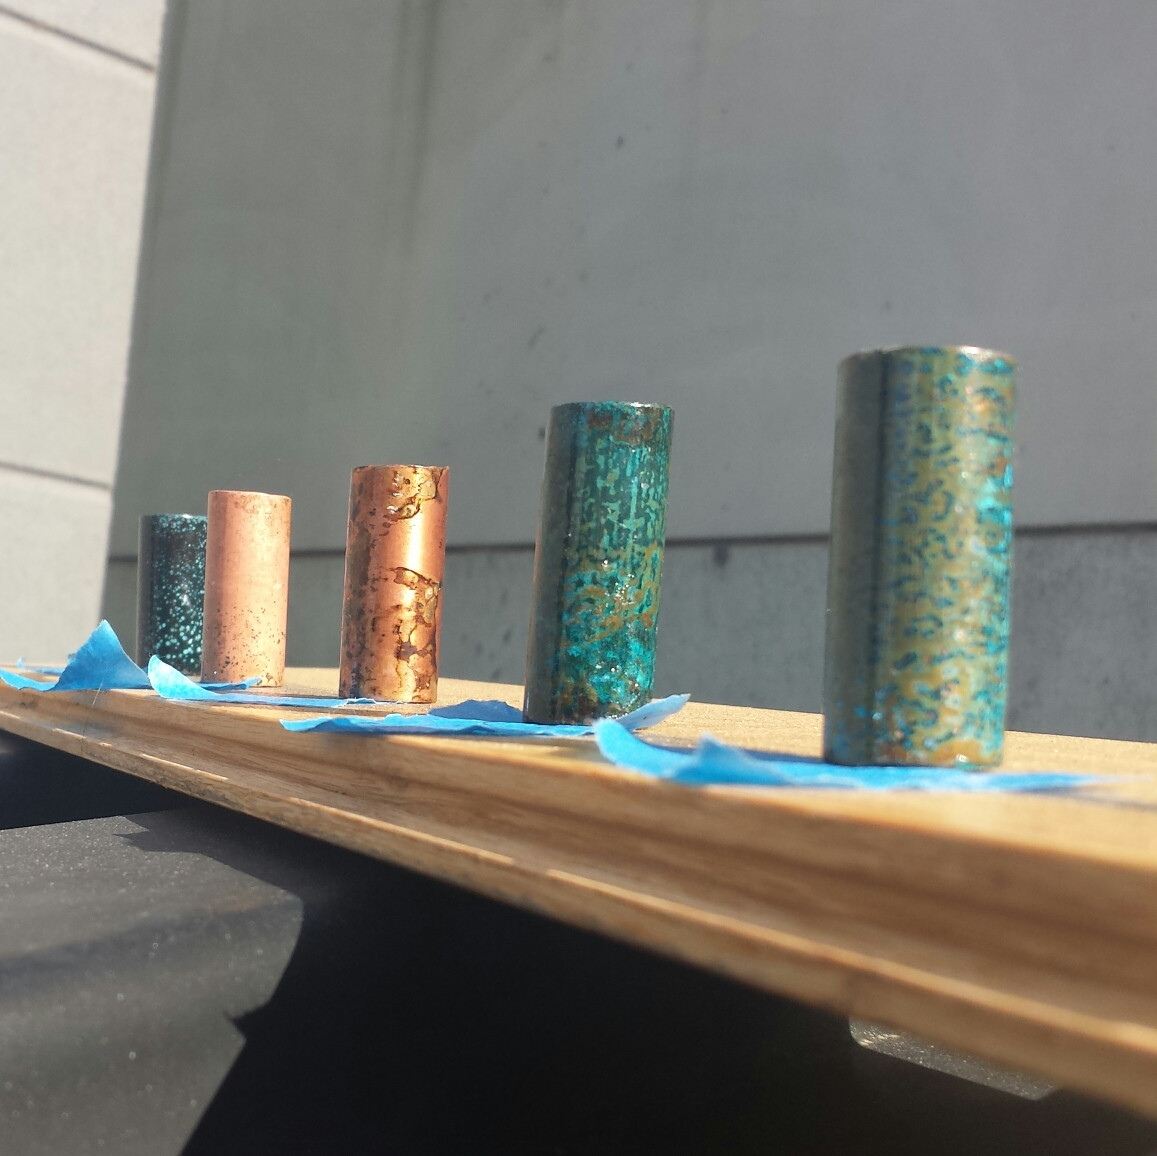
From left to right we have
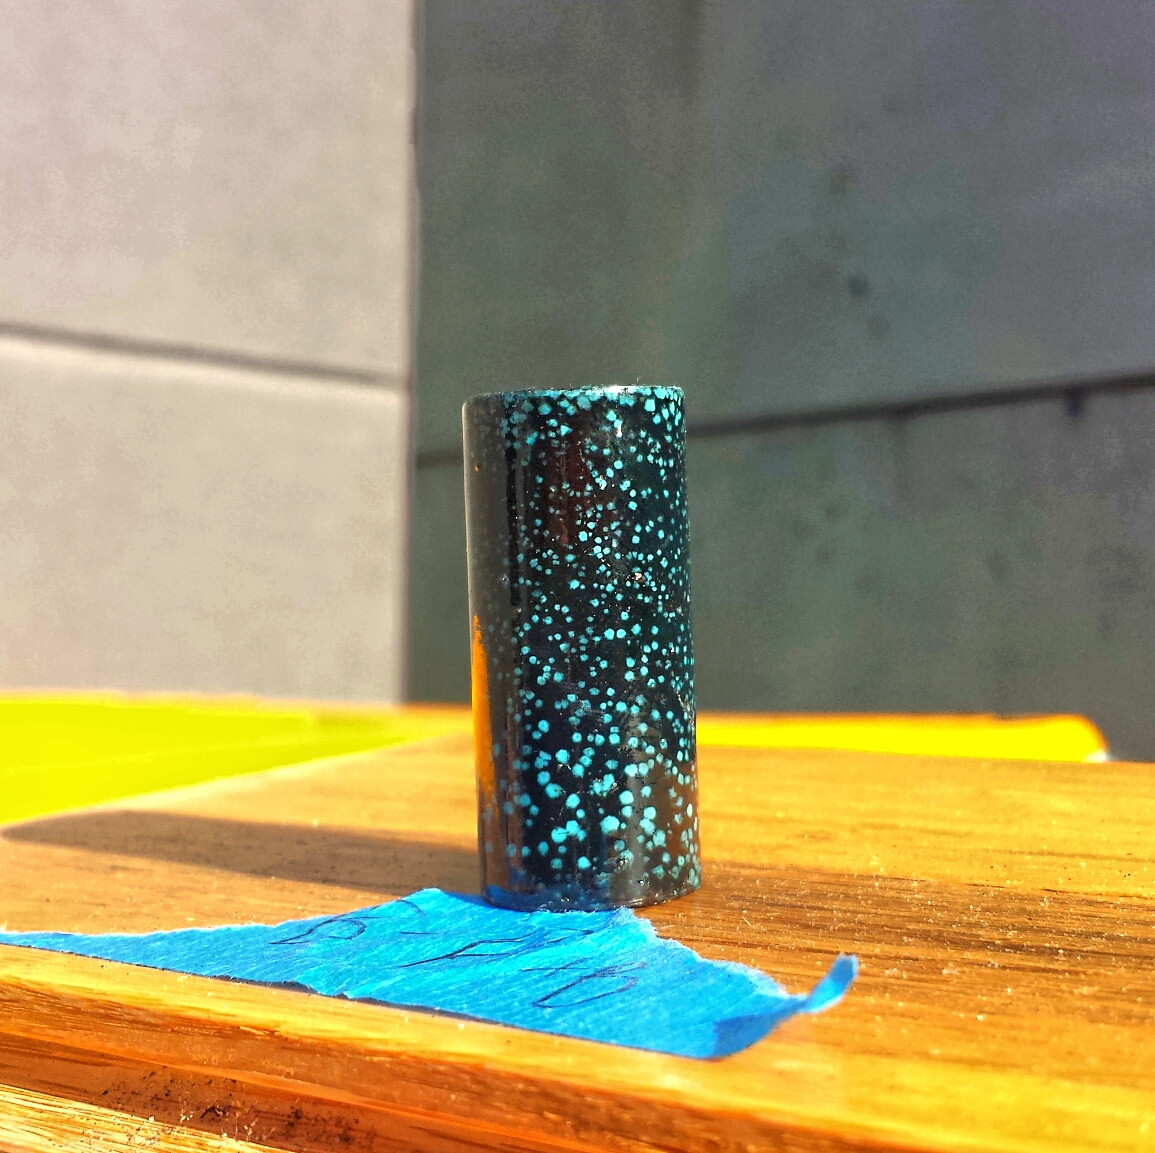
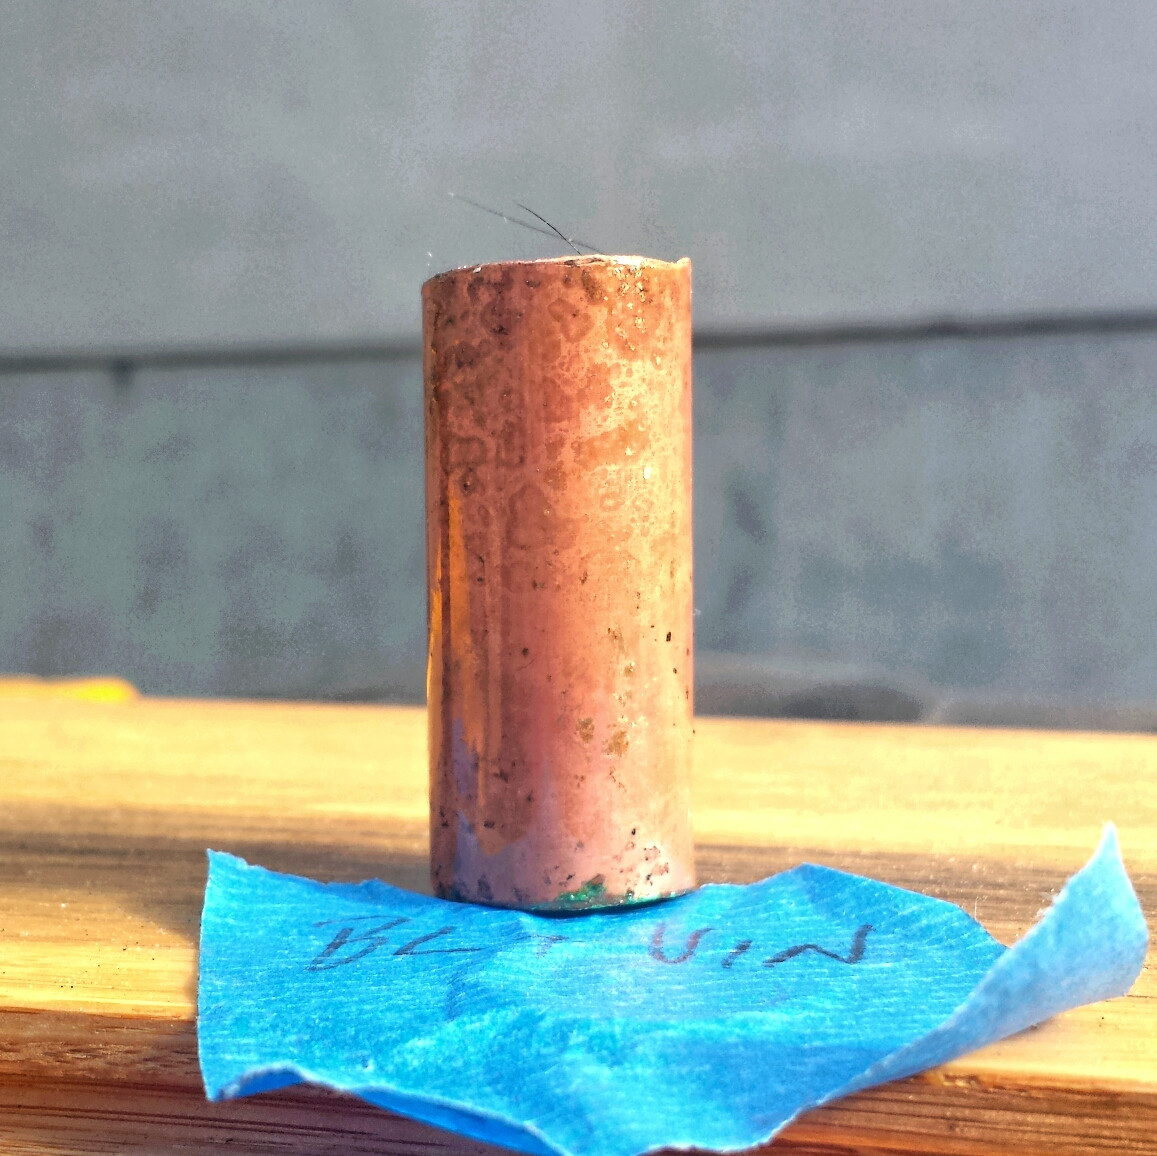
1. Here we have bleach for 24 hours after which time I added an equal amount of ammonia super saturated with iodized table salt as what bleach was in there which was shaken to foam up the bleach and left for 24 hours again with the occasional shake whenever I felt like it between work and sleep
2. ***WARNING*** This one is dangerous and should under no circumstances be attempted by anyone, the gases that come off the combination of chemicals can and will potentially KILL you, your loved ones and pets. You have been warned
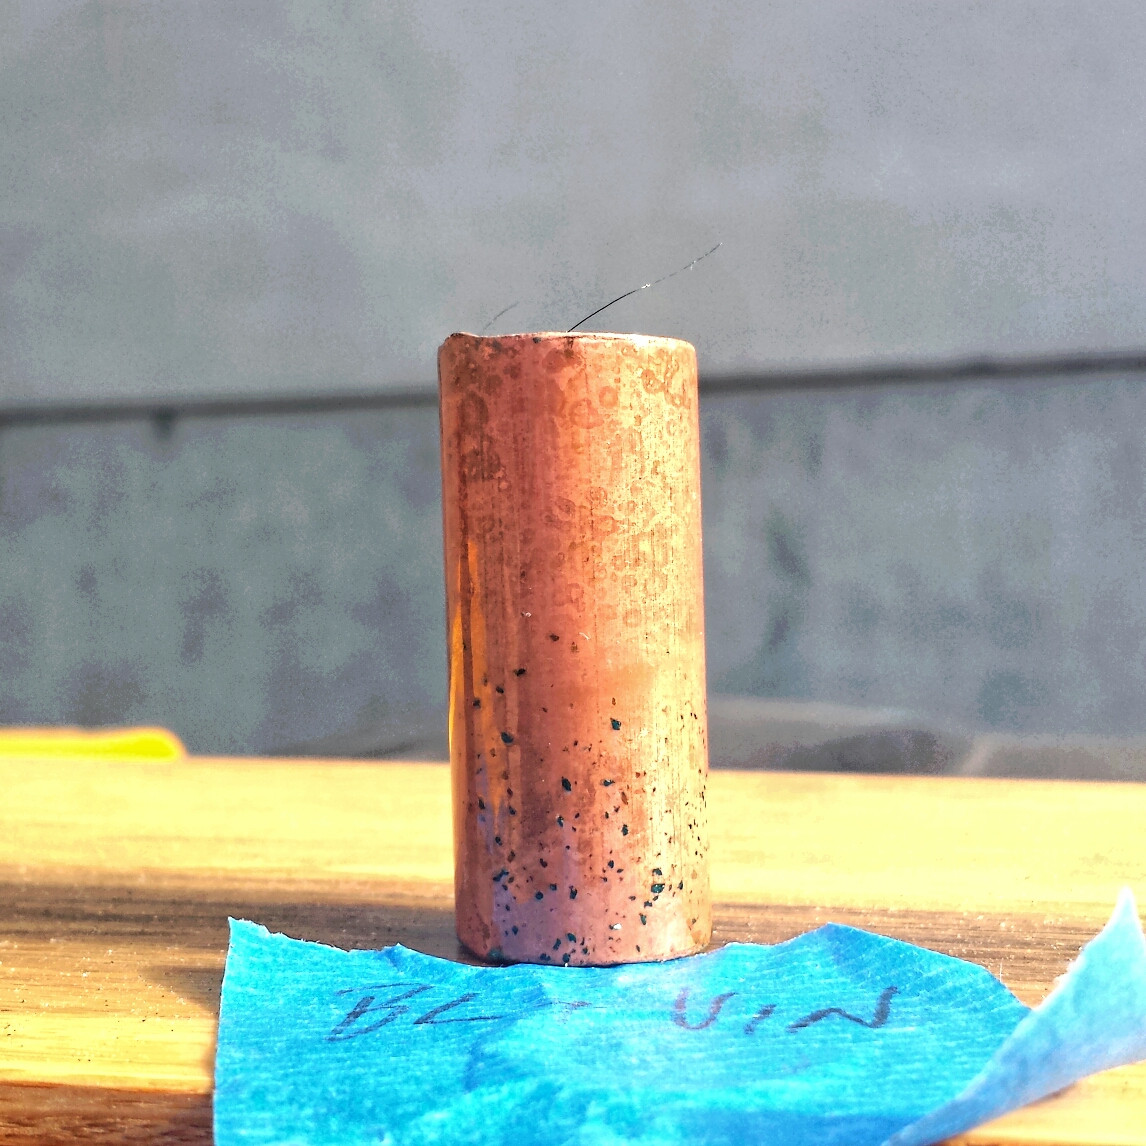
Here we have a mixture of DILUTED vinegar (approx 20% vinegar to 80% water) which was added to bleach in a 1:1 ratio (so the solution contained 10% vinegar, 50% bleach and 40% water) which the chemists among you will know releases Chlorine gas. I literally dunked this piece of copper into the solution, shook it about a bit and left it for approx 12 hours after which time it was carefully removed and left to dry in the air.
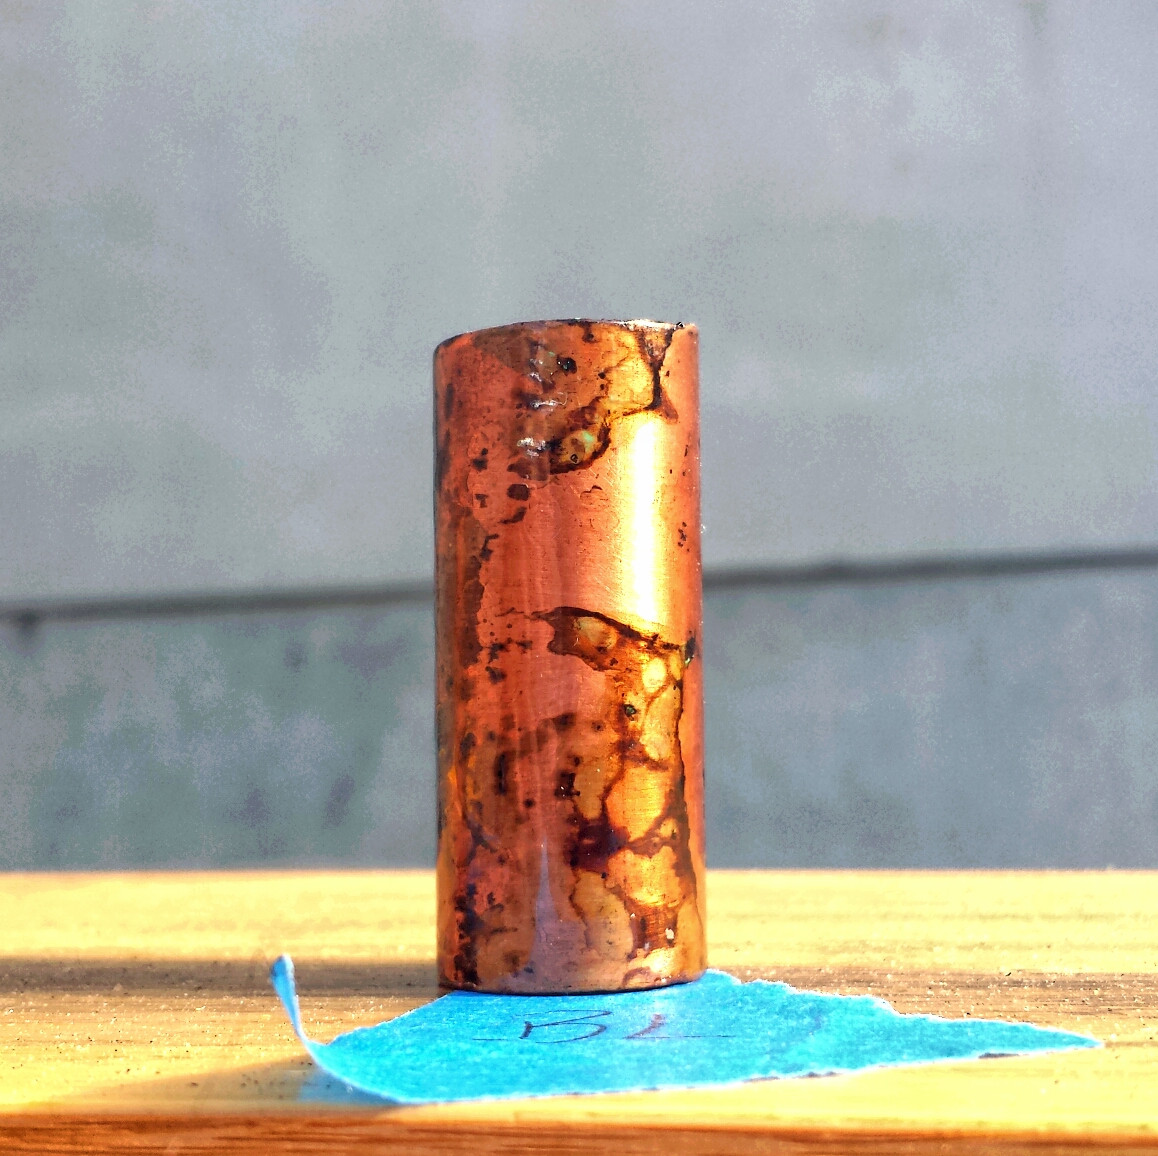
3. Here we have bleach for approximately 48-60 hours. Nothing but bleach. basically it was strung up, the same 0.75" puddle of bleach in the bottom and just shaken every couple of hourse to froth the bleach up again and coat the copper (and fill the container with foam) I personally really like how this one turned out, I might try another leaving it for a couple more days to see if the marbling expands or does something else

4. ***WARNING*** This is another potentially dangerous one. The gas released from the first part of this chemical reaction is potentially explosive. Again, you have been warned
Here we have Copper which was fumed and splashed with Hydrochloric acid for 24 hours which released a good amount of Hydrogen gas. It was then removed, washed thoroughly to remove all of the acid and then put into an ammonia fuming chamber You will notice when compared to the ammonia 'control' test (5) that the background color (the color that isn't blue) is much darker and that certain sections were corroded by the HCl leading to dark, almost navy blue patches in between the striping
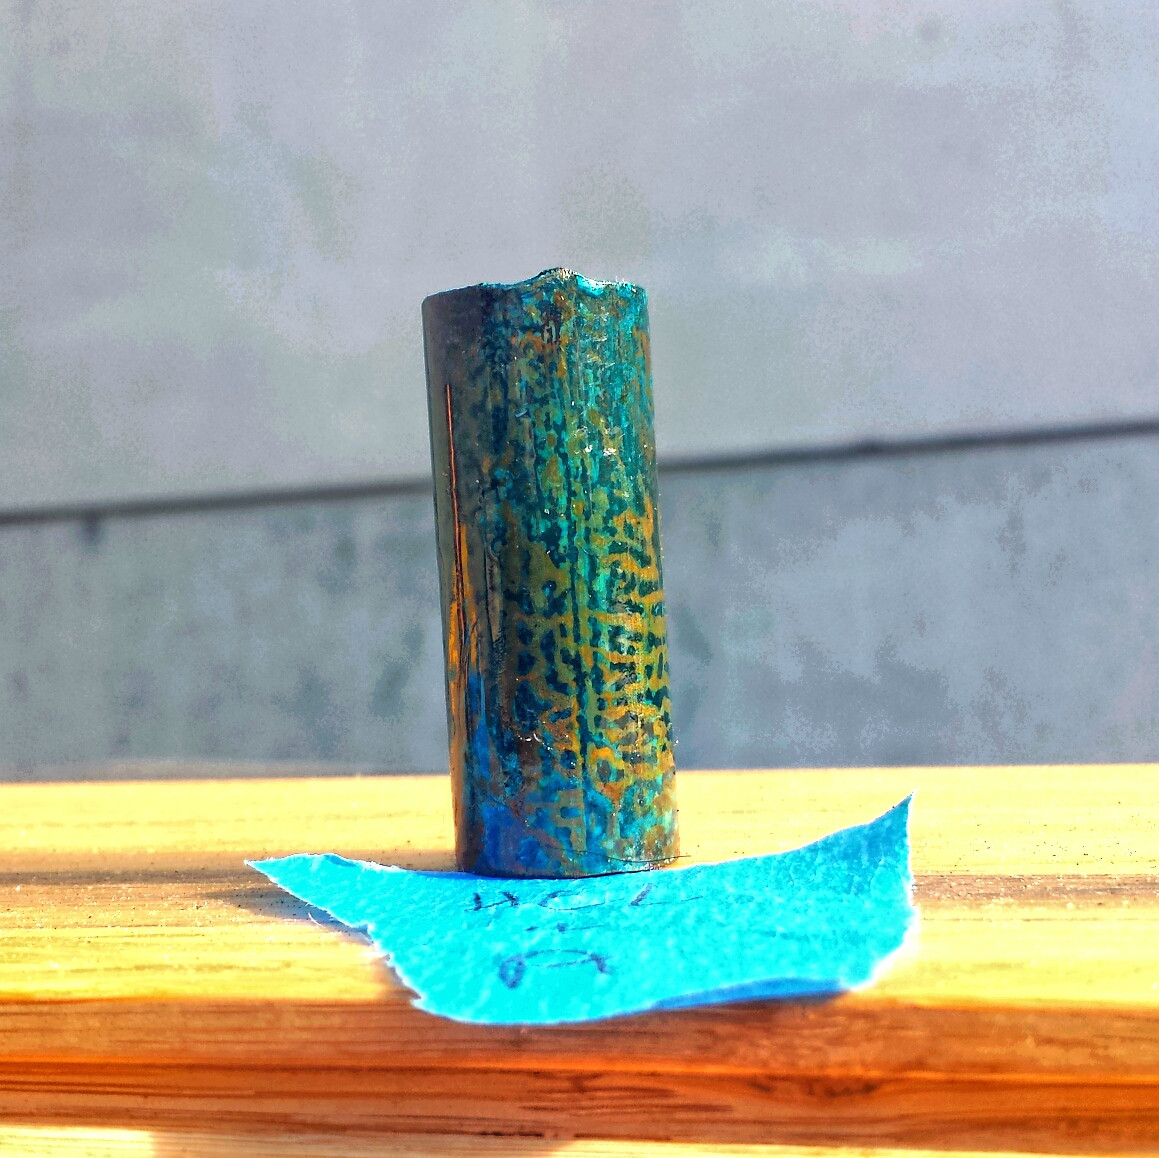
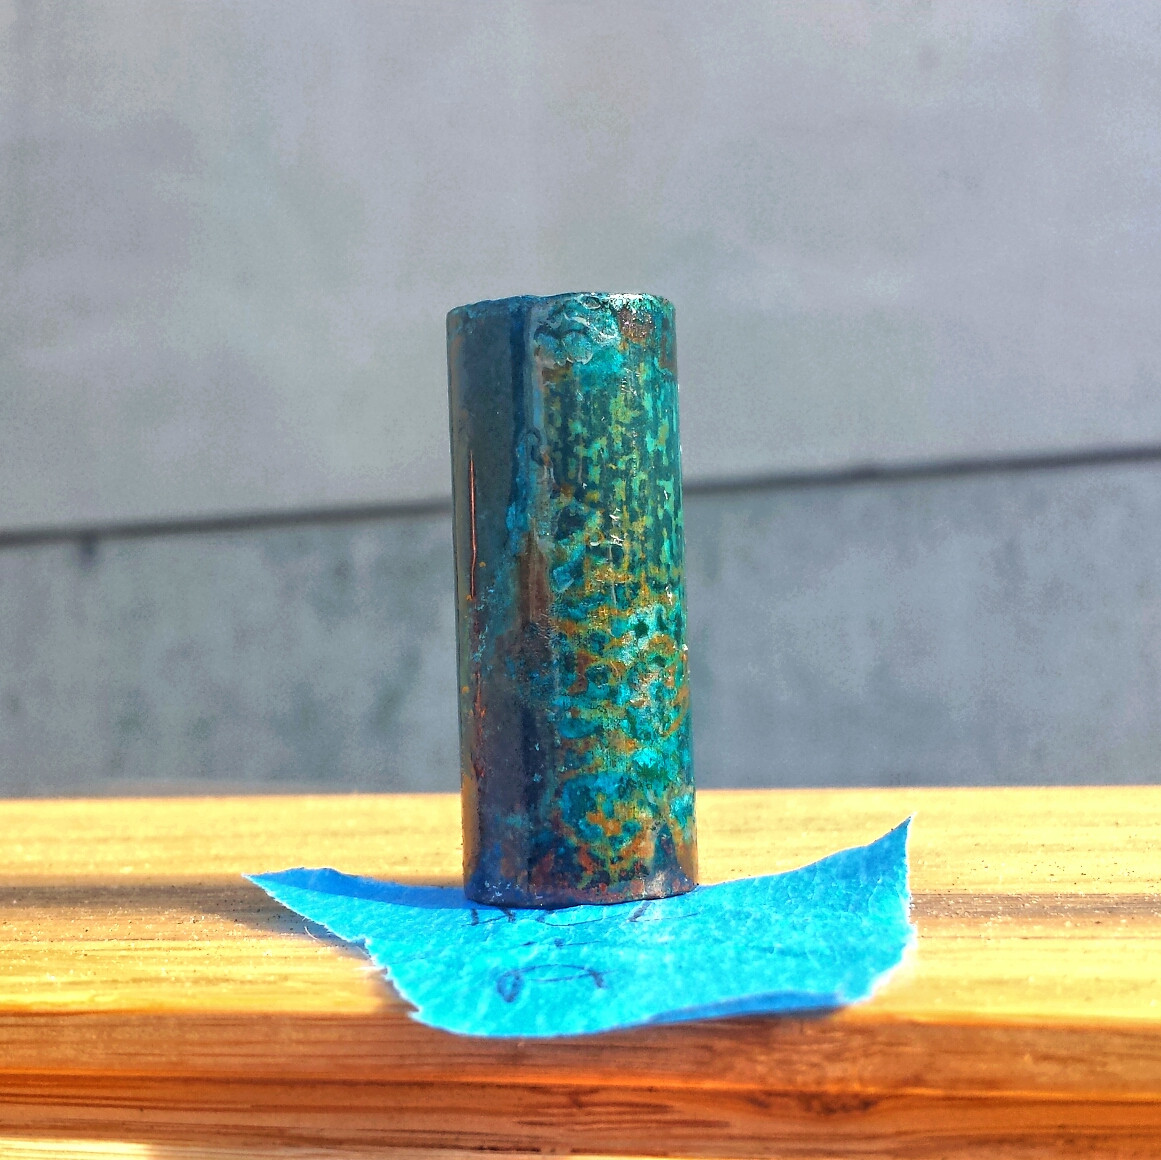
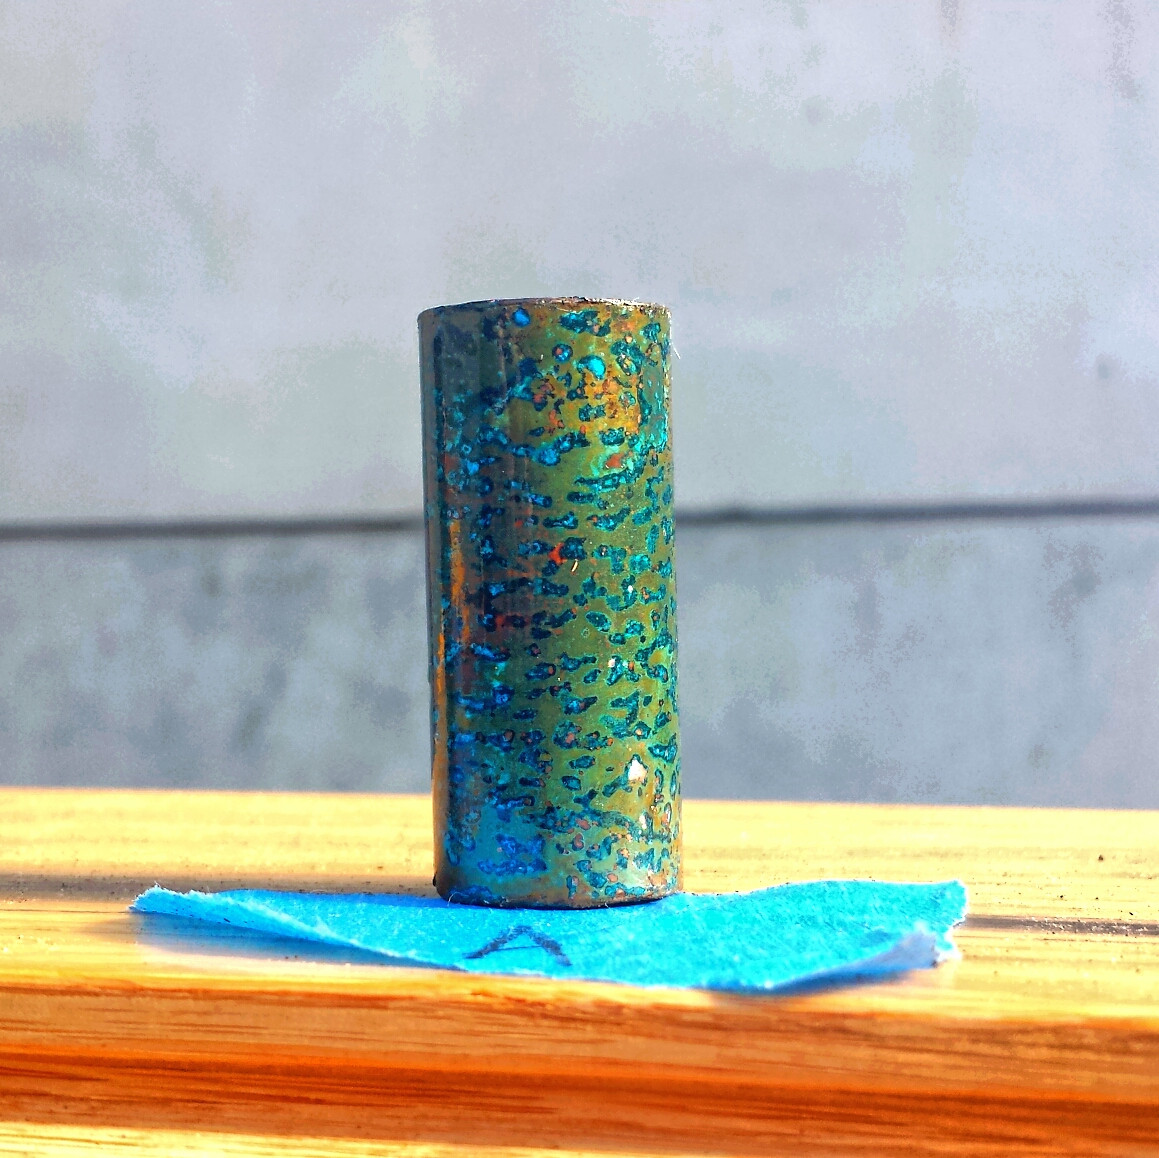
5. Finally, a good old fashioned Control group. This was basically just an ammonia fume but under the same conditions as the other 4 chambers. A 0.75" bath of super saturated ammonia with iodized sea salt and a shake at every occasion that the other tests were shaken to coat the copper. Slightly lighter in color than test subject 4 and due to only being 24 hours, didn't get a huge amount of blue develop but it does show the difference between the 4 conditions very clearly (the point of being a control group)
*** WARNING ***
First off, I'd like to warn everyone that chemicals are dangerous. Many of the chemicals found here you will find either in your garage, under your sink, in your laundry and at your hardware store. THIS DOES NOT MEAN THAT THEY ARE SAFE. Chemicals come with warning labels on the bottles whose instructions you should read explicitly and follow any and all safety directions contained therein including but not limited to adequate ventilation, safety glasses and respiration devices. Some of the chemicals used in the following review were mixed in ways that YOU SHOULD NOT ATTEMPT even if you fully understand what will happen, have researched any safety precautions and understand the consequences of your actions. I nor ECF hold any responsibility for anything you may do to either yourself, others or property in attempting to recreate the results shown here
Now that I got that out of the way, basically use your common sense, do as much research as you can and stay safe. On with the show
In this round of testing I went through the following compounds: Hydrochloric Acid, Bleach, Ammonia, Paint Stripper, Vinegar, Napthalene, Camphor and a couple of combinations of those. Some of them did nothing (Camphor and Napthalene for instance) some took a very long time to show any kind of change (Paint Stripper for instance) and some were very interesting (Hydrochloric acid and Bleach)
I do plan on making a video once I get my Zachary Method down to where I want it but for the minute, here are the results of this round of testing.
Not wanting to waste my good polyurethane or good copper mods, these were all made from approx 1.75" (4cm) lengths cut from a pipe of 0.75" (approx 19mm) diameter copper tubing from the hardware store and clear coated once finished with some cheap clear gloss enamel paint I bought specifically for testing purposes. They were first sanded with a 100 grit sanding block until all imperfections were ameliorated and any surface coatings had been removed. That's when the fun began.
Placed into individual small fuming chambers, the bases of which had already been filled to approx 0.25" (5-7mm) of the corresponding chemical and strung up with some kanthal wire. They were shaken to coat the entire copper tube with the substances and left for a couple of hours, at which time they were shaken again. They were then left overnight. The actual times of each one varied a little as well as what was done after their initial fume but I'll outline that as I go along.
First up, a group shot of them all finished
From left to right we have
1. Here we have bleach for 24 hours after which time I added an equal amount of ammonia super saturated with iodized table salt as what bleach was in there which was shaken to foam up the bleach and left for 24 hours again with the occasional shake whenever I felt like it between work and sleep
2. ***WARNING*** This one is dangerous and should under no circumstances be attempted by anyone, the gases that come off the combination of chemicals can and will potentially KILL you, your loved ones and pets. You have been warned
Here we have a mixture of DILUTED vinegar (approx 20% vinegar to 80% water) which was added to bleach in a 1:1 ratio (so the solution contained 10% vinegar, 50% bleach and 40% water) which the chemists among you will know releases Chlorine gas. I literally dunked this piece of copper into the solution, shook it about a bit and left it for approx 12 hours after which time it was carefully removed and left to dry in the air.
3. Here we have bleach for approximately 48-60 hours. Nothing but bleach. basically it was strung up, the same 0.75" puddle of bleach in the bottom and just shaken every couple of hourse to froth the bleach up again and coat the copper (and fill the container with foam) I personally really like how this one turned out, I might try another leaving it for a couple more days to see if the marbling expands or does something else
4. ***WARNING*** This is another potentially dangerous one. The gas released from the first part of this chemical reaction is potentially explosive. Again, you have been warned
Here we have Copper which was fumed and splashed with Hydrochloric acid for 24 hours which released a good amount of Hydrogen gas. It was then removed, washed thoroughly to remove all of the acid and then put into an ammonia fuming chamber You will notice when compared to the ammonia 'control' test (5) that the background color (the color that isn't blue) is much darker and that certain sections were corroded by the HCl leading to dark, almost navy blue patches in between the striping
5. Finally, a good old fashioned Control group. This was basically just an ammonia fume but under the same conditions as the other 4 chambers. A 0.75" bath of super saturated ammonia with iodized sea salt and a shake at every occasion that the other tests were shaken to coat the copper. Slightly lighter in color than test subject 4 and due to only being 24 hours, didn't get a huge amount of blue develop but it does show the difference between the 4 conditions very clearly (the point of being a control group)