
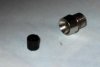
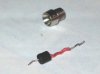
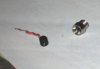
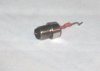
LED holder Radioshack dot com ?
cant post links......its the metal led holder not the black plastic ones. Just google it.
I found these at radioshack when I was looking for the DC connectors and the threads are the same because they both mount into the same size panel hole.
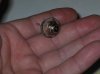
This holder has a small rubber stopper with two holes that an led fits into but I just run a wire through one of the holes down to the switch and fold it over into the other hole on top to make a center conductor.
The unthreaded portion of the panel mount needs to be trimmed off with a dremel, but if you do it right then you still have plenty of thread to use the supplied lock washer and nut.
The actual led holder/ lens part is a little big and so also may need to be trimmed down. I used this on a laser pointer and had to take a lot of metal off that part. works great now and makes a solid connection with the nut on the outside.
The advantage of using this over a dc conector is that it is more rugged and smaller, plus it can be trimmed to fit as I described. They are a lot sturdier than a conventional battery connector and do not rely on the press fit. Plus you can find them locally if you are in the US.
If any one is interested maybe I'll get some pictures up.
cant post links......its the metal led holder not the black plastic ones. Just google it.
I found these at radioshack when I was looking for the DC connectors and the threads are the same because they both mount into the same size panel hole.
This holder has a small rubber stopper with two holes that an led fits into but I just run a wire through one of the holes down to the switch and fold it over into the other hole on top to make a center conductor.
The unthreaded portion of the panel mount needs to be trimmed off with a dremel, but if you do it right then you still have plenty of thread to use the supplied lock washer and nut.
The actual led holder/ lens part is a little big and so also may need to be trimmed down. I used this on a laser pointer and had to take a lot of metal off that part. works great now and makes a solid connection with the nut on the outside.
The advantage of using this over a dc conector is that it is more rugged and smaller, plus it can be trimmed to fit as I described. They are a lot sturdier than a conventional battery connector and do not rely on the press fit. Plus you can find them locally if you are in the US.
If any one is interested maybe I'll get some pictures up.

")