Burnt taste from the Kayfun EHPro V2

Status
Not open for further replies.

New2vaps

Ultra Member
ECF Veteran
May 10, 2013
1,036
885
USA
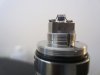
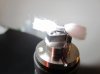
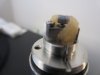
Hi everyone, this is my first time at building an rba. Also this is my 3rd coil since the first 2 were giving me a burnt taste.

1- I am using a kayfun EHPro V2
2- Provari
3- Kanthal 28 gauge from Temco
4- Organic cotton from walgreens
5- I built the coil at 1.4 ohms

For some reason I keep getting the bad burnt taste no matter what I am doing. The vapor production is there, the kayfun vapes, but the burnt taste is there. I have included a few pictures and I am hoping someone can spot something that is causing this.

Thank you
 

Attachments

  • IMG_0935.jpg
    IMG_0935.jpg
    17 KB · Views: 792
  • IMG_0936 - Copy.jpg
    IMG_0936 - Copy.jpg
    15.9 KB · Views: 203
  • IMG_0940.jpg
    IMG_0940.jpg
    19.9 KB · Views: 190
  • IMG_0943.jpg
    IMG_0943.jpg
    15.8 KB · Views: 170
  • IMG_0945.jpg
    IMG_0945.jpg
    18.2 KB · Views: 417

vapdivrr

Vaping Master
ECF Veteran
Verified Member
Jul 8, 2012
9,966
19,932
60
sarasota,fl
A few things I see, first to much of a bend in wick. Position of your coil is off, it's to far angled. Straighten the coil up so your wick tail doesn't have that bend. Also because of this angle, the juice has a longer distance to go. Also I think your coil is wrapped counter clockwise, this is positioning your leads in the wick tail path. I believe if you wrap your coil the other direction, your leads can be out of the way. One more thing is the coil looks a little to close to the deck, from the pic it looks less then 1 mm. I would try for 1.5mm. I think if you position the wick tails more in the center, instead of off to one side, you should be good
 

Wickedgt

Senior Member
ECF Veteran
Verified Member
Jul 8, 2014
273
393
Phoenix, AZ
Agreed, your wick looks a little short. I'm using 4 different KFL+'s and I cut my cotton longer and lay it across the deck so it has a chance to soak up the juice from the juice channels when you draw on your device. Like an "S" pattern. Also be sure not to put too much (too thick) cotton in your coil. It should slide back and forth pretty easy through the coil. Works for me every time. Also I'd personally vape around 4.1 to 4.3 volts on your 1.4ohm build. But that's subjective. Just my :2c:
 
Last edited:

New2vaps

Ultra Member
ECF Veteran
May 10, 2013
1,036
885
USA
You must mean 3.7 volts

With 1.4 ohm coil, that would be 9.8 watts
_______________________________

Switch to a wick made from braided silica and you will never get a burnt taste.

Yes, you are correct, I meant 3.7v. I made a mistake. I am rebuilding a new one now and will update.

Thank you all for all the tips and taking the time to look at the pictures.
 

autobiogphnation

Super Member
ECF Veteran
Verified Member
Oct 14, 2013
553
606
Chicago
I've never done the "diagonal" orientation of the coil like it is suggested. I've always orientated the coil to allow for the wick to be in line with the juice channels. Build the coil and install it, run a wick through and keep it long. place the cylinder on over the wick as it is pulled upward. Trim the wick just a bit over the cylinder (leave more over the top if you coil is raised more over airhole) and them tuck the tails down between the deck and cylinder, keep it fluffy, dont compact it. Saturate it until u just barely see liquid in the channels and build the tank and fill. Never ever had a single burnt taste building like this, I run 12.5 watts.
 

New2vaps

Ultra Member
ECF Veteran
May 10, 2013
1,036
885
USA
I've never done the "diagonal" orientation of the coil like it is suggested. I've always orientated the coil to allow for the wick to be in line with the juice channels. Build the coil and install it, run a wick through and keep it long. place the cylinder on over the wick as it is pulled upward..

Thank you for the responses. Ok so I tried this method as autobioghnation suggested. It worked, worked very well but only for about 5 draws. First 5 were perfect, it was nice and airy, tones of clouds, vaping a 1.4 ohms coil at 3.9v. Then i started getting a TIGHT draw and burnt taste again. I am pretty sure it is not the coil at this point. I raised above the hole. Do you think at this point I need more cotton or less cotton?
 

autobiogphnation

Super Member
ECF Veteran
Verified Member
Oct 14, 2013
553
606
Chicago
Thank you for the responses. Ok so I tried this method as autobioghnation suggested. It worked, worked very well but only for about 5 draws. First 5 were perfect, it was nice and airy, tones of clouds, vaping a 1.4 ohms coil at 3.9v. Then i started getting a TIGHT draw and burnt taste again. I am pretty sure it is not the coil at this point. I raised above the hole. Do you think at this point I need more cotton or less cotton?
Its probably too much cotton. And yes, with this build you may get a tighter draw sometimes.
 

autobiogphnation

Super Member
ECF Veteran
Verified Member
Oct 14, 2013
553
606
Chicago
Wow, less?? I am going crazy trying to get the right amount lol. It seems like when I use too much in my head it's too little and vice versa.
Use enough that it is loose enough so that it doesn't pull on the coil but enough so that it has a little drag on the coil so that it holds in place. Make sure you fluff it after in place as well.
 

VaPreis

Ultra Member
ECF Veteran
Verified Member
Oct 5, 2013
2,043
2,273
St. Louis, MO
Thank you for the responses. Ok so I tried this method as autobioghnation suggested. It worked, worked very well but only for about 5 draws. First 5 were perfect, it was nice and airy, tones of clouds, vaping a 1.4 ohms coil at 3.9v. Then i started getting a TIGHT draw and burnt taste again. I am pretty sure it is not the coil at this point. I raised above the hole. Do you think at this point I need more cotton or less cotton?

Could be some debris in the center post causing the tight draw. I've taken a couple of Kayfun clones apart that had shavings inside the center pin from being pushed through the bottom insulator.

The build style that autobiogphnation mentioned is what I always do, and it generally runs flawlessly. The only difference being, that I like to wet the tails before installing the chimney, and then push the tails in to the wells. Just a matter of preference.

Despite what is commonly mentioned, dont be afraid to wick the coil tightly with cotton, not to the point the coil distorts, but fully.

I find to little to be more of a problem then a little to much.
 

Hill

Super Member
ECF Veteran
May 7, 2013
467
521
Texas USA
I too could never get the KFs down just right. I kept getting not really a dry hit per se but not what P.Busardo would call a fully saturated vape, it always felt kinda scratchy with a slightly toasted taste.

Then thanks too JeremyR I discovered the wonder wicking material RAYON! My KF clones have never been better as a matter of fact its all I've used since I got them wicked with rayon. Check out the Rayon thread I would link it but I don't know how (I'm computer illiterate) but type rayon in the search window and it will take you right to it. It's a long thread but very informative.

And rayon is awesome.
 

New2vaps

Ultra Member
ECF Veteran
May 10, 2013
1,036
885
USA
I am using 50/50 juice

Well I have tried it another time. Same thing. This time I when I took the chimney apart I noticed the cotton was split in half. The cotton inside the coil was burnt. I did saturate well and on the coil as well. I tried another time with more cotton same thing. Not sure what I am doing wrong. I watched several other videos and I believe I am doing it the same way. This really sucks, I was really hoping this would work out for me.
 
Status
Not open for further replies.

Users who are viewing this thread