Chuck switchectomy and new skirt step by step.

Status
Not open for further replies.

tonypilot7

Senior Member
ECF Veteran
Jun 5, 2009
106
1
Portland, OR
So I have had my Chuck for almost a year and after several drops, she lost her prom dress. Also I have finally beat the switch into submission. It is totally dead. I decided to do a switchectomy and figured I would put a new skirt on her while I was at it so here goes...

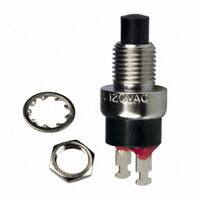
First, I took the nut off of the outside of the switch and pushed the switch through the hole.

Then, unscrew the top cap completely. (mine was loose already)

IMAG0040.jpg


IMAG0037.jpg


IMAG0038.jpg


Unsolder the wire from the top cap to the switch.

IMAG0041.jpg

IMAG0043.jpg


Push the other part of the assembly through the bottom of the Chuck housing.

IMAG0042.jpg


unsolder the other lead from the switch

IMAG0044.jpg


IMAG0049.jpg


Clean Everything!
as you can see, there was a lot of filth inside the threads. I used scotch pads to clean all the threads and contact surfaces.

NEW SKIRT!
I found this material at Lowes:

IMAG0048.jpg


I liked the woodchuck that someone posted earlier so I thought why not try it on mine. I bought the 12 x 48 inch (enough to do at least 20 chucks) piece in red oak. It was all that Lowes had at the time but if you go to the website : Band-It® Products | Real Wood Veneer There are all kinds of exotic and purty woods to choose from.

Then I cut a piece and dry fitted it.

This veneer has a heat activated glue backing material. I used a hobby iron to Iron it on to the Chuck housing. (you can use a regular clothes iron also.)

IMAG0047.jpg


Cut the hole for the switch:

IMAG0046.jpg


sanded the crap out of it..

And she is ready for stain and varnish.

I will post pics of the reassembly and finished product when she is done.
 
Last edited:

tonypilot7

Senior Member
ECF Veteran
Jun 5, 2009
106
1
Portland, OR
Ok, so after about a zillion attempts to get an even sanding on this thing, I finally figured out a solution...

I turned my drill into a lathe by wrapping a piece of scotch pad tight around a long 1/4 inch socket extension then jamming it into the bottom of the chuck tube.

IMAG0052.jpg


That made things a lot easier. It also allowed me to wet-sand between coats of varnish.

Reassembly:

The first step is to shove the switch assembly (with the new switch already soldered on one lead) back into place:

IMAG0053.jpg


Then put the battery in place and screw in the endcap:

IMAG0054.jpg


Then, the tricky part... Re-solder the top cap lead to the switch. This is a lot easier to do if you have 3 or 4 hands to hold all the parts.

IMAG0055.jpg


IMAG0056.jpg


Then, you want to remove the end cap and battery and slide the bottom end assembly towards the tail end of the chuck so that you can scoot the switch down into the tube and push it through the hole. screw the switch nut into place and tighten. (note, there was a lock washer on the inside of the chuck around the switch button)

IMAG0057.jpg


But I couldn't get mine to fit with it in place because of the increased diameter after applying the veneer. So I left it out.

IMAG0058.jpg


Then you want to twist the top cap counter-clockwise to wind up the wire. (if you skip this step, you will twist off the wire on the top cap before you get it fully threaded on.

With the wire pre-twisted, you can now thread the top cap on slowly, if it resists, back it out. The wire is binding. Then install batteries and test with multimeter.

Congrats, you're done.

And now, the unveiling:

It's part chuck.... It's part oak...

I call it.....

The Choak

IMAG0063.jpg


IMAG0061.jpg


IMAG0060.jpg


IMAG0066.jpg


IMAG0065.jpg


OOOOHHHHHHH YEEEEEEAAAAAAHHHHH

IMAG0062.jpg
 
Last edited:

Xanax

Ultra Member
ECF Veteran
Apr 28, 2010
2,211
10
East Coast
OH wow... was this ordered online or you just walked into your local radioshack and found it in there? That's really good to know in case I have any more problems with my switch. Thanks for this post, it's really helpful.

Do you happen to know if it's gold plated by any chance? I wonder what kind of difference that makes if any at all... I think Jeff has said he uses the gold plated ones... not too sure why.
 

WillyB

Vaping Master
ECF Veteran
Oct 21, 2009
3,709
591
USA
I found it at radio shack. its an spst momentary switch rated .5 amps at 125 vac. Its the same switch that came out of my Chuck, but made by a different manufacturer.
You sure? I can't imagine the Chuck using an under rated 0.5A 50¢ switch. Looks can be deceiving.

There's lots of similar looking switches with much better specs and construction.

I'd feel more comfortable with a 3A switch from a respected manufacturer like this.

8531MZQE2,%208531SZQE2,%208532MZQE2,%208534MZQE2,%208551MZQE2_sml.jpg


Digi-Key - CKN1672-ND (Manufacturer - 8551MZQE2)
 

tonypilot7

Senior Member
ECF Veteran
Jun 5, 2009
106
1
Portland, OR
You sure? I can't imagine the Chuck using an under rated 0.5A 50¢ switch. Looks can be deceiving.

There's lots of similar looking switches with much better specs and construction.

I'd feel more comfortable with a 3A switch from a respected manufacturer like this.

8531MZQE2,%208531SZQE2,%208532MZQE2,%208534MZQE2,%208551MZQE2_sml.jpg


Digi-Key - CKN1672-ND (Manufacturer - 8551MZQE2)


Yeah I just looked at it again, .5A 125v made in Japan, no other markings. So far with the new switch I have had no misfires, hard presses or other problems. Voltage to the connector measures 6.2 v. I don't have a load voltage checker so I can't measure that, but it's working fine.

I did have to rebuild the atty connector because the rubber separator for the positive lead had rotted and it was shorting intermittently, but other than that, she works just fine.
 
Last edited:
Status
Not open for further replies.

Users who are viewing this thread