Fogger v2 performance upgrades

Status
Not open for further replies.

Arvidx

Senior Member
ECF Veteran
Verified Member
Nov 25, 2009
202
109
Tucson, Arizona, United States
So the Fogger v2 has turned into a superb and currently favorite setup for me, and I wanted to share a few of the things I did along the way to make it perform the best it can, as well as a few tips/warnings and a bunch of pics.

IMG_20131014_213844.jpg IMG_20130925_012211.jpg
This setup is running 3mm Ekowool, a .9 ohm 28g coil and is sitting on an 18350 8 diagrams mod.
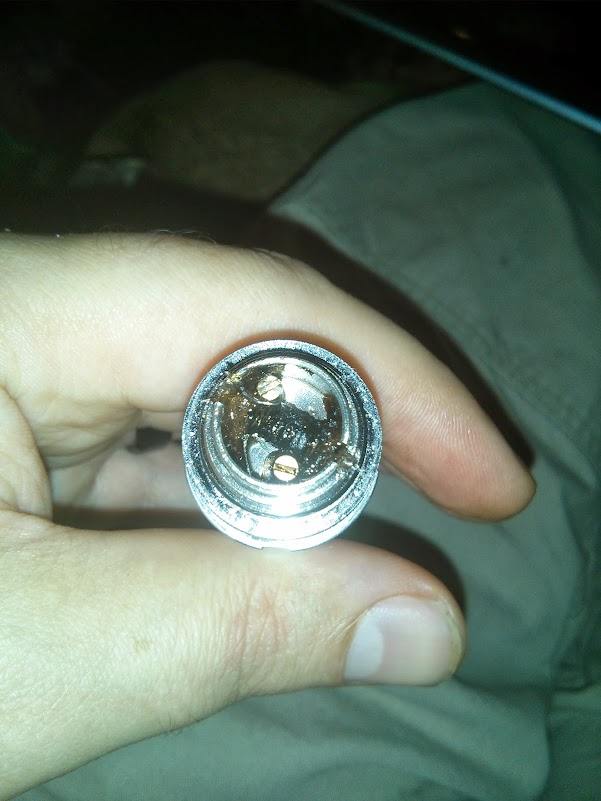
Other than the learning curve on the builds, the biggest limiting point on the Fogger v2 is the air flow. Here's the innards of the air flow control as they come:

966995_639519752735895_1498204570_o.jpg
The red circle shows the air flow tube limitation as it comes. This is the part that really causes the Fogger v2 to have a tight draw.

IMG_20131013_160731.jpg
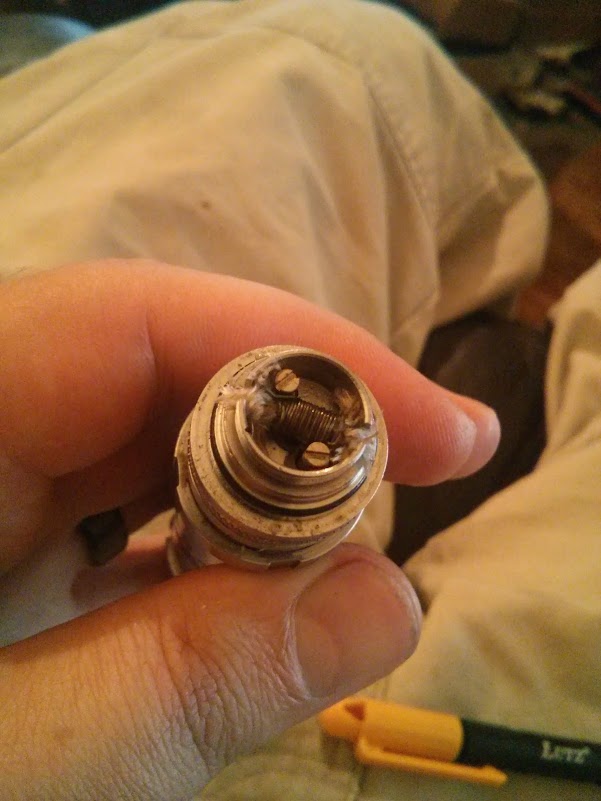
Number 1 shows the air flow tube cut off. This tube is thin enough to be broken off with a sturdy set of pliers. It provides no conductivity, only air restriction. There is also an insulator which the air tube normally fits into when pressing up into the center hole seen in number 2 this also should be removed. Number 3 shows the insulator around the positive screw post, more on that later.

Clearing out the air path, immediately makes this mod a contender, and can be done with a simple wire cutter or even broken off with a pliers.

IMG_20131013_155238.jpg
For those that just need that extra air, it can be pushed a bit further with a 1/16th drill bit opening the 3 external holes a bit more and giving more range for the air control. I don't feel this is necessary, but if you have the tools you can feel the air increase. The compromise is less vacuum in the atomizer chamber so your wick building has to be even better. You may find slower wicks are helped by dialing the air back down with the air flow, if you decide to open up these holes.

More details in the next post.
 

Arvidx

Senior Member
ECF Veteran
Verified Member
Nov 25, 2009
202
109
Tucson, Arizona, United States
One danger on the Fogger v2 is the way the positive power connects up from the Positive Screw through the bottom of the Air Control Disk onto the + post contact in the bottom of the Deck and through to the + post in the Atomizer Chamber.

This leaves 3 areas that can short out. The main cause of shorting is the positive post being adjusted too long for the mod it is connected to. So long as it is adjusted precisely, no shorting, but there are a few preventative measures that can be taken, I'll illustrate.

2-a.jpg
If the + post screw is adjusted too long, it can cause the AFC Disk to tilt upwards and contact the Negative Deck.

2-c.jpg
Too long of a + Post Screw pressing up on the +Post in the Deck can also cause that post to lean out towards the negatively charged wall after extended use. Here are two preventative measures you can add to buffer over lenghthy positive posts, but first and foremost CAREFULLY ADJUST THE POSITIVE FOR EACH MOD!

2-d.jpg 2-b.jpg
Use the insulator for the inside air post on the + Post Screw. You can also use the insulator from an AGA or AGI series atomizer or probably many other atomizers. You do have to cut the height down to fit the negative screw area.
This insulator also prevents the + Post Screw from contacting the negative 510 threads for the 3rd area that can short. Again all caused by too long of a + Post Screw.

2-e.jpg
Finally from the cuttings from the insulator, or if you have a spare high temp o-ring (think silicone), you can add it to the + Post in the Atomizer Chamber. If you do this, keep in mind how large you make it. You need clearance between this ring and the coil built. A longer Half cylinder might be better.
 

jac1766

Ultra Member
ECF Veteran
Verified Member
Jul 7, 2013
1,793
3,055
The 6th circle
Very nice work! How do I get the bottom to open up to do this? Mine is working well now that I got the coil right. Any help would greatly be appreciated.

The AFC section is threaded together, not press fit. Unscrew the very bottom section of the Atty and the air flow tube can be pulled out. When you reassemble the unit, make sure the silicone air-flow diverter is not blocking the holes. Many people have this issue alone, and complain about an impossibly tight draw.
 

Arvidx

Senior Member
ECF Veteran
Verified Member
Nov 25, 2009
202
109
Tucson, Arizona, United States
Is it a real PITA to get the two parts separated?

It sure can be. I had to wrap the bottom AFC deck in a piece of leather and get a pair of vice grips around it. The leather or thick cloth can stop you from damaging the metal. Then the slots in the Atty chamber can be used to unscrew it. I laid the back side of my good sized pocket knife into the slots and turned it like a screwdriver basically. Once the pieces Pop and come loose, it has nice threads, they are just tightened on some way more than others.

Another guy here in town, who got one from the same shipment, actually had the bottom come off before the top cap did when he opened it the first time.
 

Ninjay16

Full Member
Verified Member
Aug 10, 2013
54
7
BAY AREA, CA
How wide is your coil? I cant get mine over 1.2 without it touching the top of the center post. Also can you show a pic from the top so we can see how you wicked it? mines just cotton wrapped around the coil atm tryna get a better wick for this vertical coil. Also how low is your coil to the insulator around the center post under the wick? im afraid of burning mine.

Did all your fixes on mine, plus added little dental floss to the threads of the air control and now it holds its place.
Very happy with this setup. 1.3ohm vertical 28g nano coil, hemp fiber wick.:) clic pic for video.


BJ43

Vaping Master
ECF Veteran
Verified Member
Nov 27, 2008
5,896
7,212
81
I wrap all my vertical coils on a 1.5mm drill bit. I can't measure how close it is at the bottom but it is pretty close. This stays so wet I don't think it will be a problem. I have put 40 ml thru it with one cleaning and dry burn at 30ml.

Next time I clean it and dry burn I will take a pic from the top without the filler. I am now using hemp fiber for filler.

 
Last edited:

Wmmeese

Dedicated Lurker
ECF Veteran
Verified Member
Jul 23, 2013
247
285
St Louis
I installed the vertical coil set up in my Fogger also. Be aware that the diameter of the coil is going to be the air flow limitation of the devise. I prefer some restriction so a coil built on a 1/16 drill bit or an 18 gauge blunt needle works for me. I did open the lower chamber and drilled out their holes in the air tube with a 3/64 bit. It is still. Little tight so I may try a 1/16 drill in the air tube next. If it is still a tight draw, I will wrap a coil an an 18 gauge needle and still have the option to cut off the air tube entirely and open up the air holes under the air control ring. The is as staged approach rather than a full on attack.
 
Last edited:
Status
Not open for further replies.

Users who are viewing this thread