- My Impressions & Experiences -
I've been using the Marvos S 80W Kit for over 3 weeks now. I've vaped probably 40-50 mL worth of juice through the 0.35 Ohm coil and probably about the same through the 0.15 Ohm coil that came with Marvos S kit. I'm continuing to be impressed, and I'm sure I will until these coil burns out. If either coil lasts as long as the 904L coils do, which also use FM CoilTech 4.0, then these will become the new standard for me.
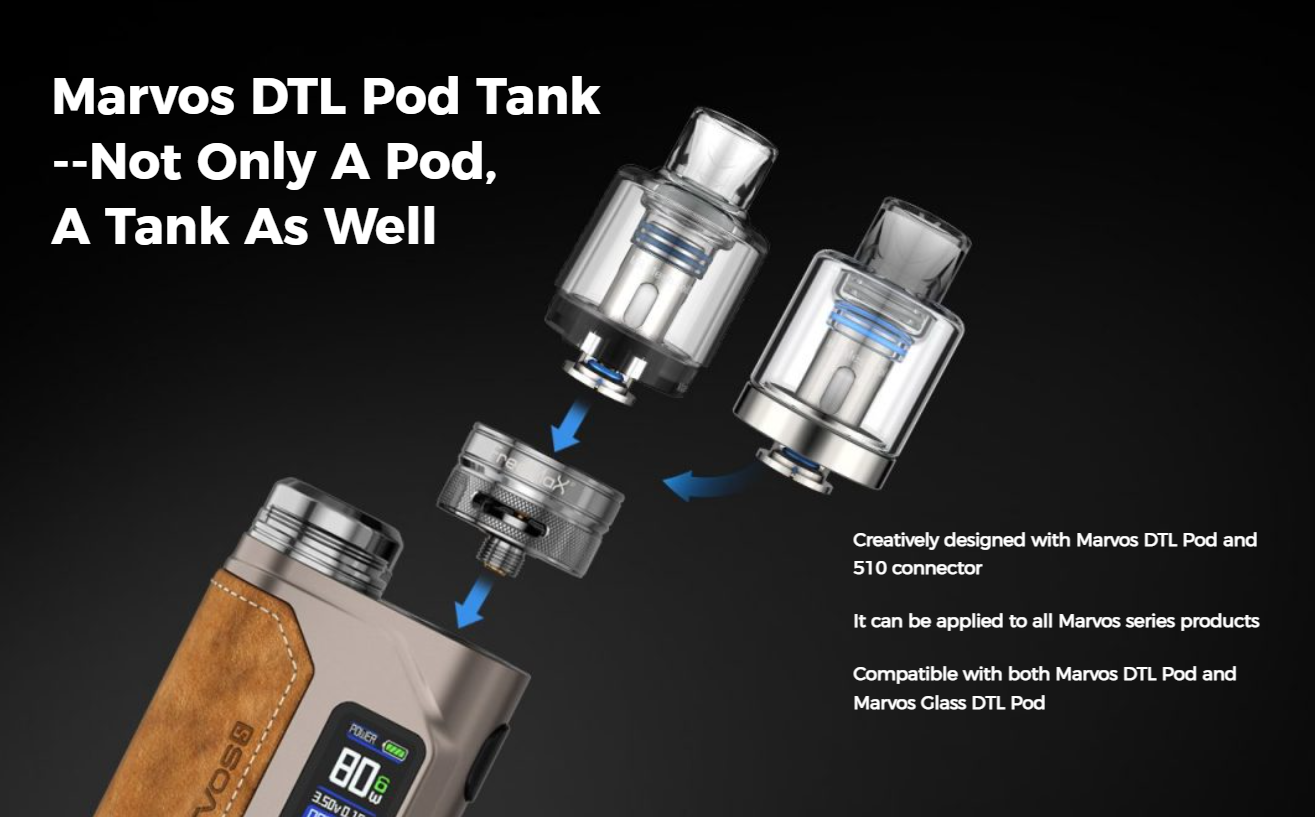
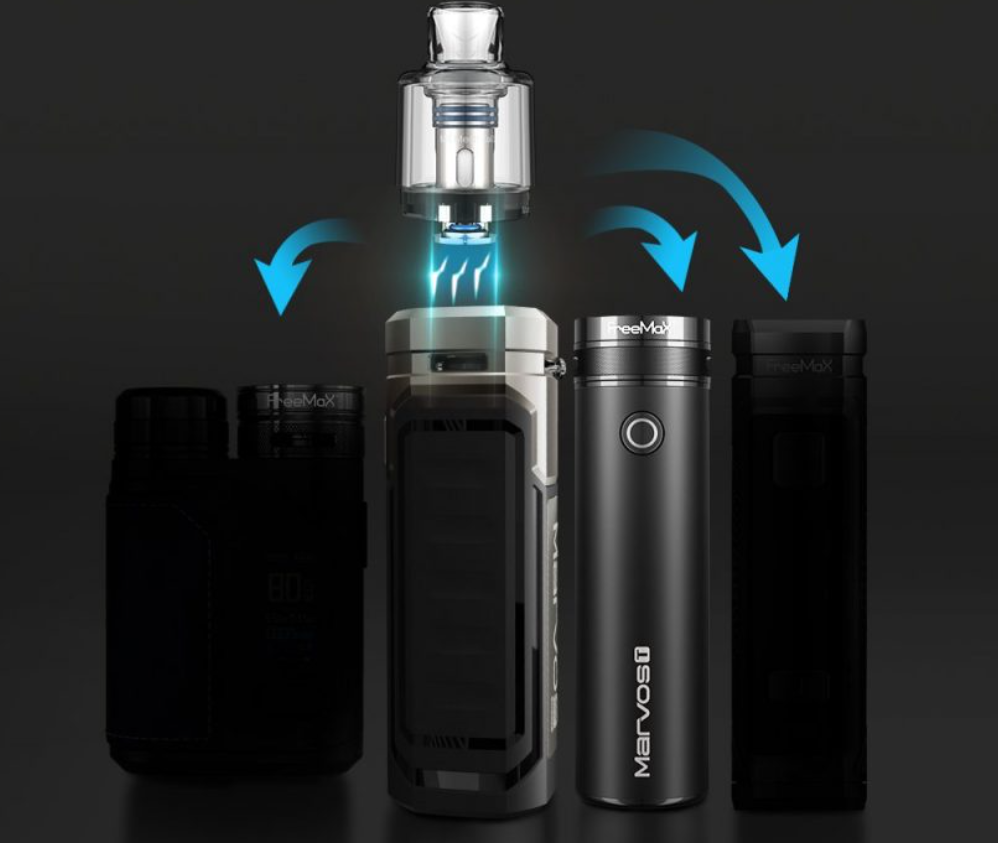
I realize not everyone will be purchasing several Marvos products, but knowing this Pod Tank can be transferred to the entire line is pretty awesome. That prolongs the usability of these coils and tanks if something were to happen to the mod. Moreover, with the 510 base adapter that comes along with the Marvos Pod in this kit, you're able to use the Tank on any 510 mod. There's little to no reason not to stock up on a few of these tanks and coils. Being that we're headed the way we currently are with the available market, I'd suggest picking something good and stocking up on it - this kit, namely this Pod Tank, is a great choice for that.
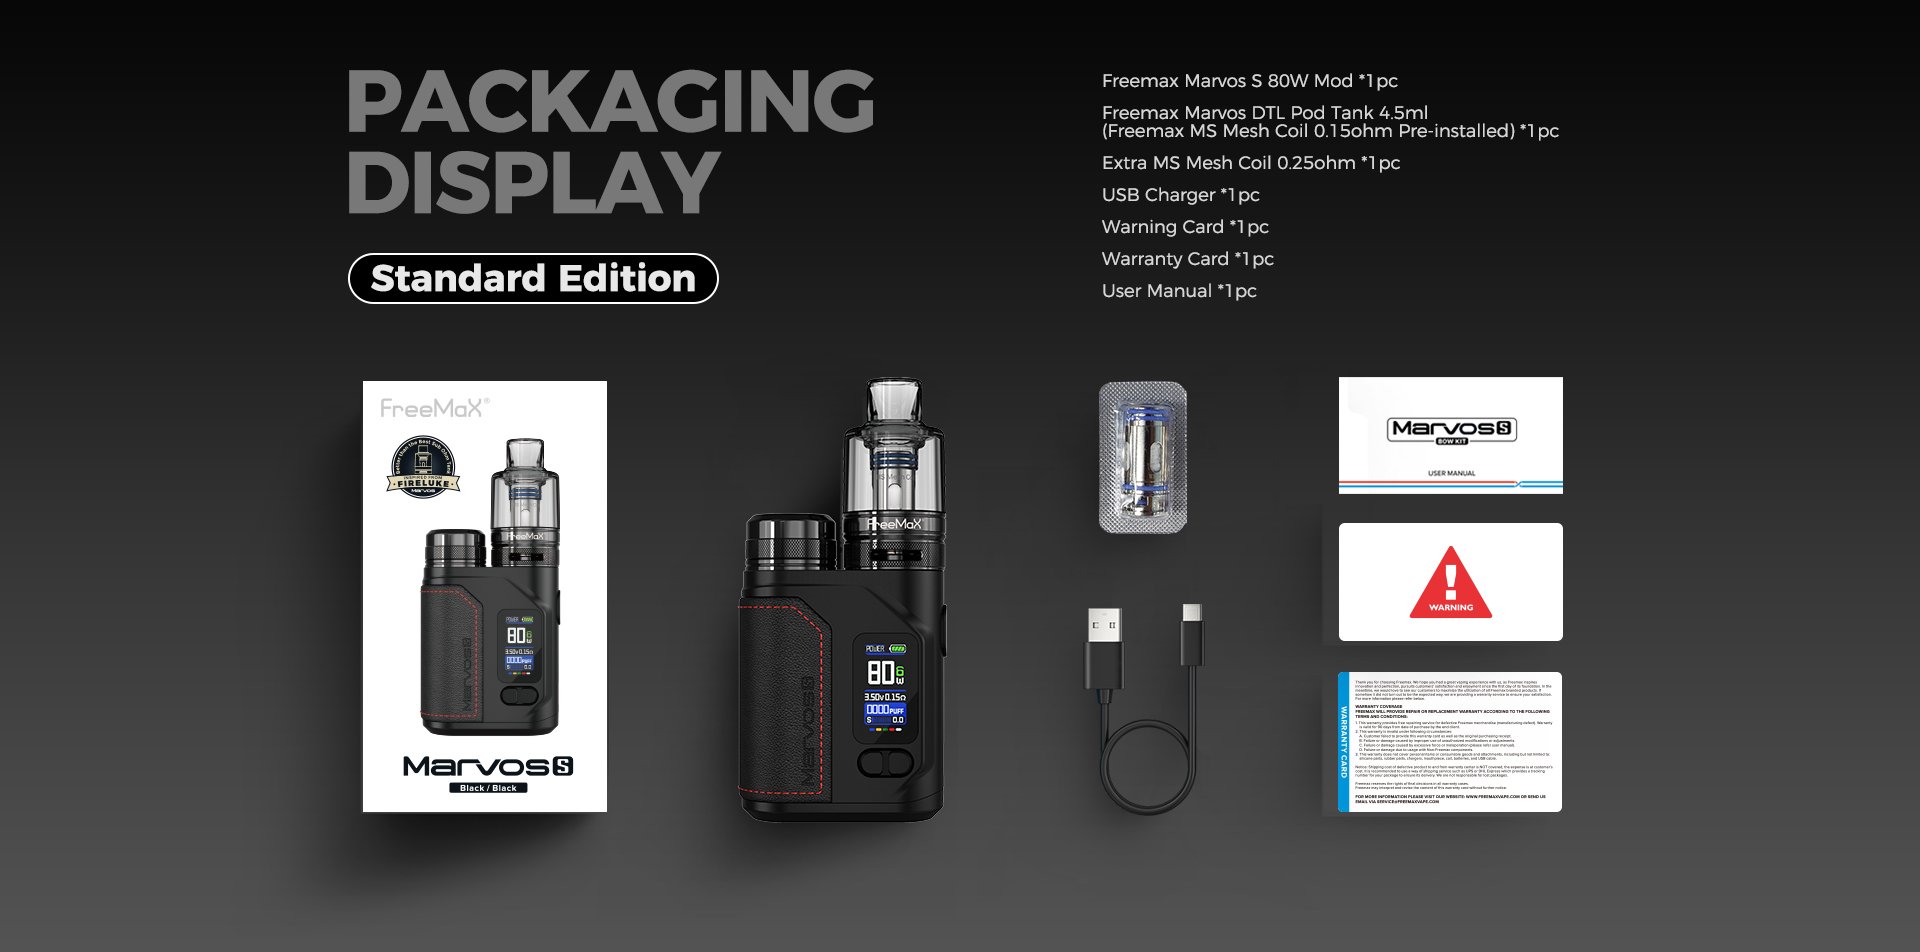
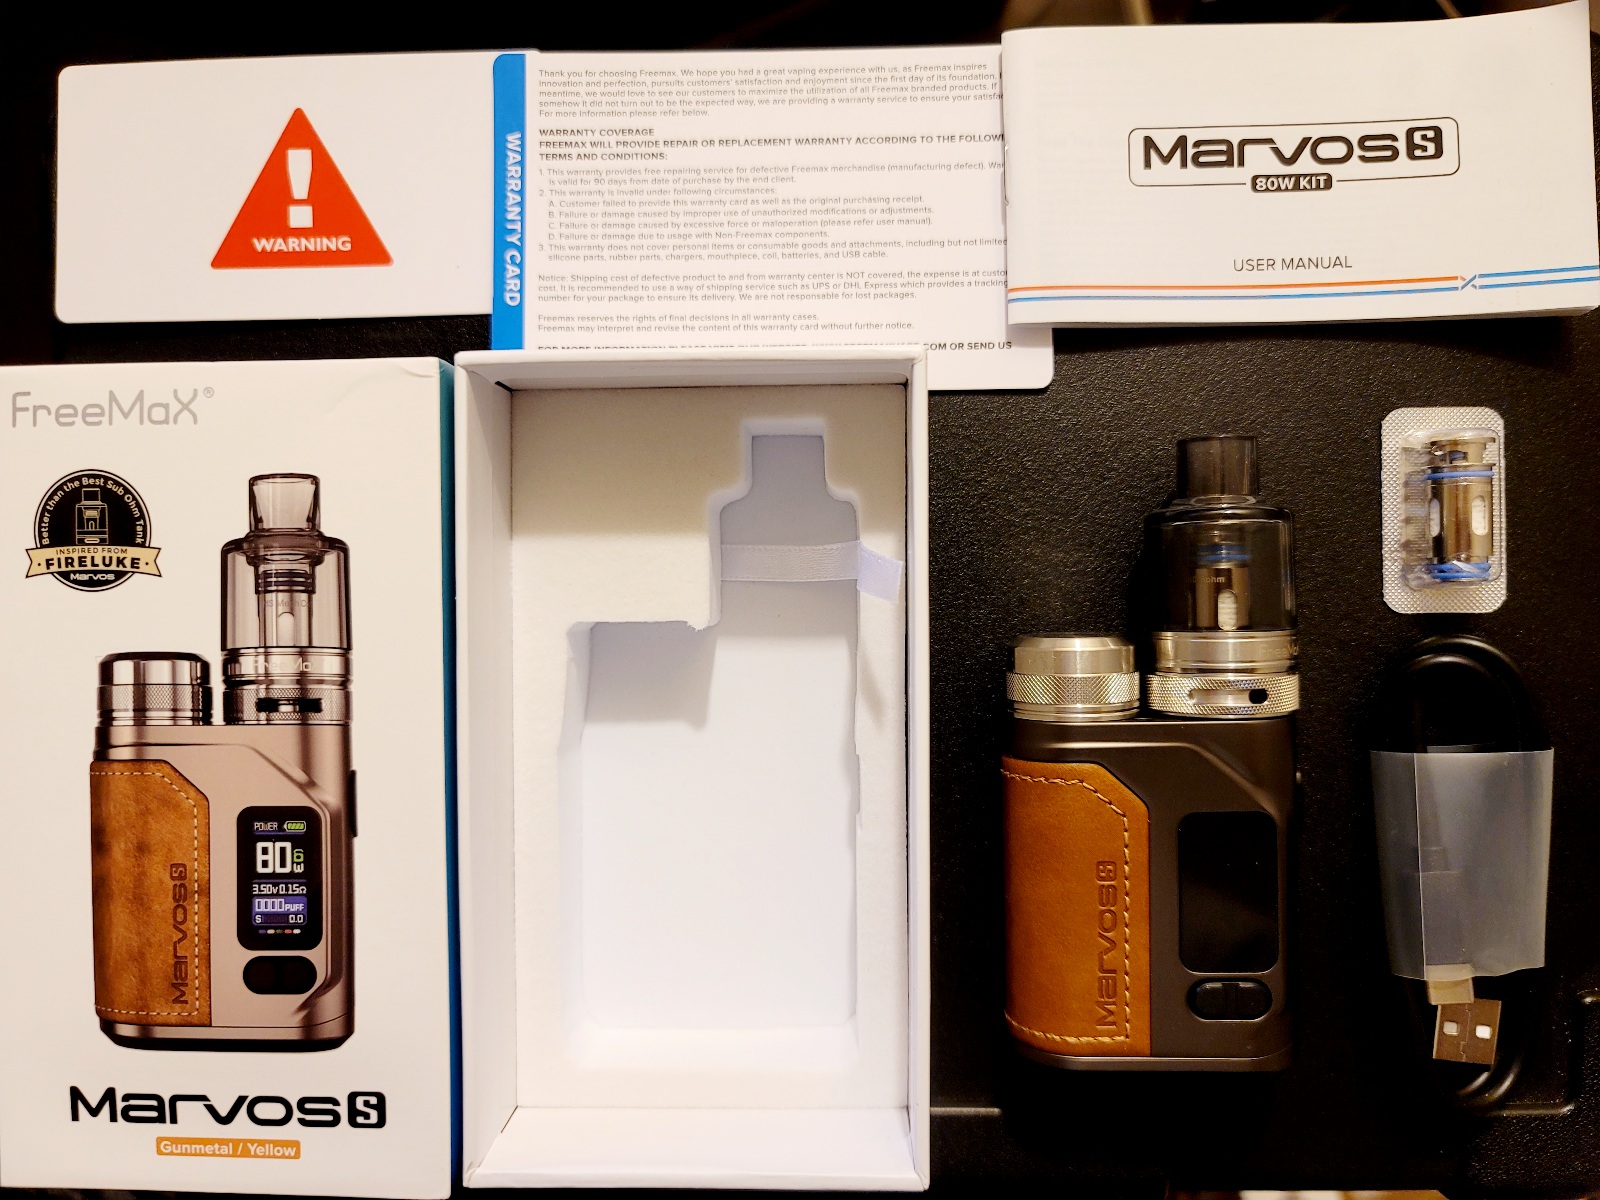
Out of the Package:
The packaging will definitely get this item to your doorstep safely under normal transportation wear and tear.
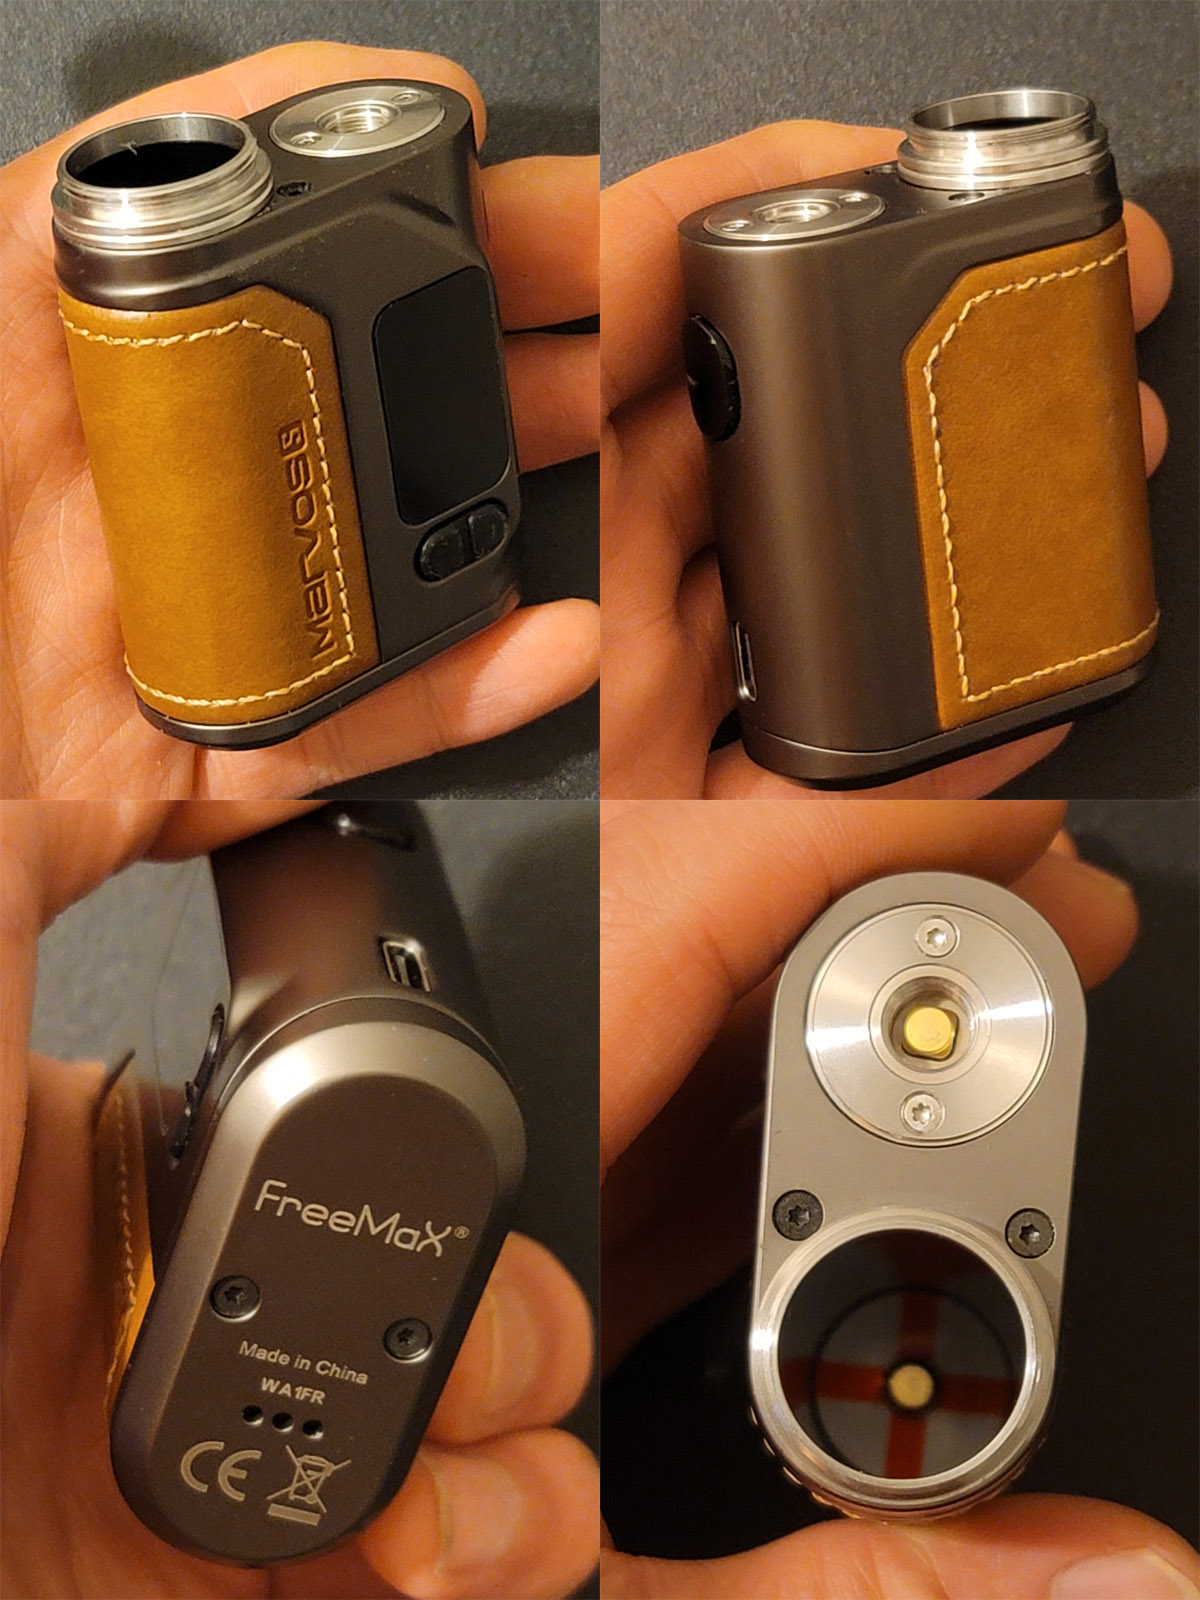
The form feel of this mod in hand is comfortable. If you have smaller hands, they should fit around this mod very easily without having to death grip it for fear of dropping it. The leather with the off-colored stitching gives this a rugged feel, like you would see on a leather hiking backpack. It does have a little cushion to it giving you that soft feel.
The 510 plate is screwed in with torx screws which is great - I'm sure you've heard or read horror stories of press-fit 510s; they don't hold up very well. The 510 pin is spring-loaded. The overall construction is lightweight and solid with its zinc alloy body.
Both directional and fire buttons are nice and clicky - there's no mushy feel to them. The battery cap does feel a little grindy, but if you apply a little bit of downward pressure while screwing it in, that will alleviate the gritty feeling. First get the threads started, then lightly press your thumb down onto the cap and spin it on. Nice and easy. There is a nice grippy knurling on the side of the battery cap if you need it, but I would suggest doing it with the thumb-press method explained above. The battery compartment also has the
+ symbol at the bottom to lessen the confusion of which way the battery goes. The Type-C USB charging port is located under the firing button toward the bottom of the mod. On the bottom you can also see the venting holes for the battery.
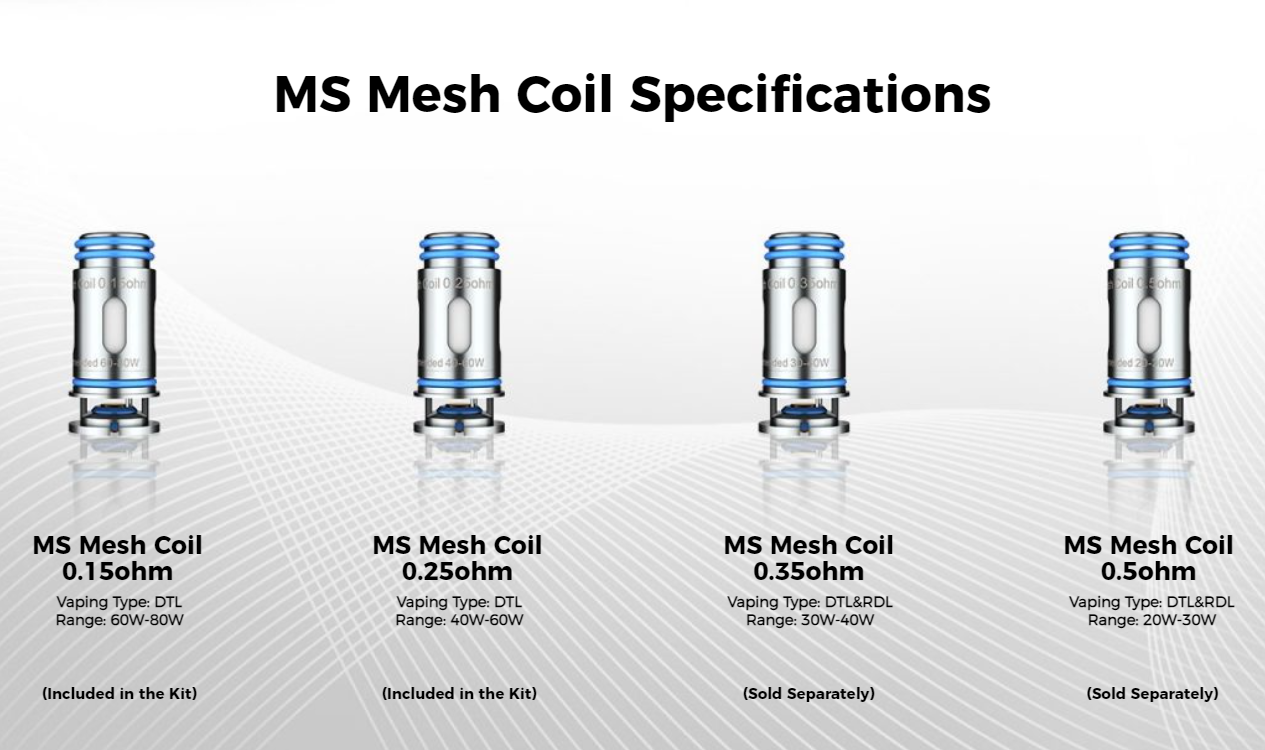
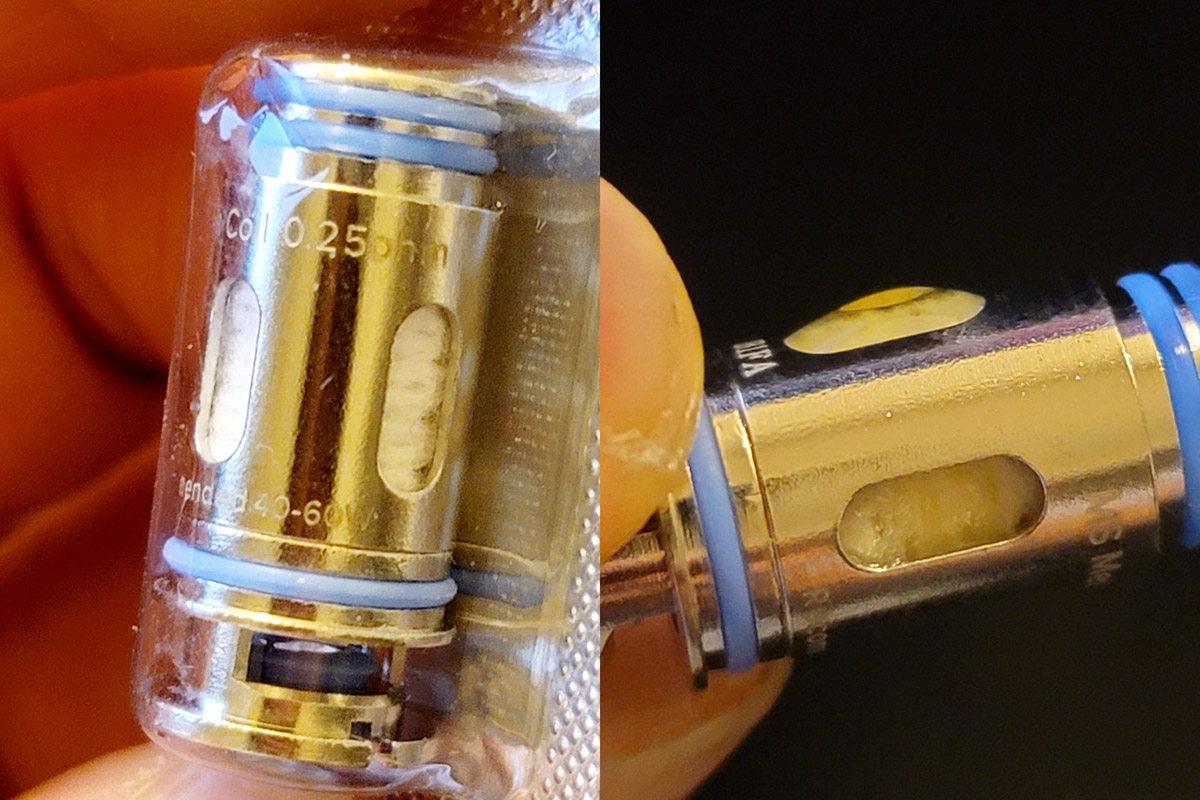
The Coils:
Left Picture:
0.25 Ohm MS coil recommended to be vaped at 40-60 Watts.
Right Picture:
0.15 Ohm MS coil comes pre-installed with a recommended 60-80 Watt range.
If you're a flavor junky like me, you can very easily get away with vaping the 0.15 Ohm coil at 40W with the AFC completely closed (my recommendation) or fully open. This will also save on battery life and likely the lifespan of the coil.
In all of my experiences using Freemax coils, I've found that the best flavor is generally below or on the lower end of the recommended Wattage range. If you like a bit of a warmer vape and more clouds, then you'll likely want to be on the higher end of the recommended range.
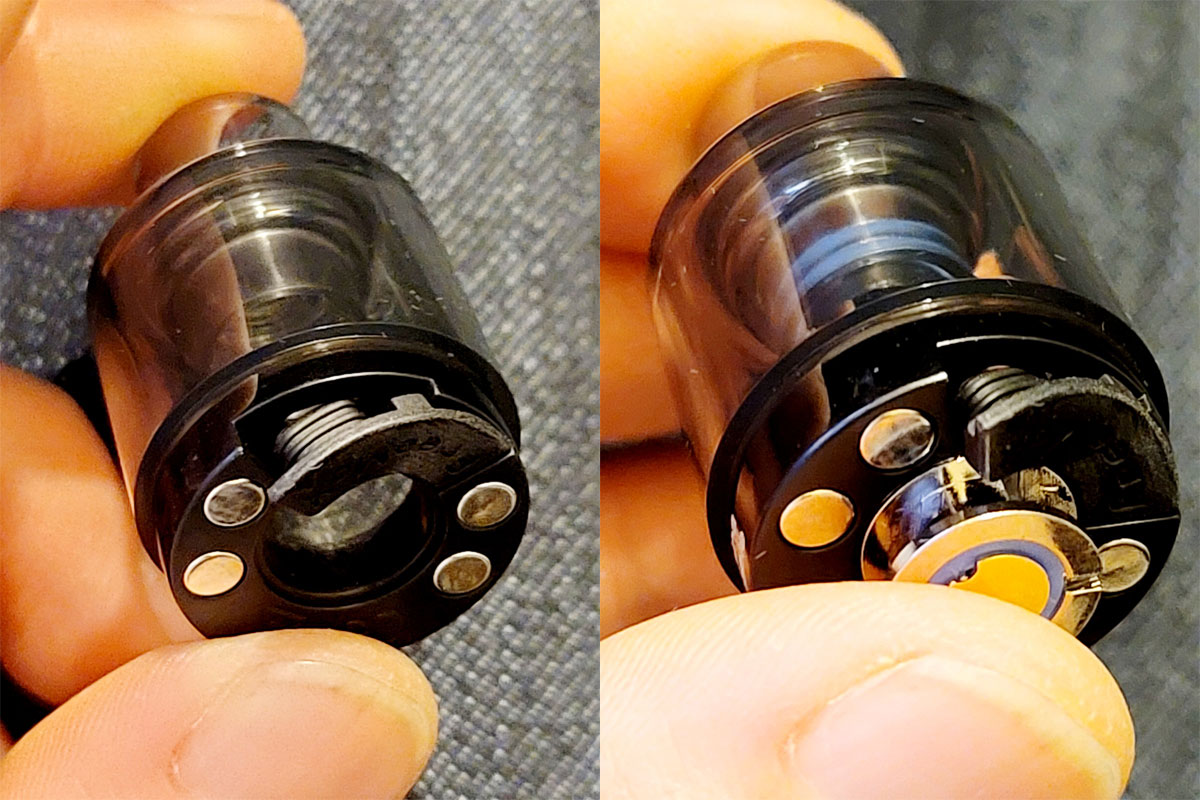
The Pod:
Left Picture:
What the pod looks like w/out a coil inserted. Note that the rubber refill plug has been pulled out so that you get a better look at it. The actual plug part of the rubber is thicker than it is where it attaches to the pod. This makes holding the flange back while refilling much easier leaving less of a potential for there to be a mess. The thinner part of the flange is not so thin that you need to worry about tearing it while getting the plug out of the hole. I've experienced this on other pods and to me, significantly reduces the expected life of it.
Right Picture:
What the pod looks like with a coil in it. Be sure to press the coil in until the base of the coil above the airflow section is flush with the plastic bottom of the pod. A firm press should do just fine.
I forgot to take a picture of the drip tip, but it is removable. The drip tip itself has 2x o-rings on it. The pod portion where the drip tip seats has no o-rings, but the drip tip fits in tight enough where it isn't loose.
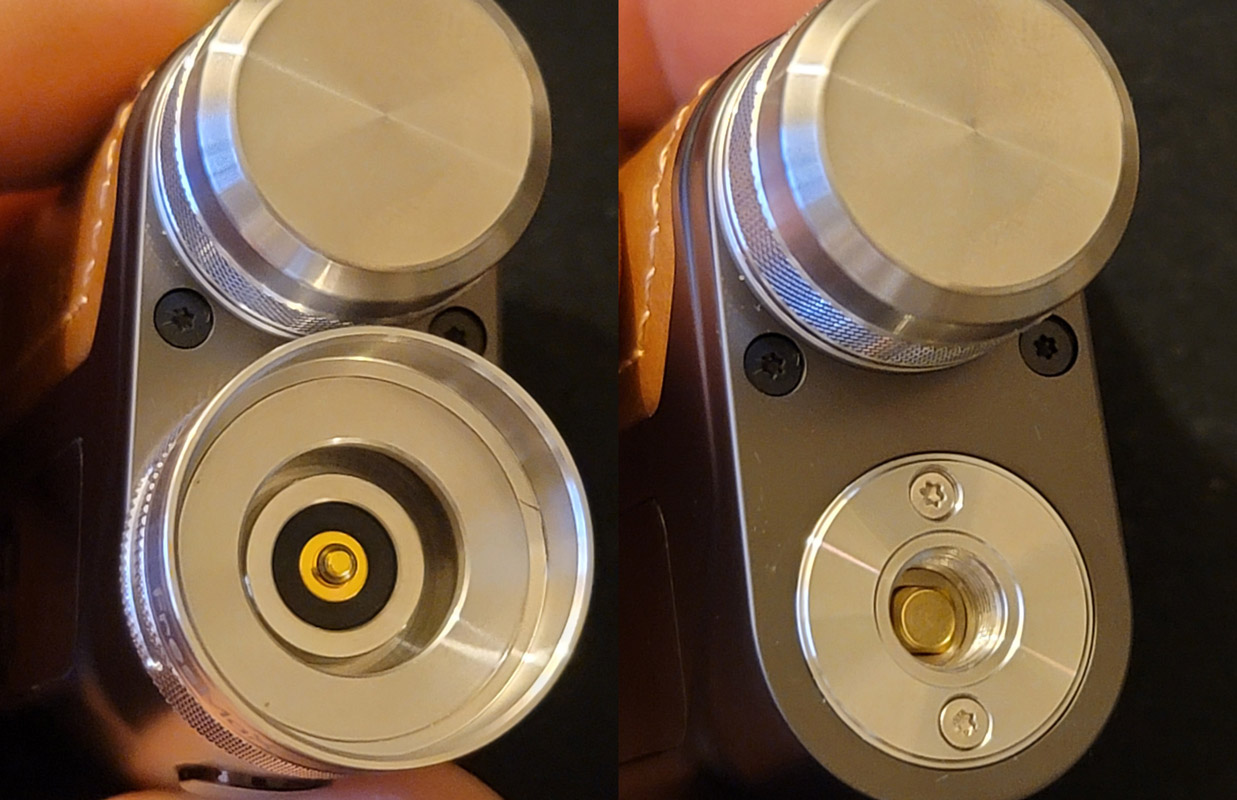
Left Picture:
This is the 510 base adapter that the pod plops down into. The 4 circular magnets found on the bottom of the Pod cling nicely to the outer rim of the adapter. Below that is a spring mounted pin that connects the mod 510 (right picture) to the bottom of the coil. It's a good habit to check this area when pulling the pod out to refill it making sure there isn't any coil leakage. Of the two pods I've been popping in and out of this adapter, I have yet to see any fluid other than slight condensation from the airflow which is completely normal and acceptable. If juice does flow down into this compartment, it can leak out of the airflow control ring, so keep an eye out for that just in case. This adapter is also completely fine to be submerged in water or rinsed out. Make sure it's completely dried off before screwing it back into the 510 mod.
Be aware if you allow the pod magnets to "slap" the pod back into this adapter repeatedly, you may experience some coil/pod leakage from unnecessary pressure exerted on the coil seals.
Right Picture:
Just a comparison of what the mod looks like with and without the 510 base adapter. Also a better look at the spring-loaded 510 pin, the 510 plate, and the battery cap.
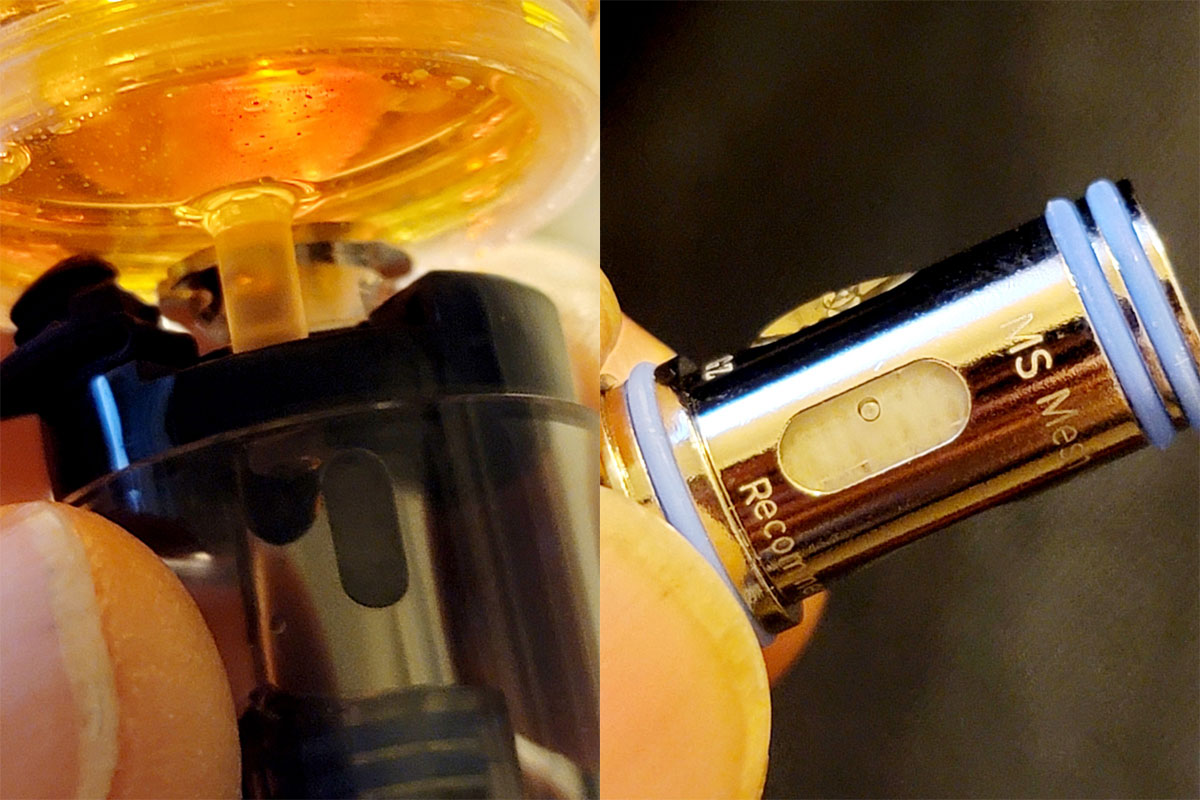
Refilling & Priming:
Left Picture:
The refill hole is very easily large enough to fit a chubby gorilla sized nozzle completely inside of it which will alleviate a lot of juicy messes. If you do this, you shouldn't have to worry about juice plugging the hole causing an instant overflow of juice. The rubber refill plug also folds back nicely.
Right Picture:
Remember to prime the coil before you pop it into the pod. Squirt enough juice to saturate the exposed wick in each of the 4 juice ports; doing this 3-4 times for each juice port after it soaks in should do the trick. You'll know it's fully saturated when you see a bubble forming outside of the juice ports like so. You can also squirt some down inside along the coil, but I've found that this often leads to initial flooding when filling the tank which is going to cause spitback and gurgling. The drip tip has an inverted cone shape to help with preventing this, but if you can pour juice out of the drip tip when you tip it upside down, the coil is flooded. If this happens, simply shake it for 10-15 seconds until most of the excess juice has dripped out, wipe the drip tip off, and off to happy vape land you go!

Remember, bubbles are good. If you do not see bubbles, you can expect dry hits. Bubbles tell you that the vaping/consumption of juice is being properly displaced with air. If no air is getting through, then that means the juice has stopped being wicked.
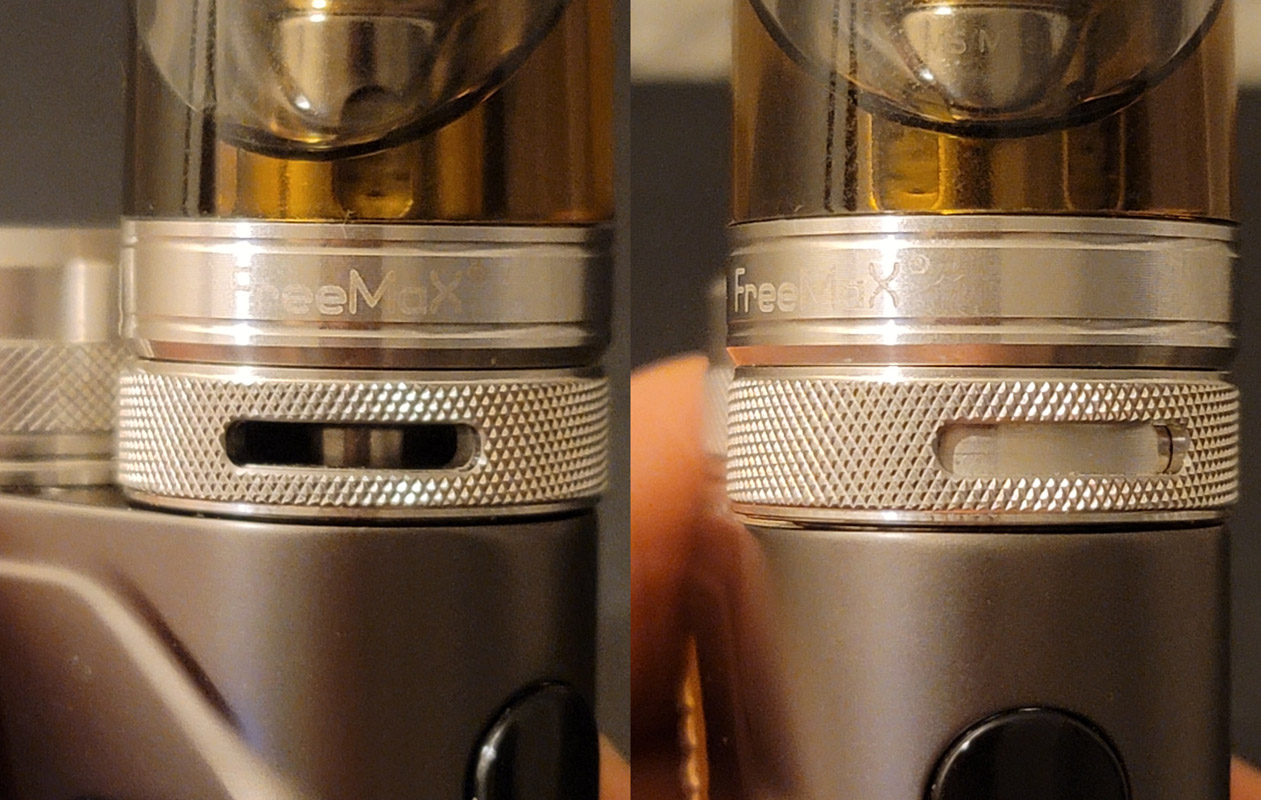
Airflow Control:
I don't think this needs to be explained much beyond what was talked about earlier in the review. Just for easier viewing:
Left Picture:
Airflow Control (AFC) Ring fully opened.
Right Picture:
Airflow Control (AFC) Ring fully closed.
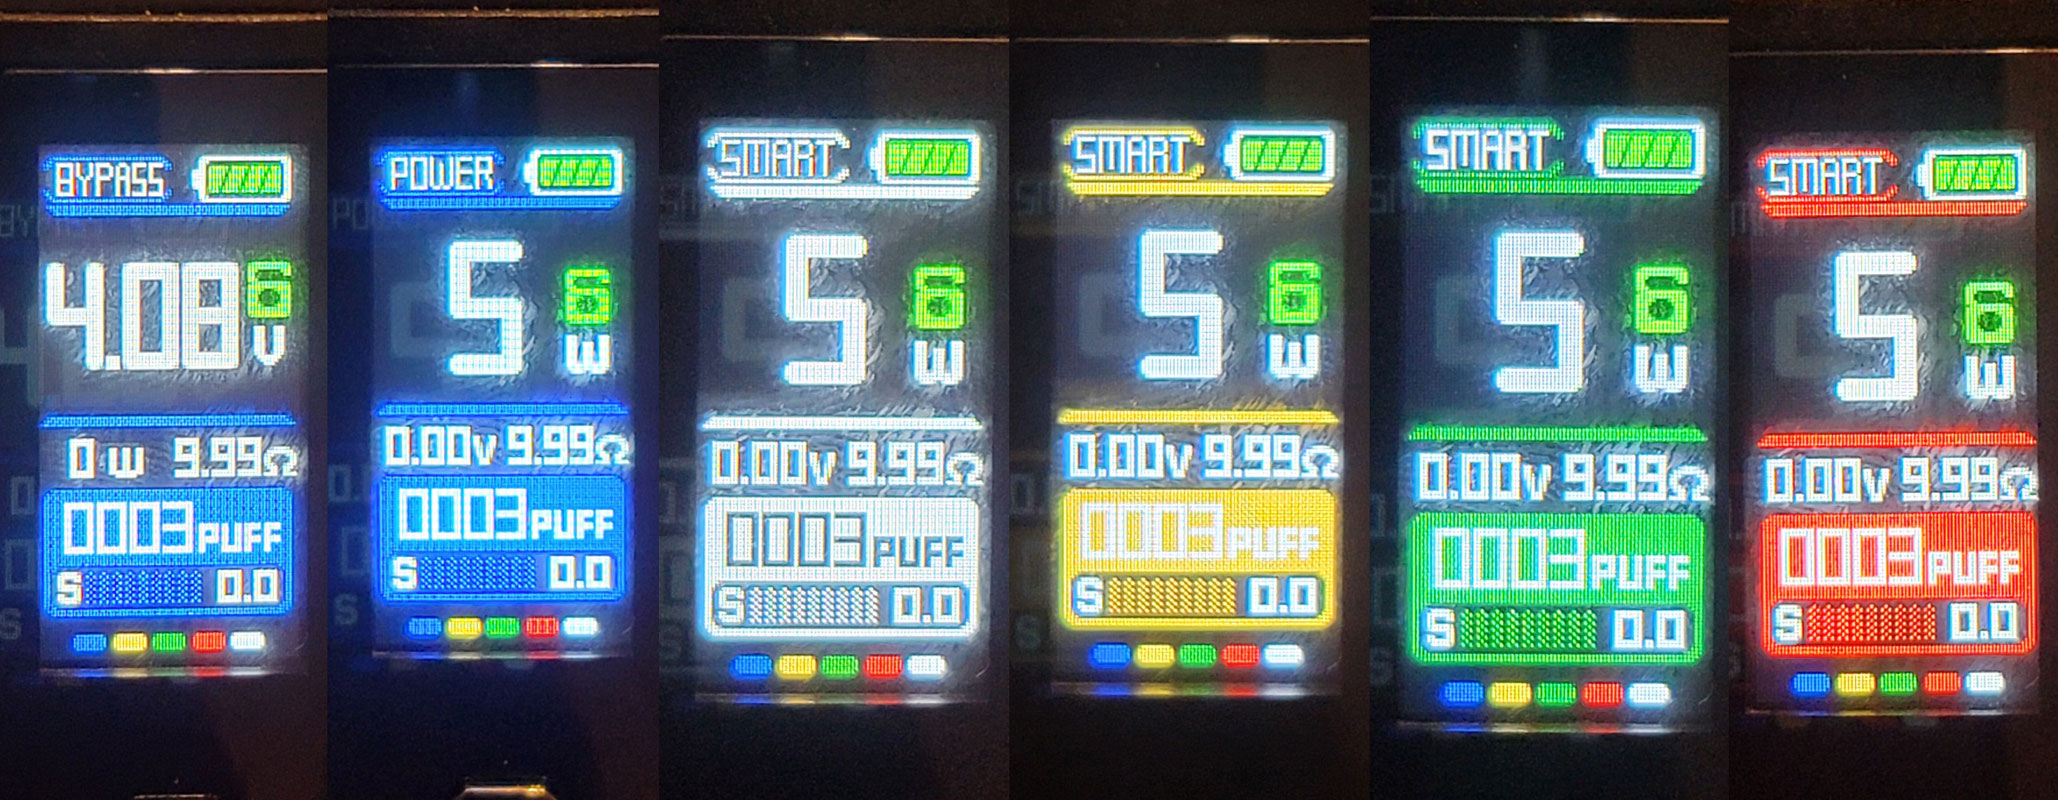
The UI & Button Functions:
From top left to bottom right on each screen, the UI shows the following:
- Firing mode (Bypass, Power, Smart)
- Battery status
- Voltage in Bypass Mode or Wattage setting in Power/Smart Mode
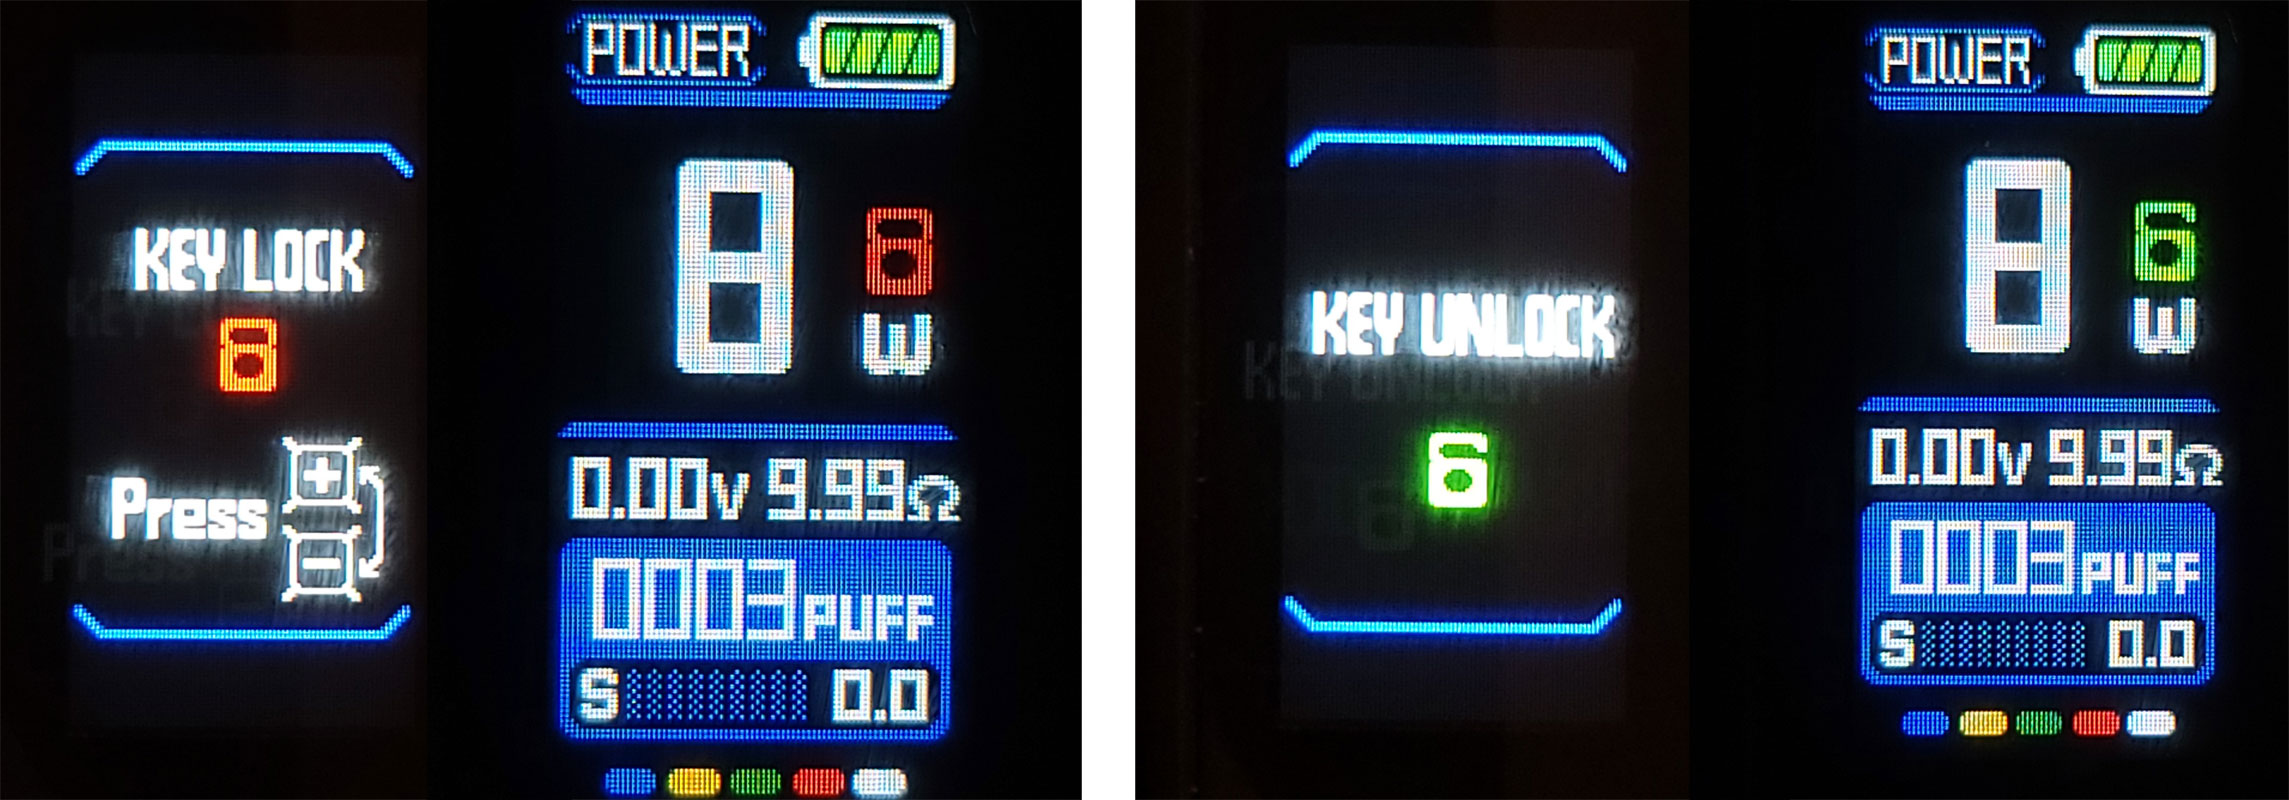
- Mod lock indicator (hold down both up and down directional buttons to toggle)
- Wattage calculation if in Bypass, Voltage reading if in Power or Smart Mode (when fired)
- Coil resistance
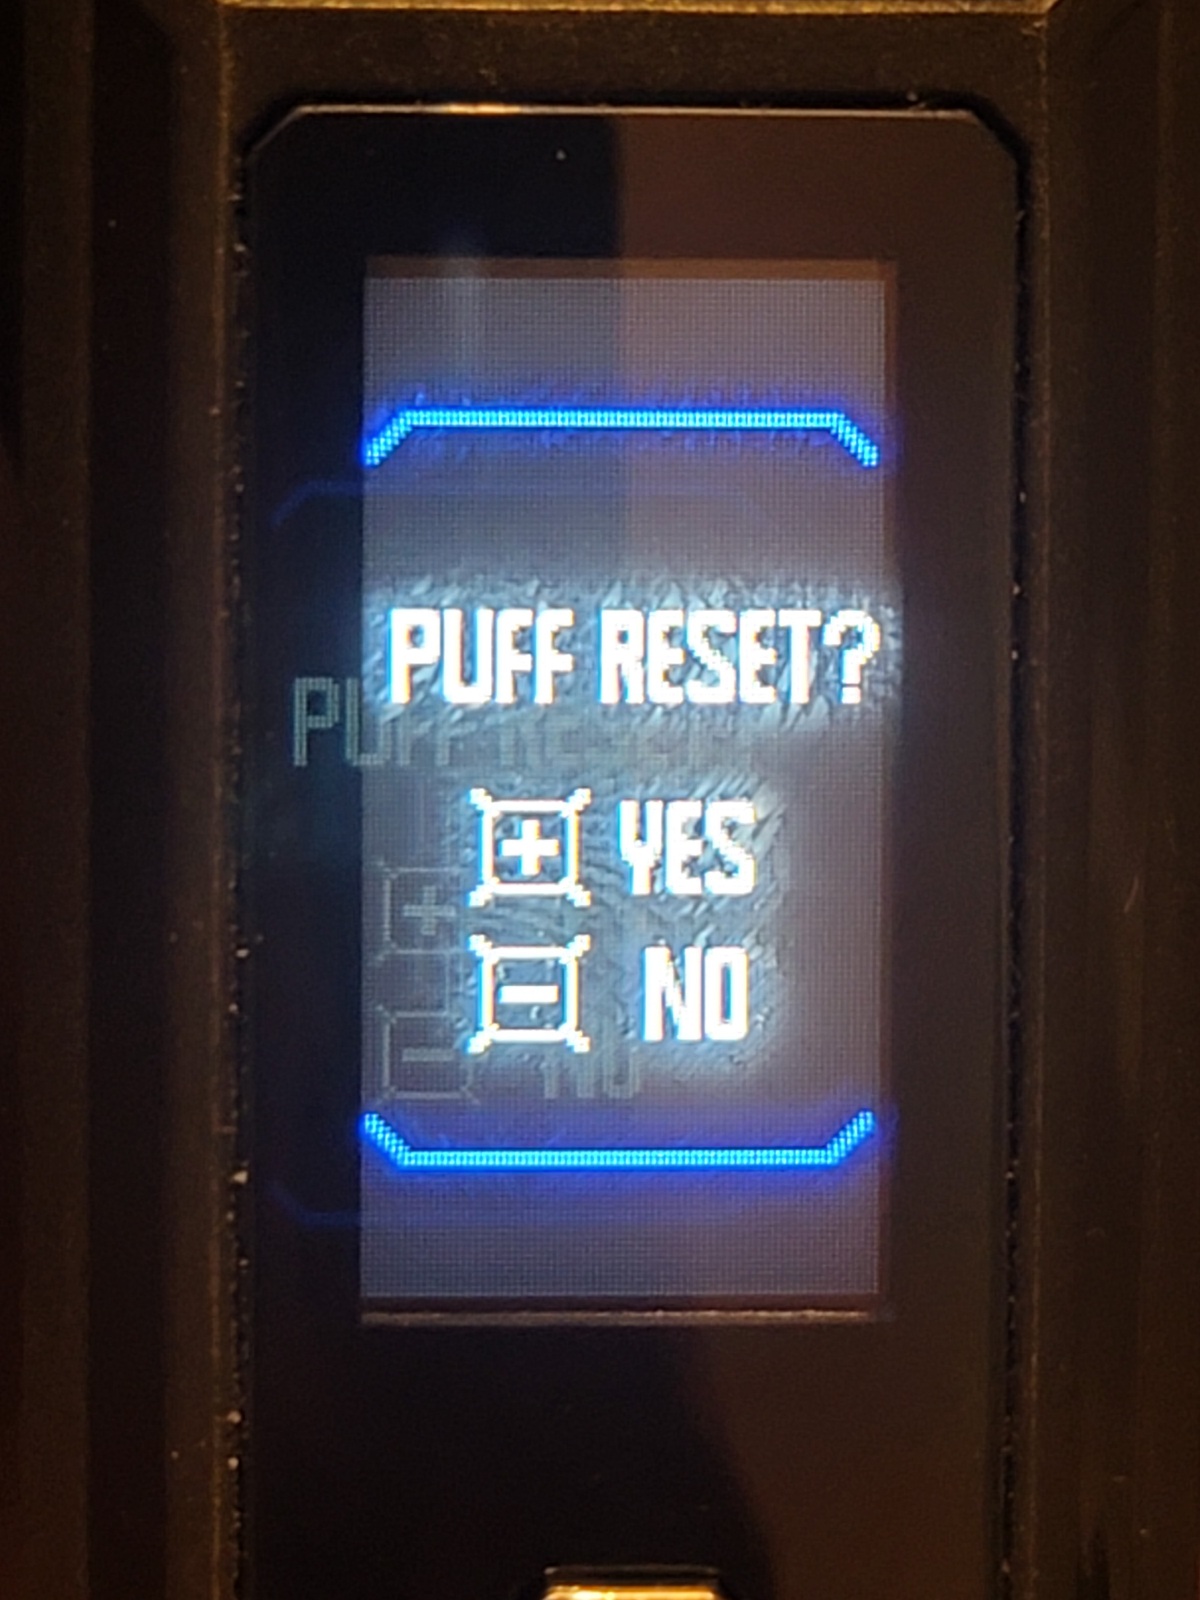
- Puff counter (to reset, press and hold fire and up directional buttons together, then 'YES' to confirm)
- Puff duration
- UI color options (to cycle, press and hold fire and down directional buttons together)
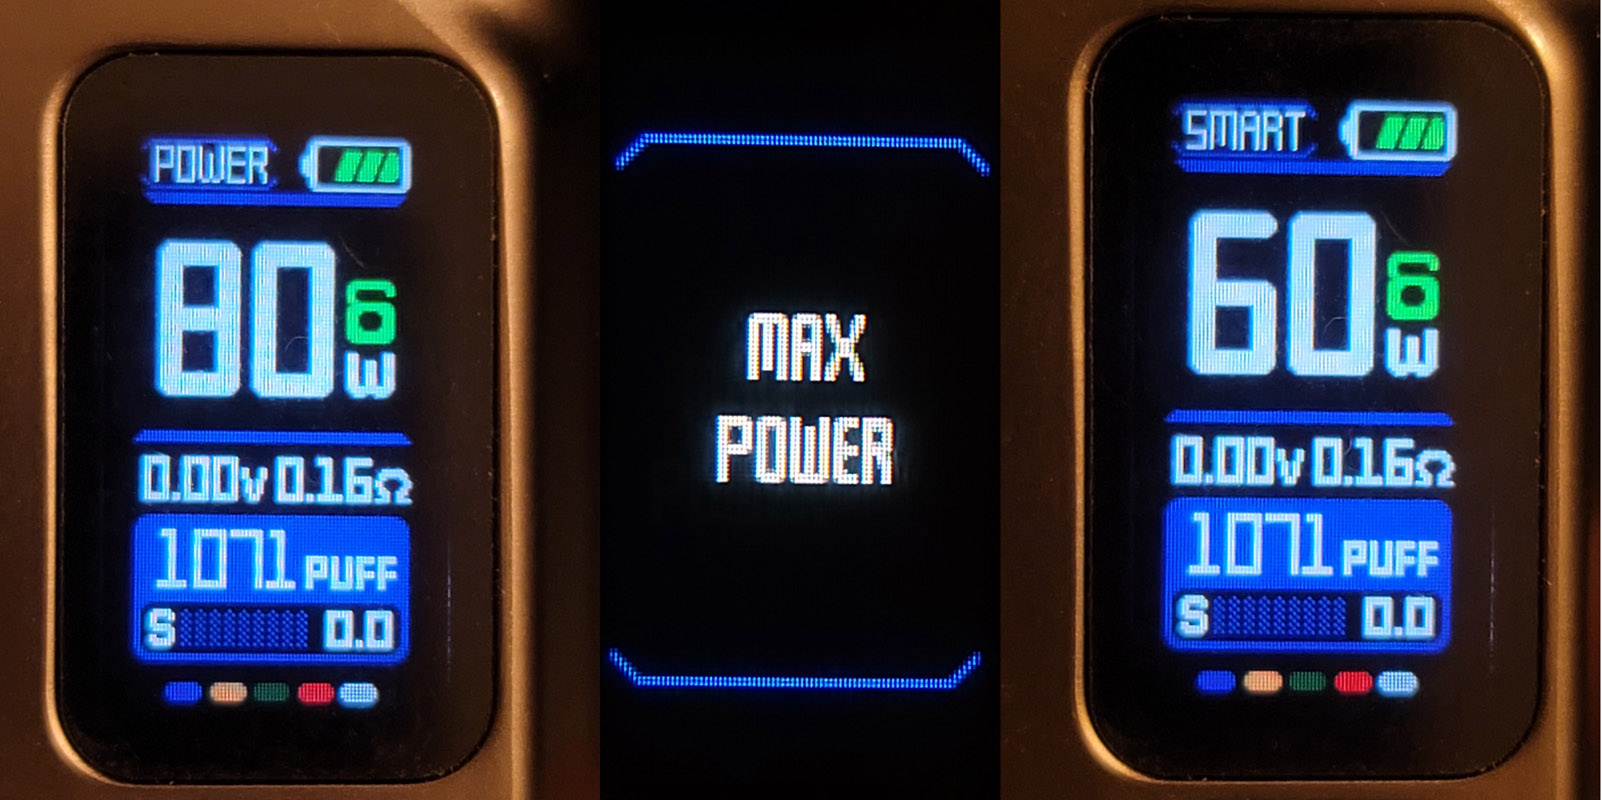
Pictures 1-3 show the 3 different firing modes (top left in the UI - Bypass/Power/Smart).
Pictures 2-6 show the 5 different UI colors.
A confirmation screen to reset the Puff Counter. I love this. Many-a-times switching between mods, I forget what what all of the button combos do, and I don't want to accidentally reset the Puff Counter to find out, so I just don't press anything at all. Now I don't have to worry if I forget how to change the color or lock the mod. I'm also not interested in digging through my stash of opened mod boxes just to remember. Ain' nobodeh got time fah dat.

Holding both up and down directional buttons simultaneously, you can lock and unlock the mod from being tampered with. You can still fire the mod when it's locked, but the firing mode, Wattage setting, UI color cycling, and Puff Counter reset are not accessible. The padlock icon just below battery status indicator will turn red when locked, and green when unlocked.
The Slap Test:
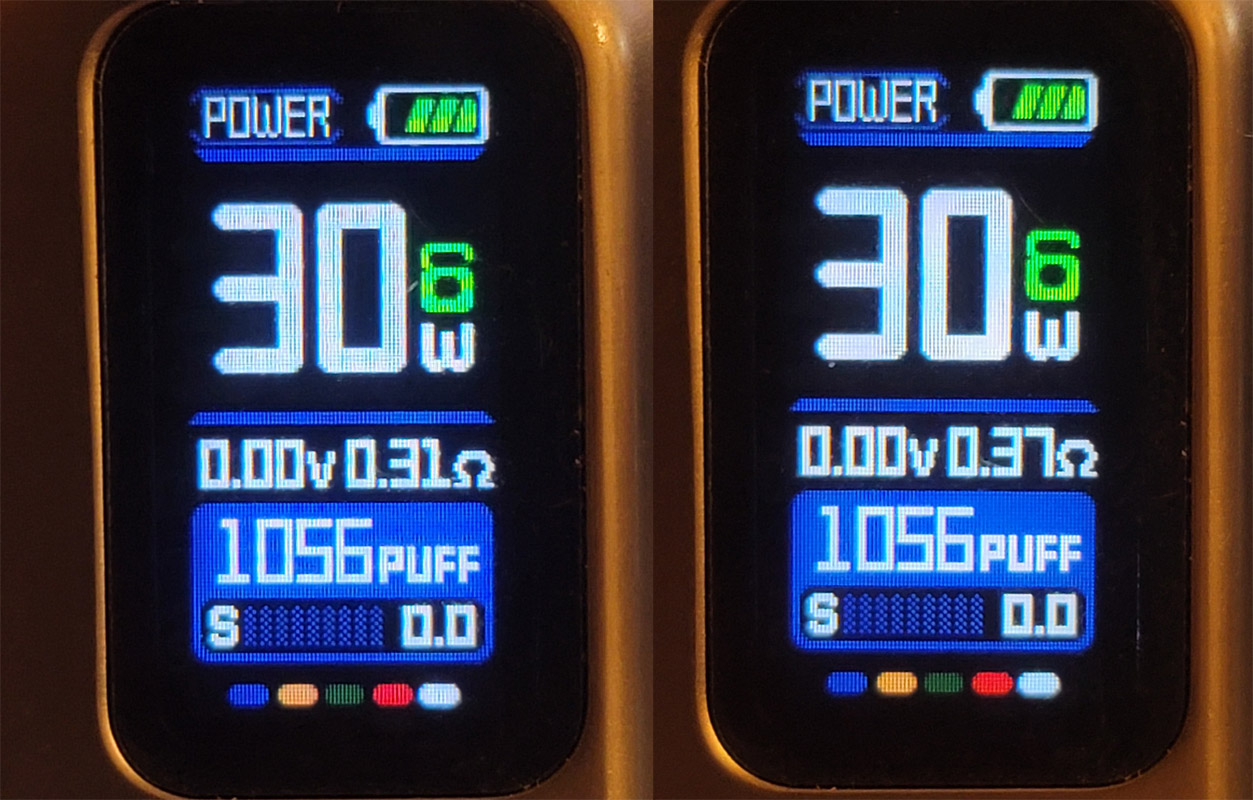
Have you ever dropped a mod and then went to vape it, and it fired extremely hot? How about if it's tipped over on your desk? Did you check the coil resistance readout on the mod? These types of concussive hits to any mod and tank can often change the resistance reading of the atomizer. The slap test is to see how erratic the coil readings are when the pod is slapped back into the 510 adapter or mod. These are my findings:
The coil that's currently in this pod is supposed to be 0.15 Ohm. Having slapped the pod into the 510 adapter 15 or so times, this is as erratic of a reading as I could get. Now, if you were to fire the mod while the resistance was this high, the mod is going to shoot quite a bit more Voltage into this coil, as a regulated mod is supposed to with an actual coil reading at 0.31 or 0.37 Ohms. You on the other hand, are going to experience this Voltage output through a 0.15 Ohm coil and it's not likely going to be pleasant. It may or may not be a dry hit, but it's going to be very warm never-the-less. Now for a more worrying situation:
Before when I had done the slap test with the 0.35 Ohm coil, simply unscrewing the 510 adapter until the mod 9.99 Ohms (no atomizer), and then screwing it back in reset the reading back to somewhat close to what the coil was supposed to read. Having run the slap test with the 0.15 Ohm coil and hitting 0.31 and 0.37 Ohms, I went to reset the coil resistance reading by unscrewing and re-screwing in the 510 adapter and I got the two Ohm readings above. Firing the mod with these types of readings is surely going to give you a big mouthful of dry burning cotton and probably a lot of expletives.

Luckily there's an easy fix to this by simply hitting the fire button quickly 5 times, turning the mod off, and then hitting the fire button 5 times to turn it back on. If the reading ends up being 0.23 or something that's close, but not quite exactly where it should be, it's okay to fire the mod - every 2 seconds or so, the mod will reread the coil resistance and reset the reading back to where it should be.
The only explanation I have for this is, the mod is reading the coil "too" fast (there's such a thing?

) and the resistance is being read before the pod/coil has been properly seated into the 510 adapter. Having run this test with the Marvos 60W which doesn't have a 510 adapter, the furthest resistance reading was only 0.04 Ohms off. Adding the 510 adapter between the mod and pod creates more moving parts, so I can't say this is unexpected however, it should be put out there that this is still possible. I wouldn't suspect this happening to the normal user though, as this is more or less an extensive stress test.
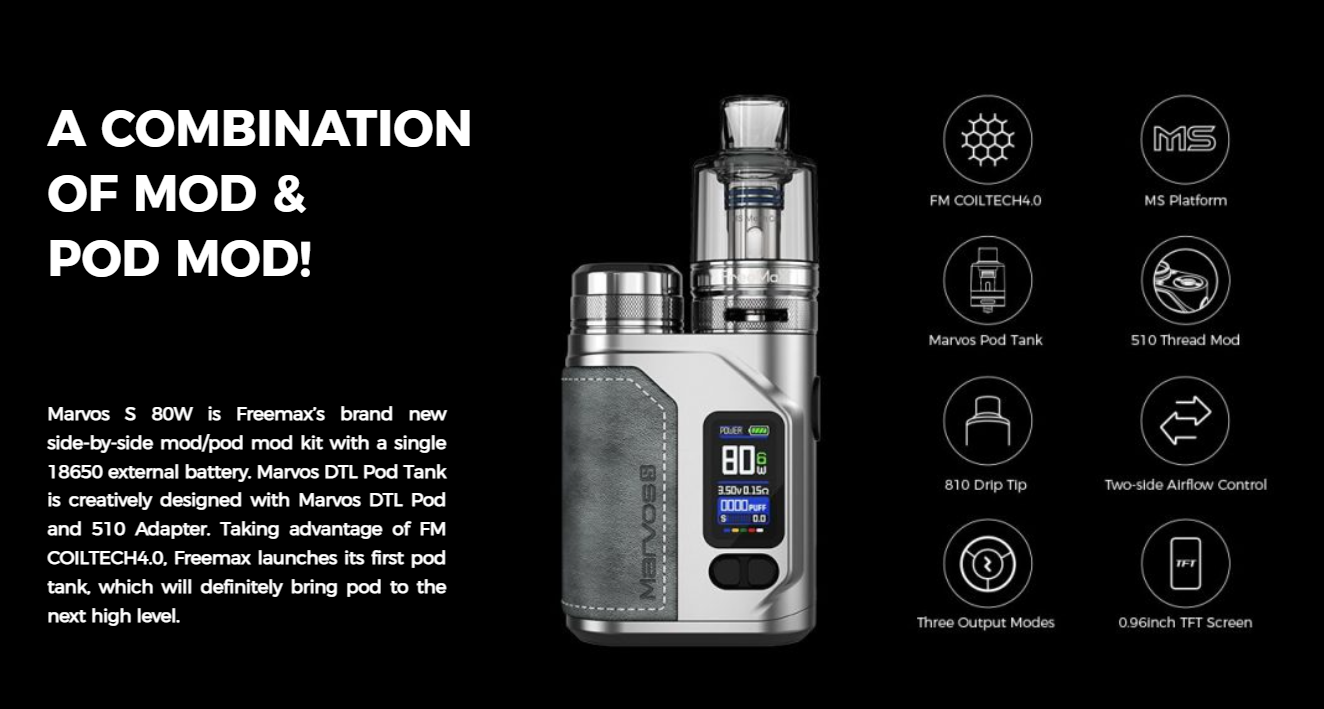
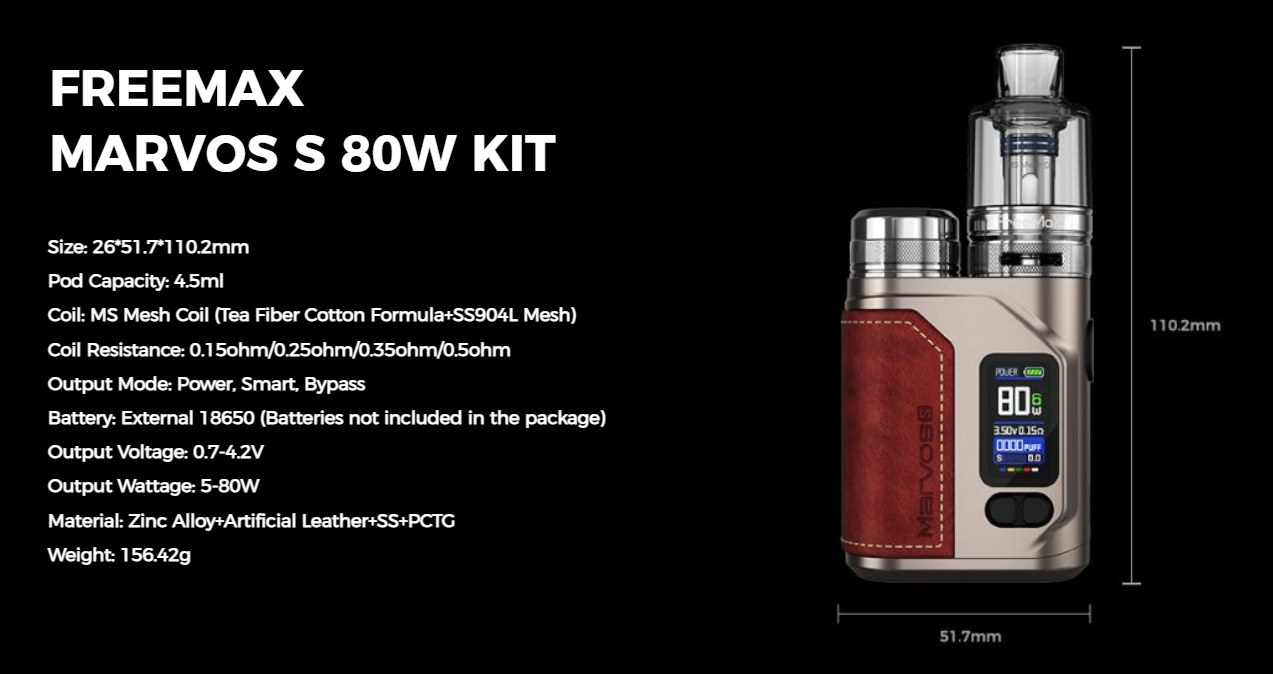
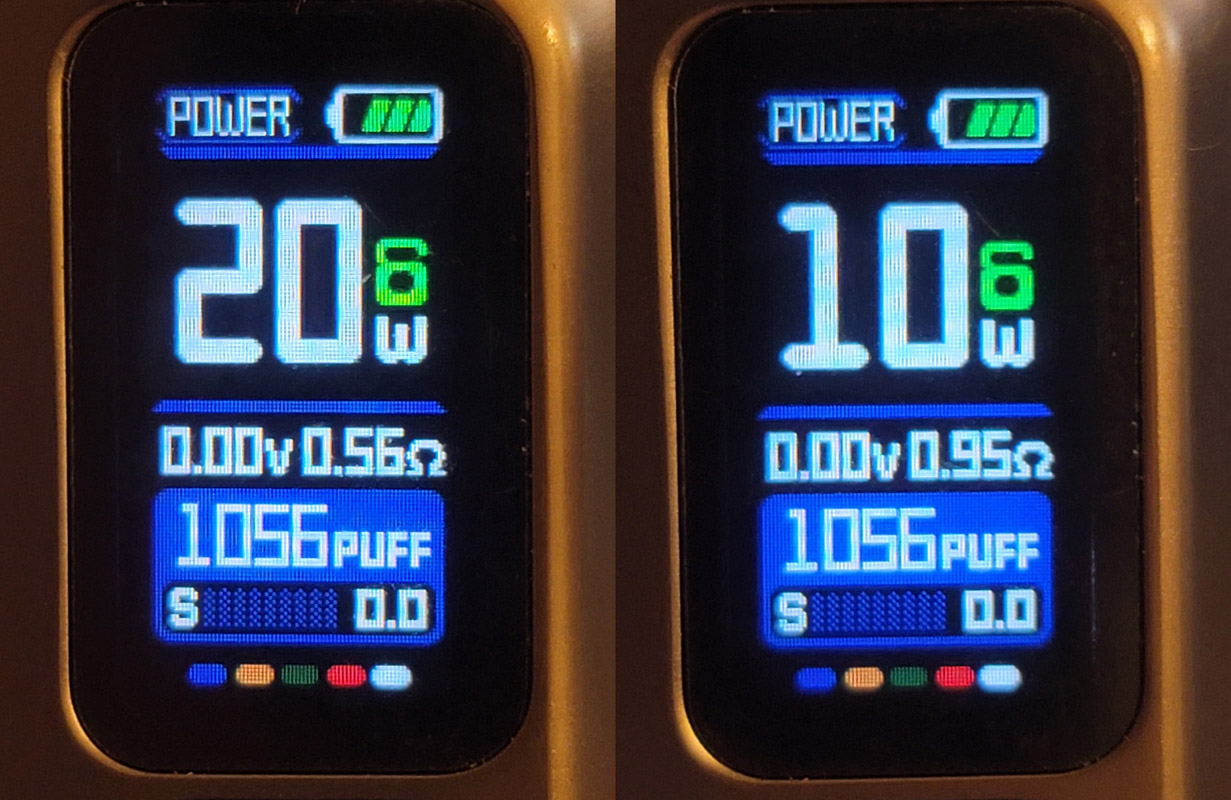
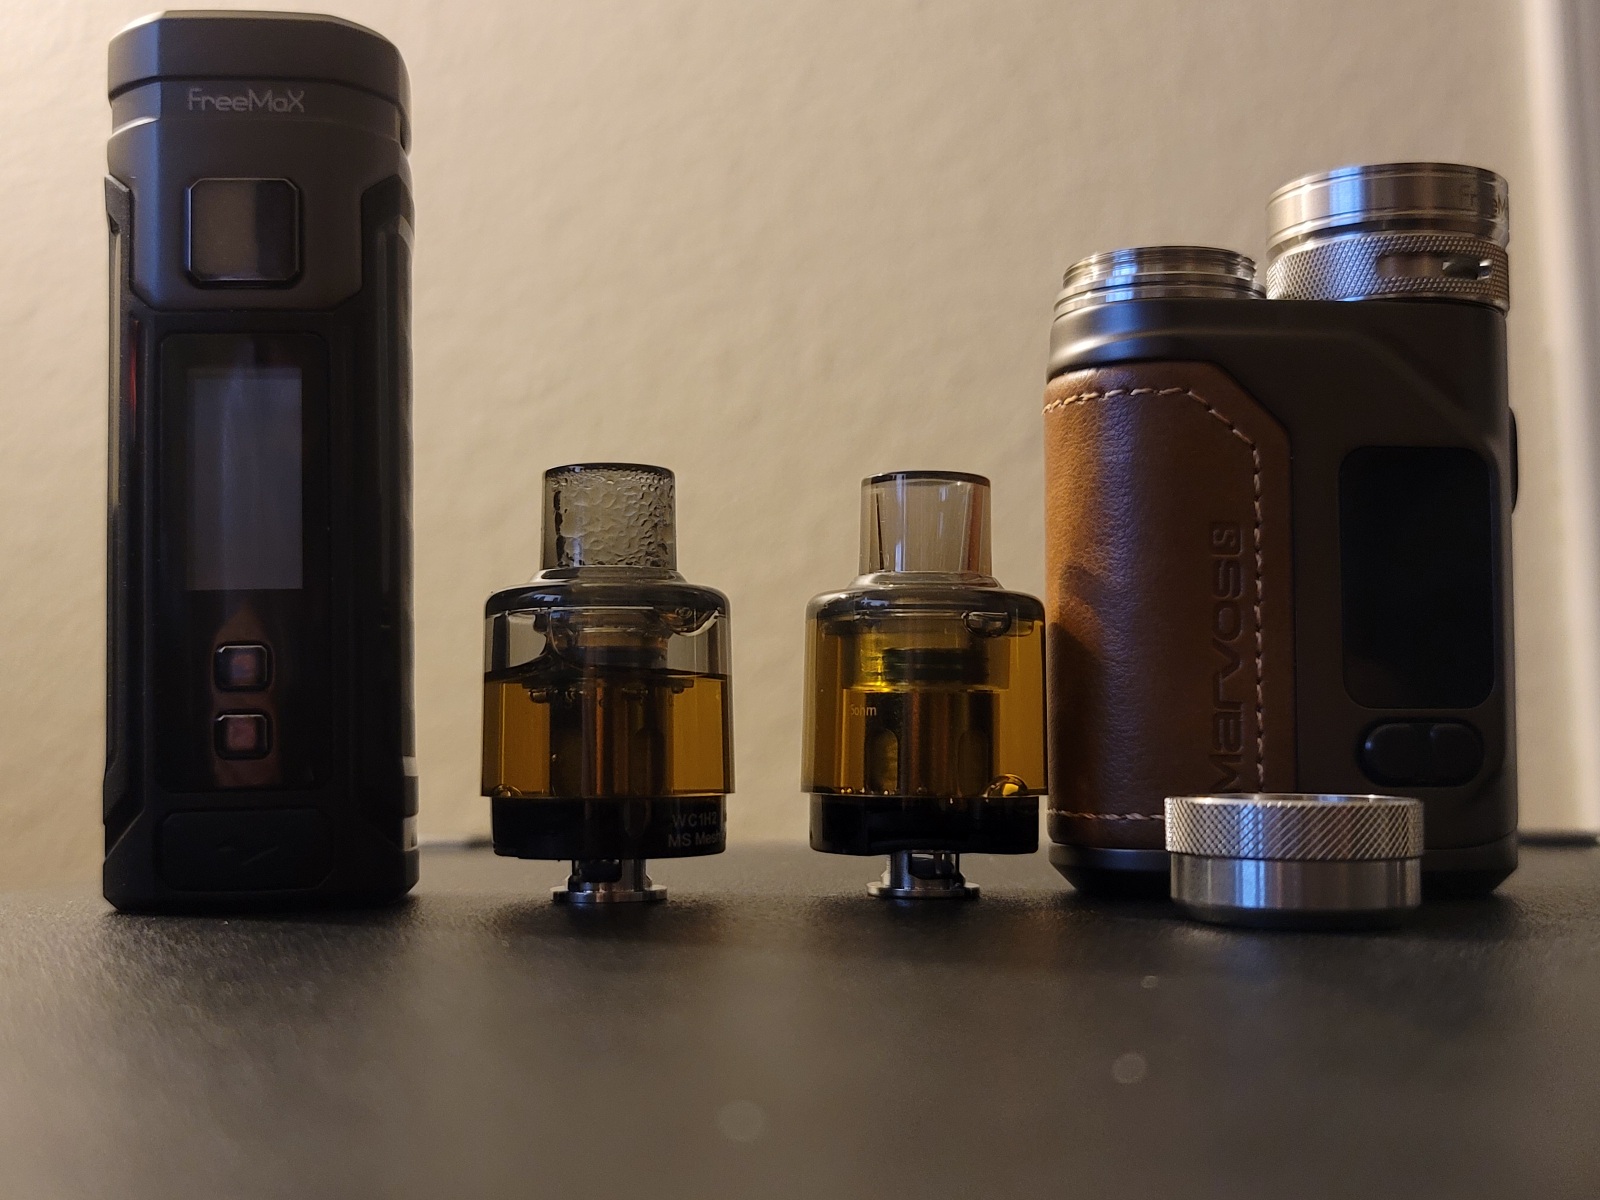
The Mod:
The max Wattage you can reach is 80 Watts in Power Mode, and 60 Watts in Smart Mode. Smart mode is mainly to help newer vapers that are unfamiliar with what they should set their mod to, and keep them within a safer limit, thus the lower Wattage cap. Regardless, this chip is not boosted, therefore I think this danger is rather minimal in this case. In a boosted chip, the Volts and Amps will increase as you set the Wattage higher, allowing you to exceed the 4.2 Volt battery limit that is otherwise capped in an unboosted mod. You may very well set the mod to 60 Watts, but if the voltage cannot be raised to meet that Wattage setting n an unboosted mod (depending on the resistance), it will be capped at wherever voltage is available - your remaining battery. That would make this a fairly safe mod to start out with.
For more experienced vapers that are looking to vape at higher Ohms (0.6 or above),
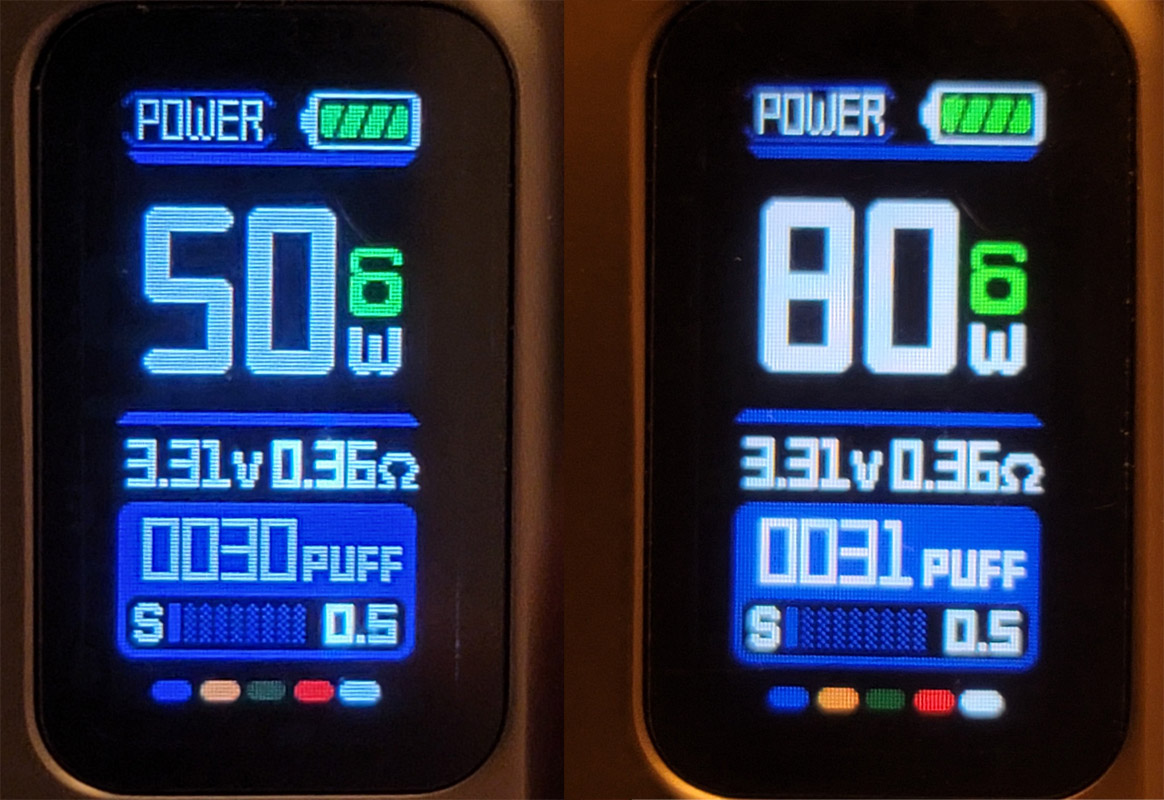
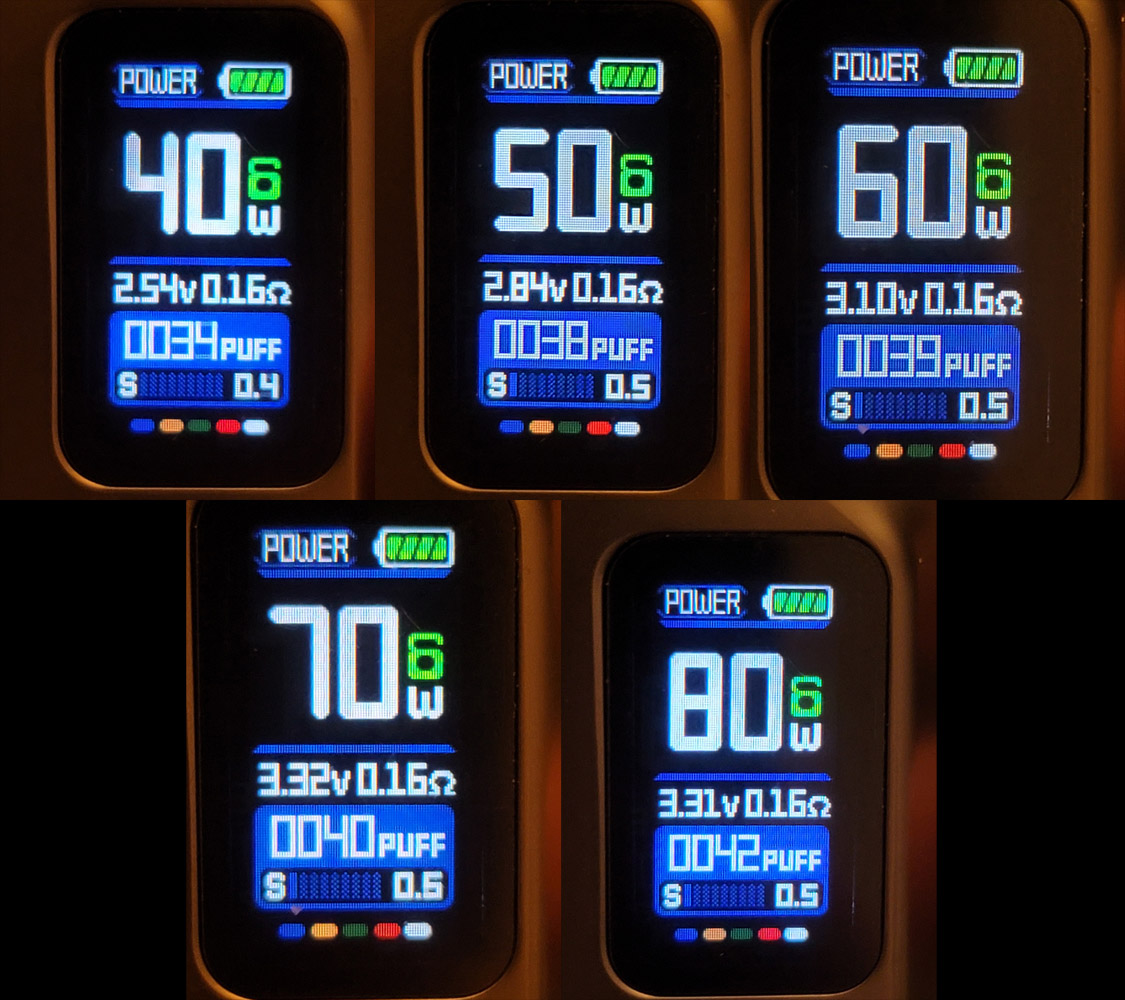
For the 0.35 Ohm coil, you can see that the Voltage output cap is below 50W. If you do the math, 3.31 Volts / 0.36 Ohms = 9.19 Amps. 3.31 Volts x 9.19 Amps = ~30.42 Watts. Essentially, you could set this mod anywhere between 31 and 80 Watts, and it's going to perform at 30.42 Watts. Bear in mind, this is also with a full battery. So, for the coils that come in the Marvos kits, this mod will work fine. If you had hopes of putting a Zenith II with a 1.6 Ohm Z coil on the Marvos S, you're limited to about 9 Watts on a fresh battery, which will continue to drop as the battery drains.
Same for the 0.15 Ohm coil. Voltage output stops somewhere above 60W based on the pictures above. The math says 3.32 Volts / 0.16 Ohms = 20.75 Amps (make sure your 18650 CDR is 25A or above to be safe). 3.32 Volts x 20.75 Amps = 68.89 Watts. So this mod actually caps the performing Wattage at 68.89. Wattage settings at 69 to 80 will all perform at 68.89 Watts for the 0.15 Ohm coil.
Again, for the purpose of properly firing the Marvos Pods with its 4 different coil resistances, the Marvos S will work just fine. This is another extenuating stress test that doesn't really apply to the functioning of the actual kit. If you're looking for a single battery mod that's a great performer for all Ohms, check out the Freemax Maxus 100W or 200W. Both have exquisite mods and atomizers.
-=-=-=-=-=-=-=-=-=-=-=-=-
- Final Thoughts -
Overall, the Marvos S 60W tastes pretty delicious. I have to go out and buy another one now because I ate it.

Having also received the Marvos 60W at the same time, I would have expected a 510 mod with a pod and 510 base adapter with a 0.15 Ohm coil to be much more close to my general liking, but I think the Marvos 60W takes the cake for overall performance and durability (IP67 rated!) in comparison. I would recommend the Marvos DTL Pod Tank to any and everyone; it's an absolute stellar pod with no leaks and the CoilTech 4.0 technology Freemax transferred over from the 904L series coils will be my recommendation to anyone looking for a drop-n coil flavor banger. The Marvos S mod, while it does what it needs to for the kit, is limited to just about that. I'd recommend picking up its big or biggest brother, the Maxus 100W (boosted chip) or 200W if you're looking for additional mod performance.
In regard to Wattage settings using the 0.15 Ohm coil, flavor appears around 30W and peaks at about 45W. From there, any additional Wattage is going to add warmth to the vape.
-= Pros =-
-Pod Tank-
- No leaking
- Slight leaking after "slap testing" the pod back in 40-50 times continuously (to be expected)
- Magnets are strong
- Decent tank size
- Removeable 810 drip tip (2x seals on drip tip)
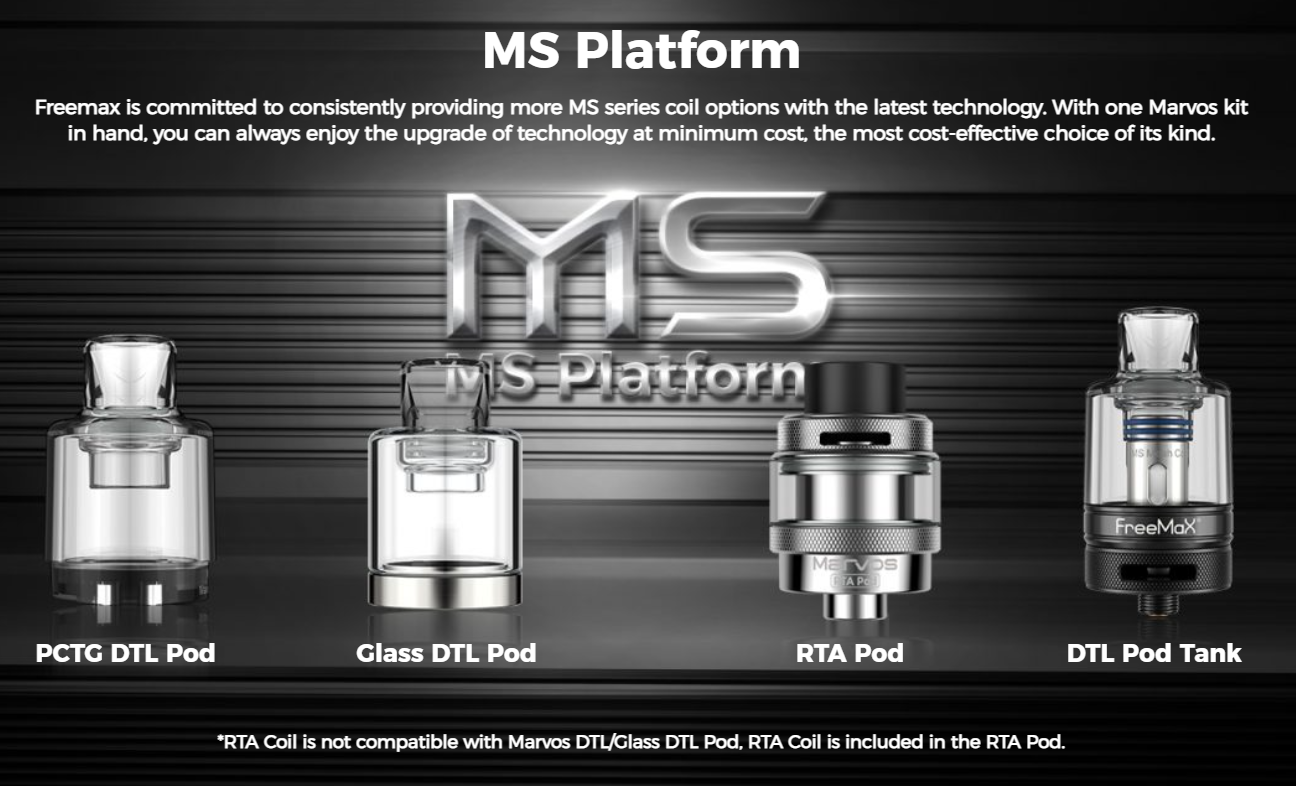
- Glass/PCTG/MTL Pods available (PCTG comes with kit)
- RTA Pod available (sold separately)
- Cannot currently verify the performance of this
- Rubber refill tab is thick at the plug and thinner at the fold
- Easier to hold back when refilling
- Refill opening fits chubby gorilla nozzles with ease
- MS coils (FM CoilTech 4.0) are outstanding in flavor and vape production
- As good or better than 904L’s which is my golden standard for drop-in coil heads
- Coils range from 0.15 to 0.5 ohms
- CoilTech 4.0 Mesh requires lower Watts than most coils to properly fire
- Chain vapeable
- AFC fully closed to fully open gives Restricted DL to DL as advertised
- No whistling no matter what the AFC is set to
- Knurling feels nice and grippy
- No spitback/gurgling
- Easy to disassemble and clean
-Mod-
- Resistance is corrected every 2 seconds
- More on this in the cons below
- Small and compact
- Lightweight
- External battery
- Both pro or con depending on user
- Battery cap can be easily thumb tightened/loosened
- Recommended to prevent wear and tear on cap threads
- Decent battery life if not cranked to 60+ Watts
- No sharp edges including the bottom
- 510 plate is screwed in and not press-fitted
- Fire and directional buttons are clicky and responsive
- USB Type-C 2A charging port
-= Cons =-
-Pod Tank-
- Pod can sometimes disconnect from the 510 pin when walking and vaping
- It won't cuddle me back?
-Mod-
- Would always prefer a 217 battery option over just an 18650
- Mod reads atomizer resistance too fast with 510 pod base (only applies when using 510 base adapter)
- With so many moving parts, resistance readout is sometimes random when dropping pod in
- Corrects after 2 seconds but wattage doesn’t (do not fire if readout is more than 0.2 ohms off from listed coil resistance to avoid roasting coil, unpleasant vaping, and dry hits)
- Can be easily remedied by powering the mod off and then back on
- Chip lacks a step-up/boost converter for wider application than just the kit
- Final Evaluation -
Before I give a final evaluation, I want the viewer to understand how I rate this. For all values with a Weight of 10, it means this is a high priority for me - what I personally look for in a vape product. The lower the weight, the less this effects my overall judgment. You and I will not likely be interested in the same things, so rate the kit based on what you would weight as a 10. Also bear in mind that I am evaluating this product for its intended purpose. The overall rating isn't a computed average of each of these scores, but rather my overall enjoyment of vaping with this product.
Evaluation considerations:
Battery: Weight 10, Evaluation 8
Internal/External, battery capacity, recharge time.
Flavor Production: Weight 10, Evaluation 10+
Depth of flavor, full/rich vs. hollow taste.
Vape Production: Weight 6, Evaluation 8
Cloud size, volume, thickness.
Coil Performance (0.15 Ohm): Weight 10, Evaluation 10
Lifespan, dry hitting, chain vaping.
Build Quality: Weight 10, Evaluation 9
Durability, quality, leakage, reliability.
Efficiency (0.15 Ohm): Weight 10, Evaluation 10
Juice consumption.
Size: Weight 3, Evaluation 9
Comfort, pocketing, weight.
Visual Appeal/Style: Weight 7, Evaluation 9
Schmexiness.
Versatility: Weight 8, Evaluation 10
Options, available adapters, Ohm range, salt nic vs. freebase.
Recommendation: Weight 7, Evaluation 9
Would I pick this as the kit I'd rave about to another vaper?
- Overall Rating -
Compared to other pod kits:
9.5
(A few kinks, but the Marvos Pod Tank  )
)
Compared to other mod+atomizer kits:
9
(The Marvos Pod Tank makes up for most mod shortcomings)
Final note:
I hope you enjoyed the review and/or learned something that might help you to make a more informed decision or comparison. The Freemax Marvos S 80W can be purchased from their website here
Freemaxvape.com and various other outlets.
Cheers and happy vape hoarding!