I’m here today to present my second review for Hellvape. The Hellvape Dead Rabbit R tank was sent to me for the purpose of providing a fair and honest review by Hellvape. You might be surprised to find out that I’ve never tried any of the Dead Rabbit series of tanks and have only tried a couple of tanks made by Hellvape. Testing the R Tank has been a very interesting experience for me. The R Tank is a bottom airflow tank and holds 5ml of liquid with the pre-installed straight glass and 6.5ml of liquid with the included spare bubble glass. It is in my opinion an attractive looking tank but I’m sure what you really want to know is how it vapes so let’s get to it.


WHAT’S IN THE BOX?


SPECIFICATIONS:

FEATURES:
1. New style meshed rebuildable tank
2. Quarter-turn top fill system
3. Knurled grip to assist bottom airflow adjustment easily
4. Changeable drip tip, 5ml/6.5ml capacity
5. One pack of R Coil accessories can be built the coil 10 times
6. Easy to build the coil with DIY fun


INITITAL THOUGHTS:
The packaging on this one is an eye catcher. The box is bright red with the Hellvape logo on top and the Dead Rabbit picture larger in the center. Once opened, the tank is exposed with the straight glass on it for shipping and the bubble glass below it in the foam insert. Actually what is seen first it the coil insertion instructions sitting on top of the tank and glass when the box is first opened.
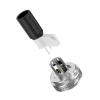
The R Tank is very easy to disassemble for cleaning which I like to do before using any new tank. I was a little surprised that they went with a 510 drip tip but it seems to work out well. The top cap and the base both have a Celtic design wrapping around them. The top cap was very easy to remove for filling with a ¼ turn.
The first thing I did after cleaning the tank was to go ahead and install the bubble glass. I prefer to have the larger liquid capacity but the 5ml capacity with the straight glass isn’t bad at all either.


The internal chimney has R Tank printed on it which is easily visible through the glass. Above the airflow/ deck screw ring is the Dead Rabbit symbol on one side and on the opposite side is the Dead Rabbit name.


By now you might be thinking that this is just another regular RTA. Well, it’s not. The R Tank is not only a mesh coil tank but it is a vertical mesh coil tank. I find the base design rather interesting. The circular opening where the coil is inserted has multiple openings in it to allow plenty of liquid to flow to the cotton for the coil. Below where the opening is in the circular base there are two holes and when you turn the airflow ring it exposes two flat head screws that tighten down on the legs of the mesh coils.

First, you lay the included cotton strip down on a flat surface and place the mesh strip on it trying to center it as much as possible. It is important that you lay the strip with the cut corner on the top left. Then use the included coil tool with the side with the dimple sticking out upward and wrap the coil and cotton in one motion. Hold the cotton, coil, and tool securely and slide the coil down into the opening on the base. Don’t forget to loosen the flat head screws first so that the coil legs can go into place and then tighten the two screws. Clip the cotton as close as you can to the opening and you are done. Soak the cotton with liquid, fill the tank, and you’re ready to vape. I totally expected to have issues inserting the coil but had none. It was so easy that I was actually surprised at how well it went. Hellvape says it can be done in 15 seconds. I’m not sure about that but it went very quickly.


FINAL THOUGHTS:
I really enjoyed testing the Hellvape Dead Rabbit R Tank. I was a little skeptical at first about how difficult it was going to be to install a coil in this tank but it went smoother than I could even have imagined.
I think it’s a really great and interesting design. I’ve used a few other mesh tanks but had never seen a rebuildable vertical mesh tank like this. Even though the literature says you can build ten coils, there are only five coils and cotton strips included with the tank. However, if you buy the refill packs then you will get ten coils and strips for about the price of a couple of drop in coils.
On my first build, I didn’t get the cotton pushed down far enough on the bottom after cutting the cotton strip and got a bit of leaking after each refill. I knew pretty quickly what the cause was and installed a new coil and cotton strip. After that I didn’t have any leaking issues so it was purely operator error. I knew about pushing the cotton down but didn’t get it right the first time.
I felt like the vapor and flavor production was very good and liked running the airflow about 1/3 open at 36 watts for a really nice slightly restricted direct lung vape.
I’d like to thank Hellvape and Cara for sending the Hellvape Dead Rabbit R Tank for this review. A big thanks to the readers for sticking it out to the end of my review. Below is a link to the Hellvape website if you would like to explore their line of products.
Dead Rabbit R Tank - Unique Rebuildable Mesh Tank-Hellvape - The DIY atomizer leading brand
WHAT’S IN THE BOX?
SPECIFICATIONS:
FEATURES:
1. New style meshed rebuildable tank
2. Quarter-turn top fill system
3. Knurled grip to assist bottom airflow adjustment easily
4. Changeable drip tip, 5ml/6.5ml capacity
5. One pack of R Coil accessories can be built the coil 10 times
6. Easy to build the coil with DIY fun
INITITAL THOUGHTS:
The packaging on this one is an eye catcher. The box is bright red with the Hellvape logo on top and the Dead Rabbit picture larger in the center. Once opened, the tank is exposed with the straight glass on it for shipping and the bubble glass below it in the foam insert. Actually what is seen first it the coil insertion instructions sitting on top of the tank and glass when the box is first opened.
The R Tank is very easy to disassemble for cleaning which I like to do before using any new tank. I was a little surprised that they went with a 510 drip tip but it seems to work out well. The top cap and the base both have a Celtic design wrapping around them. The top cap was very easy to remove for filling with a ¼ turn.
The first thing I did after cleaning the tank was to go ahead and install the bubble glass. I prefer to have the larger liquid capacity but the 5ml capacity with the straight glass isn’t bad at all either.
The internal chimney has R Tank printed on it which is easily visible through the glass. Above the airflow/ deck screw ring is the Dead Rabbit symbol on one side and on the opposite side is the Dead Rabbit name.
By now you might be thinking that this is just another regular RTA. Well, it’s not. The R Tank is not only a mesh coil tank but it is a vertical mesh coil tank. I find the base design rather interesting. The circular opening where the coil is inserted has multiple openings in it to allow plenty of liquid to flow to the cotton for the coil. Below where the opening is in the circular base there are two holes and when you turn the airflow ring it exposes two flat head screws that tighten down on the legs of the mesh coils.
First, you lay the included cotton strip down on a flat surface and place the mesh strip on it trying to center it as much as possible. It is important that you lay the strip with the cut corner on the top left. Then use the included coil tool with the side with the dimple sticking out upward and wrap the coil and cotton in one motion. Hold the cotton, coil, and tool securely and slide the coil down into the opening on the base. Don’t forget to loosen the flat head screws first so that the coil legs can go into place and then tighten the two screws. Clip the cotton as close as you can to the opening and you are done. Soak the cotton with liquid, fill the tank, and you’re ready to vape. I totally expected to have issues inserting the coil but had none. It was so easy that I was actually surprised at how well it went. Hellvape says it can be done in 15 seconds. I’m not sure about that but it went very quickly.
FINAL THOUGHTS:
I really enjoyed testing the Hellvape Dead Rabbit R Tank. I was a little skeptical at first about how difficult it was going to be to install a coil in this tank but it went smoother than I could even have imagined.
I think it’s a really great and interesting design. I’ve used a few other mesh tanks but had never seen a rebuildable vertical mesh tank like this. Even though the literature says you can build ten coils, there are only five coils and cotton strips included with the tank. However, if you buy the refill packs then you will get ten coils and strips for about the price of a couple of drop in coils.
On my first build, I didn’t get the cotton pushed down far enough on the bottom after cutting the cotton strip and got a bit of leaking after each refill. I knew pretty quickly what the cause was and installed a new coil and cotton strip. After that I didn’t have any leaking issues so it was purely operator error. I knew about pushing the cotton down but didn’t get it right the first time.
I felt like the vapor and flavor production was very good and liked running the airflow about 1/3 open at 36 watts for a really nice slightly restricted direct lung vape.
I’d like to thank Hellvape and Cara for sending the Hellvape Dead Rabbit R Tank for this review. A big thanks to the readers for sticking it out to the end of my review. Below is a link to the Hellvape website if you would like to explore their line of products.
Dead Rabbit R Tank - Unique Rebuildable Mesh Tank-Hellvape - The DIY atomizer leading brand