
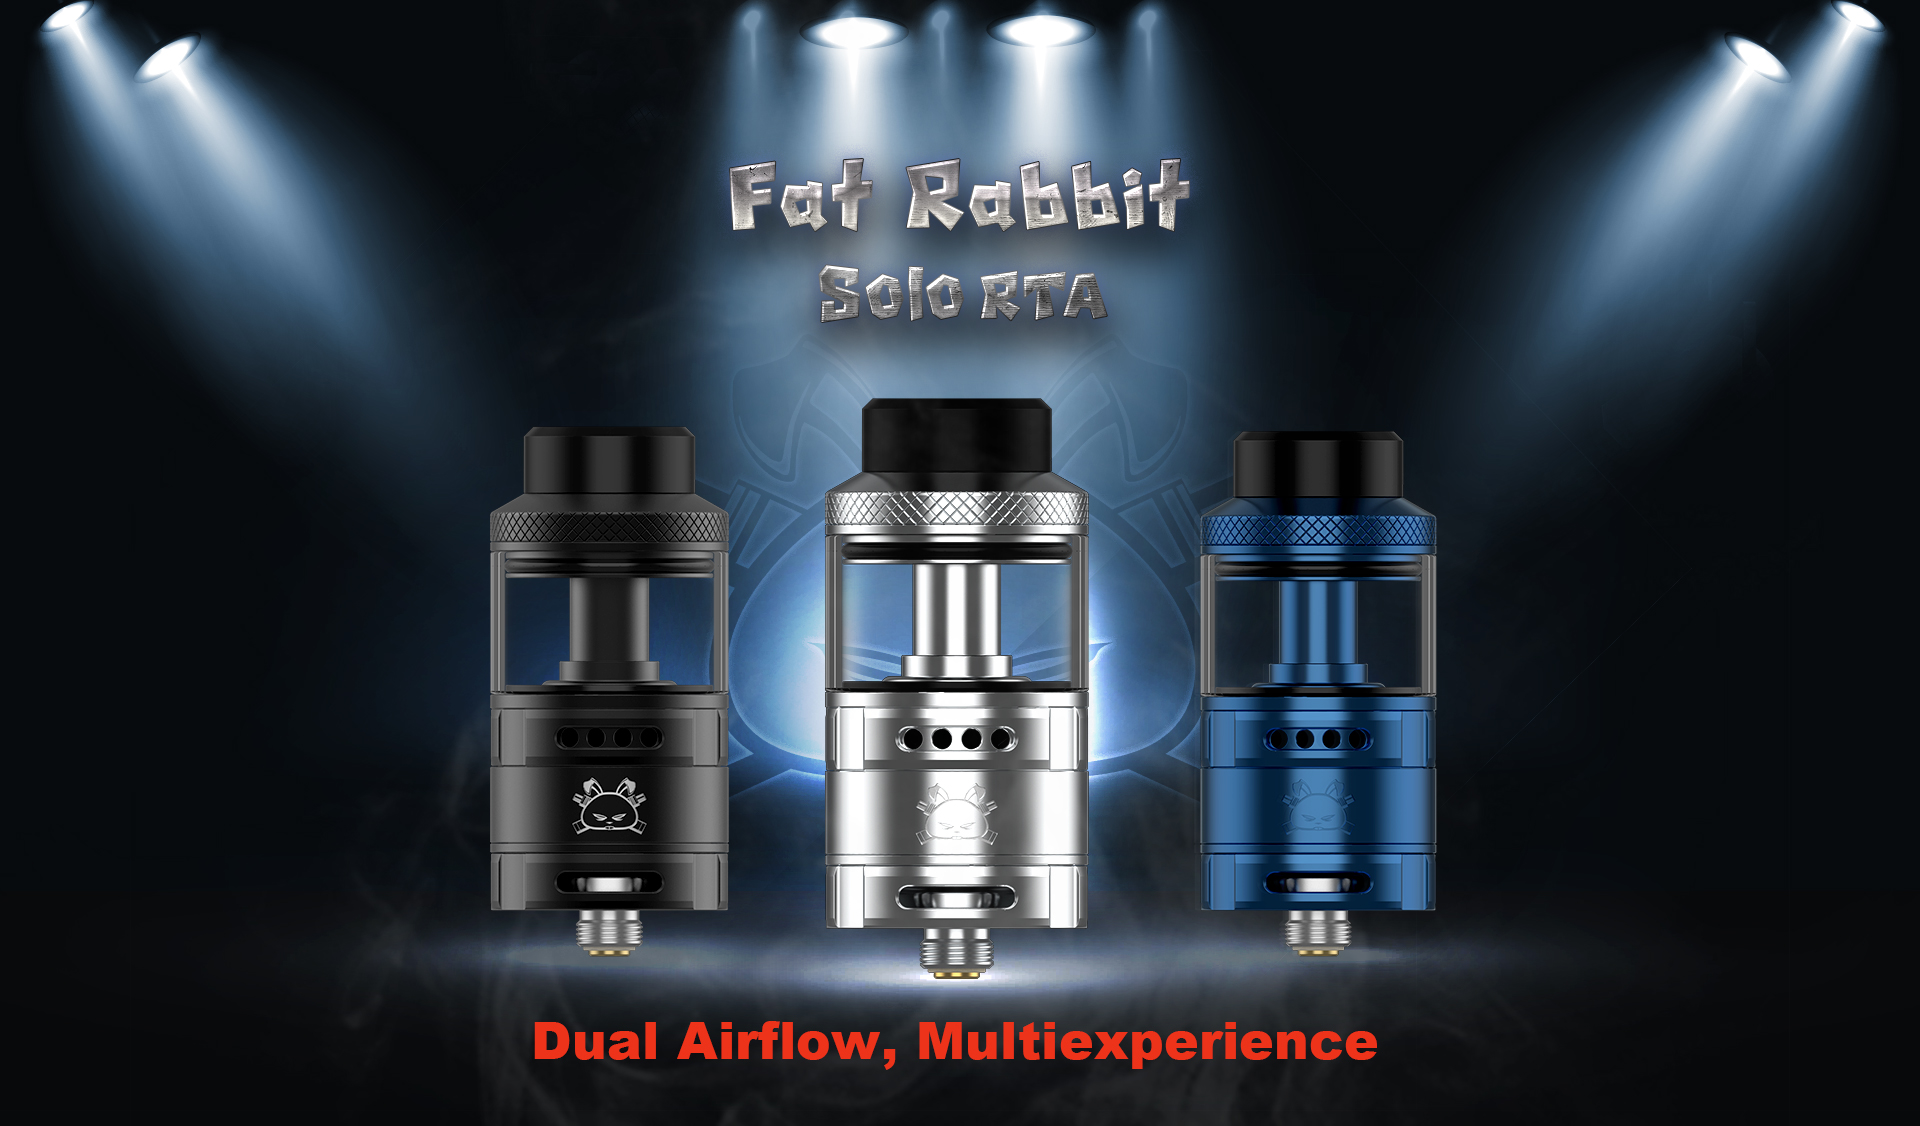
Hello and welcome to yet another review. This time I’ll be taking a look at the new Hellvape Fat Rabbit Solo rta. I purchased and very much liked the original dual coil Fat Rabbit rta so was rather excited to receive the new Solo single coil rta for this review. The Solo has a 25mm postless single coil base that actually has four grub screws. This may lead some to try to put dual coils in it but I wouldn’t. Just like the original it has both side and bottom airflow available so you can use just one type or both at the same time to try to get the best flavor production for your needs. I found with the original that I liked the bottom airflow with the side closed. I’ll have to see if that holds true with this one.
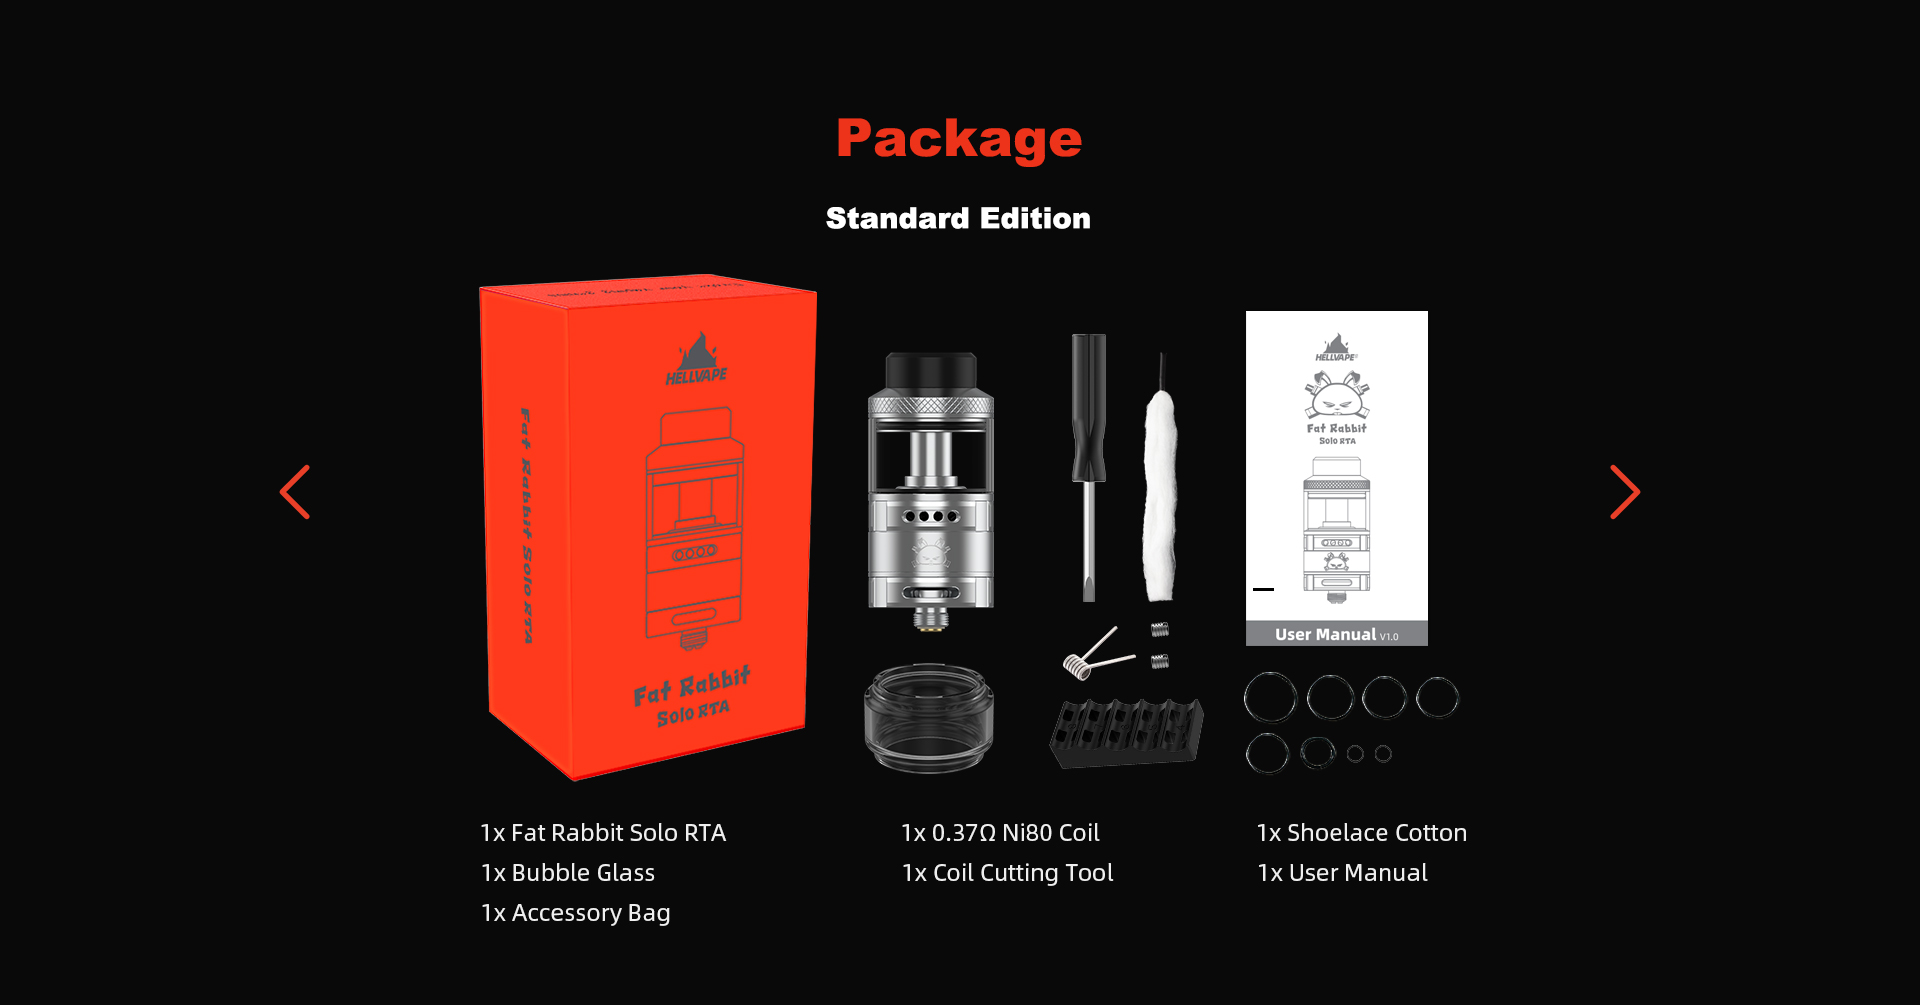
WHAT’S IN THE BOX?

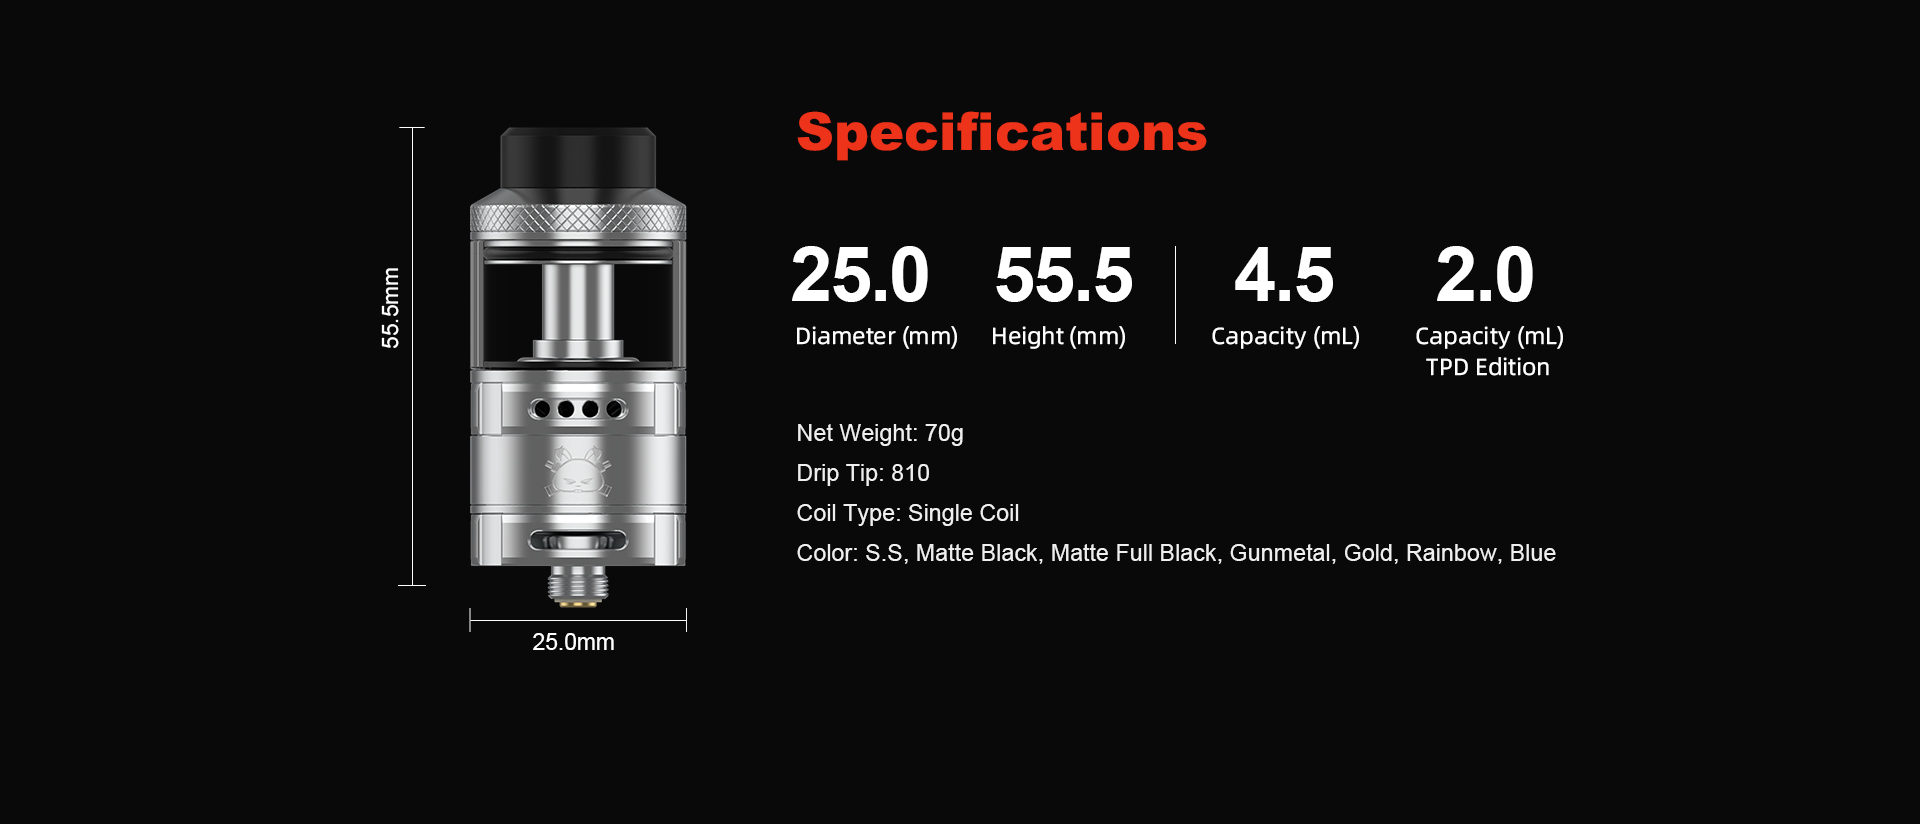
SPECIFICATIONS:
FEATURES:
28mm Diameter
5.5mL Tank Capacity
Pyrex Glass Reinforcement
Superior 304 Stainless Steel Tank Construction
Quarter Turn Top Fill System - Dual Fill Ports
Postless Build Deck - Side Secured via Flat Head Screws
Single or Dual Coil Configuration
PEEK Insulation
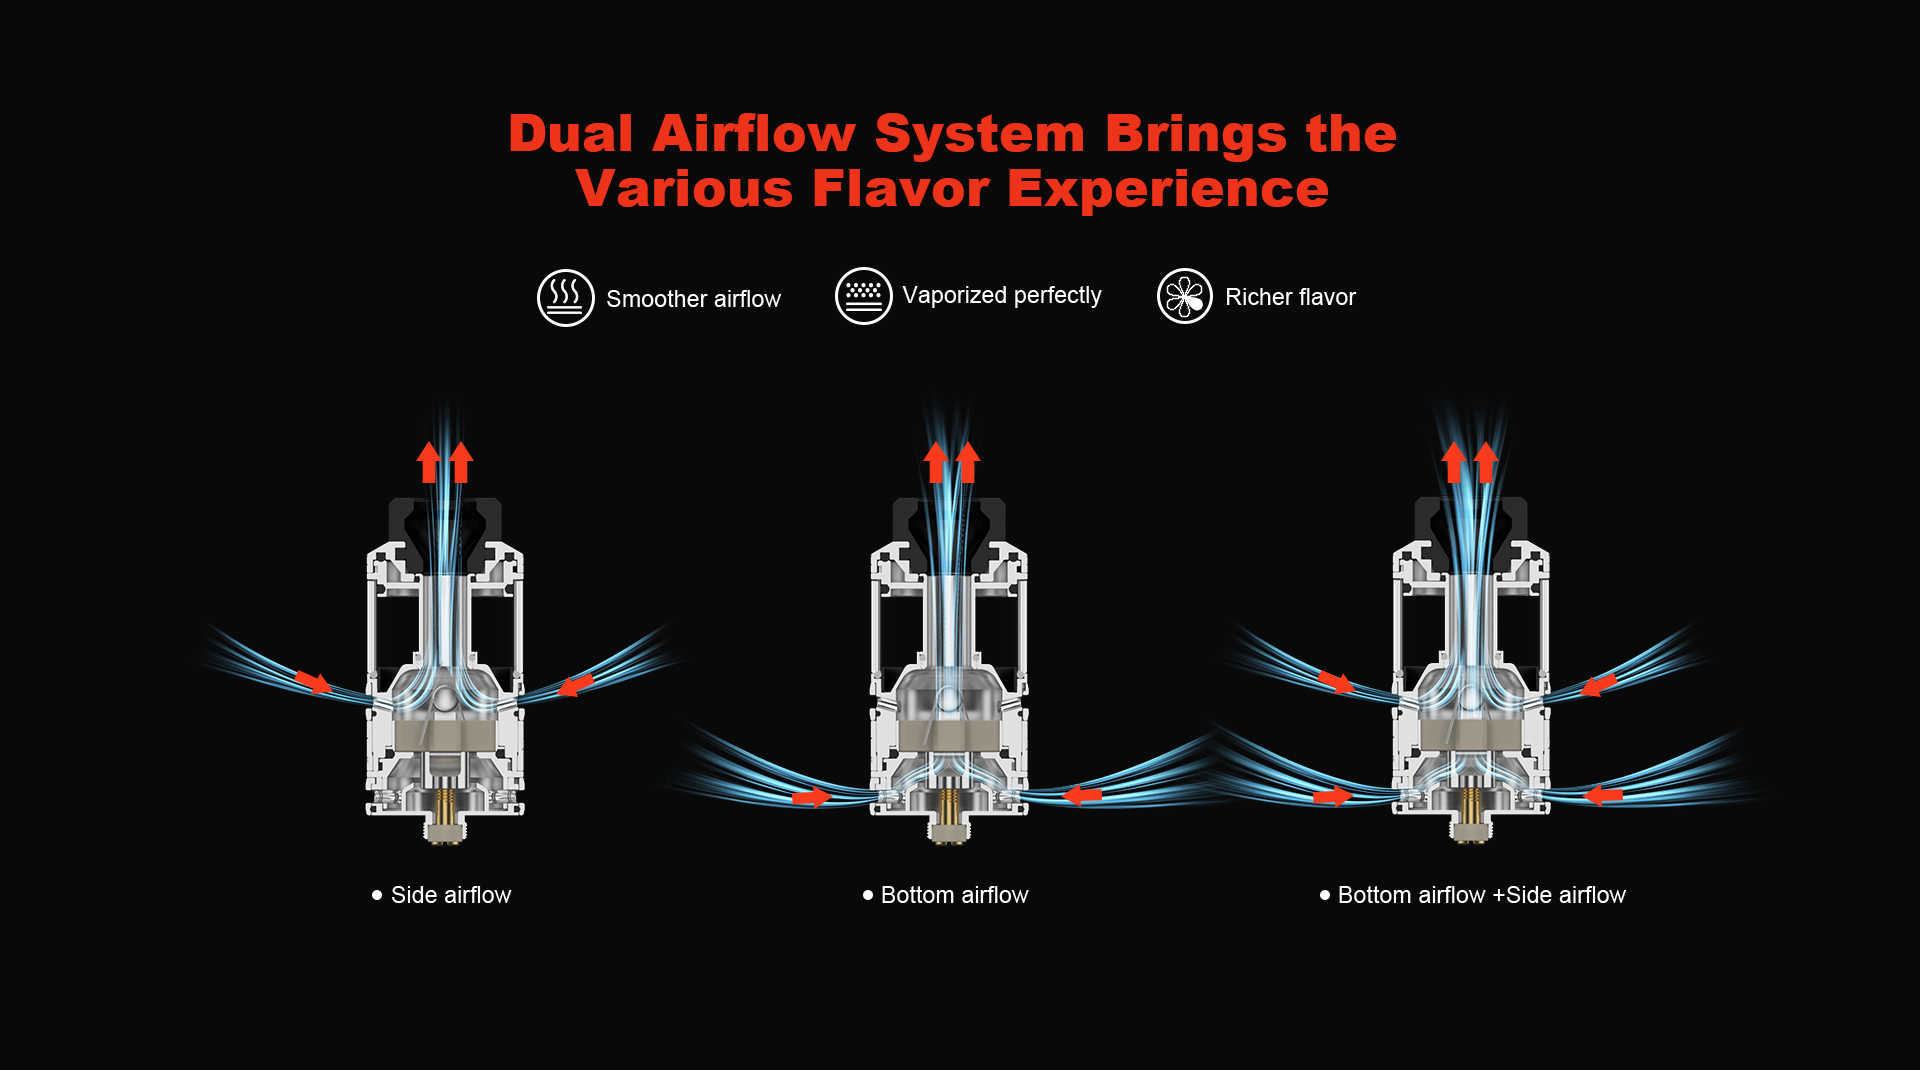
Dual Airflow Control System - Side and Bottom
Widebore 810 Drip Tip
Threaded 510 Connection
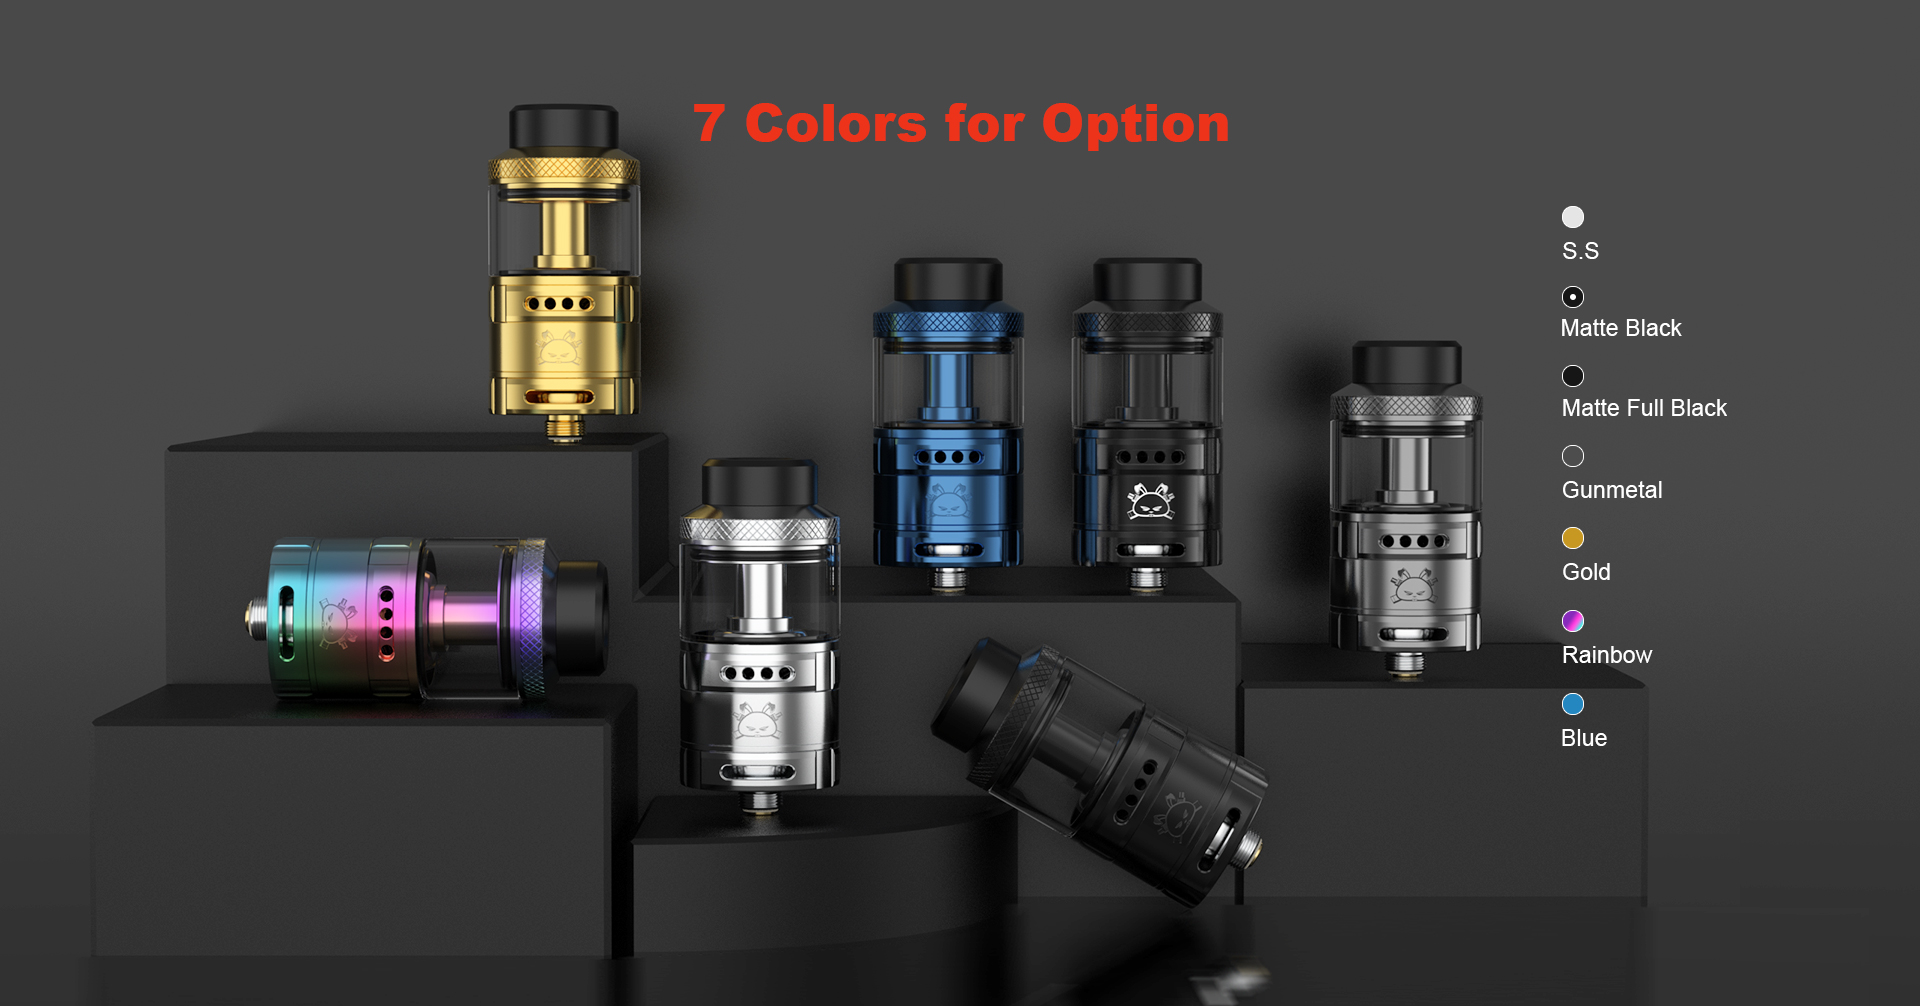
Available in Black, Rainbow, SS, Blue, Gunmetal, Matte Full Black, and SS
INITIAL THOUGHTS:
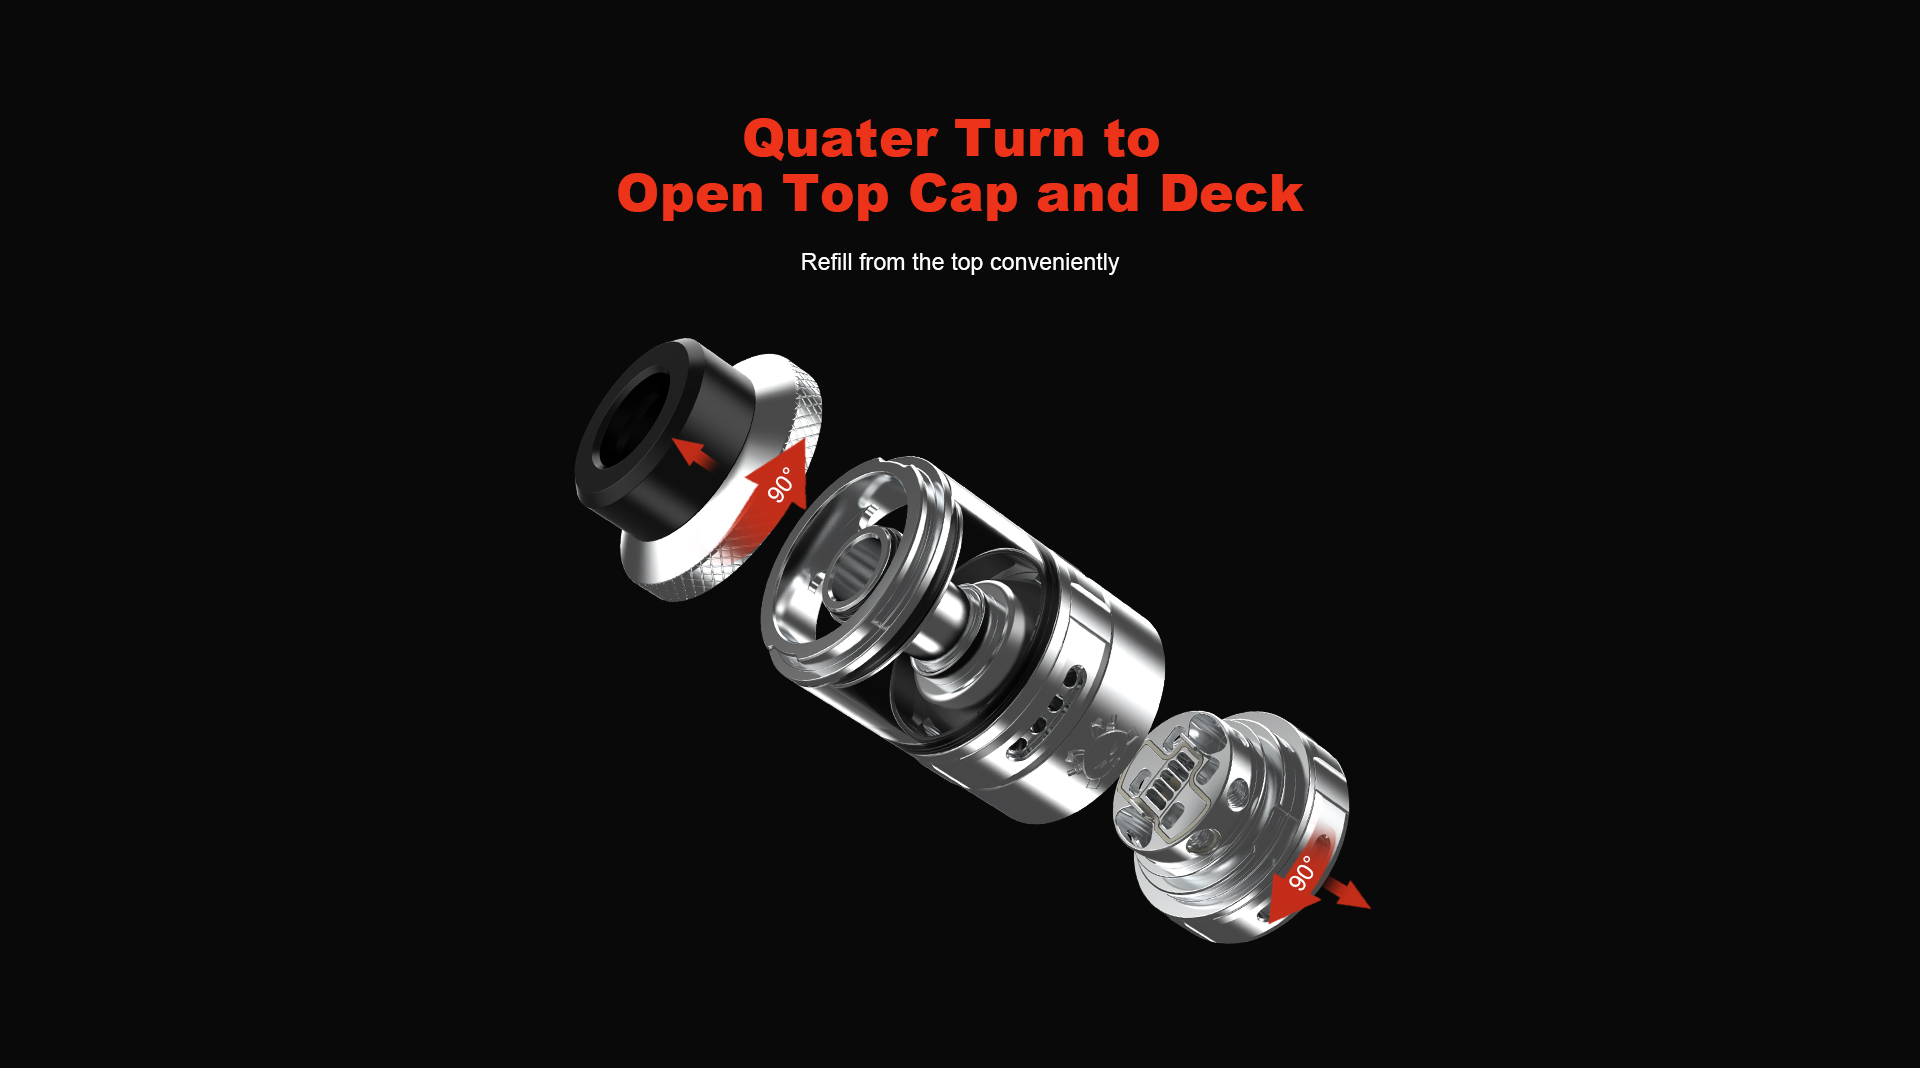
The packaging for the Solo was no surprise when it arrived in the all too familiar red box. On the front is the Hellvape name along with a sketch of the Solo and the Fat Rabbit name near the bottom. The back side shows the features of the Solo as well as the package contents. You may notice as I did that in one of the promotional pictures above, the word quarter was misspelled as quater. This is also the case in the package that I received as you can see on the back where the features are listed. I will let the Hellvape rep know about this. I’m sure what I received was a review sample and will be corrected in the future.


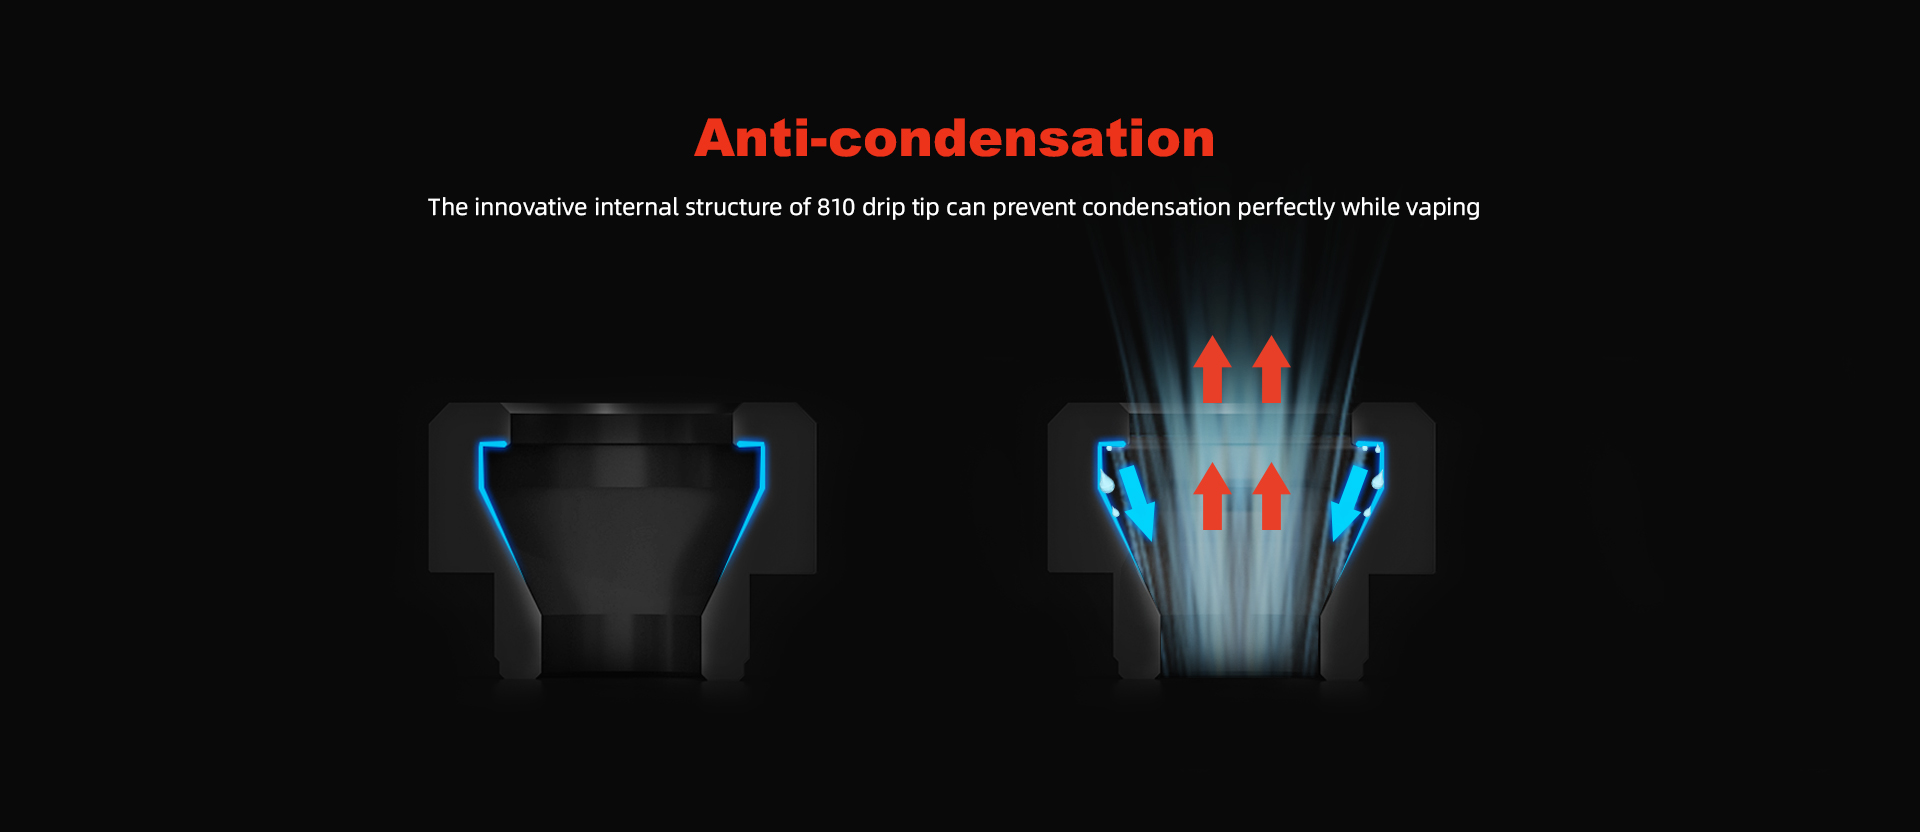
The Solo uses an 810 drip tip and can be easily changed with your favorite drip tip. I tried it with the included one but like a little longer tip so went ahead and changed mine. The included drip tip has a different type of internal design to try to help to prevent condensation build up.

You may get tired of hearing this but I always clean a new tank and recommend that you do the same. I really like tanks like the Solo that come completely apart and make it easier to clean and dry. It has become reflex for me that when I receive a new tank I take it apart, clean it, and if one is included I install the bubble glass so I have the extra liquid capacity that it allows. I do have to say though that after installing the bubble glass on the Solo that I kind of like the looks of it better with the straight glass and may switch back to that later. The Solo came apart very easily which I appreciate. I have had some tanks where you almost have to break the glass to take off the one installed at the factory.
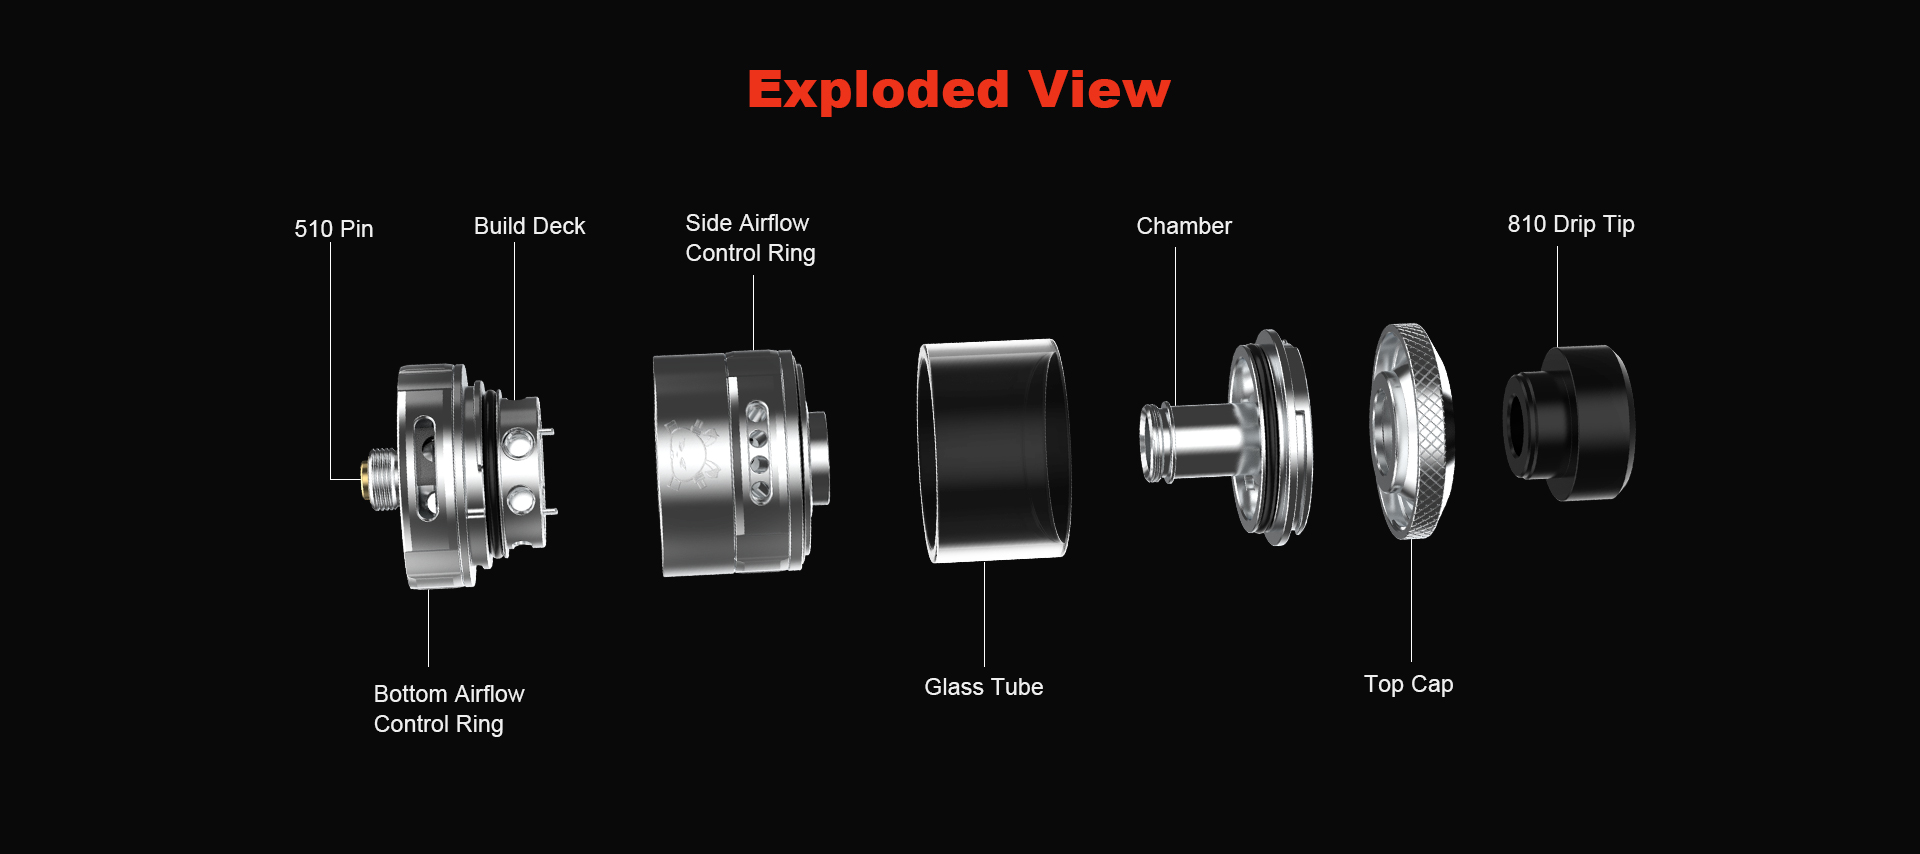
The tank is made up of six individual parts. The drip tip, top cap, chamber, glass, side airflow control ring, and base with bottom airflow control. The top cap has a nice knurled texture to it to make it easy to grip for installing or removing while the fill port openings are very large and you should be able to fill with just about any type of bottle. The side airflow control ring has four individual holes on each side for a total of eight while the base has a slotted airflow opening on each side. I ended up liking it with the bottom airflow open about ¼ while having just a portion of one hole open on the top using the included Ni80 coil. I understand this is a single coil rta but it might have been nice if they had included a second coil. However, perhaps they don’t want people trying to stuff two coils into the 25mm deck area.


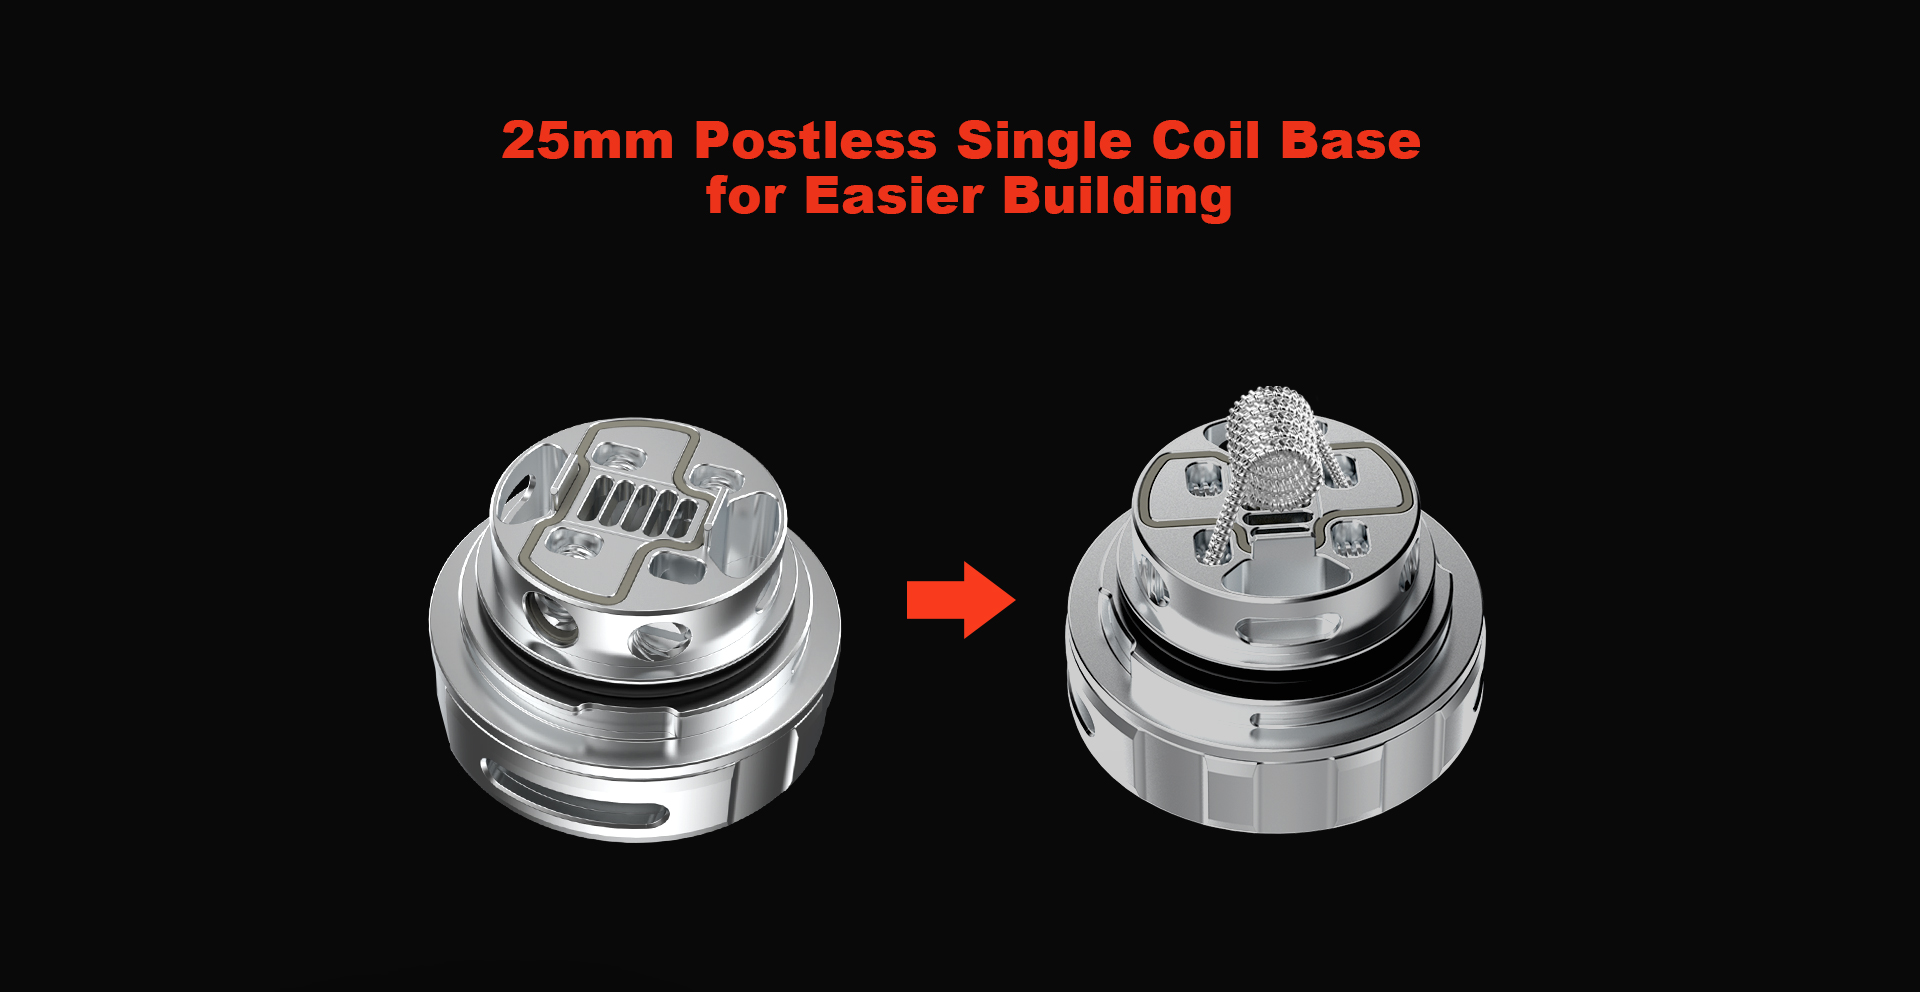
The deck of the Solo is postless and has four grub screws although it is intended for single coil use. Why? I’m not sure but thinking ahead, if you had one screw or threads in the deck get messed up then you could switch to the opposite screws to install your coil. The screws used require a flat head screwdriver which is included in the package. I like that the screw openings in the deck are deep enough that you can unscrew the screws enough to fit the coil legs in the opening without bringing the screws too far out to where you don’t have the hole to guide the screwdriver. This might sound silly but some folks don’t have the best vision and this allows you to tighten the screws down without actually having to see the screw head. Just put the screwdriver into the opening and lightly turn the screwdriver until it catches the slot in the screw head and then apply pressure and tighten the screw on the coil. I’ve had just a couple other tanks that I’ve tested that have had this feature whether intended or not. There are a couple extra grub screws included in the accessory bag if you happen to lose one. I have to admit that I’ve had that happen before but not on this tank. The base on this tank just takes a ¼ turn to remove it just like the top cap does. Mine is a little tight to remove so have to wiggle it back and forth a little.


Ok, now onto installing a coil and wick in the Solo. There is just a single coil and cotton thread included in the package. However, the wick included is long enough to get a couple wicks out of if you pull the wick almost all the way through before cutting it leaving the plastic ring on the end. Not a big deal but why not get two wicks out of it if you can. The included coil is an Ni80 coil rated at .37 ohms. I’m quite used to running coils in this range since there is a brand of coils that I like that come in .35 and .40. I had always been a fan of 316 SS coils but the more I use these Ni80 coils the more I like them. I decided to use the included coil measuring tool to cut the coil legs to 5mm. This type of deck is very easy to install, tighten, and straighten the coil. I did a few short pulses on the coil to make sure it was heating evenly and installed the wick once the coil was cool. On my first build, I thinned the cotton tails out quite a bit. I found out while using it that I thinned too much. Once I tried chain vaping it, I would get a little gurgling indicating that the deck was flooding and when I laid the tank on its side then some liquid leaked out. After this I cleaned the tank and installed a new wick. This time I didn’t comb out one side and just gave the other side a light fluff. The cotton was really packed into the liquid wells and I wondered if I’d get dry hits. It hasn’t happened yet. Even with the cotton that tight I can still chain vape without getting a dry hit. However, I did feel like the flavor was better with a little less cotton than my second attempt.

The bottom of the base of course has a gold plated center pin. Also on the base is the Hellvape and Fat Rabbit Solo name along with what I believe is a serial number.

FINAL THOUGHTS:
I know there are a lot of people that like the dual coil Fat Rabbit rta of which I am included and am sure the first question I’ll receive is “ is the flavor with the solo as good as the original dual coil?”. I have to say that the answer is kinda. The flavor is really good on this rta but of course the dual coil version provides a more dense vapor and a little bit better.
Just like the original, the Solo uses a quarter turn to remove not only the top cap but also the base. I was actually used to this from my experience using the original Fat Rabbit rta. The deck is postless and very easy to build on. I cut my coil legs at 5.5mm but may try a little higher next time just to see if it affects the flavor. I feel like this rta has more airflow available than I could ever use. The combination of top airflow and bottom airflow gives the user a lot of options to tweak the airflow to their liking. I found that I got better flavor when using bottom airflow with just a tiny bit of the first hole open on top.
So, would I recommend the Hellvape Fat Rabbit Solo RTA? I would if you’re looking for an easy to build single coil rta with lots of airflow options, really good flavor, and has enough room to put some really good sized coils in if that’s your thing. I’d like to thank Hellvape and Dani for sending the Fat Rabbit Solo RTA for this review. Thanks also to the readers that made it to the end. Below is a link to their website so you can take a look for yourself.
Fat Rabbit Solo RTA-Hellvape - The DIY atomizer leading brand

WHAT’S IN THE BOX?
SPECIFICATIONS:
FEATURES:
28mm Diameter
5.5mL Tank Capacity
Pyrex Glass Reinforcement
Superior 304 Stainless Steel Tank Construction
Quarter Turn Top Fill System - Dual Fill Ports
Postless Build Deck - Side Secured via Flat Head Screws
Single or Dual Coil Configuration
PEEK Insulation
Dual Airflow Control System - Side and Bottom
Widebore 810 Drip Tip
Threaded 510 Connection
Available in Black, Rainbow, SS, Blue, Gunmetal, Matte Full Black, and SS
INITIAL THOUGHTS:
The packaging for the Solo was no surprise when it arrived in the all too familiar red box. On the front is the Hellvape name along with a sketch of the Solo and the Fat Rabbit name near the bottom. The back side shows the features of the Solo as well as the package contents. You may notice as I did that in one of the promotional pictures above, the word quarter was misspelled as quater. This is also the case in the package that I received as you can see on the back where the features are listed. I will let the Hellvape rep know about this. I’m sure what I received was a review sample and will be corrected in the future.
The Solo uses an 810 drip tip and can be easily changed with your favorite drip tip. I tried it with the included one but like a little longer tip so went ahead and changed mine. The included drip tip has a different type of internal design to try to help to prevent condensation build up.
You may get tired of hearing this but I always clean a new tank and recommend that you do the same. I really like tanks like the Solo that come completely apart and make it easier to clean and dry. It has become reflex for me that when I receive a new tank I take it apart, clean it, and if one is included I install the bubble glass so I have the extra liquid capacity that it allows. I do have to say though that after installing the bubble glass on the Solo that I kind of like the looks of it better with the straight glass and may switch back to that later. The Solo came apart very easily which I appreciate. I have had some tanks where you almost have to break the glass to take off the one installed at the factory.
The tank is made up of six individual parts. The drip tip, top cap, chamber, glass, side airflow control ring, and base with bottom airflow control. The top cap has a nice knurled texture to it to make it easy to grip for installing or removing while the fill port openings are very large and you should be able to fill with just about any type of bottle. The side airflow control ring has four individual holes on each side for a total of eight while the base has a slotted airflow opening on each side. I ended up liking it with the bottom airflow open about ¼ while having just a portion of one hole open on the top using the included Ni80 coil. I understand this is a single coil rta but it might have been nice if they had included a second coil. However, perhaps they don’t want people trying to stuff two coils into the 25mm deck area.
The deck of the Solo is postless and has four grub screws although it is intended for single coil use. Why? I’m not sure but thinking ahead, if you had one screw or threads in the deck get messed up then you could switch to the opposite screws to install your coil. The screws used require a flat head screwdriver which is included in the package. I like that the screw openings in the deck are deep enough that you can unscrew the screws enough to fit the coil legs in the opening without bringing the screws too far out to where you don’t have the hole to guide the screwdriver. This might sound silly but some folks don’t have the best vision and this allows you to tighten the screws down without actually having to see the screw head. Just put the screwdriver into the opening and lightly turn the screwdriver until it catches the slot in the screw head and then apply pressure and tighten the screw on the coil. I’ve had just a couple other tanks that I’ve tested that have had this feature whether intended or not. There are a couple extra grub screws included in the accessory bag if you happen to lose one. I have to admit that I’ve had that happen before but not on this tank. The base on this tank just takes a ¼ turn to remove it just like the top cap does. Mine is a little tight to remove so have to wiggle it back and forth a little.
Ok, now onto installing a coil and wick in the Solo. There is just a single coil and cotton thread included in the package. However, the wick included is long enough to get a couple wicks out of if you pull the wick almost all the way through before cutting it leaving the plastic ring on the end. Not a big deal but why not get two wicks out of it if you can. The included coil is an Ni80 coil rated at .37 ohms. I’m quite used to running coils in this range since there is a brand of coils that I like that come in .35 and .40. I had always been a fan of 316 SS coils but the more I use these Ni80 coils the more I like them. I decided to use the included coil measuring tool to cut the coil legs to 5mm. This type of deck is very easy to install, tighten, and straighten the coil. I did a few short pulses on the coil to make sure it was heating evenly and installed the wick once the coil was cool. On my first build, I thinned the cotton tails out quite a bit. I found out while using it that I thinned too much. Once I tried chain vaping it, I would get a little gurgling indicating that the deck was flooding and when I laid the tank on its side then some liquid leaked out. After this I cleaned the tank and installed a new wick. This time I didn’t comb out one side and just gave the other side a light fluff. The cotton was really packed into the liquid wells and I wondered if I’d get dry hits. It hasn’t happened yet. Even with the cotton that tight I can still chain vape without getting a dry hit. However, I did feel like the flavor was better with a little less cotton than my second attempt.
The bottom of the base of course has a gold plated center pin. Also on the base is the Hellvape and Fat Rabbit Solo name along with what I believe is a serial number.
FINAL THOUGHTS:
I know there are a lot of people that like the dual coil Fat Rabbit rta of which I am included and am sure the first question I’ll receive is “ is the flavor with the solo as good as the original dual coil?”. I have to say that the answer is kinda. The flavor is really good on this rta but of course the dual coil version provides a more dense vapor and a little bit better.
Just like the original, the Solo uses a quarter turn to remove not only the top cap but also the base. I was actually used to this from my experience using the original Fat Rabbit rta. The deck is postless and very easy to build on. I cut my coil legs at 5.5mm but may try a little higher next time just to see if it affects the flavor. I feel like this rta has more airflow available than I could ever use. The combination of top airflow and bottom airflow gives the user a lot of options to tweak the airflow to their liking. I found that I got better flavor when using bottom airflow with just a tiny bit of the first hole open on top.
So, would I recommend the Hellvape Fat Rabbit Solo RTA? I would if you’re looking for an easy to build single coil rta with lots of airflow options, really good flavor, and has enough room to put some really good sized coils in if that’s your thing. I’d like to thank Hellvape and Dani for sending the Fat Rabbit Solo RTA for this review. Thanks also to the readers that made it to the end. Below is a link to their website so you can take a look for yourself.
Fat Rabbit Solo RTA-Hellvape - The DIY atomizer leading brand

