
Hello, Vapers,
100%VG here with a review of the Innokin MVP5 & Ajax Kit. It’s been a pretty long time since my last review, but I am Proud to be doing this one! I don’t have fancy test gear to calculate things like Amperage ratings, Wattage Accuracy charts, mAh Accuracy ratings, or Temperature Control Accuracy, so this is my evaluation based on my satisfaction of usage.
I was given an MVP5 & Ajax Kit for my submission in a Giveaway, where innokin had 2 Optional Questions, asking for Ideas and Suggestions on what innokin could do to help us in this (what I will call) American War against Our legal nicotine “e-cigarette, or vaping, products.” Instead of actually Entering the Giveaway by following the posted rules to Win, I simply posted a Draft of what turned out to be the 9-page letter that I wrote and mailed to President Trump at the White House. Innokin announced me as an Additional Winner, thanked me for telling the Truth, and gave me the Kit. I was both surprised and delighted, not having expecting this, and I gratefully and thankfully accepted.
However, the fact that this was a Gift will not have any effect on my review! Never has and never will!
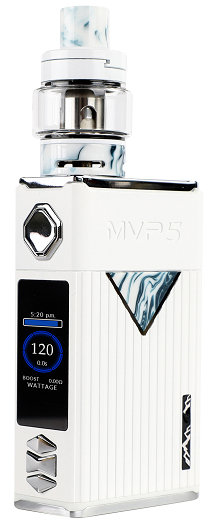
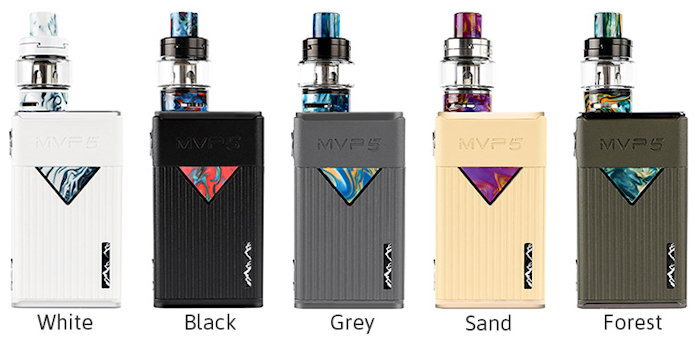
In the following PM, I was told that I could select the color I wanted, and I said, either the Black one or the White one, if Black was not available. I was sent and received, in like 2 days, the Beautiful White one which I have been using exclusively since October 25, so it’s nearly a month now. I offered to review it after having used it long enough to get to know all the Ins and Outs. Innokin accepted, and now I am here to tell you about it.
But first, let me present a Proper Introduction...
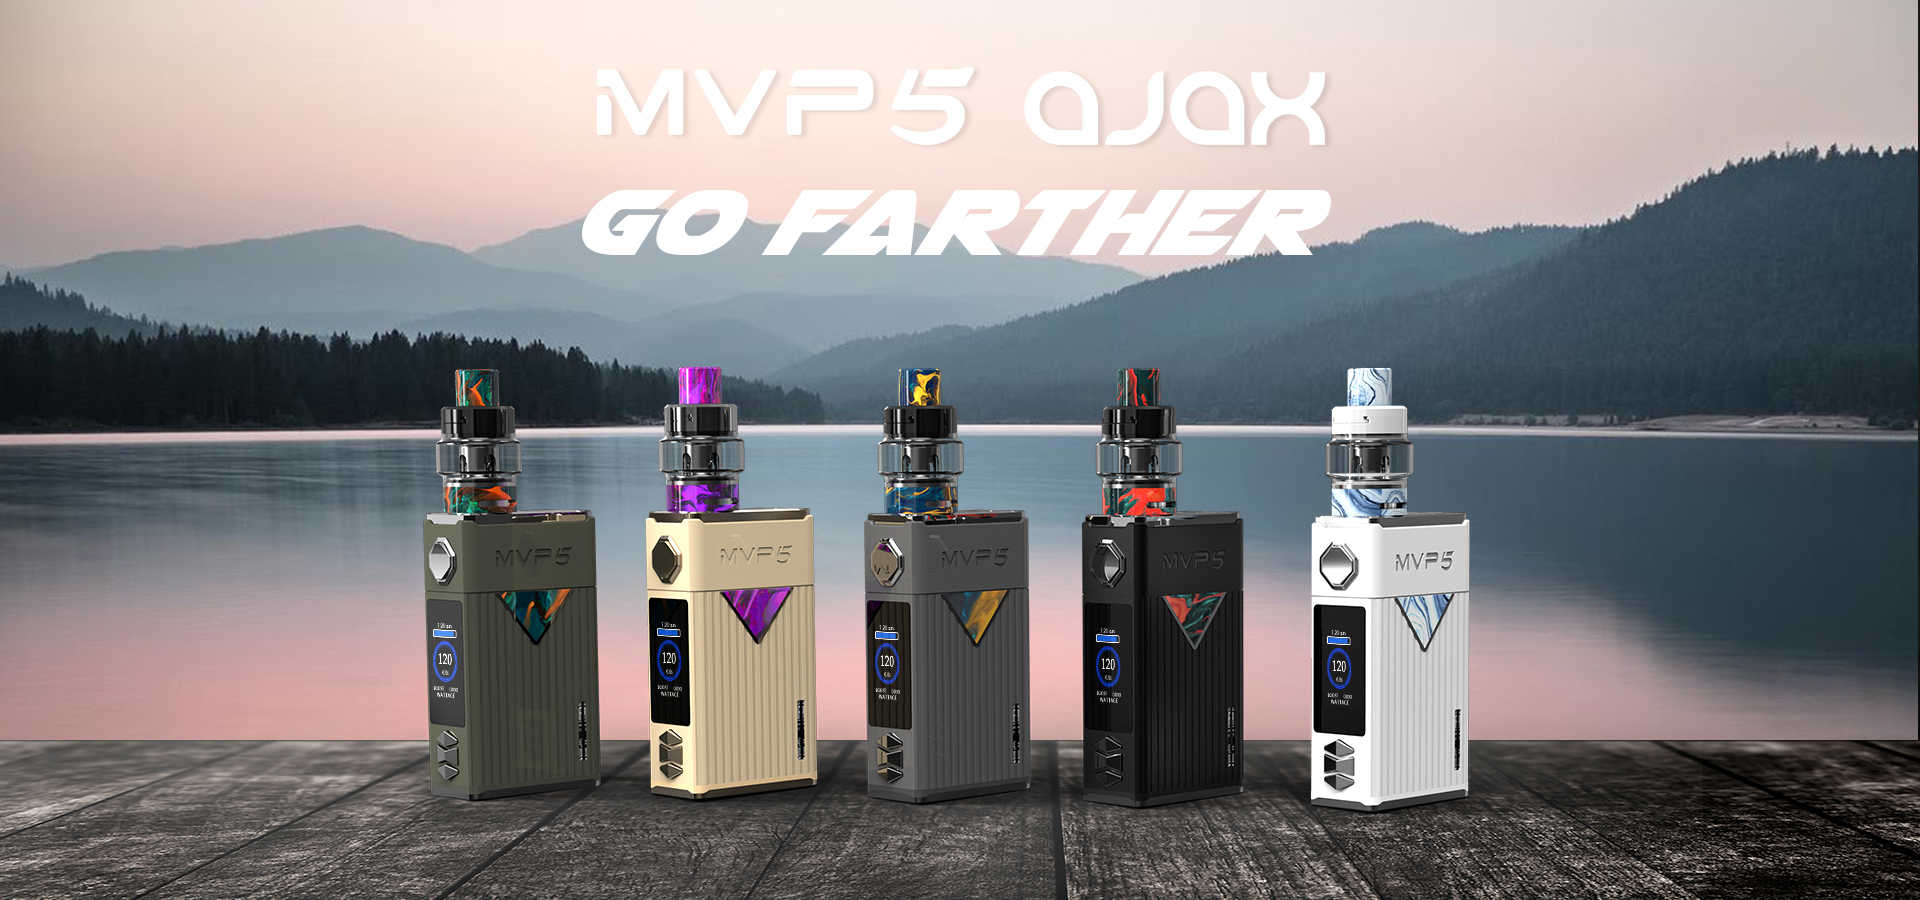


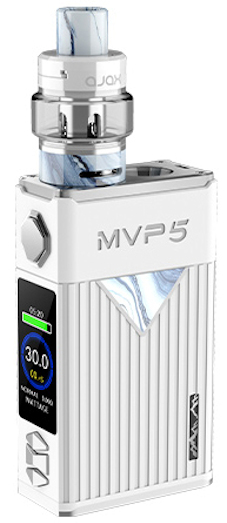
Innokin MVP5 Mod with Ajax Tank Kit
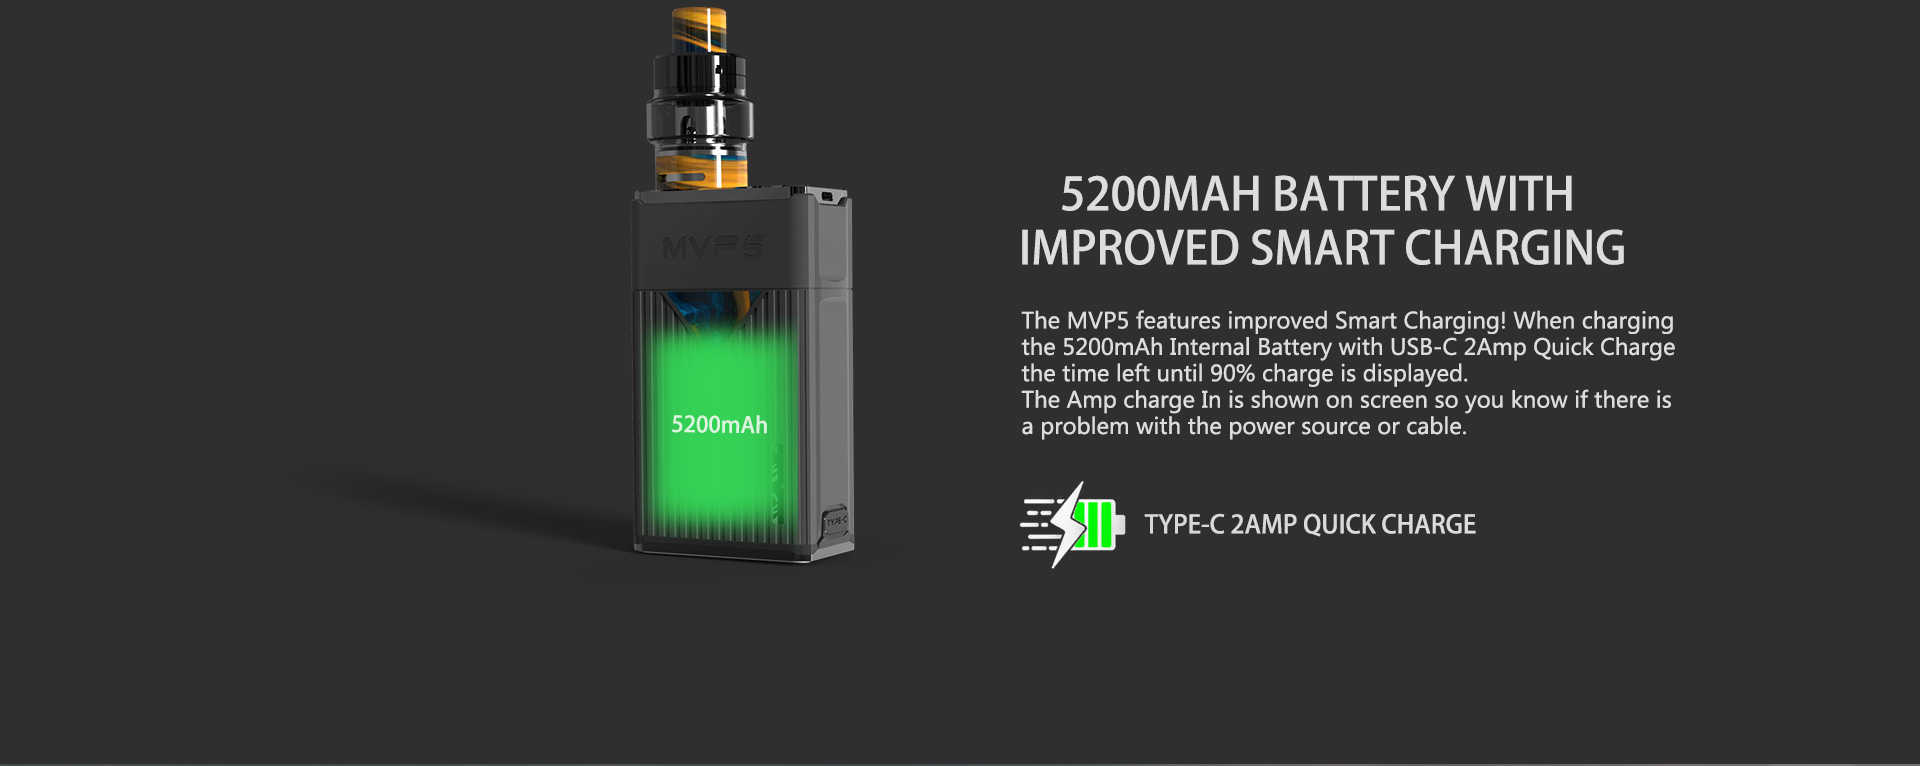
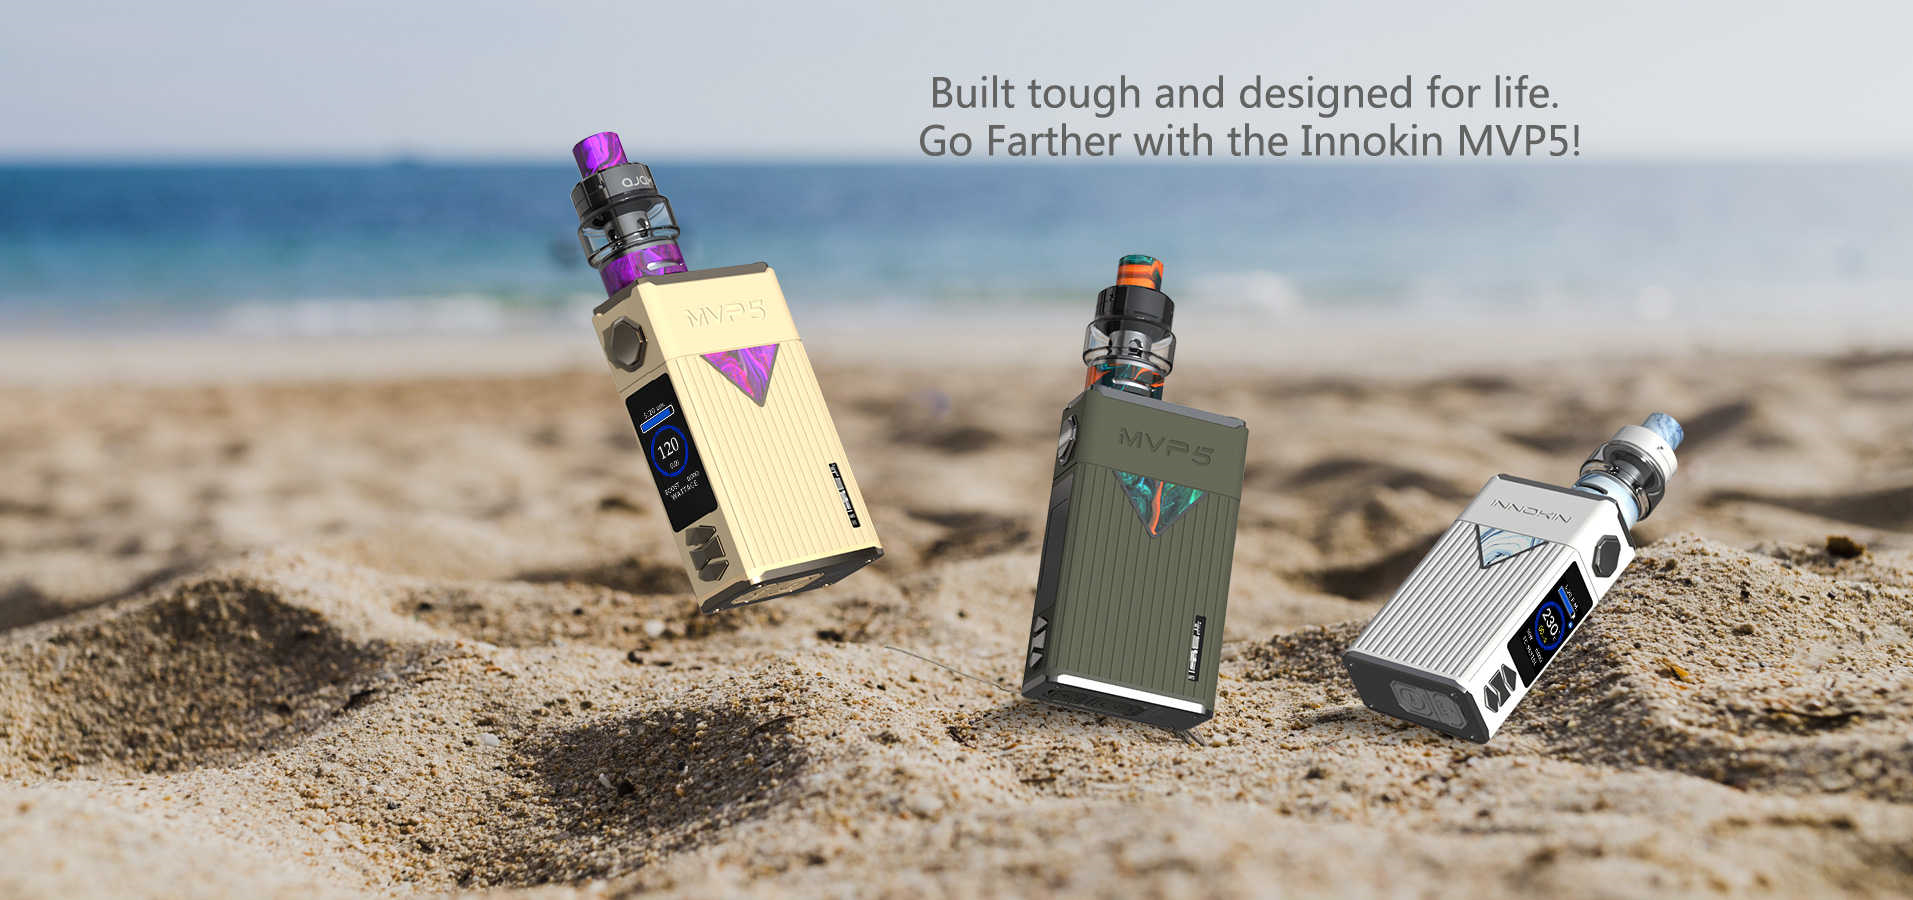
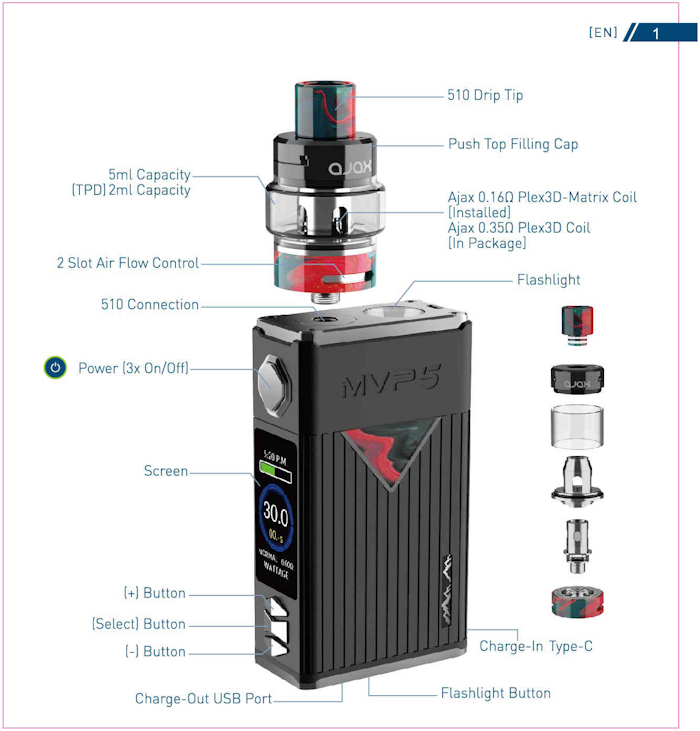
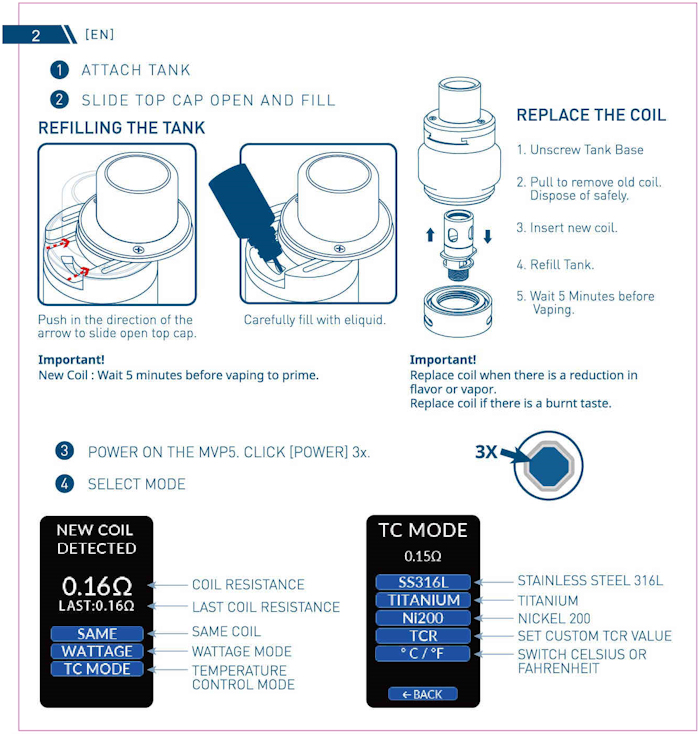
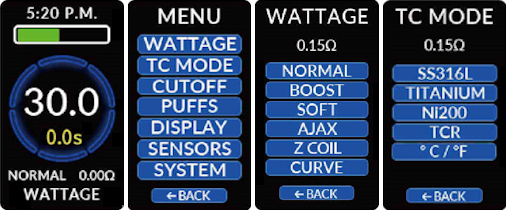
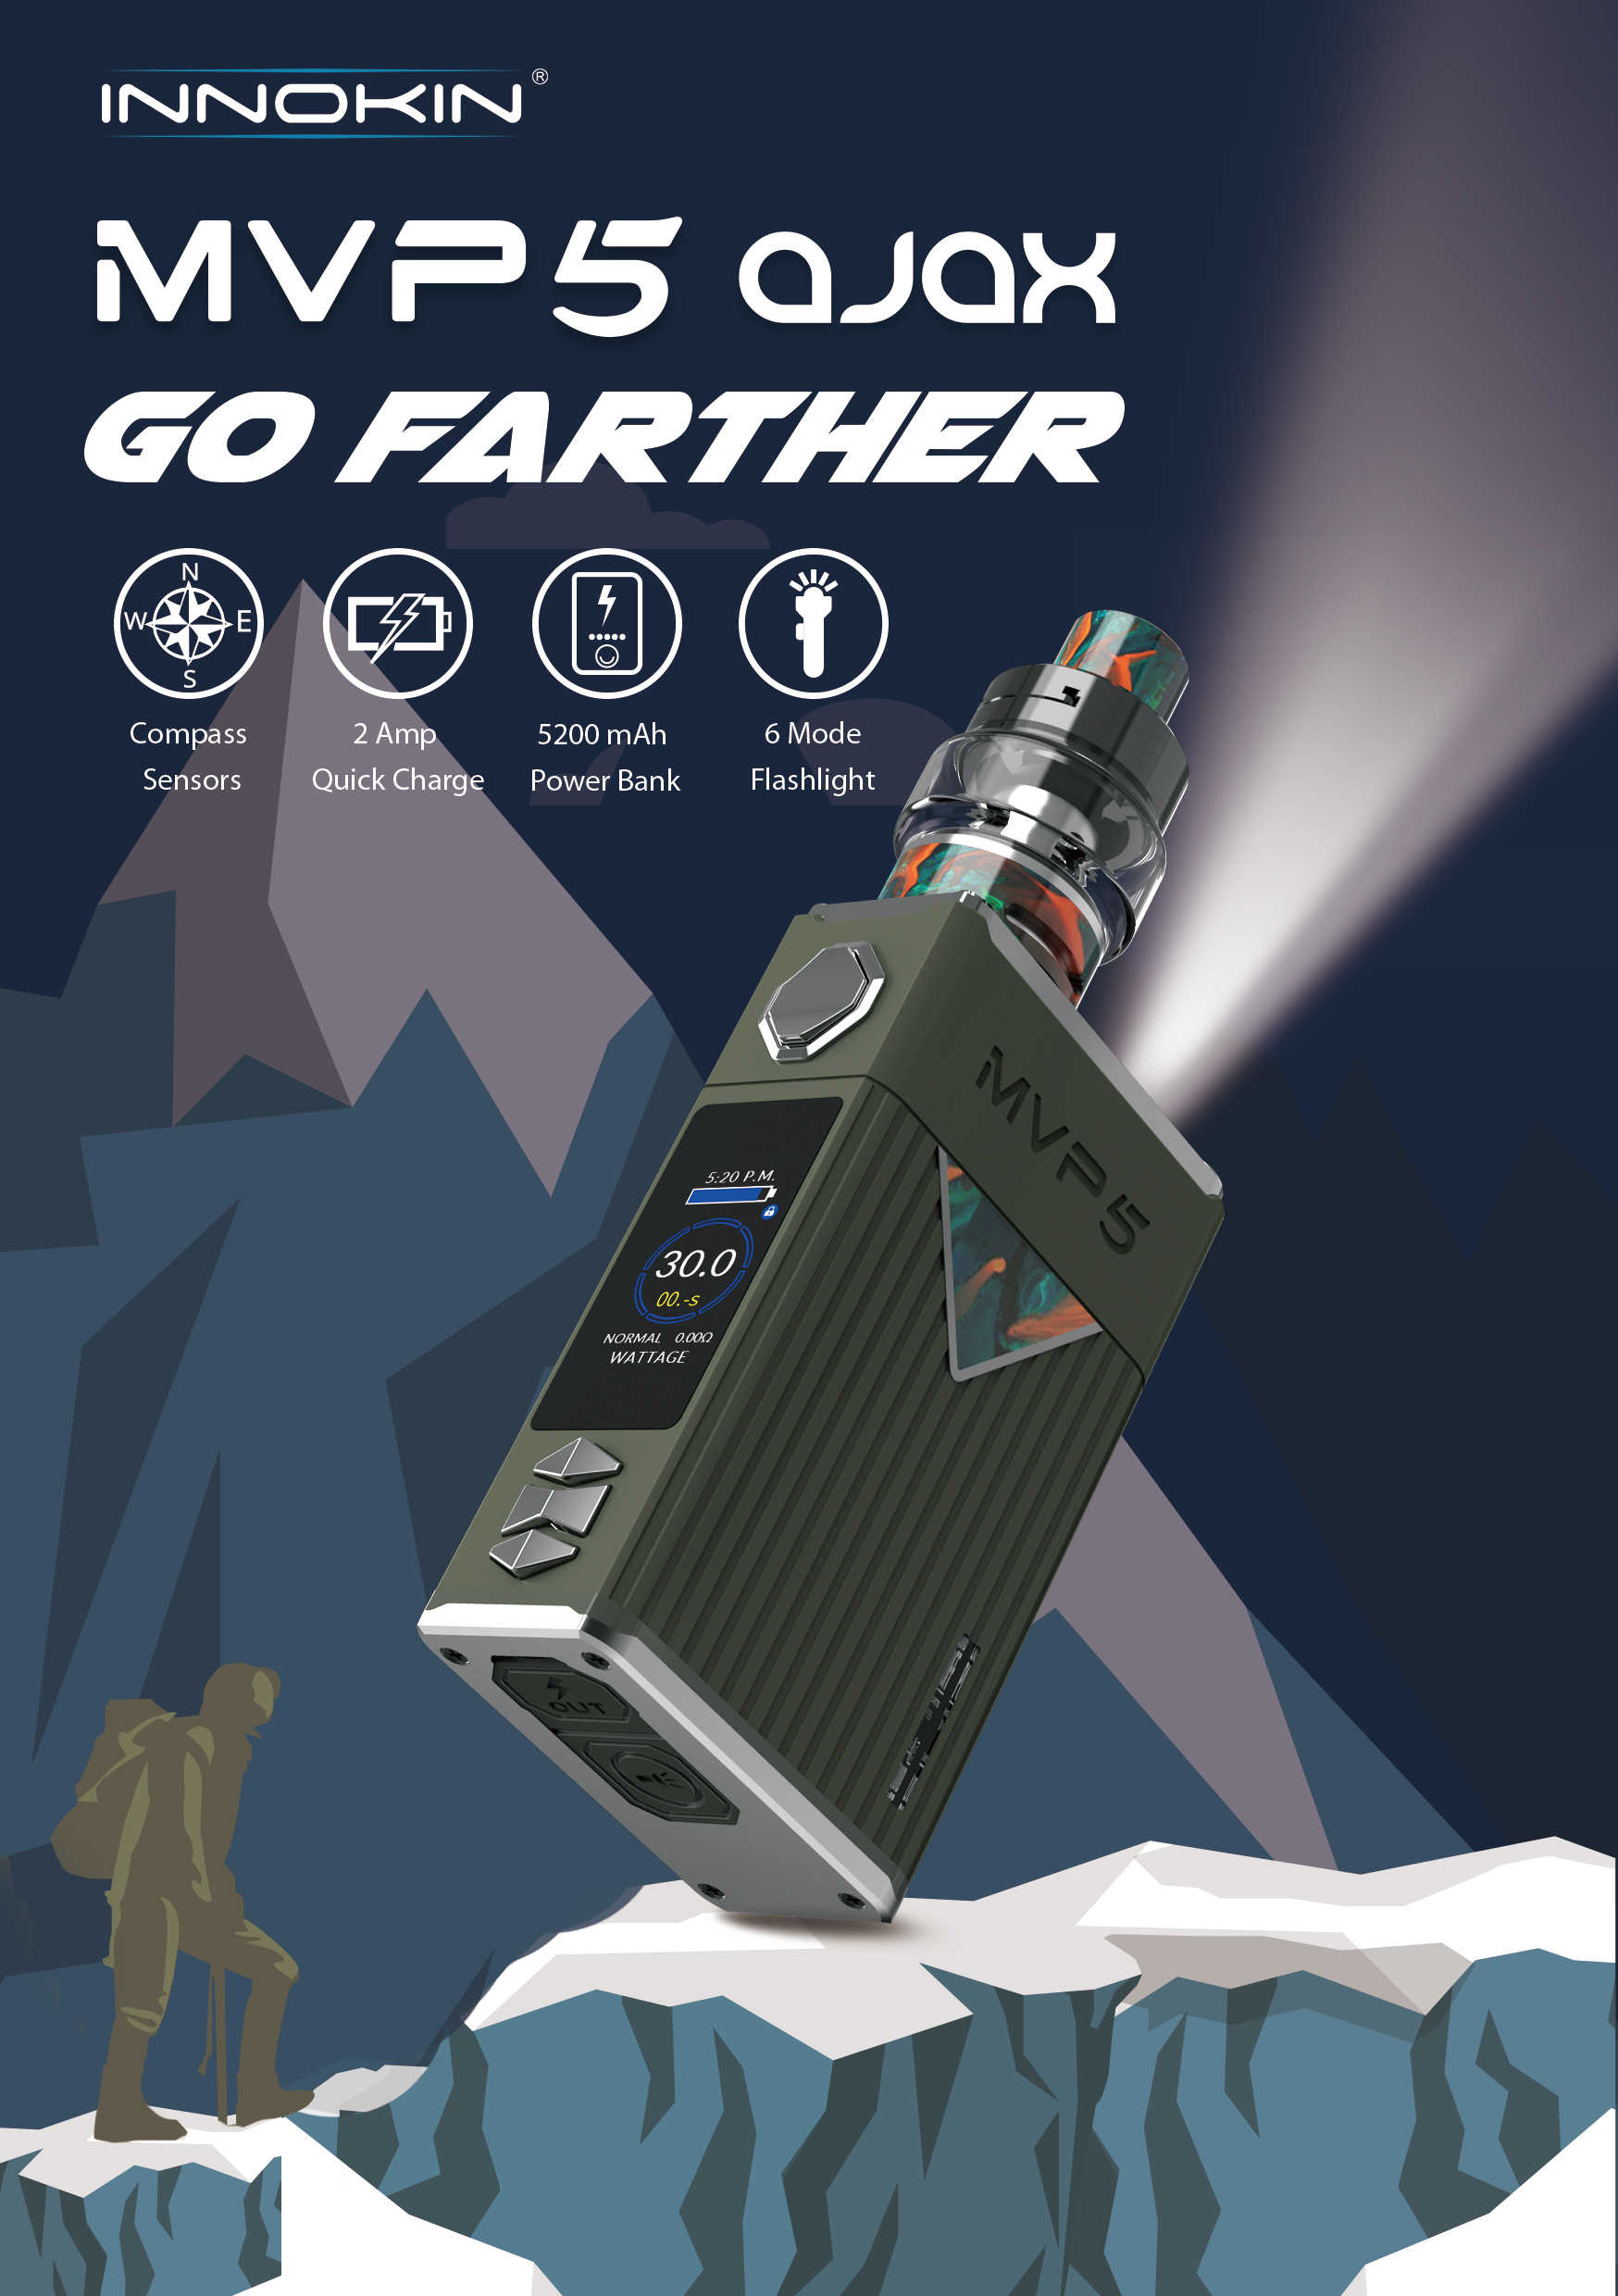
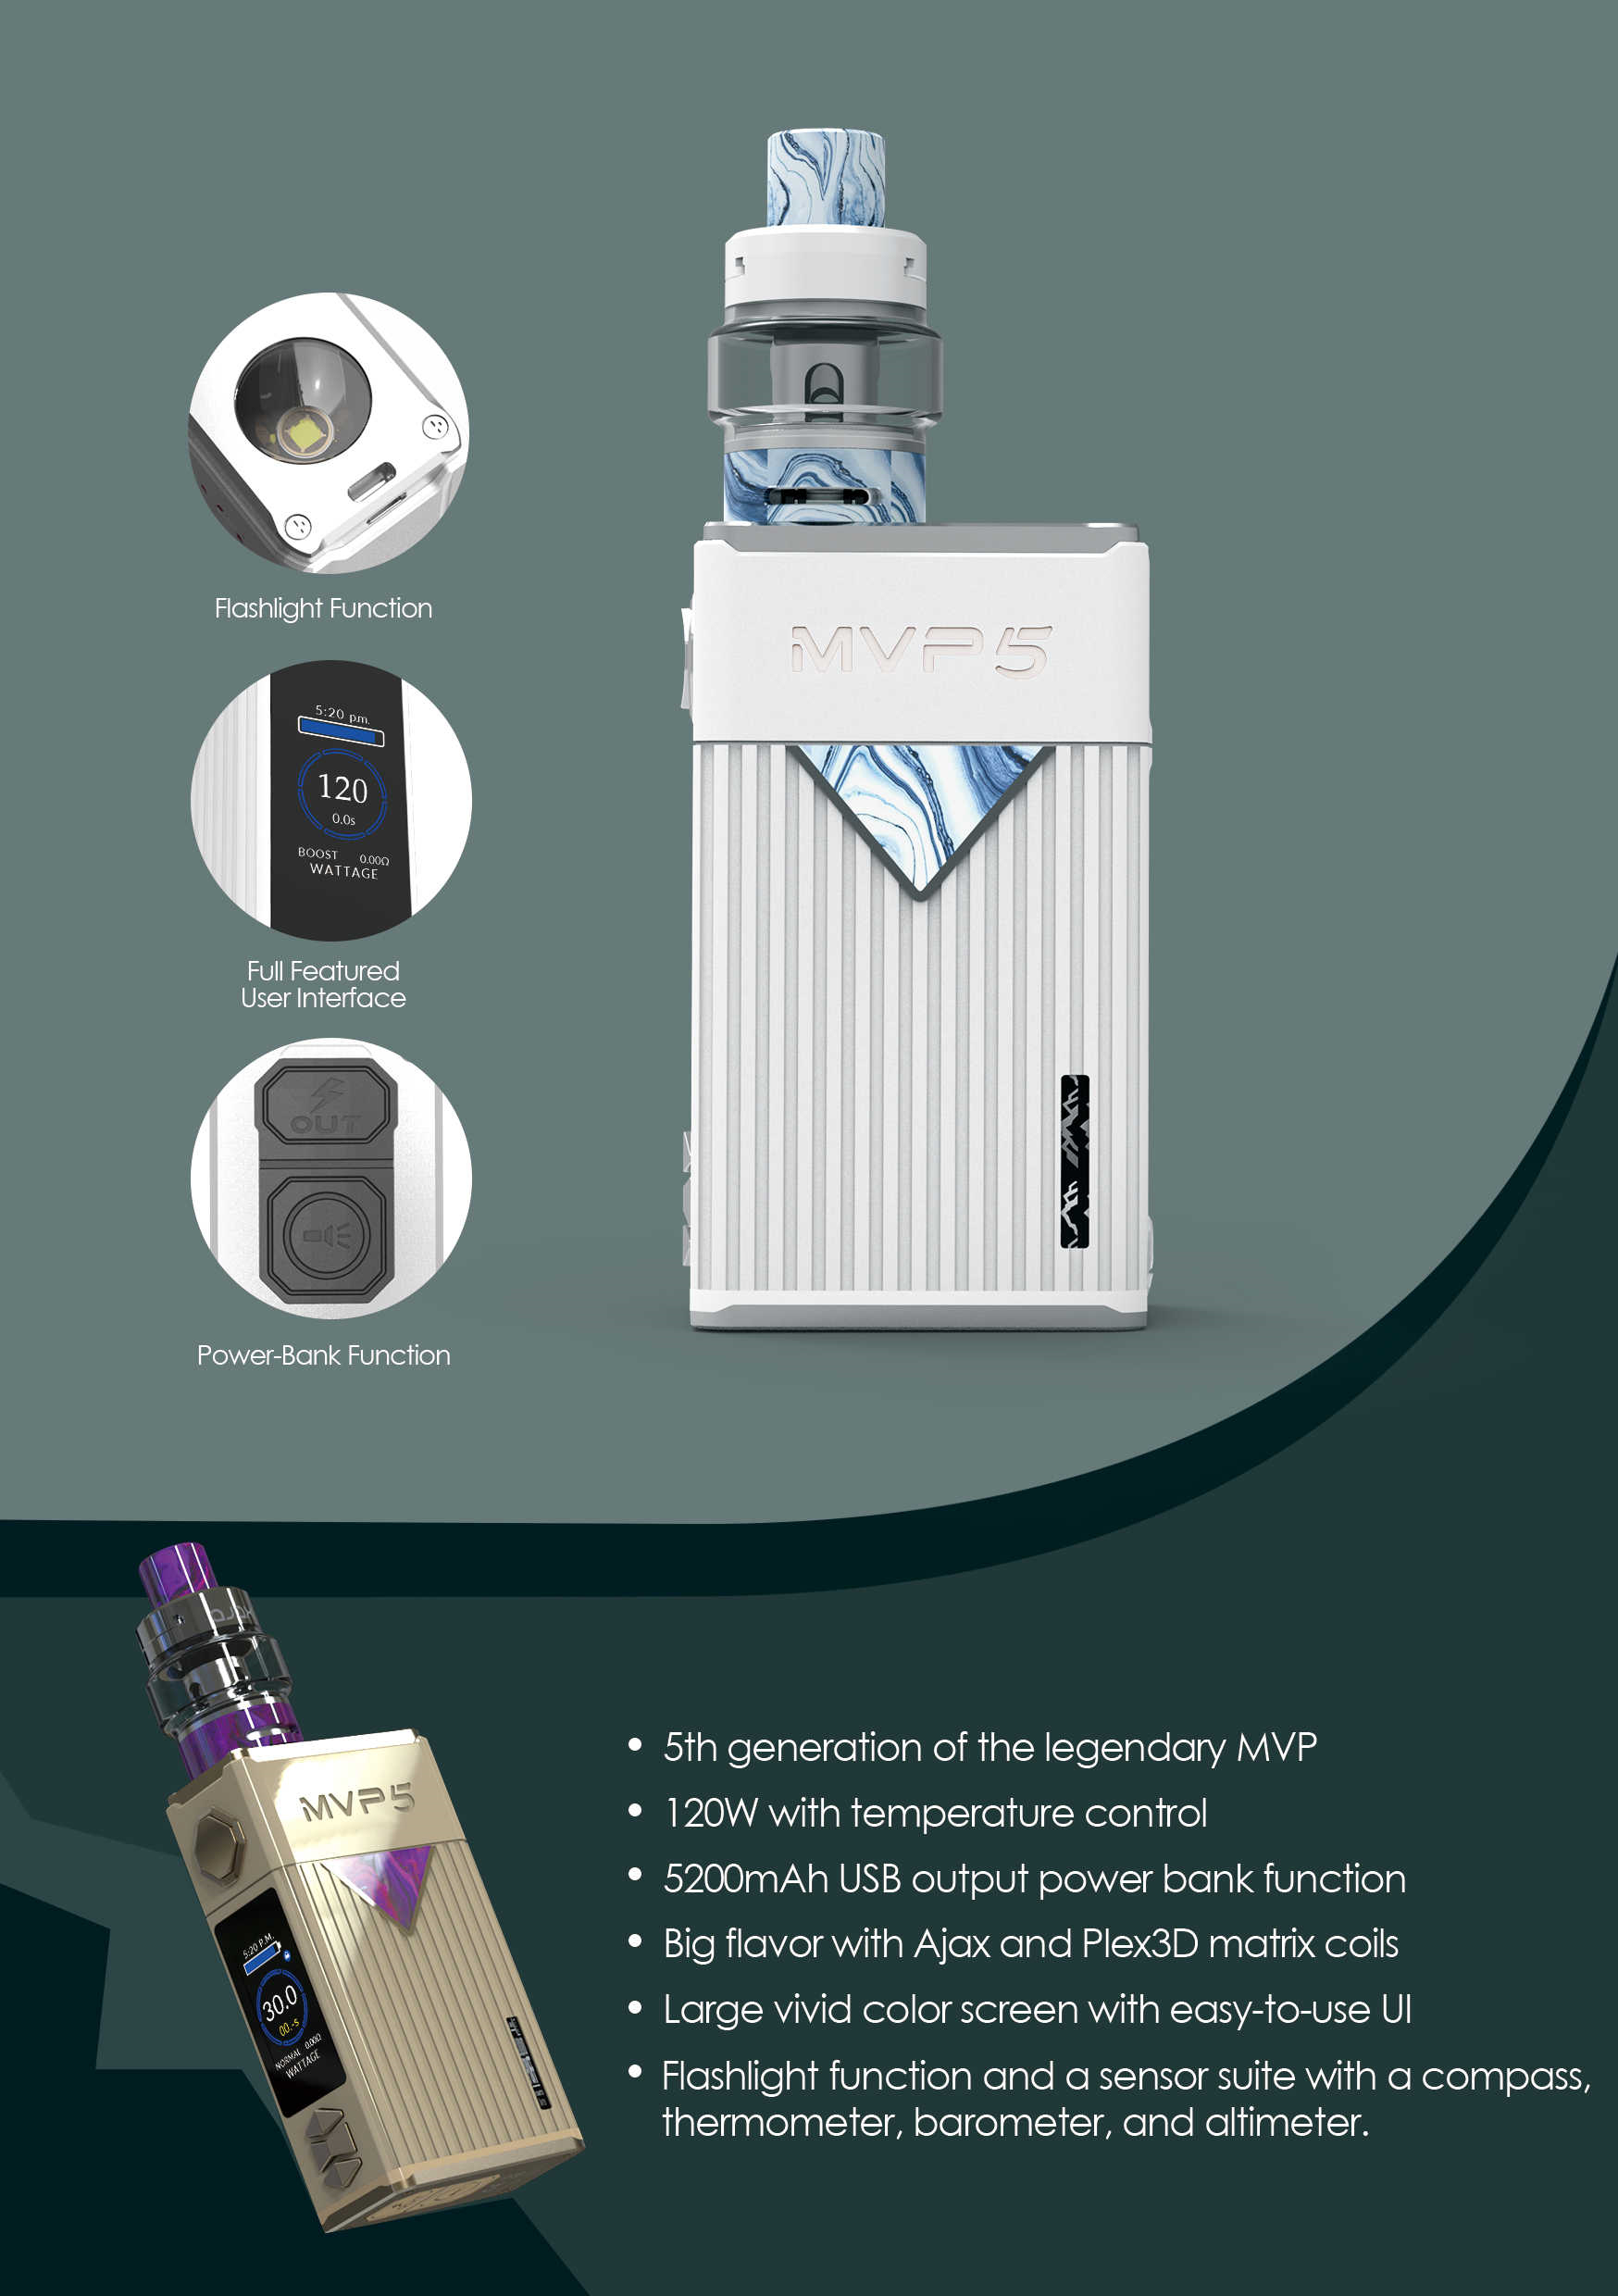
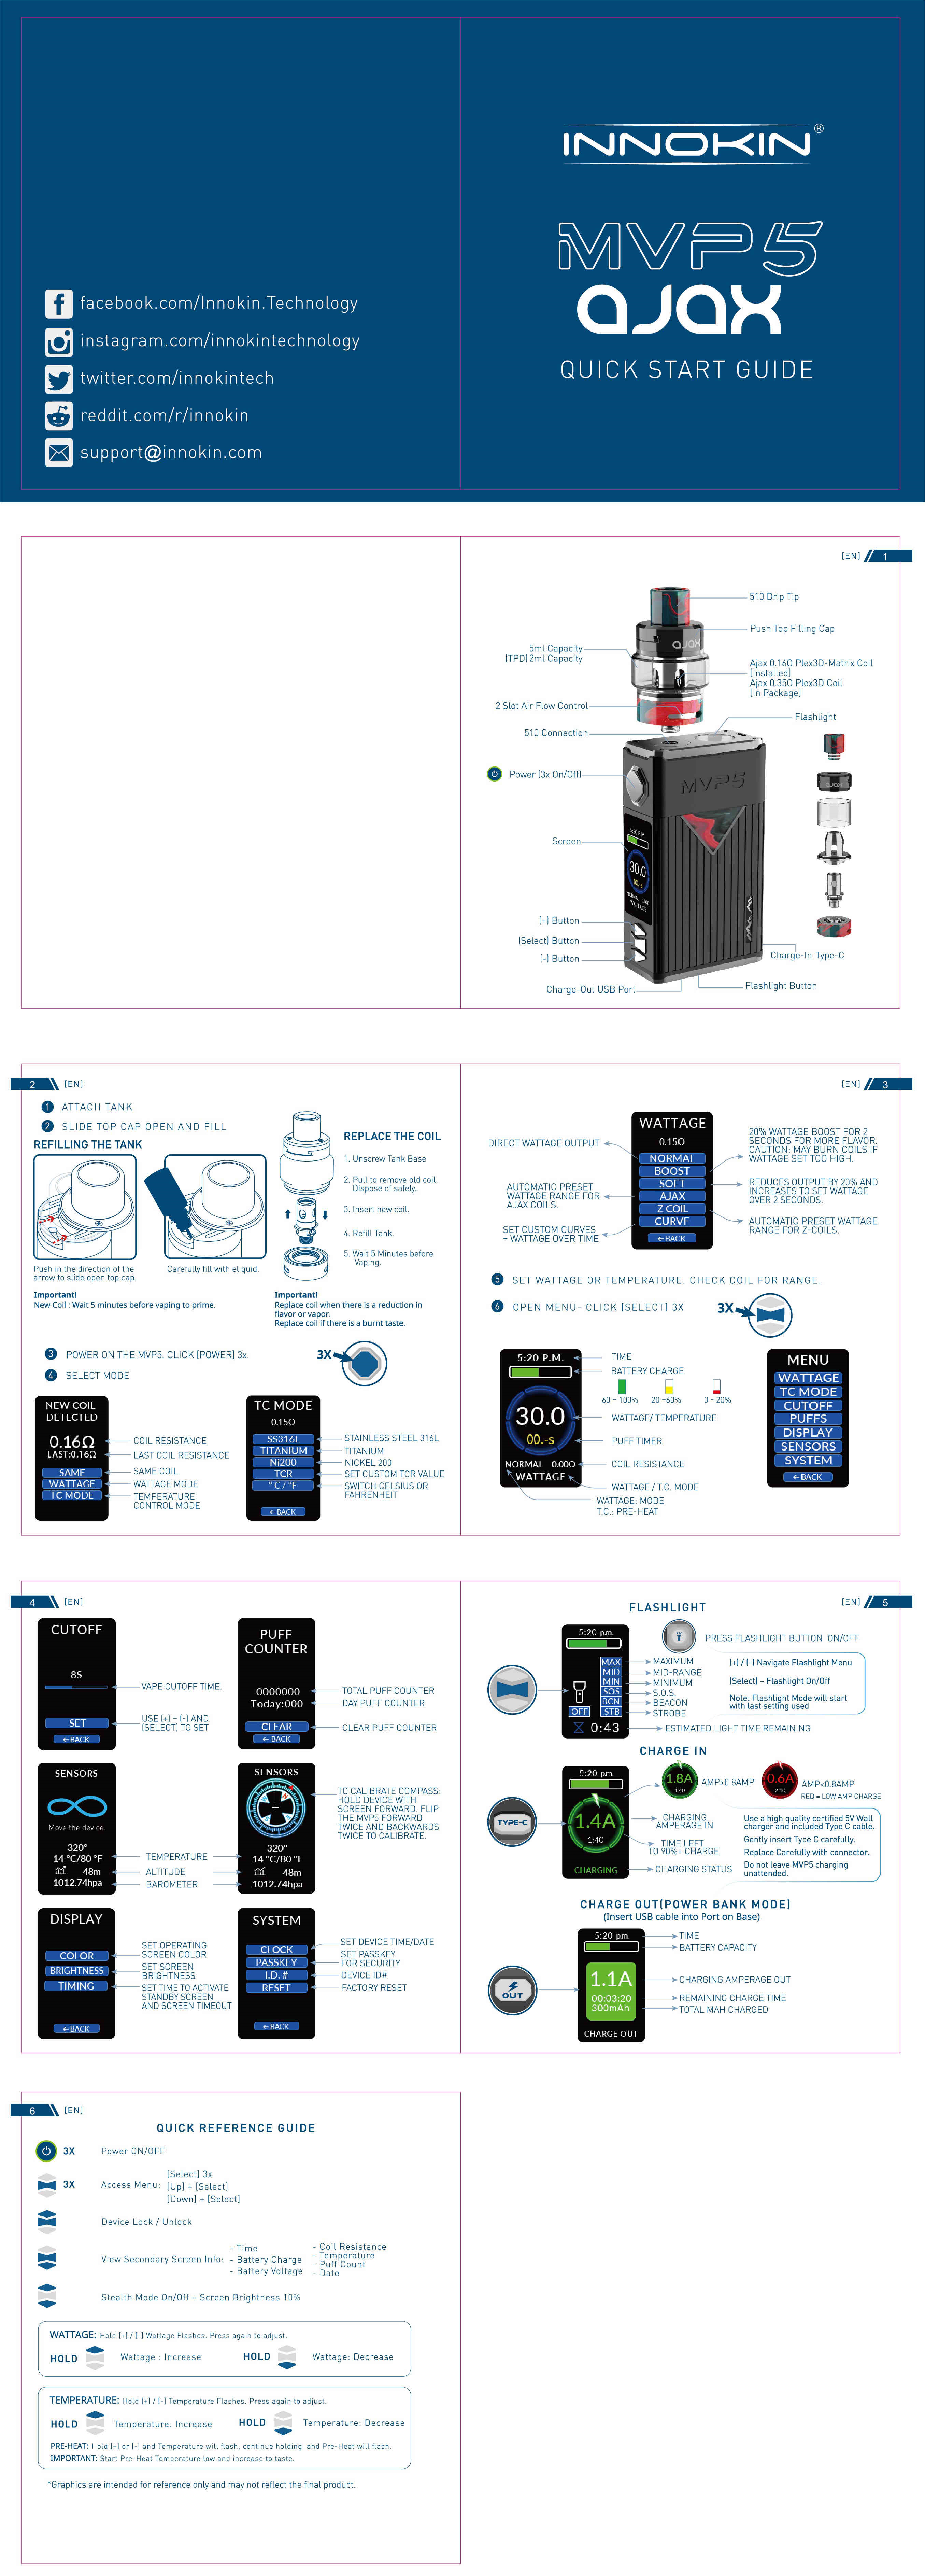
The Innokin MVP5 Vape Mod is the latest version of the famous Innokin MVP series. The MVP5 has been redesigned and updated with an all new rugged and sturdy look, which is perfect for the outdoors. The MVP5 features a huge built-in 5200mAh battery capacity. The MVP5 features three different Wattage modes along with Temperature Control and TCR mode. The MVP5 features Wattage Presets for the Innokin Ajax and Innokin Zenith/Zlide Tanks for an optimized vaping experience when using these tanks. The MVP5 features an independent flashlight design with six different light modes, depending on the situation. The MVP5 features a USB Power Bank function to recharge your cellphone, tablet, or any other USB powered electronic device. The MVP5 features a unique Sensor Suite, which includes a Compass, Thermometer, Barometer, and Altimeter Senor. The MVP5 includes a convenient USB Type-C Charging Cable Lanyard for a fast charging port. Conquer the outdoors with the Innokin MVP5 Vape Mod!
The Innokin Ajax Vape Tank features a great balance between flavor and vapor production, using the included Ajax Plex3D Coil Atomizer Heads. The Ajax features a 5.0ml e-Liquid capacity that may be filled using the convenient sliding top fill design. The Ajax is designed for direct to lung users with dual airflow slots that may be adjusted down to your personal preferences. The Ajax utilizes Ajax Kanthal Plex3D Coil Atomizer Heads that produce large amounts of vapor and pure flavor. The Ajax is topped off with a sleek Wide-Bore Resin Drip Tip and is also compatible with other 510 Drip Tips.
Features and Specs for Innokin MVP5 Mod:
Features and Specs for Innokin Ajax Tank:
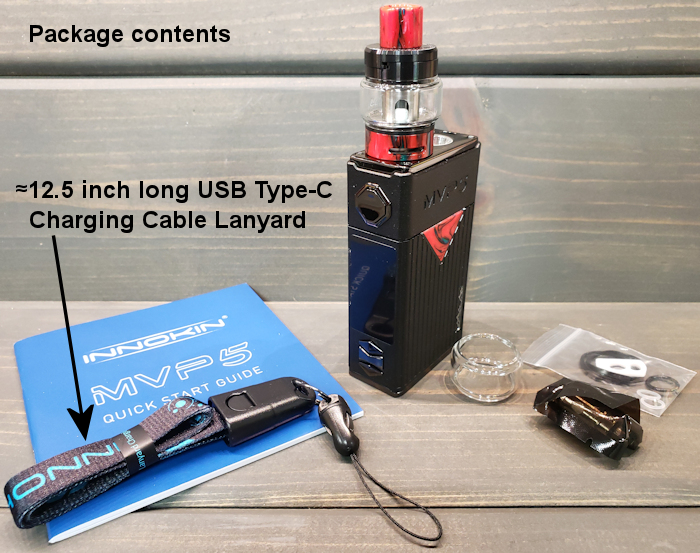
1 x Innokin MVP5 Mod
1 x Innokin Ajax Tank
1 x Ajax Plex3D Matrix Coil 0.16ohm Atomizer Head (Pre-installed)
1 x Ajax Plex3D Coil 0.35ohm Atomizer Head
1 x [Spare] Replacement 5ml Bubble Glass
1 x Packet of Spare Parts
1 x [≈12.5 inch long] USB Type-C Charging Cable [Wrist Strap] Lanyard
NOTE: The recommended High Quality 2Amp USB Charging Adapter is not included.
I’m sorry for this, but I have to present this in multiple postings to get all of the pictures in, as there is a 10-Image Limit per post
.
100%VG here with a review of the Innokin MVP5 & Ajax Kit. It’s been a pretty long time since my last review, but I am Proud to be doing this one! I don’t have fancy test gear to calculate things like Amperage ratings, Wattage Accuracy charts, mAh Accuracy ratings, or Temperature Control Accuracy, so this is my evaluation based on my satisfaction of usage.
I was given an MVP5 & Ajax Kit for my submission in a Giveaway, where innokin had 2 Optional Questions, asking for Ideas and Suggestions on what innokin could do to help us in this (what I will call) American War against Our legal nicotine “e-cigarette, or vaping, products.” Instead of actually Entering the Giveaway by following the posted rules to Win, I simply posted a Draft of what turned out to be the 9-page letter that I wrote and mailed to President Trump at the White House. Innokin announced me as an Additional Winner, thanked me for telling the Truth, and gave me the Kit. I was both surprised and delighted, not having expecting this, and I gratefully and thankfully accepted.
However, the fact that this was a Gift will not have any effect on my review! Never has and never will!
In the following PM, I was told that I could select the color I wanted, and I said, either the Black one or the White one, if Black was not available. I was sent and received, in like 2 days, the Beautiful White one which I have been using exclusively since October 25, so it’s nearly a month now. I offered to review it after having used it long enough to get to know all the Ins and Outs. Innokin accepted, and now I am here to tell you about it.
But first, let me present a Proper Introduction...
Innokin MVP5 Mod with Ajax Tank Kit
The Innokin MVP5 Vape Mod is the latest version of the famous Innokin MVP series. The MVP5 has been redesigned and updated with an all new rugged and sturdy look, which is perfect for the outdoors. The MVP5 features a huge built-in 5200mAh battery capacity. The MVP5 features three different Wattage modes along with Temperature Control and TCR mode. The MVP5 features Wattage Presets for the Innokin Ajax and Innokin Zenith/Zlide Tanks for an optimized vaping experience when using these tanks. The MVP5 features an independent flashlight design with six different light modes, depending on the situation. The MVP5 features a USB Power Bank function to recharge your cellphone, tablet, or any other USB powered electronic device. The MVP5 features a unique Sensor Suite, which includes a Compass, Thermometer, Barometer, and Altimeter Senor. The MVP5 includes a convenient USB Type-C Charging Cable Lanyard for a fast charging port. Conquer the outdoors with the Innokin MVP5 Vape Mod!
The Innokin Ajax Vape Tank features a great balance between flavor and vapor production, using the included Ajax Plex3D Coil Atomizer Heads. The Ajax features a 5.0ml e-Liquid capacity that may be filled using the convenient sliding top fill design. The Ajax is designed for direct to lung users with dual airflow slots that may be adjusted down to your personal preferences. The Ajax utilizes Ajax Kanthal Plex3D Coil Atomizer Heads that produce large amounts of vapor and pure flavor. The Ajax is topped off with a sleek Wide-Bore Resin Drip Tip and is also compatible with other 510 Drip Tips.
Features and Specs for Innokin MVP5 Mod:
- Dimensions (inches): 3-5/8”(H) x 2-1/16”(W) x 1-1/16”(D)
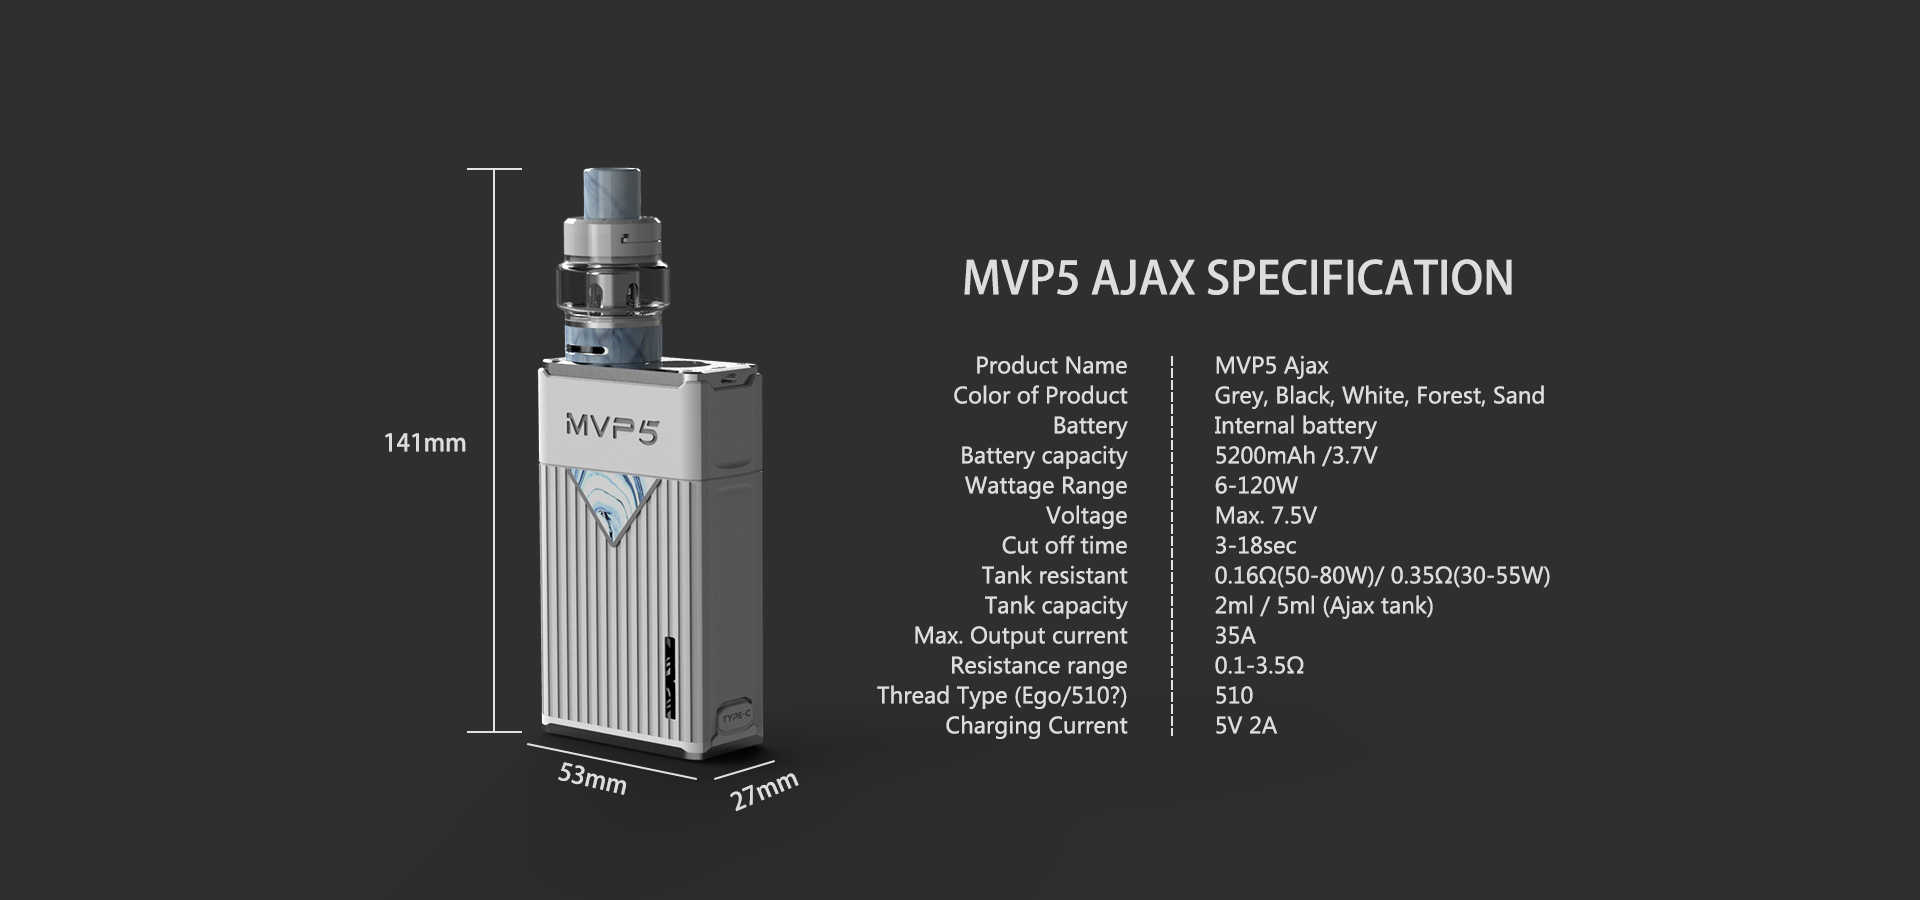
- Dimensions (metric): 92mm(H) x 53.4mm(W) x 27mm(D)
- 510 Threaded
- Built-in Battery Capacity: 5200mAh
- Wattage Range: 6 - 120W
- Resistance Range: 0.1 - 3.5ohm
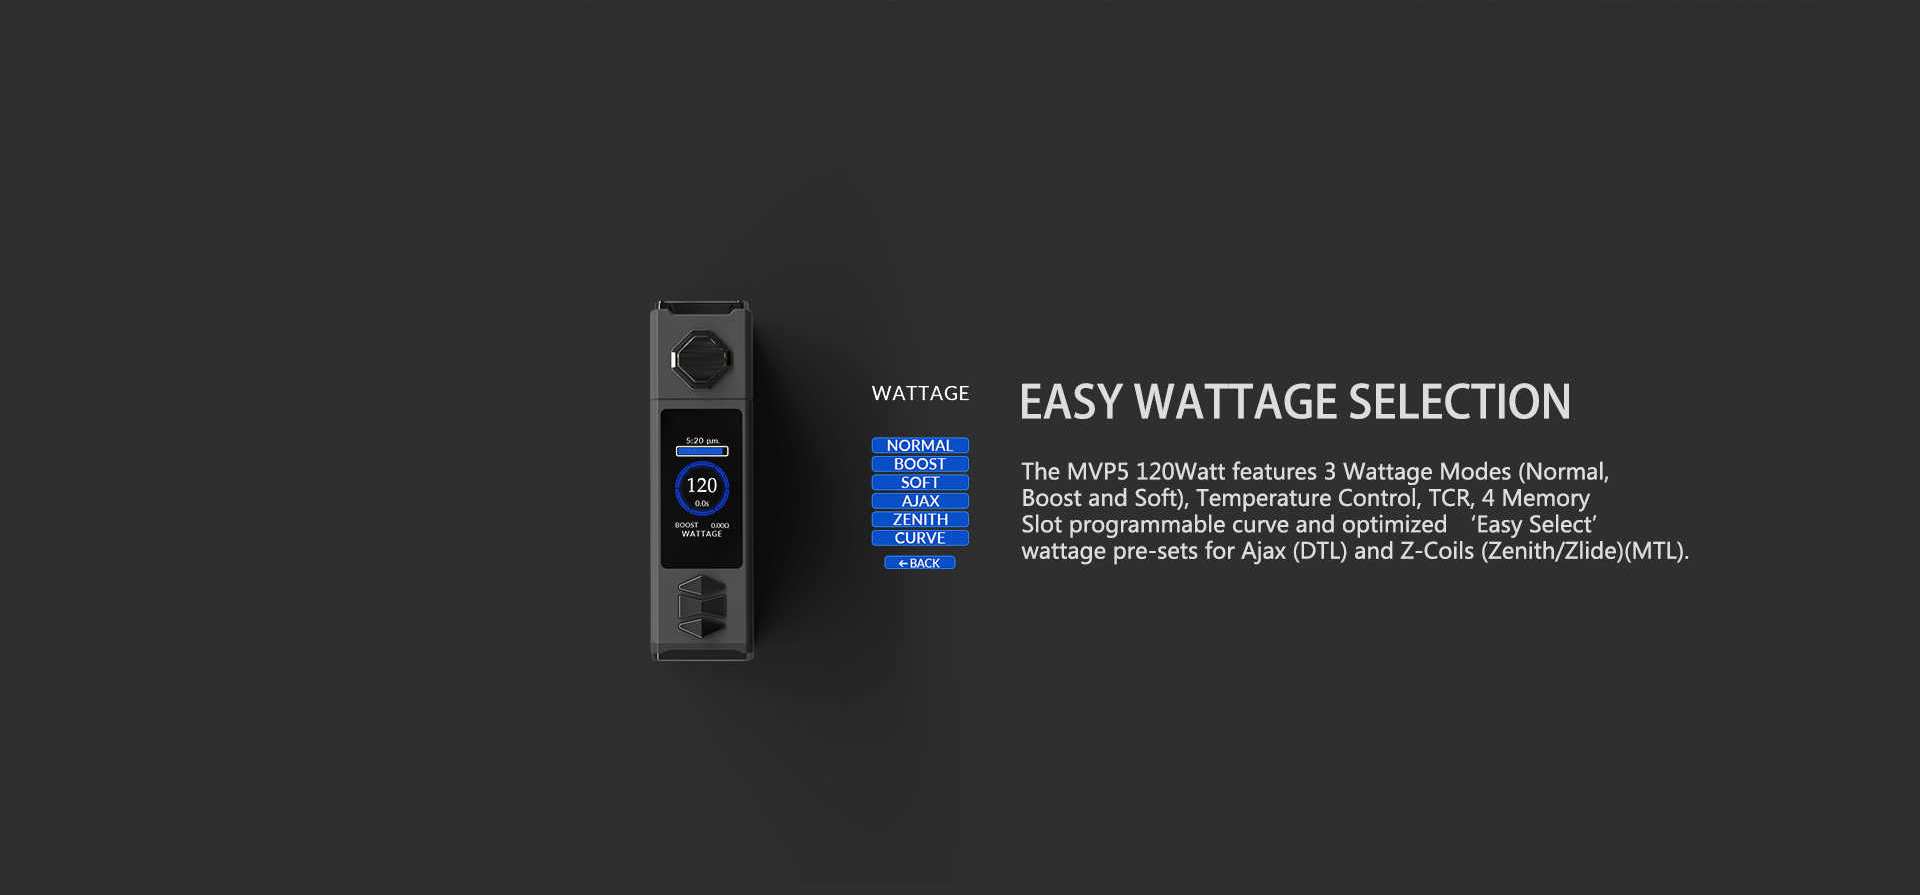
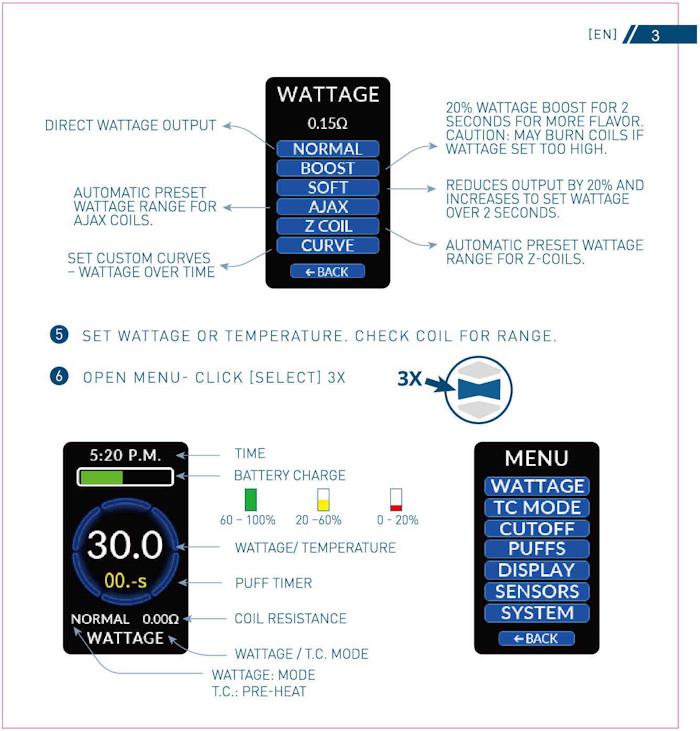
- Three Wattage Modes: Normal, Boost, and Soft
- Temperature Control and TCR Mode [with Memory for 4 Settings]
- Wattage Presets for Ajax (DTL) and Zenith/Zlide (MTL)
- Rugged and Sturdy Design
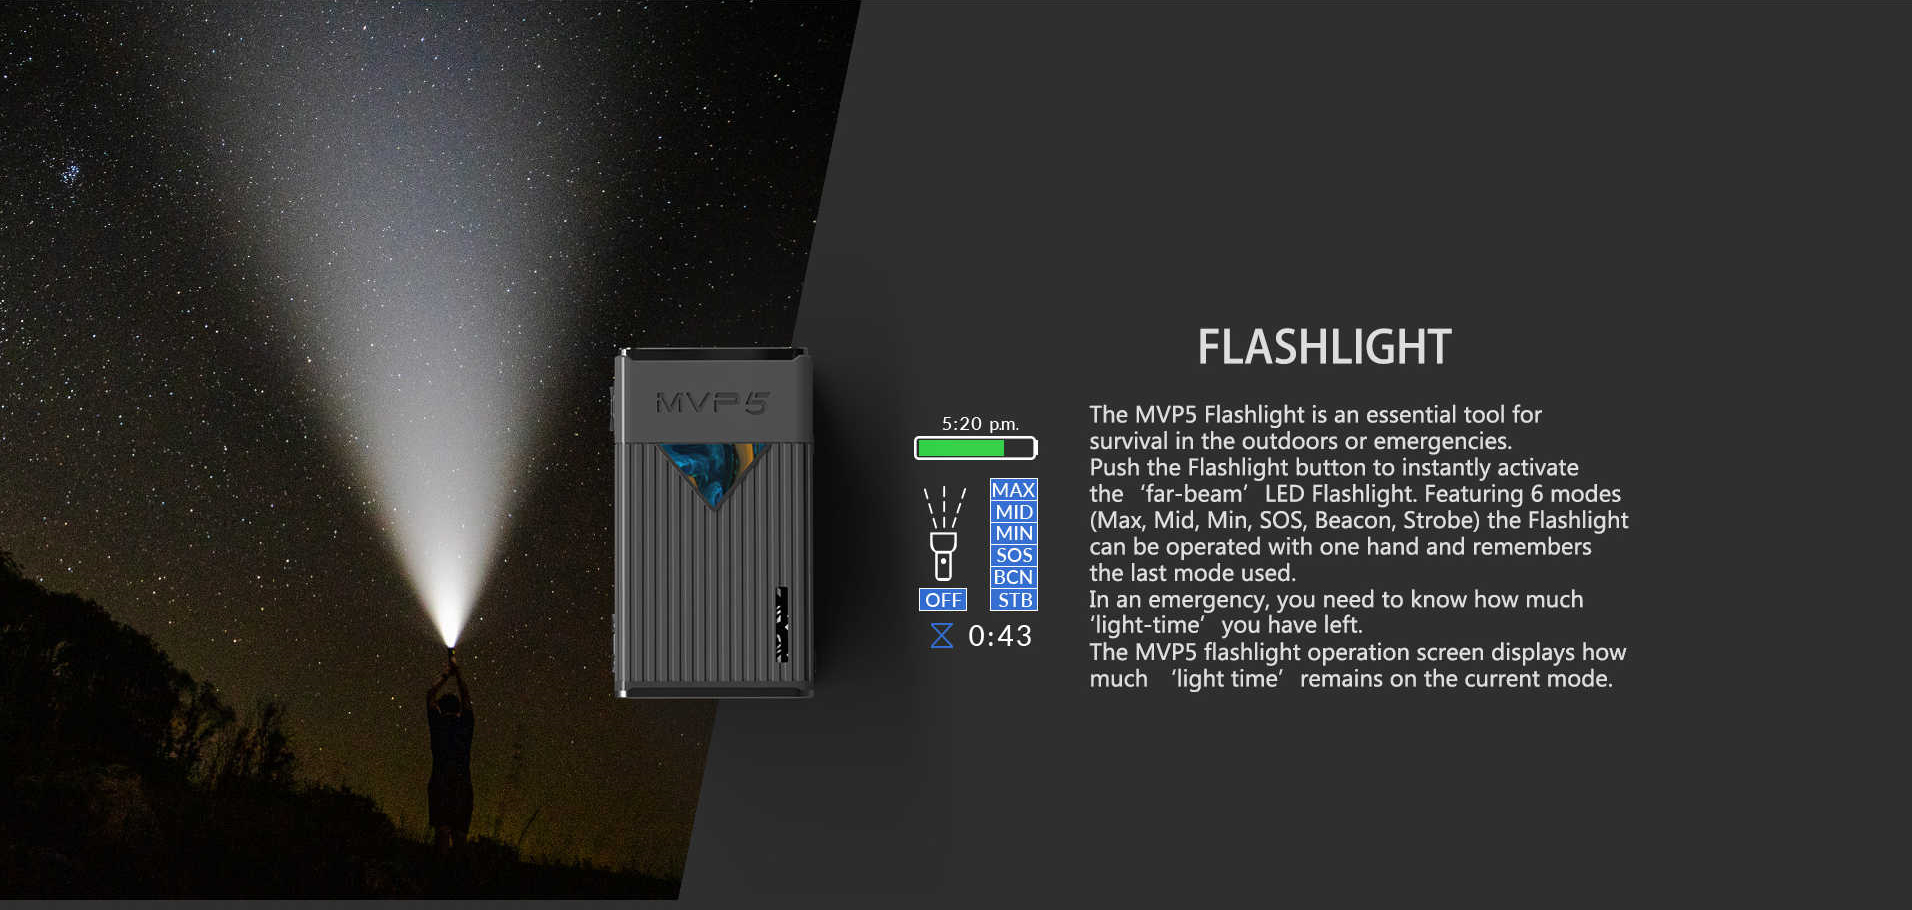
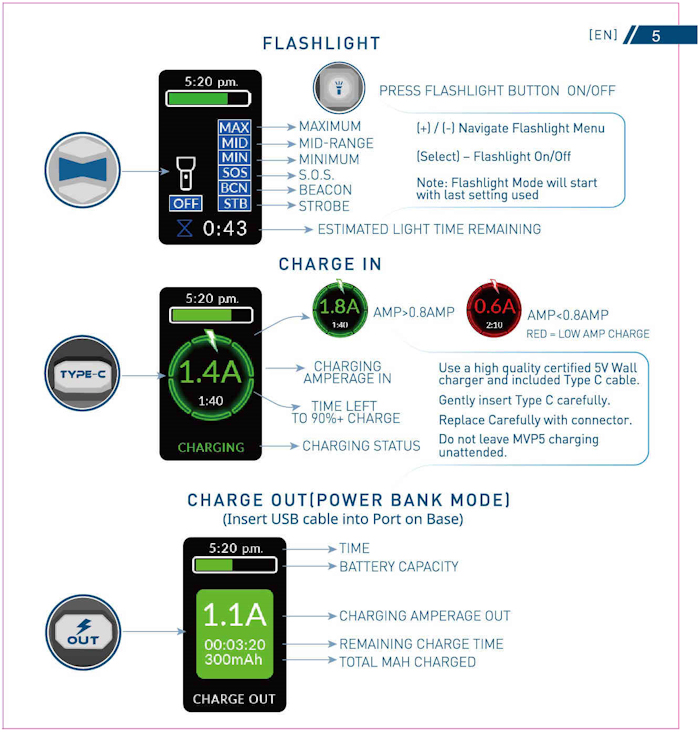
- Independent Flashlight Button with Six Light Modes
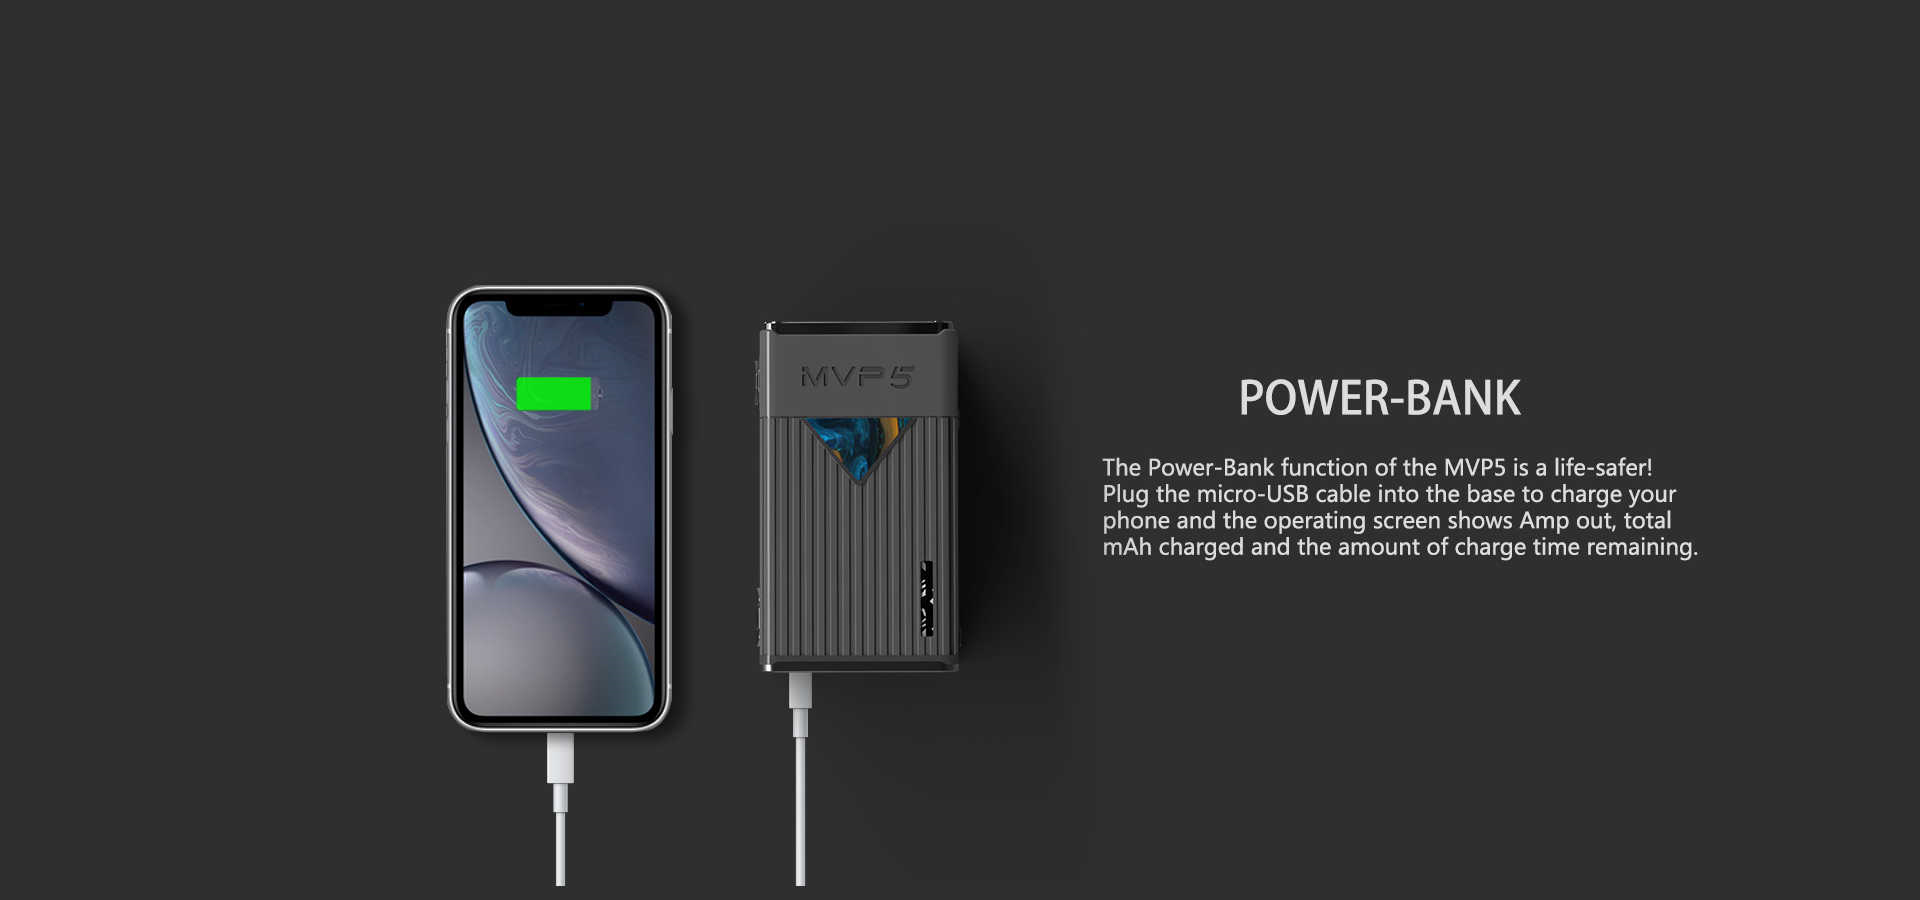
- USB Power Bank Function [on the bottom, for things like Charging a Cell Phone]
- Sensor Suite: Compass, Thermometer, Barometer, and Altimeter Sensors
- Includes (1) USB Type-C Charging Cable [Wrist Strap] Lanyard
- Lower Rear Side] Bottom USB Type-C Charging Port
- USB-C 2Amp Quick Charge
Features and Specs for Innokin Ajax Tank:
- Dimensions (inches): 1-15/16"(H) x 15/16"(W) (Including Drip Tip)
- Dimensions (metric): 49.2mm(H) x 23.8mm(W) (Including Drip Tip)
- [Base] Diameter: 24mm
- 510 Threaded
- E-Liquid Capacity: 5.0ml Bubble Glass Tube (in “Standard” version. 2.0ml in “TPD” Compliance)
- Sliding Top Fill Design
- Glass Tank
- Dual Airflow Slots
- Bottom Adjustable Airflow Control Valve
- Designed for Direct to Lung Use
- Includes (1) Ajax Kanthal Plex3D Matrix Coil 0.16ohm Atomizer Head (Pre-installed) (50 - 80W)
- Includes (1) Ajax Kanthal Plex3D Coil 0.35ohm Atomizer Head (30 - 55W)
- 510 Drip Tip Compatible
1 x Innokin MVP5 Mod
1 x Innokin Ajax Tank
1 x Ajax Plex3D Matrix Coil 0.16ohm Atomizer Head (Pre-installed)
1 x Ajax Plex3D Coil 0.35ohm Atomizer Head
1 x [Spare] Replacement 5ml Bubble Glass
1 x Packet of Spare Parts
1 x [≈12.5 inch long] USB Type-C Charging Cable [Wrist Strap] Lanyard
NOTE: The recommended High Quality 2Amp USB Charging Adapter is not included.
I’m sorry for this, but I have to present this in multiple postings to get all of the pictures in, as there is a 10-Image Limit per post
.


 This lasts me all day, especially with the Plex3D Coil 0.35ohm Atomizer Heads! I’ve been using Dual Series 18650 Samsung 30Q 3000mAh in my Mods, and changing them at least once per day, sometimes twice. I had to hit the Plex3D Matrix Coil 0.16ohm Atomizer Head (included in the box) a bit longer for a satisfying vape, but the 5200mAh battery still lasted until bed time.


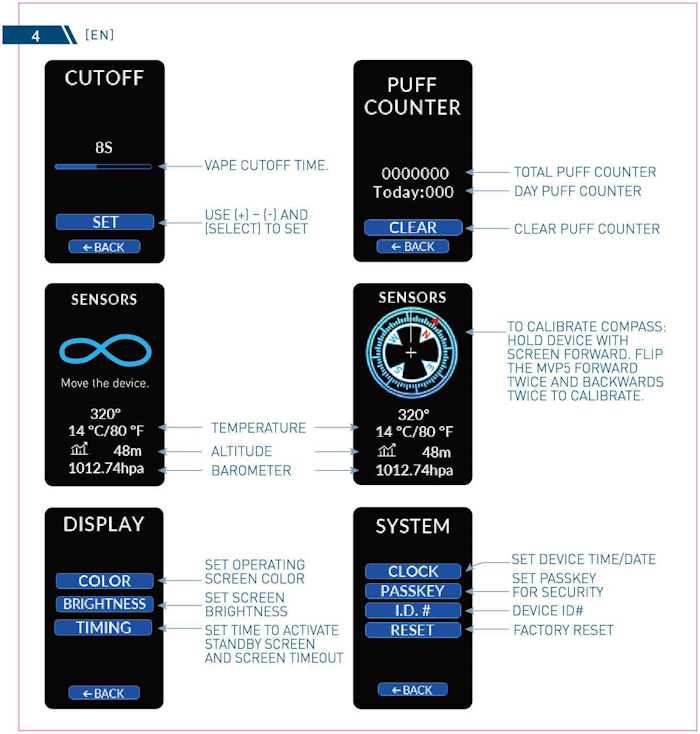


 So feel free to join in and share your experiences with us. I'd love to hear stories from anyone who actually uses features like the Compass, the Thermometer, or the Barometer and Altimeter.