
First off I wanted to thank everyone in this sub forum for all the great information, without it I would of never been able to put something together in such short manner.
After observing all the different direct feed mods being released, I wanted to see if I could produce something that incorporated this functionality. I wanted to use wood instead of plastic for my enclosure, but I am an amateur when it comes to dealing with wood, so I enlisted the help of my father who is an experienced wood worker (and someone who has the tools to make the enclosures properly).
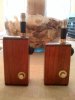
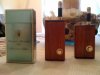
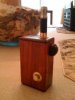
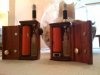
I have two working prototypes that I have been using in rotation for about 3 weeks now. I make any changes (design and build) to one of them, and if it works out I move it to the second prototype. Both boxes are bottom feed systems that use 3ml bottles, one uses a 18500 battery, while the other uses a 18650 battery.
While both are similar, there are some differences between the two. The 18500 is the first prototype and has some newer features that I just started incorporating into the 18650 box.
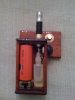
18500 box, has a slide master on/off switch (will be integrated into the 18650 box once I source a switch I am happy with), uses a semi direct pipe feed system (the filler pipe that runs into the atty also feeds into the bottle cap using a teflon tube as a gasket at the bottle end of the tube, then uses another teflon tube that runs inside the bottle). The feed tube is also my positive lead that I solder to my momentary switch. Instead of using an epoxy for anchoring the battery connector to the box, I used a steel grommet (thats brass coated) with an o-ring beneath it. I compress it into a recessed hole in the box, then use a brass plate as an anchor inside the box. The brass plate is also my negative bus and is soldered to the battery connector rim. I use another brass plate as my positive bus that runs down the right side and bottom of the box and is soldered to the momentary switch (small wire from switch to buss). The cover for the box uses rails to sit in alignment, while the magnets hold the cover to the battery (and therefore the box), this makes for easy opening and closing. I also fabricated a feed button on the cover for ease of pumping liquid into the atty.
The 18650 box is basically the same, but slightly larger and does not (in the pictures below) have all of the components as the 18500 box, yet. I also changed the feed system slightly on this box (since I have more working room for the connection). This is not pictured, but I have a single teflon tube that runs from the bottom of the bottle into a silicone hose out the top of the bottle, the silicone hose then connects to the filler pipe that has a teflon hose as a gasket.
As of now both work great and have really opened my eyes to bottom feed systems, I get great vapor and taste with both and no longer have to deal with dripping (especially while I'm driving) or using cartos that have a tendency to burn the filler in them. I will post more pics and information later as time is available.
Happy vaping.
After observing all the different direct feed mods being released, I wanted to see if I could produce something that incorporated this functionality. I wanted to use wood instead of plastic for my enclosure, but I am an amateur when it comes to dealing with wood, so I enlisted the help of my father who is an experienced wood worker (and someone who has the tools to make the enclosures properly).
I have two working prototypes that I have been using in rotation for about 3 weeks now. I make any changes (design and build) to one of them, and if it works out I move it to the second prototype. Both boxes are bottom feed systems that use 3ml bottles, one uses a 18500 battery, while the other uses a 18650 battery.
While both are similar, there are some differences between the two. The 18500 is the first prototype and has some newer features that I just started incorporating into the 18650 box.
18500 box, has a slide master on/off switch (will be integrated into the 18650 box once I source a switch I am happy with), uses a semi direct pipe feed system (the filler pipe that runs into the atty also feeds into the bottle cap using a teflon tube as a gasket at the bottle end of the tube, then uses another teflon tube that runs inside the bottle). The feed tube is also my positive lead that I solder to my momentary switch. Instead of using an epoxy for anchoring the battery connector to the box, I used a steel grommet (thats brass coated) with an o-ring beneath it. I compress it into a recessed hole in the box, then use a brass plate as an anchor inside the box. The brass plate is also my negative bus and is soldered to the battery connector rim. I use another brass plate as my positive bus that runs down the right side and bottom of the box and is soldered to the momentary switch (small wire from switch to buss). The cover for the box uses rails to sit in alignment, while the magnets hold the cover to the battery (and therefore the box), this makes for easy opening and closing. I also fabricated a feed button on the cover for ease of pumping liquid into the atty.
The 18650 box is basically the same, but slightly larger and does not (in the pictures below) have all of the components as the 18500 box, yet. I also changed the feed system slightly on this box (since I have more working room for the connection). This is not pictured, but I have a single teflon tube that runs from the bottom of the bottle into a silicone hose out the top of the bottle, the silicone hose then connects to the filler pipe that has a teflon hose as a gasket.
As of now both work great and have really opened my eyes to bottom feed systems, I get great vapor and taste with both and no longer have to deal with dripping (especially while I'm driving) or using cartos that have a tendency to burn the filler in them. I will post more pics and information later as time is available.
Happy vaping.
Attachments
Last edited:
