
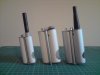
I'd like to take this opportunity to present some things I've been busy with, having pored over these forums for quite some time and bringing together bits from here and there. A lot of the body design is similar to tornadodragon's mods, with some slight changes along the way....
As for all of these, the standard so far is3.7v, 510 powered, atty injected bottom feeders with a simple mechanical switch and in the larger of the two slow changing 5mm RGB LED's, which when fired run red for 5secs, then turn green and if you really stick around, blue. The little one is going to get lit properly soon I think.
The larger two use 18650's and the little one a 14500. I find the 14500 good for a couple of hours, but then lackluster after that- with the exception of using a LR atty, then it rocks. I've had one for over a week but hadn't put it to use, boy that was a mistake. Now the little guy has been running solid almost 24hrs now.
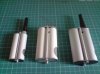
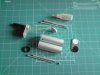
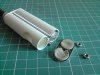
Endcaps are cut/ground down from a section of 1.5mm aluminum computer case which had a rather stubborn brushed black finish now mostly removed. The negative connection is switched and runs throughout the metal of the case. The batteries are positive side down and have wiring running between the tubes back up to the top for atty connection and LED's.
Each of the connectors is held in place with solder/plumber's putty and has a small brass tube from a disposable lighter (1/16" on the top, 3/32 on the bottom-- couldn't find 1/16" tubing here) up through the center positive connector to which the positive wire is soldered. once set in place putty is around the assembly on the inside to keep things sealed.
LED's have inline resistors and are swappable via small fan header sockets.
The bottles are inline with the atties and have a section of 3/32" brass tube in the inside and connect to the atty tube with a small section of silicon tubing protruding off the bottles nipple and pressure fit to the atty's feed tube. A little window by this connection provides peace of mind and avoids accidents.
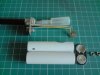
The bodies themselves are two tubes to house the battery and bottle, connected with small screws on the inside along with two smaller tubes with threaded rod inside to keep the caps secure. The big one on the right uses 25mm OD/ 22mm OD brushed aluminum tubing and feels really solid. The middle one is a bit lighter and uses 22mm OD conduit. Unfortunately, the bottle tube had to be slit partly to make room for the 10ml bottle. Not a real problem, but you could I suppose squeeze the tube hard enough to pump some juice inadvertently.
The little one has exposed threaded rod and uses 16mm conduit, which is snug for the 14500 but very doable, and excellent for the 3ml bottle. There isn't much extra room though so there is only one internal bolt and the bottom cap is kept in line by two tube shaped discs of plumber's putty and will probably be how the LED gets added too. I started to work on a new body with some thin walled SS 16mm tubing but would rather get some aluminum that fits as it is much nicer to work with.
juice cups catch excess liquid and are from cart condoms/ silicon tubing, and although the ego cone is press fit over the silicone in these pics, it hasn't really been incorporated yet.
I will try to get more pics of internals soon but I've got camera/battery issues.
Hope you enjoy!
As for all of these, the standard so far is3.7v, 510 powered, atty injected bottom feeders with a simple mechanical switch and in the larger of the two slow changing 5mm RGB LED's, which when fired run red for 5secs, then turn green and if you really stick around, blue. The little one is going to get lit properly soon I think.
The larger two use 18650's and the little one a 14500. I find the 14500 good for a couple of hours, but then lackluster after that- with the exception of using a LR atty, then it rocks. I've had one for over a week but hadn't put it to use, boy that was a mistake. Now the little guy has been running solid almost 24hrs now.
Endcaps are cut/ground down from a section of 1.5mm aluminum computer case which had a rather stubborn brushed black finish now mostly removed. The negative connection is switched and runs throughout the metal of the case. The batteries are positive side down and have wiring running between the tubes back up to the top for atty connection and LED's.
Each of the connectors is held in place with solder/plumber's putty and has a small brass tube from a disposable lighter (1/16" on the top, 3/32 on the bottom-- couldn't find 1/16" tubing here) up through the center positive connector to which the positive wire is soldered. once set in place putty is around the assembly on the inside to keep things sealed.
LED's have inline resistors and are swappable via small fan header sockets.
The bottles are inline with the atties and have a section of 3/32" brass tube in the inside and connect to the atty tube with a small section of silicon tubing protruding off the bottles nipple and pressure fit to the atty's feed tube. A little window by this connection provides peace of mind and avoids accidents.
The bodies themselves are two tubes to house the battery and bottle, connected with small screws on the inside along with two smaller tubes with threaded rod inside to keep the caps secure. The big one on the right uses 25mm OD/ 22mm OD brushed aluminum tubing and feels really solid. The middle one is a bit lighter and uses 22mm OD conduit. Unfortunately, the bottle tube had to be slit partly to make room for the 10ml bottle. Not a real problem, but you could I suppose squeeze the tube hard enough to pump some juice inadvertently.
The little one has exposed threaded rod and uses 16mm conduit, which is snug for the 14500 but very doable, and excellent for the 3ml bottle. There isn't much extra room though so there is only one internal bolt and the bottom cap is kept in line by two tube shaped discs of plumber's putty and will probably be how the LED gets added too. I started to work on a new body with some thin walled SS 16mm tubing but would rather get some aluminum that fits as it is much nicer to work with.
juice cups catch excess liquid and are from cart condoms/ silicon tubing, and although the ego cone is press fit over the silicone in these pics, it hasn't really been incorporated yet.
I will try to get more pics of internals soon but I've got camera/battery issues.
Hope you enjoy!
![P270510_15.50[01].jpg](/data/attachments/5/5315-70c95ef730e4159d34ceb37a1d7ef03c.jpg)


![P010610_11.15[01].jpg](/data/attachments/5/5327-a8d0db6768020b95bea12abbf22d726c.jpg)

![P010610_11.17[01].jpg](/data/attachments/5/5329-a5c0ec4a2d7b32e6f8c931ba04376d8d.jpg)


") ....
....