OK everyone here is my first creation...The Kaos-Detonator!

Status
Not open for further replies.

kaos731

Senior Member
ECF Veteran
Verified Member
Jul 7, 2011
76
24
long Island, NY
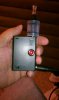
This is a 3.7 volt 1800MAH! box mod that I built using radio shack parts.
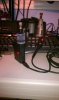
I recently acquired a single battery box mod and looked long and hard at it and said to myself I can do it better Cleaner and make it last longer. Below is the debut pics of the "Kaos-Detonator"!
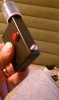
I decided not to use a master cut off switch as this will never be in my pants pocket, and I did not install any lights as battery time is precious to me. This will last me 8 - 10 hours of constant chain vaping. a normal vapor will probably get a day and a half out of this.

Kaos-Detonator 1.jpg
Kaos-Detonator 2.jpg
Kaos-Detonator 3.jpg
 

kaos731

Senior Member
ECF Veteran
Verified Member
Jul 7, 2011
76
24
long Island, NY
I know its not all fancy shmancy compared to all the other one in the modders forum, But its clean, neat, not to mention cheap.

Total cost of the build minus the batteries I had already was $3.25.

Battery Box and Red switch came from Radio shack is $.99 each.
The 510 sealed connector came from Mad-vapes for $1.25
 

Rocketman

Ultra Member
ECF Veteran
May 3, 2009
2,649
977
SouthEastern Louisiana
I know its not all fancy shmancy compared to all the other one in the modders forum, But its clean, neat, not to mention cheap.
Don't get me wrong. I wasn't dissing your mod. Simple, somewhat easy to troubleshoot if something did happen to it. Low parts count means fewer parts to fail. Simple, effective, 3.7 volt mod.

Photos show enough detail that anyone ought to be able to duplicate it.

Vape away dude :)
 

asdaq

Vaping Master
ECF Veteran
Verified Member
Feb 23, 2010
4,570
1,845
poland, and the brassy lands of google
Straightforward and VERY neat work...time to step up to a VV mod maybe? lol...there is nothin' like vaping at 4.6...at least for me...so many more complex flavors come through!

Hehe, big fan of pizza flavored juice are we? ;)

Nice job on the box too, 3 cheers for epoxy putty!
 

WillyB

Vaping Master
ECF Veteran
Oct 21, 2009
3,709
591
USA
Well with 14500s you gotta parallel them, one is pretty damn useless, except for maybe 3+Ω atties/cartos. A great way to start the ball rolling and you'll be able to give any LR offerings a decent base.

You could have run your wires in a more direct fashion though. No reason to wind around like you did.

Here's how I did it.

par_marked_.jpg


Easy cuz I didn't even have to change the orientation of the cells either.

In your case I would have gone like this (not my mod).

paral_UK_F.JPG


FWIW drip wells are a must on plastic box, the extra support and heatsinking will help it weather the drops. Some of these new longer cartos with a drip tip exert a lot of leverage.
 

kaos731

Senior Member
ECF Veteran
Verified Member
Jul 7, 2011
76
24
long Island, NY
Hello Willie B,

Thank you for the advice!
After closer inspection of your mod and the one by the other guy it appears that you have both positive terminals making contact with the connector jacket and the negative terminals making contact with the center post inline with the button.

I guess with an electrical design this simple it doesn't matter how you connect the power as long as it completes the circuit when the button is pressed. TBH I would never have thought to put my box together that way, and now that I see your design more modding creations pop into my mind working with smaller enclosures.

Thank You

-Kaos
 

kaos731

Senior Member
ECF Veteran
Verified Member
Jul 7, 2011
76
24
long Island, NY
Ok guys I am back with an update to my "Kaos-Detonator"...

While am waiting for some other boxes to come in to start my 18650 size detonator, I decided to add a charge port to my existing detonator. Below are the results:
 

Attachments

  • Kaos-Detonator with charge port 1.jpg
    Kaos-Detonator with charge port 1.jpg
    20.6 KB · Views: 79
  • Kaos-Detonator with charge port 2.jpg
    Kaos-Detonator with charge port 2.jpg
    20.7 KB · Views: 70
  • Kaos-Detonator charging coupler .jpg
    Kaos-Detonator charging coupler .jpg
    20.9 KB · Views: 76
  • Kaos-Detonator with charge port 3.jpg
    Kaos-Detonator with charge port 3.jpg
    21.8 KB · Views: 78

Robert T

Super Member
ECF Veteran
Verified Member
Dec 11, 2010
690
159
Lake City, Florida
Hey WillyB, are you using the master kill switch in that first photo, diagram? The one with the fire switch in the center of the box.

Robert


Well with 14500s you gotta parallel them, one is pretty damn useless, except for maybe 3+Ω atties/cartos. A great way to start the ball rolling and you'll be able to give any LR offerings a decent base.

You could have run your wires in a more direct fashion though. No reason to wind around like you did.

Here's how I did it.

par_marked_.jpg


Easy cuz I didn't even have to change the orientation of the cells either.

In your case I would have gone like this (not my mod).

paral_UK_F.JPG


FWIW drip wells are a must on plastic box, the extra support and heatsinking will help it weather the drops. Some of these new longer cartos with a drip tip exert a lot of leverage.
 

WillyB

Vaping Master
ECF Veteran
Oct 21, 2009
3,709
591
USA
Yes. You can just use the wire that comes with the box, you need to route it over to the other cell's negative (as shown, solder at yellow dot) then to the fire switch. If you like you can replace with a thicker wire, I was lazy that day. I rarely if ever actually use the master switch, I always just loosen the atty.

The numbers are quite good for just standard 14500's and the thin wires.

Here it is firing a 1.6Ω DC, note that's not the very first press which is higher, but the 3rd.

14500_1.6ohm.jpg
 

WillyB

Vaping Master
ECF Veteran
Oct 21, 2009
3,709
591
USA
Well it was just pointed out to me that the way I have my box wired the kill switch is basically useless as it will only turn off one cell.

So if you want a functioning master switch this should do it, just gotta pop off the little cover on the switch to get to the main negative contact. The dark blue being the original wire, the light blue creating the parallel connection pre-switch.

para_fix_64.jpg


Look correct now Robert? And thanks for the heads up.
 
Status
Not open for further replies.

Users who are viewing this thread