
I was originally going to post a review of the Baby Notta tanks from stormysvaporcellar.com But I think anyone viewing this tutorial will see that I'm a fan of these tanks and would recommend them gratuitously. So instead I decided to do a write up on how easy these are to assemble, fill, and use. I've tried a few different carto tanks now, and while each one has its merits, Stormy's offering stands out for 2 reasons: Durability and price. As Stormy herself points out, these may not be as flashy as some other tanks out there, but they'll definitely get the job done, and for a fraction of the cost.
(One quick note before I get started - while I'm not a modder myself, I can appreciate the thought and ingenuity that goes into alot of the products we as vapers use. I applaud Stormy for crediting the design of this tank on her website to the modders who originally designed it. I know of one of them here on ECF who gets a big for sharing this design and via Stormy, making it available at an affordable price for us all)
I'll start with Stormy's description of whats included with every Baby Notta Tank:
Kit contents:
1-cartomizer with the slit needed (You can select your resistance for the carto)
1-Black Drip tip
1-6ml syringe w/needle
1-polycarbonate tube
2-gaskets
1-O ring

~~Before I go on I will mention that I've tried both the punch and the slit method in the cartos I've used, and I prefer the punch. The reason for this is I've been able to better control the wicking of the juice by altering the punch size- thinnner juice, smaller hole; thicker juice, larger hole. I simply substituted a punched carto in the Notta tanks I'd be using thicker juice in, and saved the slit ones for the thinner juices, which worked well.~~
Assembly:
First, fit the included o-ring around one of the grommets:

Next, drop both grommets into a cup of water and microwave them for 60 seconds. This serves to slightly soften them for insertion into the polycarb tubing.( I would recommend doing this to make it easier for a first timer; but I've also skipped this step and was still able to reassemble the tank with no problems. A little e-liquid on the grommets serves as a lubricant and helps them slide in easily.)

Next, take the grommet/o-ring combo, and slide it down over the carto from the top down towards the threads. Again, a little e-liquid as lube makes this process much easier. You'll want the grommet flush with the base as seen in the pics below. (Note: I've always prefilled my cartos before installing them in tanks, it's just easier that way)

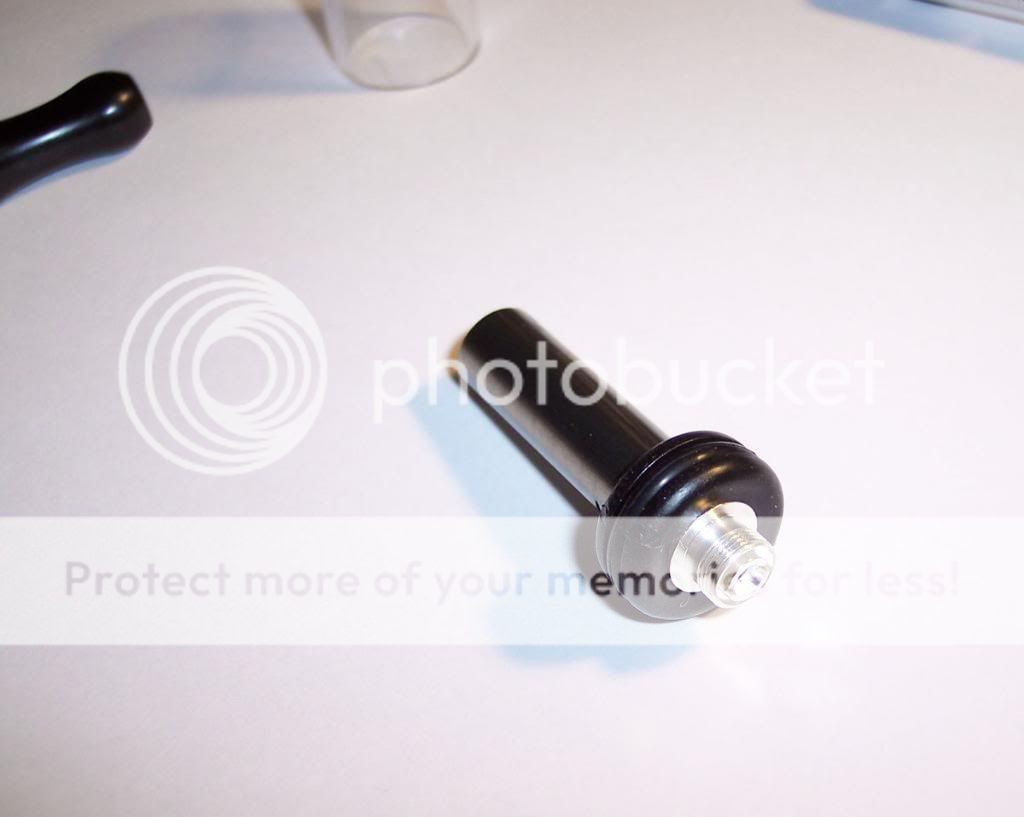
Take your carto/grommet and insert it into the polycarb tubing on the opposite end from the filler hole in the tube.

I found pushing the grommet in by starting at one side and going around the edge in a circular fashion while applying pressure made it easy. Once again, a little juice on the grommet will help it along as well.

You'll want the bottom of the grommet to be close to flush with the bottom of the tube. They are forgiving though, so don't worry if you don't get it perfect.

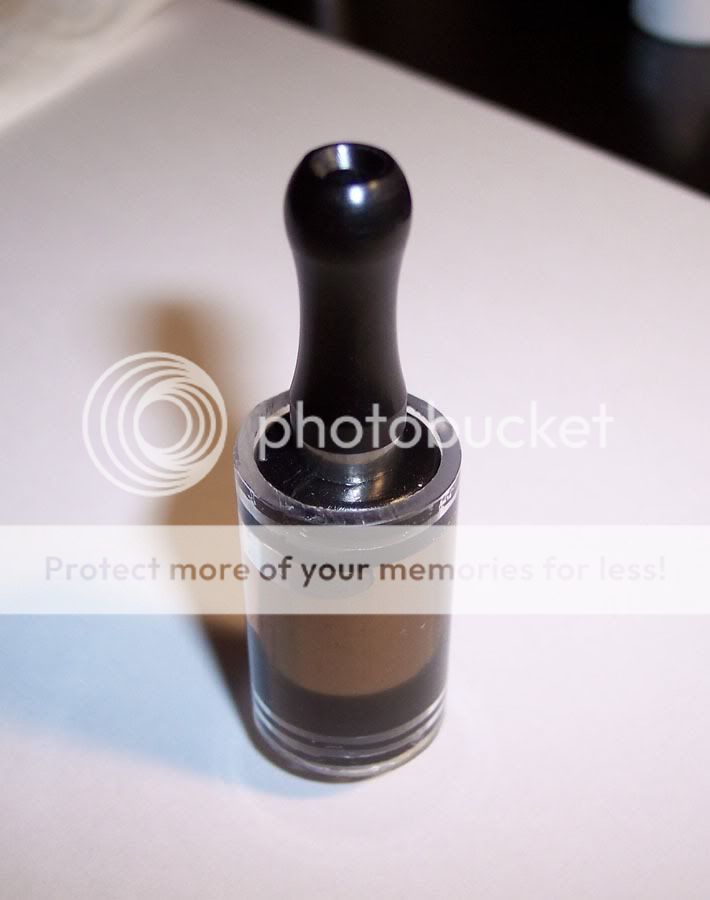
Now that the base is assembled, the other grommet (no o-ring) will be used for the top seal.

The top grommet should fit close to flush like the bottom one did.

I've used two methods to fill my Notta Tanks. Via a syringe using the fill hole, and by partially removing the top grommet. Removing the top cap is quicker and takes less steps, but has the potential to make more of a mess if you're not careful. So for this tutorial, I'll outline the syringe method. Try not to overfill the tank or you'll create a leak when you push the top cap back on.

To fill with the syringe, you need to slightly pull up the top grommet right over where the fill hole is located. You only need to pull it up enough to fit the needle into the hole.

Once you've got the juice into the tank, you'll need to push the top grommet back into place.
TIP: This took me a few leaks to figure out: When you push the top grommet back into the tank, you're creating pressure in the tank that will force juice into the slit, and eventually out through the bottom of the carto. To avoid this - Don't push the top grommet the whole way back into the tank. Instead only push it down far enough that the rubber is slightly inside the tank wall. This will create enough of a seal to keep the juice from running out when you turn the tank upside down. Yes- upside down. The reason for this is you want the air that's trapped in the tank to be positioned in a bubble over the slit before you push the grommet the whole way in. By doing this, you'll only force air into the carto instead of juice and you'll hopefully avoid any leakage. It takes a little practice and it's not a perfect solution, but it will save you alot of leaks.


Insert your drip tip, thread it on your PV, and vape away. I've had my Notta tanks for around a month now and have yet to have a problem with any of them. I've changed cartos and flavors several times in each by simply taking the tank apart to clean it, and reassembling it with a new carto installed.

Here's a couple pics of the Baby Nottas on different PVs for size comparison:


(One quick note before I get started - while I'm not a modder myself, I can appreciate the thought and ingenuity that goes into alot of the products we as vapers use. I applaud Stormy for crediting the design of this tank on her website to the modders who originally designed it. I know of one of them here on ECF who gets a big
for sharing this design and via Stormy, making it available at an affordable price for us all)I'll start with Stormy's description of whats included with every Baby Notta Tank:
Kit contents:
1-cartomizer with the slit needed (You can select your resistance for the carto)
1-Black Drip tip
1-6ml syringe w/needle
1-polycarbonate tube
2-gaskets
1-O ring
~~Before I go on I will mention that I've tried both the punch and the slit method in the cartos I've used, and I prefer the punch. The reason for this is I've been able to better control the wicking of the juice by altering the punch size- thinnner juice, smaller hole; thicker juice, larger hole. I simply substituted a punched carto in the Notta tanks I'd be using thicker juice in, and saved the slit ones for the thinner juices, which worked well.~~
Assembly:
First, fit the included o-ring around one of the grommets:
Next, drop both grommets into a cup of water and microwave them for 60 seconds. This serves to slightly soften them for insertion into the polycarb tubing.( I would recommend doing this to make it easier for a first timer; but I've also skipped this step and was still able to reassemble the tank with no problems. A little e-liquid on the grommets serves as a lubricant and helps them slide in easily.)
Next, take the grommet/o-ring combo, and slide it down over the carto from the top down towards the threads. Again, a little e-liquid as lube makes this process much easier. You'll want the grommet flush with the base as seen in the pics below. (Note: I've always prefilled my cartos before installing them in tanks, it's just easier that way)
Take your carto/grommet and insert it into the polycarb tubing on the opposite end from the filler hole in the tube.
I found pushing the grommet in by starting at one side and going around the edge in a circular fashion while applying pressure made it easy. Once again, a little juice on the grommet will help it along as well.
You'll want the bottom of the grommet to be close to flush with the bottom of the tube. They are forgiving though, so don't worry if you don't get it perfect.
Now that the base is assembled, the other grommet (no o-ring) will be used for the top seal.
The top grommet should fit close to flush like the bottom one did.
I've used two methods to fill my Notta Tanks. Via a syringe using the fill hole, and by partially removing the top grommet. Removing the top cap is quicker and takes less steps, but has the potential to make more of a mess if you're not careful. So for this tutorial, I'll outline the syringe method. Try not to overfill the tank or you'll create a leak when you push the top cap back on.
To fill with the syringe, you need to slightly pull up the top grommet right over where the fill hole is located. You only need to pull it up enough to fit the needle into the hole.
Once you've got the juice into the tank, you'll need to push the top grommet back into place.
TIP: This took me a few leaks to figure out: When you push the top grommet back into the tank, you're creating pressure in the tank that will force juice into the slit, and eventually out through the bottom of the carto. To avoid this - Don't push the top grommet the whole way back into the tank. Instead only push it down far enough that the rubber is slightly inside the tank wall. This will create enough of a seal to keep the juice from running out when you turn the tank upside down. Yes- upside down. The reason for this is you want the air that's trapped in the tank to be positioned in a bubble over the slit before you push the grommet the whole way in. By doing this, you'll only force air into the carto instead of juice and you'll hopefully avoid any leakage. It takes a little practice and it's not a perfect solution, but it will save you alot of leaks.
Insert your drip tip, thread it on your PV, and vape away. I've had my Notta tanks for around a month now and have yet to have a problem with any of them. I've changed cartos and flavors several times in each by simply taking the tank apart to clean it, and reassembling it with a new carto installed.
Here's a couple pics of the Baby Nottas on different PVs for size comparison:
") ..I love my baby notta...
..I love my baby notta...


