My roommate has been getting annoyed by my new vaping habit. Empty carts, just-filled carts "settling", half-full carts "rewicking", drying attys, spent cartos waiting to be refilled -- everywhere. Sure, my smoking habit produced ash and butts, but those stayed outside and went into the garbage. Carts and cartos can be reused - which means I never throw them away. :/
To keep the peace, I bought an inexpensive plastic 13mm test tube rack from Amazon. It comes in three pieces: the bottom/sides, and two grid shelves.


I left off the top shelf and threw in some carts and cartos to test it.

The cartos did fine, since they're thicker, but the cartridges (especially the l88b ones) kept slipping across the bottom. As soon as they were at an angle, they were too short and fell through. Time to make some changes.
At first, I thought I would just attach the second shelf below the first and make the top thicker, but then I realized that I'd have to cut it up to do that anyway. There are tabs that protrude from the grid and click into holes in the sides:

And those would have to come off to mount the grid anywhere but where the side holes are. Drilling new holes wasn't the best option, since the tabs are designed to fit through a rectangular hole, then expand a little to keep it it place. Next option: off with the tabs!

Although these are thin enough to snip off with scissors, doing it hurt my weak little girly hands. The plastic is reassuringly tough.

The unmodified grid on the right will be the top shelf, snapped into the sides. The snipped grid on the right will be dropped in place over the bottom and be held in place by pressure from the sides. For best results, don't be lazy like me - get a file and file down those nubs! Otherwise, getting the top tabs to snap in is tougher with pressure against the sides from the bottom-grid stubs.
Next, place the modified grid on the bottom. Oh, look, there are these side walls sticking up that we have no use for now! My girly hands started crying at the thought, so I got out my Dremel. I recommend this method. I also recommend all appropriate safety gear, especially gloves. Little droplets of half-melted plastic hurt bare skin.

I did not cut down the short side walls (the solid ones) because I have dreams of attaching string and using the whole whopping thing to spin cartos. Removing the upright tabs on the long sides, though, makes the contents much easier to reach for from an angle.
With the bottom grid in place (it sort of "floats" above the stubby side braces along the bottom and sits a half-inch or so above the bottom) the bottoms of the carts are constrained by the grid. No slipping, no falling over!

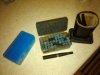
Here's the finished product, ready to hold carts waiting to be filled, or carts/cartos waiting for new juice to soak in and be topped up. The bottom plate is perforated, so it acts equally well as a draining board for drying attys or draining freshly-washed carts. The carts on the right are l88bs and the ones on the left are 510s, with some KR808 cartomizers in the back.

HTH & happy hacking!
To keep the peace, I bought an inexpensive plastic 13mm test tube rack from Amazon. It comes in three pieces: the bottom/sides, and two grid shelves.
I left off the top shelf and threw in some carts and cartos to test it.
The cartos did fine, since they're thicker, but the cartridges (especially the l88b ones) kept slipping across the bottom. As soon as they were at an angle, they were too short and fell through. Time to make some changes.
At first, I thought I would just attach the second shelf below the first and make the top thicker, but then I realized that I'd have to cut it up to do that anyway. There are tabs that protrude from the grid and click into holes in the sides:
And those would have to come off to mount the grid anywhere but where the side holes are. Drilling new holes wasn't the best option, since the tabs are designed to fit through a rectangular hole, then expand a little to keep it it place. Next option: off with the tabs!
Although these are thin enough to snip off with scissors, doing it hurt my weak little girly hands. The plastic is reassuringly tough.
The unmodified grid on the right will be the top shelf, snapped into the sides. The snipped grid on the right will be dropped in place over the bottom and be held in place by pressure from the sides. For best results, don't be lazy like me - get a file and file down those nubs! Otherwise, getting the top tabs to snap in is tougher with pressure against the sides from the bottom-grid stubs.
Next, place the modified grid on the bottom. Oh, look, there are these side walls sticking up that we have no use for now! My girly hands started crying at the thought, so I got out my Dremel. I recommend this method. I also recommend all appropriate safety gear, especially gloves. Little droplets of half-melted plastic hurt bare skin.
I did not cut down the short side walls (the solid ones) because I have dreams of attaching string and using the whole whopping thing to spin cartos. Removing the upright tabs on the long sides, though, makes the contents much easier to reach for from an angle.
With the bottom grid in place (it sort of "floats" above the stubby side braces along the bottom and sits a half-inch or so above the bottom) the bottoms of the carts are constrained by the grid. No slipping, no falling over!
Here's the finished product, ready to hold carts waiting to be filled, or carts/cartos waiting for new juice to soak in and be topped up. The bottom plate is perforated, so it acts equally well as a draining board for drying attys or draining freshly-washed carts. The carts on the right are l88bs and the ones on the left are 510s, with some KR808 cartomizers in the back.
HTH & happy hacking!