The Genesis Buiders' Nuances & Rationales Collective

Status
Not open for further replies.

Vaya

Senior Member
ECF Veteran
I've had a great number of people come into my vaping life as new vapers themselves. If they're not completely naive with respect to vaping, they approach me naive to the long list of intricate nuances that it takes a seasoned Genny builder quite some time and a history of mistakes - mistakes made, but mistakes learned from - to gain mastery over. Understanding the rationale behind an action helps the newcomer understand what place that action has towards the end goal: a wonderful vaping experience that can be as error-free as possible.

Towards effecting the dream of making this a place where those from any genny enthusiast or builder-to-be can come to congregate, develop/refine existing skills, and learn from one another, I thought this community might really benefit from a thread populated by individual replies from members who select one particular aspect of their building process and dedicate their post to describing it - the what, the where, the how and the why (sometimes, the why not!) of a topic of their choice.

Example topics may include, but are not limited to:

[1] Torching mesh partially or fully? Different amounts of torching per mesh count (#200sf vs. 400, etc.)?
[2] Annealing wire prior to wrapping a coil?
[3] Where Stainless Steel Cable shines, and where it doesn't.
[4] Why do dry juice burns? What do they effect? What effect do carboniferous deposits on materials like wire and mesh really have on the ease of build and the subsequent experience?
[5] To use wick insulators or not to use them? Why?
[6] Is cutting the bottom of a mesh wick submerged in a tank at a 45 degree angle necessary, or even beneficial?
[7] A great U-wick. How do I get there??
[8] What are L-wicks? Why would I use one over a classical rectangular piece of mesh for my wick build?
[9] How to set your genny up for high-VG, high-efficiency wicking
[10] The mesh spectrum - When is #325 mesh my best bet over #400, and when is #500 gonna meet standards that #250 couldn't hope to?
[11] What is a 4/3 wrap as opposed to a 4-wrap coil build? Does it really matter one from the other?​

I could go on forever, it seems. I love mesh and Gennies so much, and have spent a tremendous part of my vape life building them and seeking to know more about every possible step along their way. I also really like to explore alternate techniques to see if they can potentially trump that with which I've become familiar. And so, without any more blathering on, I'd like to invite you - yes, YOU out there in Gennieland! - to stop on by here and help us compile something truly great and helpful.

A condensed source for wisdom because if, as they say, "wisdom is borne of experience," we must use our collective experience to be capable of the full realization of such a place.

Would love to see pictures, too. Everyone loves pictures, and visual learners will really benefit from having non-verbal examples of the steps and materials needed. Let's have fun with it, above all else. I cant wait to see what contributions we might be gifted with!
:D
Much love,
~ Vaya
 
Last edited:

Vaya

Senior Member
ECF Veteran
I will be watching this as I had failures with Genesis in the past. To clarify you are looking for true genny atomizer not the Genesis style, ie limitless rdta etc......
Or are you discussing both?

Correct, I am talking about atomizers with tank resevoirs that employ vertical/U-wick stainless steel mesh/SS cable wicks. Although I'm not one of those people who tends to get militant about mere terminology, an RDTA has never IMO been a Genesis atomizer and I think the name is a misnomer. What these manufacturers seem to mean by 'genesis style,' in this case, is the presence of a tank and a wick extending down into it, but they are more properly labeled 'autodrippers,' because they are RTA's (think: The Rose by Eden Mods) but engineered for cloud production (hence the 'D,' for 'dripping,' in RDTA). I think including RDTA's in the scope of this thread would get confusing.
 
  • Like
Reactions: Taff Evans

Vaya

Senior Member
ECF Veteran
Why Cut the Base of a SS Mesh Wick at an Angle?


Genesis atomizers have come a long, long way since their initial inception, but the basic premise has always been much the same across devices: juice from the tank must be able to effectively move up the wick and into the atomizing chamber for the experience to be gratifying.


'Duh,' right?


When looking at the broader problem, however, one fundamental aspect of genesis atomizers that trips people up is taking into account how the physical composition of an atty may affect the wicking process. It helps a lot to ‘know your terrain,’ so to speak.


Years ago, every genny's tank had a base within the tank that was flat. Over time, certain atomizer designs such as the RSM Mods Rocket were developed, and whose design incorporated a slanting-base. The rationale behind this move was a common issue experienced by genny builders whereby the base of their wick would rest flat against the base of the tank and 'cut off' movement of juice up through the center (whether or not it was a straw, or hollow, wick).


The concept is simple: The more surface area of the wick is directly exposed to the juice in the tank, the more readily capillary-action wicking will take place - especially as juices became thicker as a standard and PG levels were reduced.


If you have an atty with a flat base, you may want to consider taking your finished wick and snipping a small portion of its bottom off at a 45-degree angle relative to the base of the tank. Doing this opens up a groove at the base of the wick, opening up its center to juice exposure and dramatically increasing the base of the wick's surface area. I've personally found this small preventative measure to be quite worth the effort, and haven't had issues with a "choked wick" in some time.

The Rocket's base slopes away from the center post, resembling a slight mountain incline. Its purpose is to prevent there from being a flat surface against which an uncut wick could 'choke.' The Nextasis, by VWM, has a base that bevels inward - towards the base - for the purpose of directing juice away from the outer rim and towards the wick.

An additional benefit is decreasing the amount of wick that could potentially touch the atomizer tank base. While not a rampant problem in my experience, genny enthusiasts occasionally posit that a wick whose base touches the atomizer bottom may be more prone to shorts and hot spots while pulsing the coil, as it represents an unnecessary metal-on-metal contact in the circuit. Taking the time to hover the wick over the base of the tank without touching it has been unnecessary for me more often than not (this issue was most pronounced on the In'Ax MKiir and MKiii for me), and reducing the contact area to a mere point seems to resolve the issue without torment.

Will return to include some photos this afternoon!

~ Vaya
 
Last edited:
  • Like
Reactions: Taff Evans

Taff Evans

Senior Member
ECF Veteran
Verified Member
May 7, 2016
224
122
76
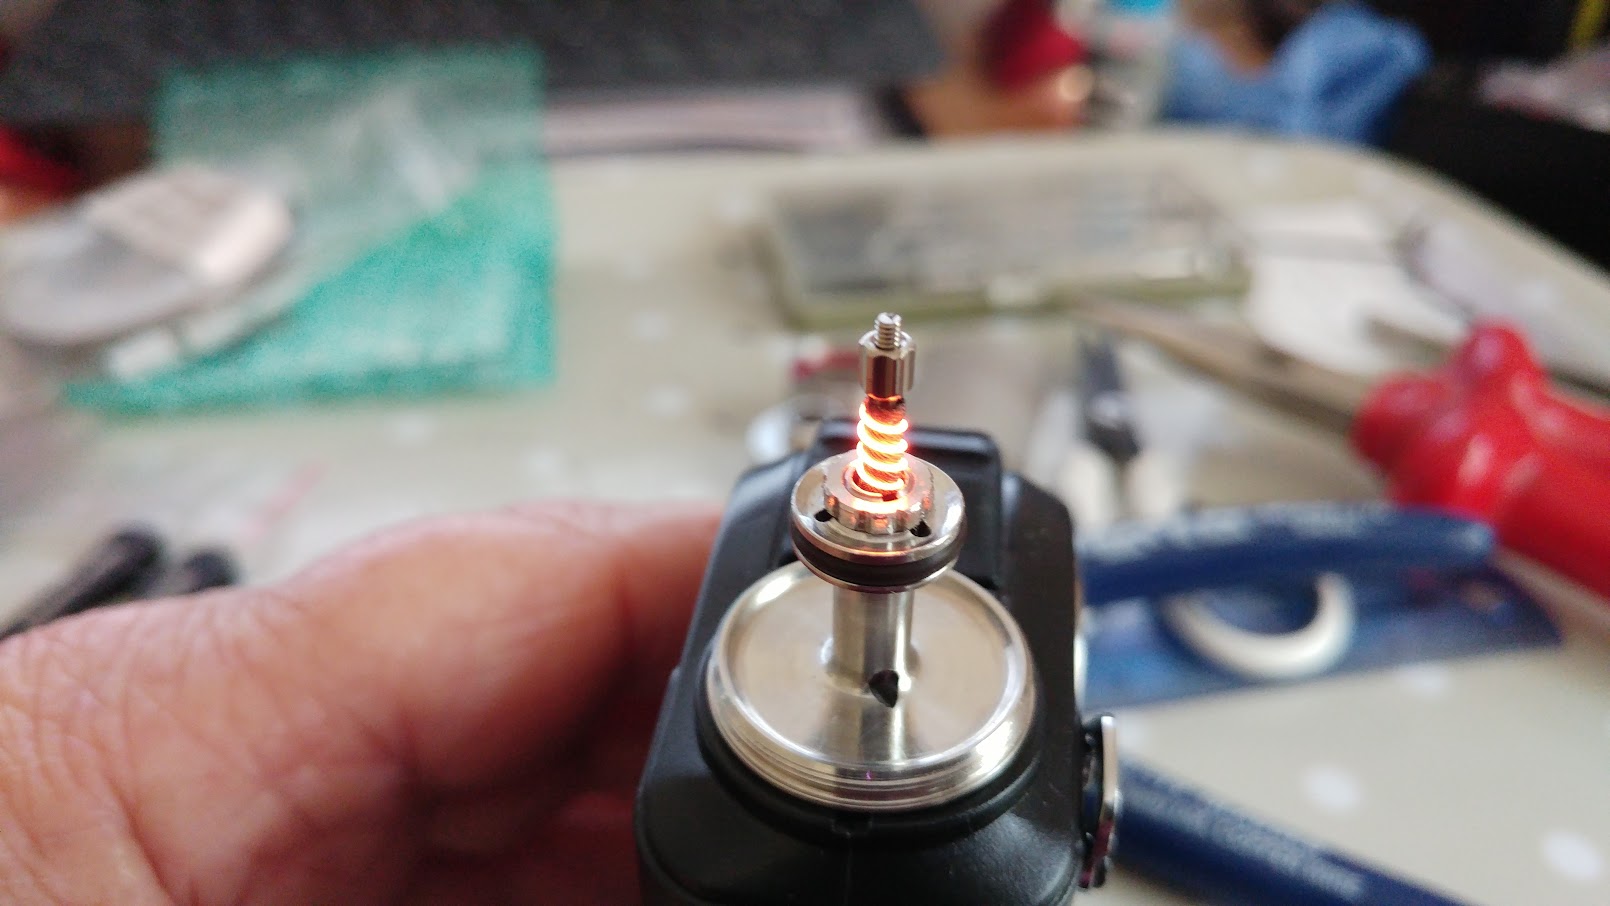
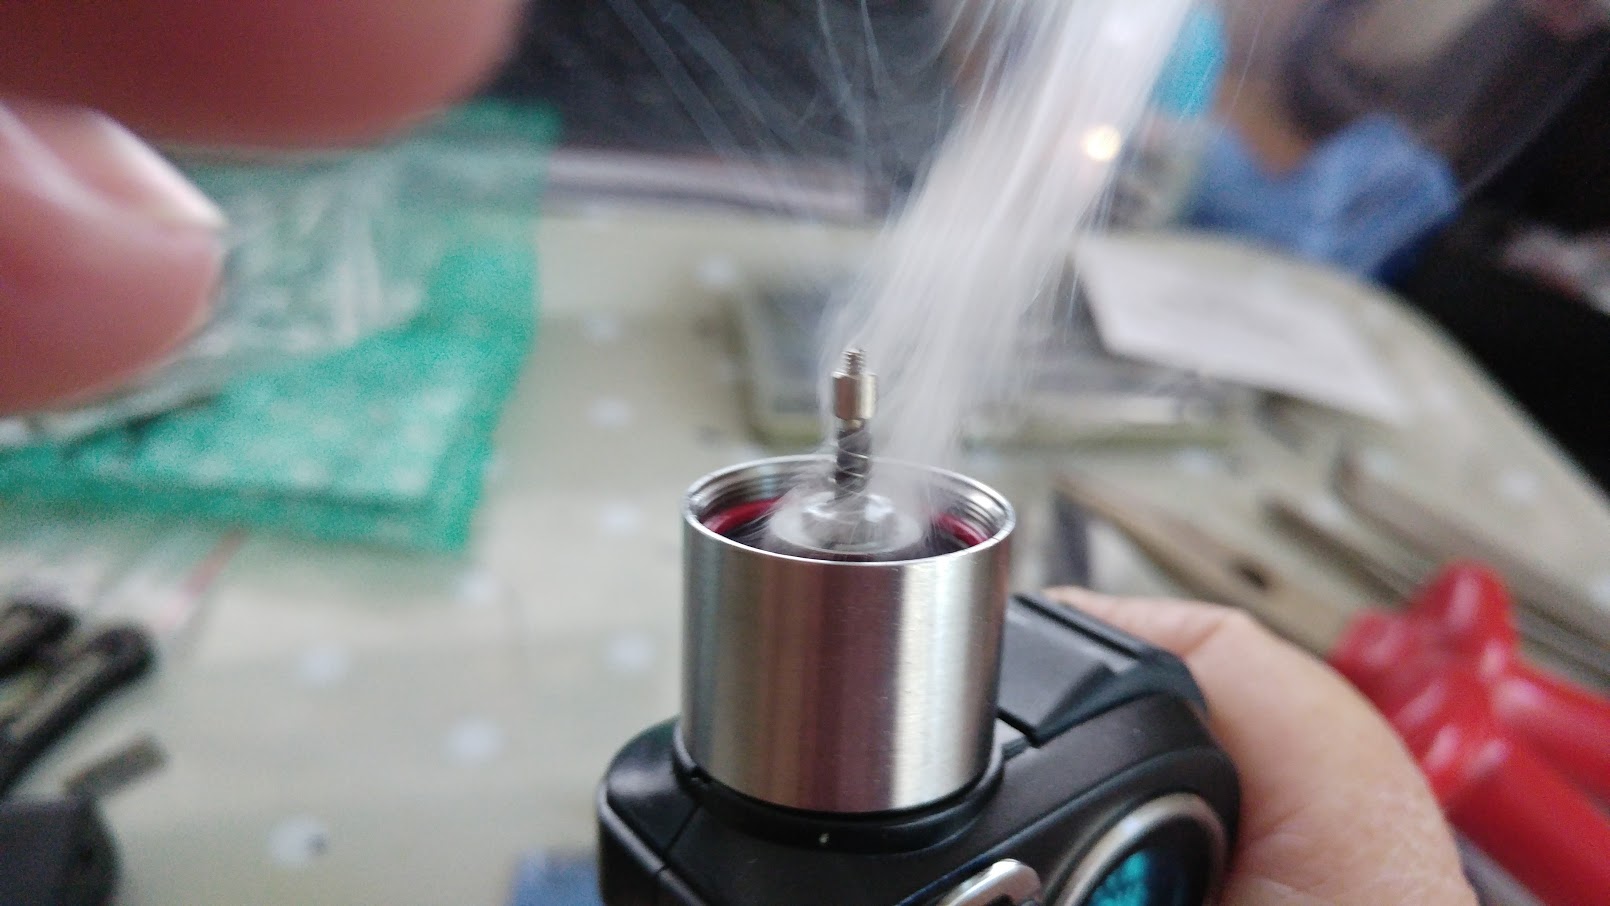
Here is a couple of images of the build i did for the In'Ax MKIII that a proper Gent by the name of Vaya, sourced for me..and that arrived this afternoon. Thanks mate you are a star.

First thing I did was swap out the center post for a threaded one I had purchased a while back. far better and easier to build with than those bloody grip-sticks!

Wicked it with 200 Superfine mesh and a 300 mesh topper. Coiled with 28 gauge Kanthal 3/4 wraps for 1.1 ohms.

The first image shows the coil glowing nicely after getting rid of a couple of hot spots, only got a couple and far less than i thought i would get to be fair.

The second image is the first fire with juice in the tank, just to make sure it would wick ok.. Its vaping like a dream. No dry hits, not even a trace of one, just superb flavor, and lots of vapor..

Really liking this atty, and can't think anything could be better than this thing at the moment.

phJZ6d0.jpg


EUgoS9c.jpg


Let it run until the mod cut out at 10 seconds.. wicking great, good vapor all the way. It does like the juice though.. tank goes down quickly! Good thing I make my own and don't have to buy it in!

Apologies for the messy background, its the tray I use for building on with some of my tools on there, and my fat fingers getting in the second image! Hard to get a picture while pressing the fire button and trying to take a picture one handed on my phone!
 
Last edited:

GrowthCurve

Senior Member
ECF Veteran
Mar 19, 2016
155
285
Rust Belt
IMG_4119.JPG
IMG_4117.JPG
I have been coiling gennys since 2013. I have too many to count--including Van's Line Le and MM Vapors Temons and DiDs.
I think that my mistakes were a result of trying too hard, and following directions to the letter. I was a slave to wrapping directly onto the wick. Therefore, if I managed to get a decent wick and coil going, I barely touched it, even when I 'cleaned' it. My setups would only last a couple days before they got old and gross.
So I started trying out PetarK with my coil jig set that I bought. 3mm too FAT of a wick. Which threw me for a major, MAJOR loop on the DiD. I could never get that vape to taste too nice.
My simple answer, don't work too hard! If you PetarK, don't wrap the coil super tight on the jig. When rolling up a wick, I do not make that stupid crease on the edge. I use 300 mesh, but 200 works nice too. I straightened 20g wire on the drill, and that is what i roll a wick on.
I torch once before, then once after rolling. But then I wind up torching the wick about once or twice a week when i rinse and clean the wick.
I start with maybe 35mm width, rolling the wick onto the straight wire. Try to slide it into coil. If rolling and rolling doesn't make the wick fit, I trim a teensy bit from the edge.
When getting my wick into the coil, i AVOID twisting--this screws up the tension on the wraps. I use the straight wire to straighten the wick up and down. Work out hot legs.
Sometimes I have to very slightly rotate jam nuts counterclockwise to make top wrap less loose. Or i slide out wick and roll it to make it a bit fatter.
I rebuild about once a month. I do not anneal the wire before wrapping on jig. I attach POS lead first, then 'sew' my coil down to the neg lead. Fire the empty coil. Insert wick and dry fire.
Right now i have two Aga T+ with polycarbonate tanks and those i take out. A DiD with a glass tank for my yummy Mexican Drinking Chocolate juice, for my house. 2.5 mm jig, 5 winds with 26g kan, 0.8Ω. I slide the wick out, rinse and blast the wick with a torch, rinse the tank and dry burn the coil clean. Put the wick back in the coil and fix it up.
Tesla Sub Box mods, and Osmium parallel box mods. They're not pretty, but they last long. These coils are dirty, but i am not going to clean them until Friday.
I don't trim my wick at the bottom. They don't touch the bottom.
I have a decent amount of pix under another name. My bank got hacked last year, and i got paranoid and closed my old account here, too.
Thank You @Vaya for this nice thread!!
Yours Truly, 'Little Orphan...'
 
Last edited:

GrowthCurve

Senior Member
ECF Veteran
Mar 19, 2016
155
285
Rust Belt
My answer to u wicks is that I am not using them right now. Love my Nectar, but i could not really clean it without just recoiling it every time. That is with a mesh u wick.
I have an Avocado packed away. My pet project after the snow starts drifting and all the Christmas crap is put away, is to put a dual-coil-dual-u mesh wick in it. It will be RIGHTEOUS, but def not a daily driver.
 
  • Like
Reactions: Taff Evans

GrowthCurve

Senior Member
ECF Veteran
Mar 19, 2016
155
285
Rust Belt
Another note on 'working too hard'
I had problems with my gennys for a long long time. (i also spent 12 years in college. I don't let go of bones that i am gnawing on very easily. Plus, i just had to google 'knawing' in order to spell it correctly). I no longer try to fire it with juice to see if it is wicking correctly. That step usually would just p*** me off anyway.
I 'gnew' that i had gennys downpat, when my vape seemed the best when the atty was COLD. I wind up with some overwicking during dog days of summer.
 
  • Like
Reactions: Taff Evans

Taff Evans

Senior Member
ECF Veteran
Verified Member
May 7, 2016
224
122
76
Nice post GrowthCurve..and good looking coils!..

There are a couple of things that i do differently to you...but as long as a method works for us, there is no right or wrong. I think if you asked 100 people for their methods that work for them, you would get 100 different answers!!

I usually try and use thin Mesh wicks, and ones not wrapped so tightly that you have to push them down the center post. I like mine to drop down it of their own accord, and pick them back up when i wrap the wire so its off the bottom of the genny, but not enough to be touching the nut at the top of the post, or the sides of the wick hole at all. . I like the mesh to be around 1 or 2 mm off the bottom of the tank, so i don't have to tilt too much. My rationale is that with a space round the wick and not too tight around the center post, but still snug, there is room for air to flow into the tank as juice is extracted from it. Think it helps the flow up the wick as there is not so much vacuum being formed in the tank and slowing down the flow upwards, even with vacuum assisted wicking like the In'Ax has.

I can't do the Peter K method at all..I always end up with a coil too tight or the wick too loose or too fat etc..I have tried unsuccessfully several times, and failed miserably! and far prefer to wrap the wire round the coil...I use a mech mod so i can spin the atty for coiling so I can guide the wire to where i want it to be. Kudos to you for mastering it, I couldn't!

The wick i did in my post above was 20mm X13mm, with a 7mm X 4mm topper under the coil to make it thicker and get slightly higher ohms, than i would wrapping on such a thin wick. Wrapped it tightly using a slightly thicker rod I think i got from the Nextgen so it would not be too tight on the post. I always tuck one end of the topper under the top of the mesh already rolled so it stays in place better.

I always torch my mesh thoroughly, both sides both before i wrap it and afterwards also. Also drip juice on it and burn it a couple of times, so give it a coating. I do not anneal my wire at all. One thing i always do is to use ceramic tools to move the wires to get rid of hot spots, never metal objects. I am probably wrong, but i feel that a ceramic tool, would not scratch the coating the mesh now has after burning etc. as much as a metal object would.

I have to admit that I am a lazy bugger with my coils and wicks. To clean them i never take the wick out, and just fire the mod until the coils are glowing nicely round the wick and when they are still glowing, stick it under a hot running tap. If there is still deposits on the coil, i lightly scrape them off using my tweezers. Then i fire the coils a few times to get rid of the water. Its also a good time to make sure no hot spots have developed. If i do this a few times i find the coils clean right up and so does the wick. I actually only do this once every few weeks, and only then if i notice a change in the way its vaping. Told you I was a lazy old git!:?:

Good to see how other folks do this, hopefully more folks will post their way also. We can always learn from other peoples ways and might just find an easier better method we can steal!
 
Last edited:
  • Like
Reactions: GrowthCurve

GrowthCurve

Senior Member
ECF Veteran
Mar 19, 2016
155
285
Rust Belt
IMG_4123.JPG
@Taff Evans I never thought that i would get Petark either. I have a couple of Bliss clones. And the dual-coil dual-wick is where i got decent at it. I like coil building. Even when i wrapped directly onto the wick, I always had an allen key down the wicks, to make them uniform.
I roll the wick backwards on the allen key or 20g wire or whatever I am using to make a thick walled straw-to make it fatter if it fits too loose in the coil. Atm, am not using my Nextgens or Tinys. Mainly because i can't take out the wick to clean it. I cut 'L' wicks for those. They are good for long commutes. I have three attys set up now, two Aga Ts with tobacco juice. And a DiD for Mexican Chocolate juice.I buy juice, because I work in a laboratory all day long, and I don't feel like dealing with Diy at home. But i have a stash of nic liquid, in case i can no longer buy eliquid. I just cleaned my DiD. The chocolate juice has alot of sweetener
 

Taff Evans

Senior Member
ECF Veteran
Verified Member
May 7, 2016
224
122
76
I tried and tried the peter k method GrowthCurve, and it just wasn't for me.. always something was not right with it, so i must admit that i conceded defeat and let it win!! I just find... For Me...that wrapping the wick is easier and it just seems to work for me. I have heard a lot of folks say that they love the P K method though so it obviously works for a lot of folk and for you..

I can see that if you are using that way to build, it most definitely would make removing the wick would be a whole lot easier than the direct wrap method, but I admit that I never touch the build once it finished. Just the heat and hot water treatment. I actually have some wicks that I can't even remember when i put them in the atty that have never been out or re-coiled. If its working I leave it alone!! disgusting eh!!:eek::D

Just had my first dry hit tonight with the MKIII... A bad one as well.. Pulled the top off to see why and there was no liquid in there at all, virtually dry.. It wicked all the way down without any problems at all, until the juice was gone.. Will have to get a clear thank for this, hate not being able to see my juice levels. Mind you the amount this attys goes through..its a good job its so easy to fill!, goes down fast!

Off to look for a clear tank now... Cheers...
 

Vaya

Senior Member
ECF Veteran
I dont know what is happening guys but I cant seem to edit my other post for the pictures, so below is an example of a Nextasis atomizer base (imagine it with the center build deck installed and therefore the juice being naturally directed inward, towards the center)


Here is an example of a wick whose bottom has been cut at a 45 degree angle as you might consider trying if your atomizer has a flat based:

 
  • Like
Reactions: Taff Evans

GrowthCurve

Senior Member
ECF Veteran
Mar 19, 2016
155
285
Rust Belt
IMG_3750.JPG
IMG_3669.JPG
IMG_3751.JPG
IMG_3672.JPG
And the winner of the All-Day-Vape Award is...the Aga T.
The DiD set up--wick was too fat and acting as a crockpot on my juice.
Nectar--great vape, but doesnt clean up well.
After screwing with the DiD for two YEARS, I figured out that a slimmer wick inside the the 3.5mm wick hole worked much better.
Now i'm in the mood to go on a building rampage lololol
 

petrotech

Ultra Member
Supporting Member
ECF Veteran
Verified Member
Feb 9, 2015
1,761
9,330
indiana
Is that second picture the Nectar?

What kind/size of wick?

View attachment 605155 View attachment 605153 View attachment 605151 View attachment 605149 And the winner of the All-Day-Vape Award is...the Aga T.
The DiD set up--wick was too fat and acting as a crockpot on my juice.
Nectar--great vape, but doesnt clean up well.
After screwing with the DiD for two YEARS, I figured out that a slimmer wick inside the the 3.5mm wick hole worked much better.
Now i'm in the mood to go on a building rampage lololol
 
  • Like
Reactions: GrowthCurve

GrowthCurve

Senior Member
ECF Veteran
Mar 19, 2016
155
285
Rust Belt
That is a Nectar. Think that was 28g wire, and 200 mesh cut on a 45 degree bias--like if you folded a napkin into a triangle and cut parallel to that. The mesh seems to get all squirmy and lends itself into being formed into a 'U'
Getting rid of hot legs on that was interesting. Used a screwdriver to raise the 'elbows' up. Still haven't perfected the process. This winter during my hibernation, i'll prolly get it down.
 
Status
Not open for further replies.

Users who are viewing this thread