
I haven't posted in a while, but I just wanted to share this little mod with everyone. I have made four of these so far and they all seem to be working really well. All the parts (except the tube) can be purchased from madvapes for around $8. This mod requires minimal building skills, but it does require a little drilling and soldering.
Here are all the parts that are needed

a) 2xAA Box w/ On/Off
b) 510 Connector
c) 6mmx6mm Tactile Switch
d) 3mm Blue* LED (w/ resistor)
e) 3ml clear juice bottle
f) 1/16" O.D. brass pipe ~2-1/4" long. This piece can be purchased at a hobby store and I'm sure it could be found online somewhere (if anyone has a good source for this, please post it)
***** I should point out that the switch I have spec'd (and have been using for over a month) is only rated at 50mA. Using it in this mod you will be putting about 30 times that through it. Like I said though, I have made four of these and they have all been used heavily, and I have not had any problems with any of the switches.
First a little prep work on the box and connector.

- Remove the metal battery connector from the top and cut it in half at the notch. The half with the spring can be set aside. It will not be used.
- Remove the spring connector (with the black wire attached) and de-solder the wire.
- Cut the red wire (leaving about an inch or so) and strip back a little.
- Remove the center pin and rubber isolator from the 510 connector.
When you're done, you should have this..

Now for the holes...
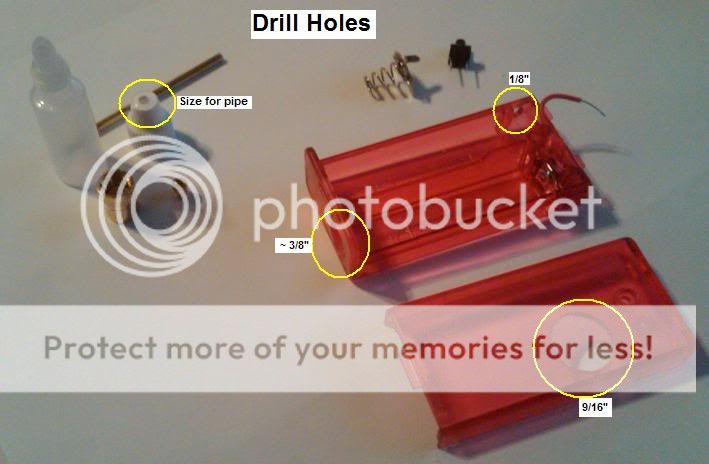
The hole measurements are not exact. These are just the sizes I used. None of these holes need to be sized perfectly.
- The hole where the connector goes needs to have some play so that you can get the bottle in and out. It should be centered on the left side of the box (with open side toward you), and centered between the front and back of the box.
- The hole where the switch goes should also be a little oversized. This will make it easier to install and press. This hole should be centered between the batt connector tab and the bottom of the box; and the edge of the hole should be right at the edge of the thick part of the box. This will make more sense later. So be sure to see all pics and read complete tutorial before you start drilling your box.
- The hole in the front (where you push the bottle) is probably the least critical when it comes to size. I just made it as big as I could without hitting the edge of the box.
- The hole in the bottle cap should be sized based on whatever pipe you end up using. It should be a snug fit, but doesn't (necessarily) need to be a tight seal. This will be sealed with putty later.
Now that the box is prepped, we can move to the bottle/connector assembly.
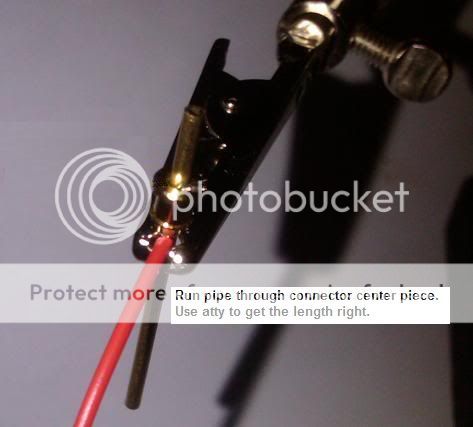
For this step you will need the center post of the 510 connector, the brass tube, and the red wire that you cut from the box earlier. A "third hand" clip is very usefull in this step, but it can be done without it on a flat surface.
To get the right length of pipe sticking out, the best thing to do is use an old atty. Place the pipe in the clip and put the center post down on it. Then put your atty on the pipe and adjust. You want the pipe to go into the atty until it 'bottoms out', then back it out just a smidge (1/32" - 1/16" just so it's not bottomed out). Now with the clip holding your pipe and the connector post resting on the clip, it should stay where you set it. Now you should have enough room in your center connector to slip the wire up through the hole along side the pipe. (Note: this will depend on the pipe you use.) If the pipe is a snug fit, you can wrap the wire around the pipe, or just tack solder it on the side of the pipe. Keep in mind that this assembly needs to slide back through the outer connector and rubber isolator, so it can not get much bigger than the small diameter of the center post.

**before combining the two pieces of the connector, the black wire needs to be attached to the outer connector (I didn't get a
pic of this, but see pic below for an idea of placement). You don't want to solder the black wire on after you have the two pieces together because you could melt the isolator.
Now you need to slide the whole assembly into the outer piece of the 510 connector. **It is very important that you do not tear the rubber isolator in this step. The extra width of the wire makes it a tight fit, but it will fit. It helps to moisten the wire and pipe to lubricate it a little so that it doesn't grab and tear the rubber.

As soon as you get it into place, screw your atty into it. This will hold the pieces strait and stable and help keep the isolator intact through the next steps.
Once you have it together and your atty screwed on, it should look like this...

At this point you should test with a meter (if you have one) to be sure there is no short between the black wire and red wire (ie. torn isolator). If you do have a torn isolator, there are a few options. I won't go into the details of the fixes here, but if someone runs into this let me know and I can explain some of them.
Next you need some epoxy putty. I recommend the stuff pictured below. I think it is sold at all Home Depot stores and probably any hardware store (or walmart) Just look in the plumbing section. It sells for about 4 bucks a tube. This mod only uses about a tenth of the tube (if that), so you can get a smaller amount than the $4 tube, but this stuff has quite a few uses so it handy to have around.

** This could be replaced with any epoxy, adhesive, etc. that gets fairly hard. If you use something that still has flex to it when hardened, you risk having the pipe move around and wear through the isolator. Also, I would try to stick with putty epoxies and not liquid.
To use the epoxy putty, you just slice off a small piece and kneed together until the two parts are combined evenly.
** once mixed, you have about 2-3 minutes to get through the next three pictures**
To start, take a small piece and roll it into a small enough stick to get the connector. Start by getting some between the red wire and the outer connector, then just fill the connector. *be careful not to mash the red wire into the sharp edge of the outer connector, as this will create a short.


Now it looks like I take a big jump in the pictures, but it's really not. Once you have the connector filled with putty, take your bottle cap and slide it onto the pipe. It will come to rest in the (still soft) putty. Next screw your bottle on (take the dripper out first). Now with your atty screwed into one end and the bottle screwed into the other end, your whole assembly should stay strait and stable while you finish applying the putty. Note: Leave the atty connected until the putty hardens (I just took it off for the pic).

You can set this aside and let it harden while we move on to the switch.
For this part, you will need the box, the switch and the spring connector(the one the black wire was on)

Solder one leg of the switch to the red wire as shown.

Place the switch in the box. The switch fits nice and snug between the bottom of the box and the plastic piece that holds the batt contact. It will help if you make the hole for the button a little bigger that needed.

Now place the spring piece into the box, bend the tab down over the other leg of the switch, and tack with solder.

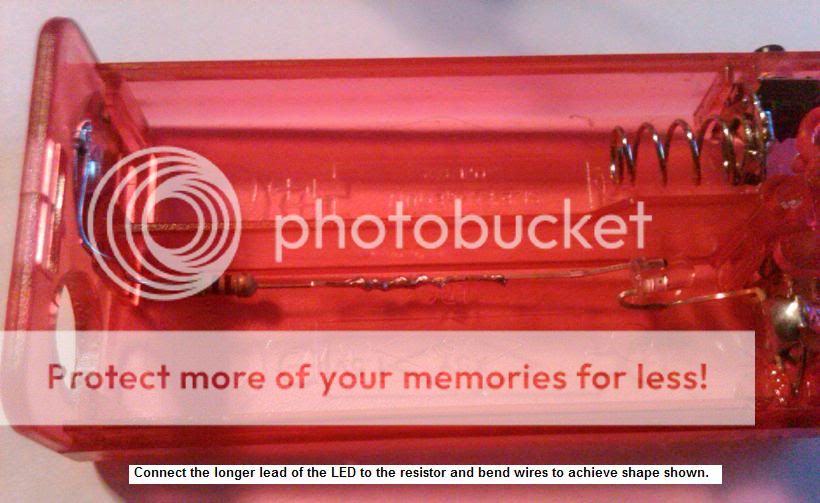
Solder your LED as shown. The resistor connects to the longer of the two LED leads. Bend to fit and tack with solder.
Test LED and switch.

Once your bottle assembly has hardened (10 min or so), you can place it in the box and make the connections. Run the black wire to the bottom and the red wire to the top. Note: do not run the red wire strait to the top. You will need to have a little slack to allow the bottle to be removed. Just run the red wire downward a half inch or so and then loop it back up to the top.

Pop the cover on and you are done!


I have been using mine for a couple months and it is holding up nicely. Hits good, batt will run most of a day, no more messing with juice bottles, dripping, carts, etc. and my juice lasts twice as long now.
If anyone decides to make one of these, please post pics for all to see. These boxes could be painted (with a quick sanding to rough the surface) so it would be cool to see what kind of customs ppl create.
Good luck and happy modding..
Here are all the parts that are needed
a) 2xAA Box w/ On/Off
b) 510 Connector
c) 6mmx6mm Tactile Switch
d) 3mm Blue* LED (w/ resistor)
e) 3ml clear juice bottle
f) 1/16" O.D. brass pipe ~2-1/4" long. This piece can be purchased at a hobby store and I'm sure it could be found online somewhere (if anyone has a good source for this, please post it)
***** I should point out that the switch I have spec'd (and have been using for over a month) is only rated at 50mA. Using it in this mod you will be putting about 30 times that through it. Like I said though, I have made four of these and they have all been used heavily, and I have not had any problems with any of the switches.
First a little prep work on the box and connector.
- Remove the metal battery connector from the top and cut it in half at the notch. The half with the spring can be set aside. It will not be used.
- Remove the spring connector (with the black wire attached) and de-solder the wire.
- Cut the red wire (leaving about an inch or so) and strip back a little.
- Remove the center pin and rubber isolator from the 510 connector.
When you're done, you should have this..
Now for the holes...
The hole measurements are not exact. These are just the sizes I used. None of these holes need to be sized perfectly.
- The hole where the connector goes needs to have some play so that you can get the bottle in and out. It should be centered on the left side of the box (with open side toward you), and centered between the front and back of the box.
- The hole where the switch goes should also be a little oversized. This will make it easier to install and press. This hole should be centered between the batt connector tab and the bottom of the box; and the edge of the hole should be right at the edge of the thick part of the box. This will make more sense later. So be sure to see all pics and read complete tutorial before you start drilling your box.
- The hole in the front (where you push the bottle) is probably the least critical when it comes to size. I just made it as big as I could without hitting the edge of the box.
- The hole in the bottle cap should be sized based on whatever pipe you end up using. It should be a snug fit, but doesn't (necessarily) need to be a tight seal. This will be sealed with putty later.
Now that the box is prepped, we can move to the bottle/connector assembly.
For this step you will need the center post of the 510 connector, the brass tube, and the red wire that you cut from the box earlier. A "third hand" clip is very usefull in this step, but it can be done without it on a flat surface.
To get the right length of pipe sticking out, the best thing to do is use an old atty. Place the pipe in the clip and put the center post down on it. Then put your atty on the pipe and adjust. You want the pipe to go into the atty until it 'bottoms out', then back it out just a smidge (1/32" - 1/16" just so it's not bottomed out). Now with the clip holding your pipe and the connector post resting on the clip, it should stay where you set it. Now you should have enough room in your center connector to slip the wire up through the hole along side the pipe. (Note: this will depend on the pipe you use.) If the pipe is a snug fit, you can wrap the wire around the pipe, or just tack solder it on the side of the pipe. Keep in mind that this assembly needs to slide back through the outer connector and rubber isolator, so it can not get much bigger than the small diameter of the center post.
**before combining the two pieces of the connector, the black wire needs to be attached to the outer connector (I didn't get a
pic of this, but see pic below for an idea of placement). You don't want to solder the black wire on after you have the two pieces together because you could melt the isolator.
Now you need to slide the whole assembly into the outer piece of the 510 connector. **It is very important that you do not tear the rubber isolator in this step. The extra width of the wire makes it a tight fit, but it will fit. It helps to moisten the wire and pipe to lubricate it a little so that it doesn't grab and tear the rubber.
As soon as you get it into place, screw your atty into it. This will hold the pieces strait and stable and help keep the isolator intact through the next steps.
Once you have it together and your atty screwed on, it should look like this...
At this point you should test with a meter (if you have one) to be sure there is no short between the black wire and red wire (ie. torn isolator). If you do have a torn isolator, there are a few options. I won't go into the details of the fixes here, but if someone runs into this let me know and I can explain some of them.
Next you need some epoxy putty. I recommend the stuff pictured below. I think it is sold at all Home Depot stores and probably any hardware store (or walmart) Just look in the plumbing section. It sells for about 4 bucks a tube. This mod only uses about a tenth of the tube (if that), so you can get a smaller amount than the $4 tube, but this stuff has quite a few uses so it handy to have around.
** This could be replaced with any epoxy, adhesive, etc. that gets fairly hard. If you use something that still has flex to it when hardened, you risk having the pipe move around and wear through the isolator. Also, I would try to stick with putty epoxies and not liquid.
To use the epoxy putty, you just slice off a small piece and kneed together until the two parts are combined evenly.
** once mixed, you have about 2-3 minutes to get through the next three pictures**
To start, take a small piece and roll it into a small enough stick to get the connector. Start by getting some between the red wire and the outer connector, then just fill the connector. *be careful not to mash the red wire into the sharp edge of the outer connector, as this will create a short.
Now it looks like I take a big jump in the pictures, but it's really not. Once you have the connector filled with putty, take your bottle cap and slide it onto the pipe. It will come to rest in the (still soft) putty. Next screw your bottle on (take the dripper out first). Now with your atty screwed into one end and the bottle screwed into the other end, your whole assembly should stay strait and stable while you finish applying the putty. Note: Leave the atty connected until the putty hardens (I just took it off for the pic).
You can set this aside and let it harden while we move on to the switch.
For this part, you will need the box, the switch and the spring connector(the one the black wire was on)
Solder one leg of the switch to the red wire as shown.
Place the switch in the box. The switch fits nice and snug between the bottom of the box and the plastic piece that holds the batt contact. It will help if you make the hole for the button a little bigger that needed.
Now place the spring piece into the box, bend the tab down over the other leg of the switch, and tack with solder.
Solder your LED as shown. The resistor connects to the longer of the two LED leads. Bend to fit and tack with solder.
Test LED and switch.
Once your bottle assembly has hardened (10 min or so), you can place it in the box and make the connections. Run the black wire to the bottom and the red wire to the top. Note: do not run the red wire strait to the top. You will need to have a little slack to allow the bottle to be removed. Just run the red wire downward a half inch or so and then loop it back up to the top.
Pop the cover on and you are done!
I have been using mine for a couple months and it is holding up nicely. Hits good, batt will run most of a day, no more messing with juice bottles, dripping, carts, etc. and my juice lasts twice as long now.
If anyone decides to make one of these, please post pics for all to see. These boxes could be painted (with a quick sanding to rough the surface) so it would be cool to see what kind of customs ppl create.
Good luck and happy modding..
Last edited:

") )
)