
Hello again and welcome back for today's review of the Ursa Quest Multi Kit from lost vape. This kit was provided to me from Sourcemore for the purpose of this review, later on I will provide a code and link from Sourcemore where you can purchase the Ursa Quest Multi Kit for a great price. As the title of the review says this is really a multi modular type of kit that is a great value considering everything that comes inside with it plus optional gear that can be purchased separately if you wish to. Lets begin with some information about this multi Kit before the review. This is primarily a single 21700 battery device but can use 20700 and 18650 batteries also using the provided battery adapter.
All of the pictures of mine are at the bottom of the review in order
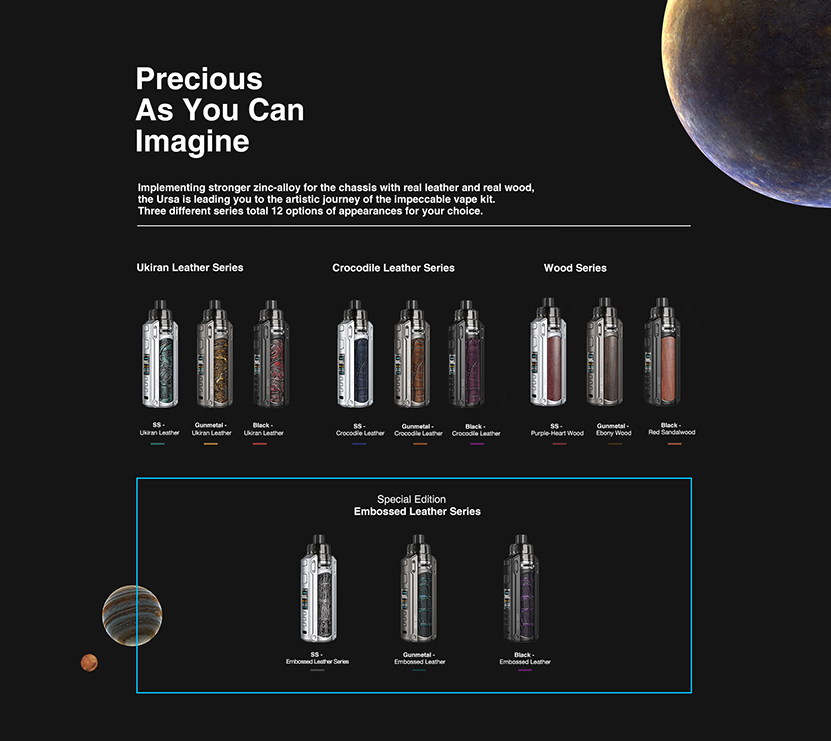
COLOR CHOICES AND DEVICE FINISHES
INCLUDED WITH THE KIT

PARAMETERS

COLOR CHANGEABLE LEATHER WITH USE

NEW FEATURES AND CHIP

UB POD COMPATIBLE WITH UB COILS

UB PRO POD WITH UB PRO COILS

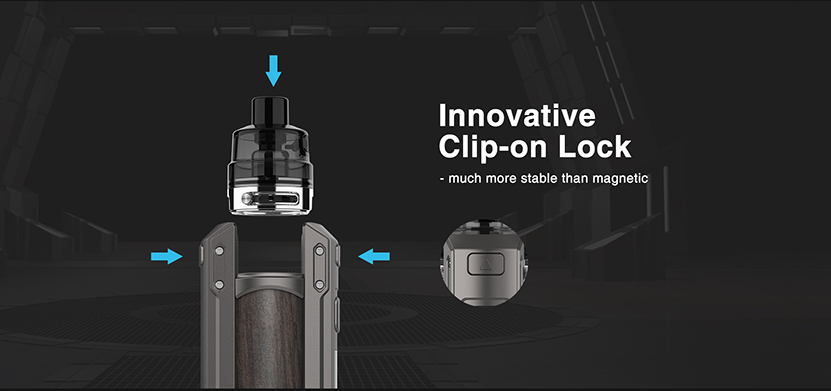
BOTH PODS AND 510 ADAPTER LOCK INTO THE DEVICE
TYPE -C WITH 5 VAPE MODES 100 WATT OUTPUT USING 21700 BATTERY

SIDE FILL JUICE PORT

COMPONENTS

As you have seen in this opening of the review there really is a lot going on with the Ursa Quest Multi Kit but we have only scratched the surface. I would call this device the poor man's DNA device and the menu sorta reminds me of one, picking up the device you can feel that it's solidly built with a quality feel as well as high end look to it.
FIRST IMPRESSIONS
Sliding the main box out of the sleeve and opening it has the device laying in a plastic form fitted top cover with all your included pieces underneath.
View attachment 935099
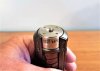
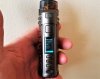
I had no idea which color I was going to receive and was ecstatic with what was sent, pictures really do not show just how attractive the device is. Starting from the top down we begin with the pods, one is the 6ml UB that takes all UB coils as well as a RBA coil and the other is the 7ml UB Pro that takes the pro coils and also has a optional RBA coil.
The UB tank uses a 510 drip tip while the UB Pro tank uses a 810 drip tip. Inside the kit the UB Pro comes already attached to the device using a screw on airflow selector, there is only one airflow selector supplied in the kit so it must be shared by both pods. In the picture below I have the clip in airflow selector turned sideways in front of the device to show 1 of the 2 indents that the 2 clips of the device use to secure the pods to the device, there another one on the other side.
View attachment 935115
Again turned somewhat sideways and highlighted in yellow. There are 2 buttons at the top of the device that need to be depressed when installing either pod or the 510 adapter, be forceful when attaching the pods or 510 adapter making sure each side is fully secured to the device. One of the buttons is shown on the top right side, both buttons are also used to release the pods or 510 adapter.
View attachment 935121
The picture below shows the 510 adapter correctly attached with no real gap under it, I know that I'm harping on this but the buttons don't really pull back the 2 nubs that far and it's easy to leave one not fully attached because of the strong springs. I'd rather have strong stiff springs than soft easy to recess ones.
View attachment 935127
The fillport is located at the top portion of the pods and is a side fill that is mess free and very easy to fill with easy opening plugs.
View attachment 935157
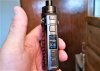
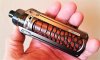
Coming down to the device, battery installation is done through the bottom such as the Grus does with a twist off cover, lift the ring up and twist off to install your battery positive side in. The battery cover has a negative symbol inside it. There is a positive marking inside the tube but it's small and hard to see and there are 3 venting holes on the battery cover.
View attachment 935129
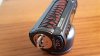
Now let's move to the side with all the action of the device. In the picture below is the side that has the display screen. At the top is one of the release buttons for the pod's and 510 adapter and below it is the power/fire button, below it is the display screen, followed by the up button, then the menu button in the center with the down button below it. The devices type-c charge/firmware update port is at the bottom.
The display screen is very bright and vivid as well as having a color screen. The displays on the screen will change depending on the power mode you choose to use. Lost Vape covered all the bases with the Ursa Quest giving you many power modes and they are: POWER/WATTAGE, BYPASS, VOLTAGE, VARIABLE POWER CURVE or ( VPC ), NI, TI, SS316, and SS904.
You will notice under wattage that there is a font saying POD and next to it is a symbol of a person with the #1 next to him, as I said earlier Lost Vape went all out developing the Ursa Quest giving you a pod mode and also a mod mode with 5 presets for each that you can tailor yourself.
Under the POD/MOD is a box for your choice of preheats and they are: SOFT, NORMAL and HARD and next to it is your 4 digit puff counter. At the very bottom of the display screen is settings
View attachment 935235
In the picture below you see that the screen color has changed because the menu button was pressed and is in adjustment mode, to make any adjustments the menu button must be pressed first, but first toggle through the different items on the screen that you want adjusted using the up or down buttons, once your on the selection that you want to adjust press the menu button ( CENTER BUTTON ) and the screen will change to this color allowing you to only now make the adjustments you want to make.
View attachment 935245
Here is a screen shot in the settings menu, in settings your first selection is atomizer, in this portion of the settings screen you can choose pod or mod ( if you choose mod it will be highlighted red instead of the pod orange color.
Next one down is screen and that is your brightness control
Next one down is user which is your 5 different profiles for pod and 5 different profiles for mod
Next on down is reset and that's self explanatory
About is the last in the settings menu
and it tells you the version of the chip
At the very bottom is back and that brings you back to the main screen
View attachment 935251
USING THE URSA QUEST
Using the Ursa Quest for a couple of weeks has been so enjoyable, picking the device up you instantly feel quality with it's solid build along with a gorgeous appearance. The menu is so easy to operate with only 1 button combination and it is to hold the + and - button simultaneously to lock and unlock wattage adjustments.
Both of the coils that come in the kit are very good giving really good flavor and Lost Vape even has a RBA for each of the pods that can be purchased separately if you wish to build your own coils.
When Lost Vape called this kit a Multi Kit they really meant it, think about it: 2 pods, 2 coils, a 510 adapter that can accept 30mm atomizers, a 18650 battery adapter, extra o-rings and a type-c cord.
Having 5 presets is great but having a ( pod mode ) and a ( mod mode ) that also has 5 presets is fantastic. Lost Vape even gives a bonus metal of SS904 because some people still use it.
The side fill is so effortless as well as mess free but a word of caution, if the pod is half empty refill it avoiding a burnt coil. The attachment of the pods to the device is not a magnet type or click in type but a solid and secure locking type of attachment method.
A word of caution when installing either of the pods or 510 adapter, press firmly down on them because to fit tolerances are so form fitted and the Ursa Quest springs are so strong. I would much rather have stiff strong springs than easy to install weaker ones whose lifespan would be reduced. Be sure to check that the pod/510 adapter is fully seated on both connection sides whenever you install them.
Lost Vape provides only 1 airflow selector that have to shared by both pods, 2 would have been better but you can only use 1 pod at a time so I can see the reason for them only supplying just 1 airflow selector. Speaking of the airflow selector I can tell you that it's smooth in any position that it's in on either pod used.
The menu system is so easy to operate without having to remember many button combinations because there is only 1 and it's the wattage adjustment lock/unlock that I mentioned earlier. Having a dedicated menu button really makes scrolling through your settings or making adjustments so easy.
The color display is also done very well having all your information laid out in a very appealing grid style. You have plenty of brightness in the brightness adjustment and the colors, fonts and symbols are done perfectly. Colors and fonts are very vivid with plenty of detail.
The attractive appearance really just grabs your eye and I think that all the color and metal finishes look really great ( ALL OF THEM ).
PROS
* Attractive
* Quality
* Well built
* Battery versatility
* Dedicated menu button
* Smooth airflow
* 2 Pods included
* 510 Adapter included
* 5 Presets ( POD MODE )
* 5 Presets ( MOD MODE )
* Bright
* Color screen
* Vivid fonts and symbols
* Pods/510 adapter connect securely
* Type-C
* Side fill
* Very good flavor
* Mess free
CONS
* Pod tinting could be lighter
FINAL IMPRESSIONS
Well I think you can tell that I really like the Ursa Quest Multi Kit for the many reasons that I mentioned above. This is not a lightweight by any means but not overly heavy either and is barely small enough to be carried in pants pockets comfortably.
Lost Vape really went all out with the Ursa Quest giving you a truly wonderful kit and a device that has so many bonuses in it as well. Lost Vape is known for quality devices and the Ursa Quest Multi Kit is no exception. The value of this kit is amazingly good with everything that's included as well as a great chipset that is in the device. The link for the Ursa Quest at Sourcemore is here Lost Vape Ursa Quest Multi Kit 100W 6ml/7ml single 21700/20700/18650 and the code is URSA.
So in closing do I recommend the Ursa Quest Multi Kit, yes I do 100%.
I would like to thank Lilia and Sourcemore for providing the Ursa Quest for the purpose of this review.
THANK YOU
BIGBOB2322
All of the pictures of mine are at the bottom of the review in order
COLOR CHOICES AND DEVICE FINISHES
INCLUDED WITH THE KIT
PARAMETERS
COLOR CHANGEABLE LEATHER WITH USE
NEW FEATURES AND CHIP
UB POD COMPATIBLE WITH UB COILS
UB PRO POD WITH UB PRO COILS
BOTH PODS AND 510 ADAPTER LOCK INTO THE DEVICE
TYPE -C WITH 5 VAPE MODES 100 WATT OUTPUT USING 21700 BATTERY
SIDE FILL JUICE PORT
COMPONENTS
As you have seen in this opening of the review there really is a lot going on with the Ursa Quest Multi Kit but we have only scratched the surface. I would call this device the poor man's DNA device and the menu sorta reminds me of one, picking up the device you can feel that it's solidly built with a quality feel as well as high end look to it.
FIRST IMPRESSIONS
Sliding the main box out of the sleeve and opening it has the device laying in a plastic form fitted top cover with all your included pieces underneath.
View attachment 935099
I had no idea which color I was going to receive and was ecstatic with what was sent, pictures really do not show just how attractive the device is. Starting from the top down we begin with the pods, one is the 6ml UB that takes all UB coils as well as a RBA coil and the other is the 7ml UB Pro that takes the pro coils and also has a optional RBA coil.
The UB tank uses a 510 drip tip while the UB Pro tank uses a 810 drip tip. Inside the kit the UB Pro comes already attached to the device using a screw on airflow selector, there is only one airflow selector supplied in the kit so it must be shared by both pods. In the picture below I have the clip in airflow selector turned sideways in front of the device to show 1 of the 2 indents that the 2 clips of the device use to secure the pods to the device, there another one on the other side.
View attachment 935115
Again turned somewhat sideways and highlighted in yellow. There are 2 buttons at the top of the device that need to be depressed when installing either pod or the 510 adapter, be forceful when attaching the pods or 510 adapter making sure each side is fully secured to the device. One of the buttons is shown on the top right side, both buttons are also used to release the pods or 510 adapter.
View attachment 935121
The picture below shows the 510 adapter correctly attached with no real gap under it, I know that I'm harping on this but the buttons don't really pull back the 2 nubs that far and it's easy to leave one not fully attached because of the strong springs. I'd rather have strong stiff springs than soft easy to recess ones.
View attachment 935127
The fillport is located at the top portion of the pods and is a side fill that is mess free and very easy to fill with easy opening plugs.
View attachment 935157
Coming down to the device, battery installation is done through the bottom such as the Grus does with a twist off cover, lift the ring up and twist off to install your battery positive side in. The battery cover has a negative symbol inside it. There is a positive marking inside the tube but it's small and hard to see and there are 3 venting holes on the battery cover.
View attachment 935129
Now let's move to the side with all the action of the device. In the picture below is the side that has the display screen. At the top is one of the release buttons for the pod's and 510 adapter and below it is the power/fire button, below it is the display screen, followed by the up button, then the menu button in the center with the down button below it. The devices type-c charge/firmware update port is at the bottom.
The display screen is very bright and vivid as well as having a color screen. The displays on the screen will change depending on the power mode you choose to use. Lost Vape covered all the bases with the Ursa Quest giving you many power modes and they are: POWER/WATTAGE, BYPASS, VOLTAGE, VARIABLE POWER CURVE or ( VPC ), NI, TI, SS316, and SS904.
You will notice under wattage that there is a font saying POD and next to it is a symbol of a person with the #1 next to him, as I said earlier Lost Vape went all out developing the Ursa Quest giving you a pod mode and also a mod mode with 5 presets for each that you can tailor yourself.
Under the POD/MOD is a box for your choice of preheats and they are: SOFT, NORMAL and HARD and next to it is your 4 digit puff counter. At the very bottom of the display screen is settings
View attachment 935235
In the picture below you see that the screen color has changed because the menu button was pressed and is in adjustment mode, to make any adjustments the menu button must be pressed first, but first toggle through the different items on the screen that you want adjusted using the up or down buttons, once your on the selection that you want to adjust press the menu button ( CENTER BUTTON ) and the screen will change to this color allowing you to only now make the adjustments you want to make.
View attachment 935245
Here is a screen shot in the settings menu, in settings your first selection is atomizer, in this portion of the settings screen you can choose pod or mod ( if you choose mod it will be highlighted red instead of the pod orange color.
Next one down is screen and that is your brightness control
Next one down is user which is your 5 different profiles for pod and 5 different profiles for mod
Next on down is reset and that's self explanatory
About is the last in the settings menu
and it tells you the version of the chip
At the very bottom is back and that brings you back to the main screen
View attachment 935251
USING THE URSA QUEST
Using the Ursa Quest for a couple of weeks has been so enjoyable, picking the device up you instantly feel quality with it's solid build along with a gorgeous appearance. The menu is so easy to operate with only 1 button combination and it is to hold the + and - button simultaneously to lock and unlock wattage adjustments.
Both of the coils that come in the kit are very good giving really good flavor and Lost Vape even has a RBA for each of the pods that can be purchased separately if you wish to build your own coils.
When Lost Vape called this kit a Multi Kit they really meant it, think about it: 2 pods, 2 coils, a 510 adapter that can accept 30mm atomizers, a 18650 battery adapter, extra o-rings and a type-c cord.
Having 5 presets is great but having a ( pod mode ) and a ( mod mode ) that also has 5 presets is fantastic. Lost Vape even gives a bonus metal of SS904 because some people still use it.
The side fill is so effortless as well as mess free but a word of caution, if the pod is half empty refill it avoiding a burnt coil. The attachment of the pods to the device is not a magnet type or click in type but a solid and secure locking type of attachment method.
A word of caution when installing either of the pods or 510 adapter, press firmly down on them because to fit tolerances are so form fitted and the Ursa Quest springs are so strong. I would much rather have stiff strong springs than easy to install weaker ones whose lifespan would be reduced. Be sure to check that the pod/510 adapter is fully seated on both connection sides whenever you install them.
Lost Vape provides only 1 airflow selector that have to shared by both pods, 2 would have been better but you can only use 1 pod at a time so I can see the reason for them only supplying just 1 airflow selector. Speaking of the airflow selector I can tell you that it's smooth in any position that it's in on either pod used.
The menu system is so easy to operate without having to remember many button combinations because there is only 1 and it's the wattage adjustment lock/unlock that I mentioned earlier. Having a dedicated menu button really makes scrolling through your settings or making adjustments so easy.
The color display is also done very well having all your information laid out in a very appealing grid style. You have plenty of brightness in the brightness adjustment and the colors, fonts and symbols are done perfectly. Colors and fonts are very vivid with plenty of detail.
The attractive appearance really just grabs your eye and I think that all the color and metal finishes look really great ( ALL OF THEM ).
PROS
* Attractive
* Quality
* Well built
* Battery versatility
* Dedicated menu button
* Smooth airflow
* 2 Pods included
* 510 Adapter included
* 5 Presets ( POD MODE )
* 5 Presets ( MOD MODE )
* Bright
* Color screen
* Vivid fonts and symbols
* Pods/510 adapter connect securely
* Type-C
* Side fill
* Very good flavor
* Mess free
CONS
* Pod tinting could be lighter
FINAL IMPRESSIONS
Well I think you can tell that I really like the Ursa Quest Multi Kit for the many reasons that I mentioned above. This is not a lightweight by any means but not overly heavy either and is barely small enough to be carried in pants pockets comfortably.
Lost Vape really went all out with the Ursa Quest giving you a truly wonderful kit and a device that has so many bonuses in it as well. Lost Vape is known for quality devices and the Ursa Quest Multi Kit is no exception. The value of this kit is amazingly good with everything that's included as well as a great chipset that is in the device. The link for the Ursa Quest at Sourcemore is here Lost Vape Ursa Quest Multi Kit 100W 6ml/7ml single 21700/20700/18650 and the code is URSA.
So in closing do I recommend the Ursa Quest Multi Kit, yes I do 100%.
I would like to thank Lilia and Sourcemore for providing the Ursa Quest for the purpose of this review.
THANK YOU
BIGBOB2322
Attachments
-
 20210311_130853.jpg1.7 MB · Views: 15
 -
 20210314_072907.jpg1 MB · Views: 14
 -
 Inked20210321_150530_LI.jpg1.3 MB · Views: 14
 -
 20210314_074713.jpg867.1 KB · Views: 15
 -
 20210317_143226.jpg741.6 KB · Views: 14
 -
 20210321_165836.jpg885.8 KB · Views: 15
 -
 20210322_130251.jpg757.7 KB · Views: 14
 -
 20210322_142432.jpg852.9 KB · Views: 14
 -
 20210322_153355.jpg1.1 MB · Views: 14
 -
 20210322_160819.jpg1.7 MB · Views: 14
Last edited:
