
I received Pyro v3 rdta from Vandy vape for the purpose of this review.
Pyro rdta colors:
- Ss
- Matte black
- Gold
- Gun metal
- Blue
- Rainbow
- Frosted grey

Specifications:
- Length: 37mm
- Diameter: 24mm
- Capacity: 2ml
In the box:
- Pyro v3 rdta
- Spare parts bag
- User manual
- Squonk pin
- Glass tube
- Coil lead guide
- Two fused clapton coils 0.33ohm
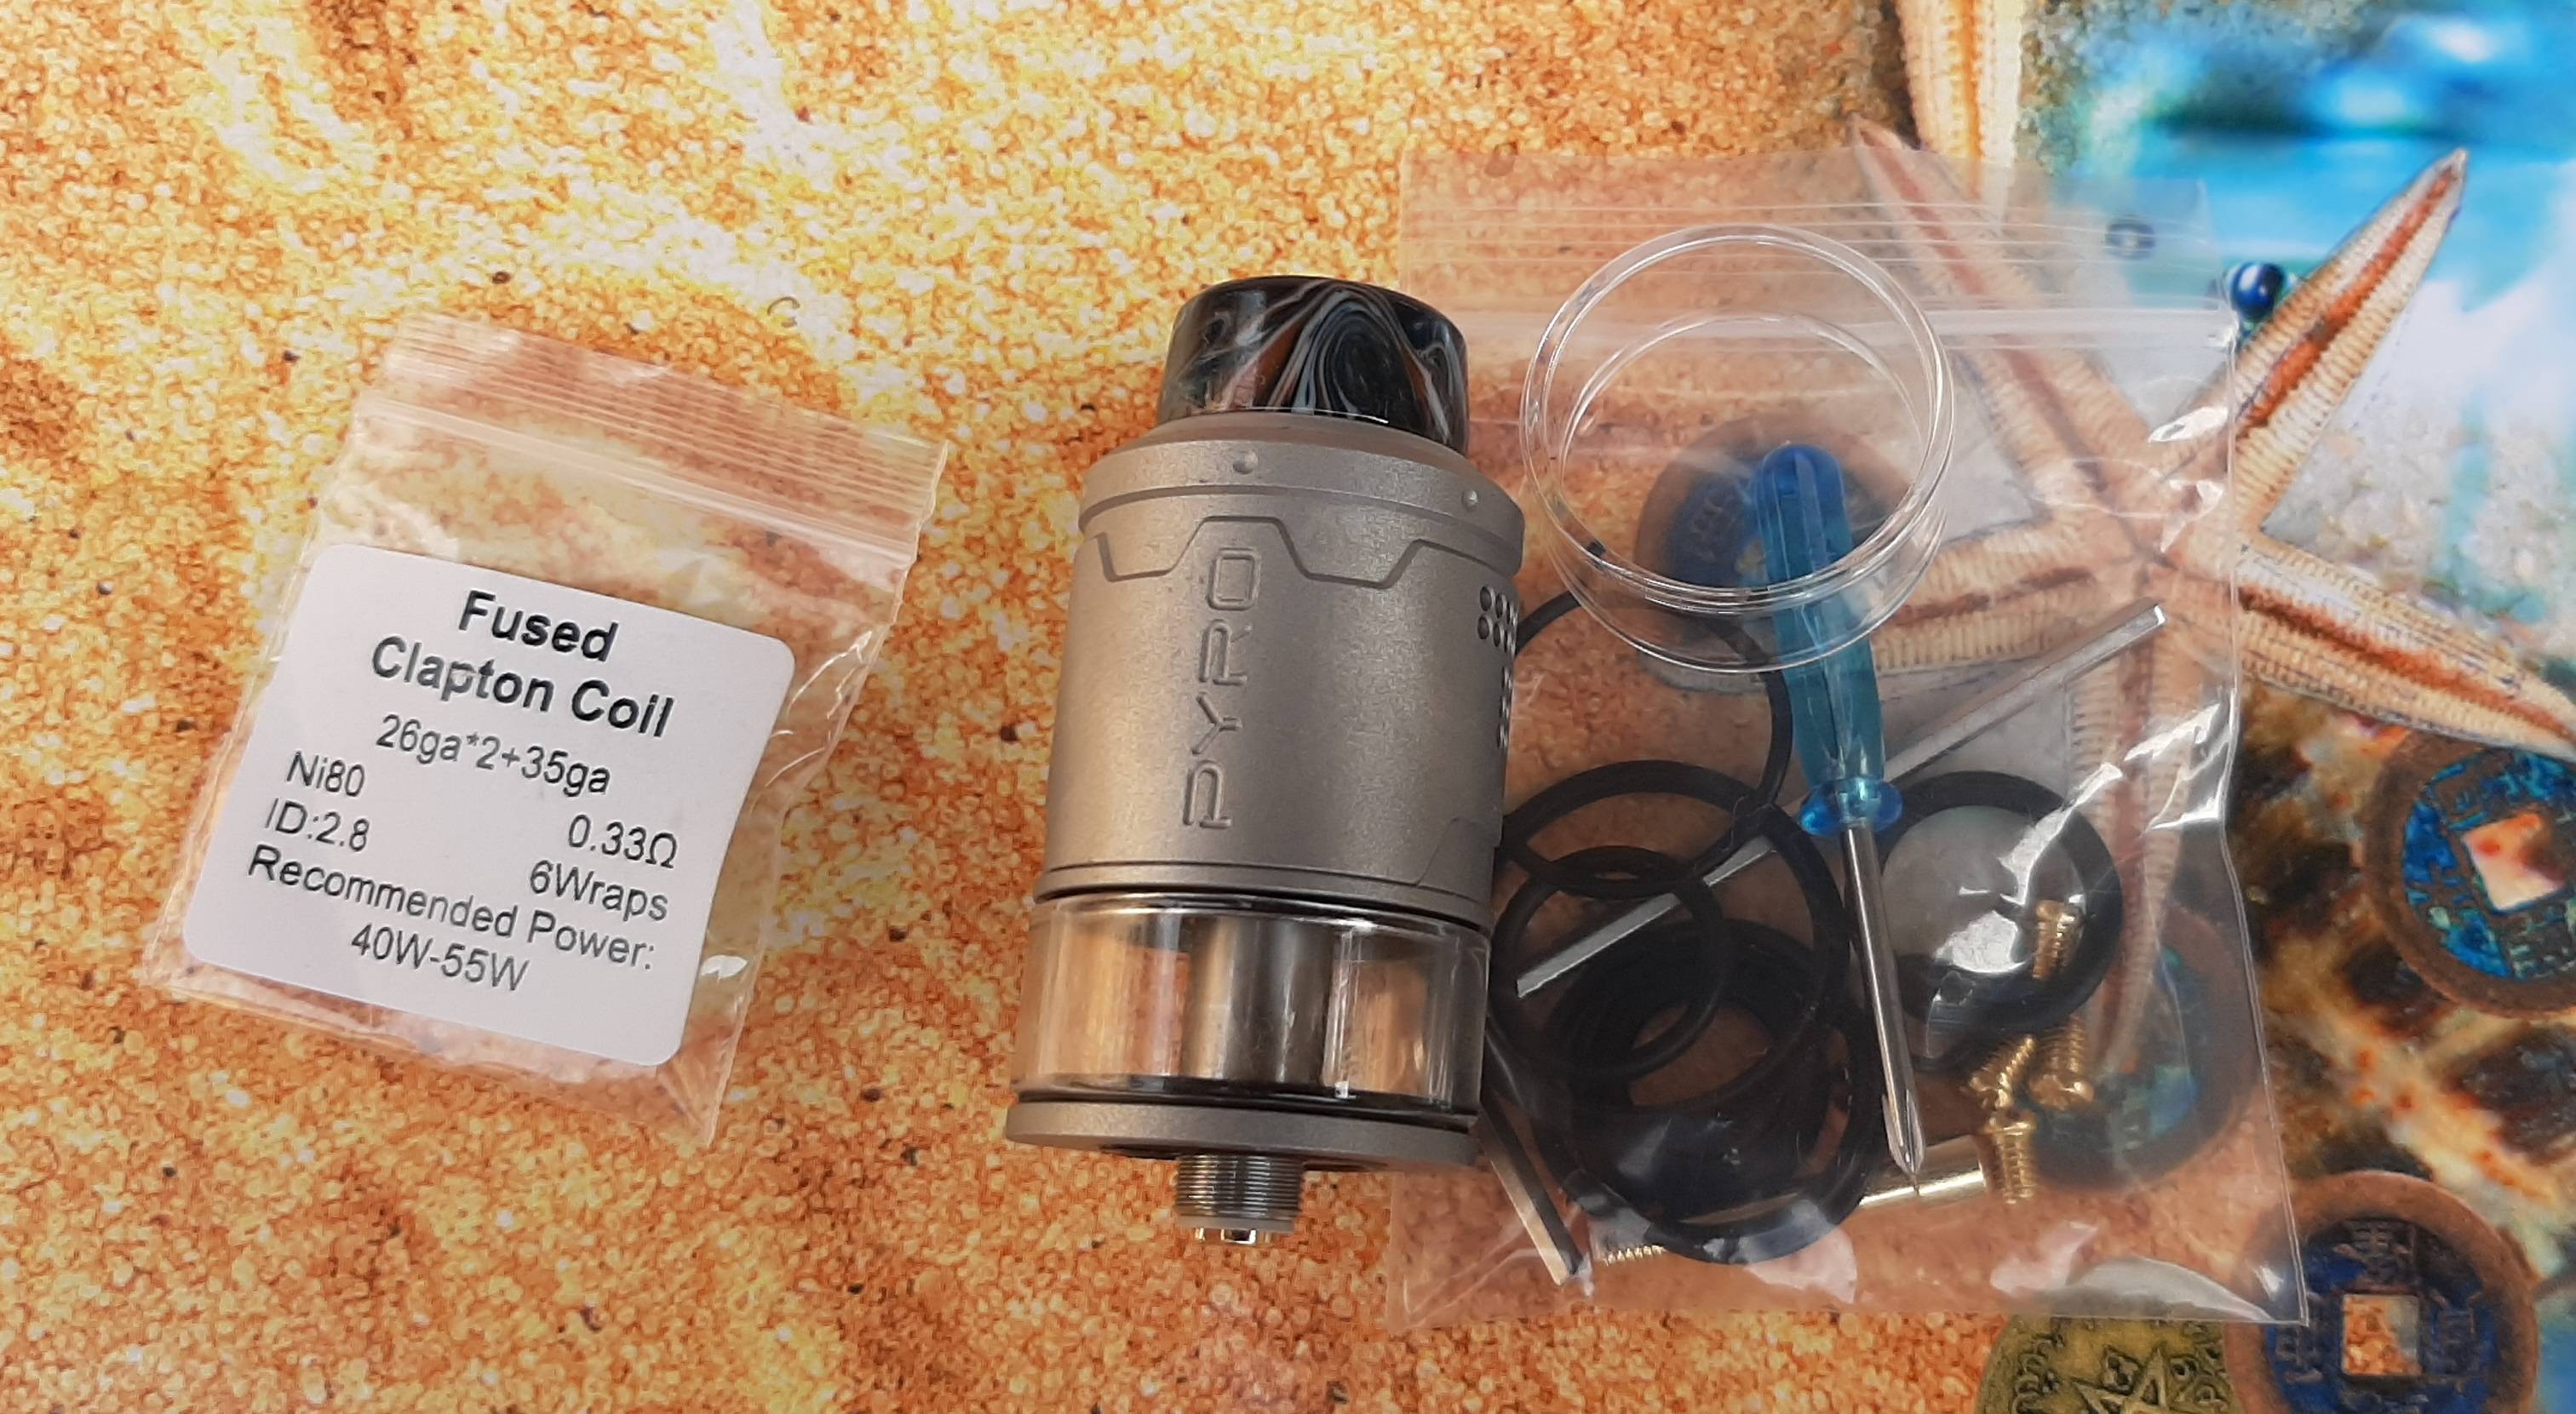
Pyro v3 rdta is the new atomizer from Vandy vape and this one is older brother of well known pyro v2. Atomizer comes in a very nice package, in the package you will receive spare glass tank, you will receive two coils which is very nice if you don't have coils, also in the package you will receive coil lead tool and of course in the package you will get bf pin.
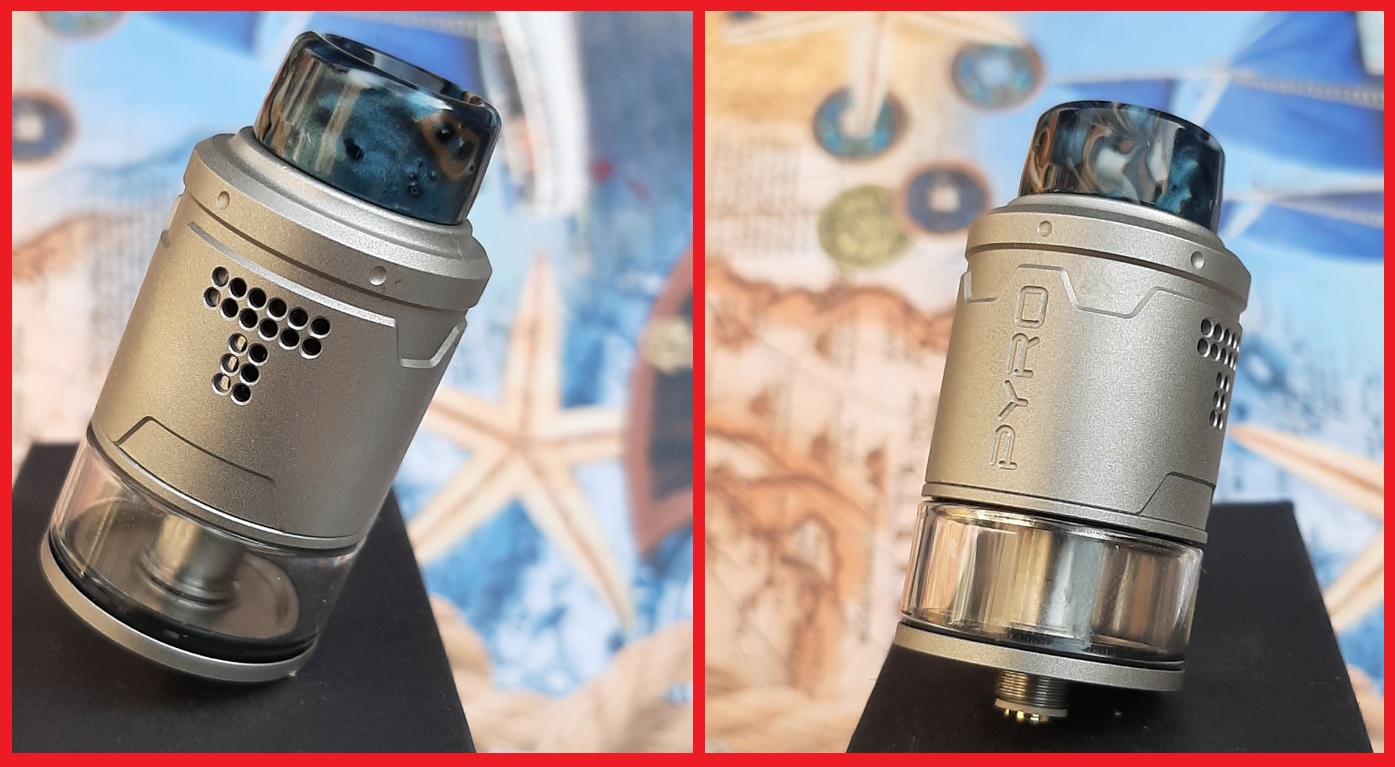
Color of the atomizer is really nice in my opinion and color quality looks good. You can buy this atomizer in very nice colors, color options are very good. Build quality of the atomizer is good as well, everything is as it should be, nothing to complain about.
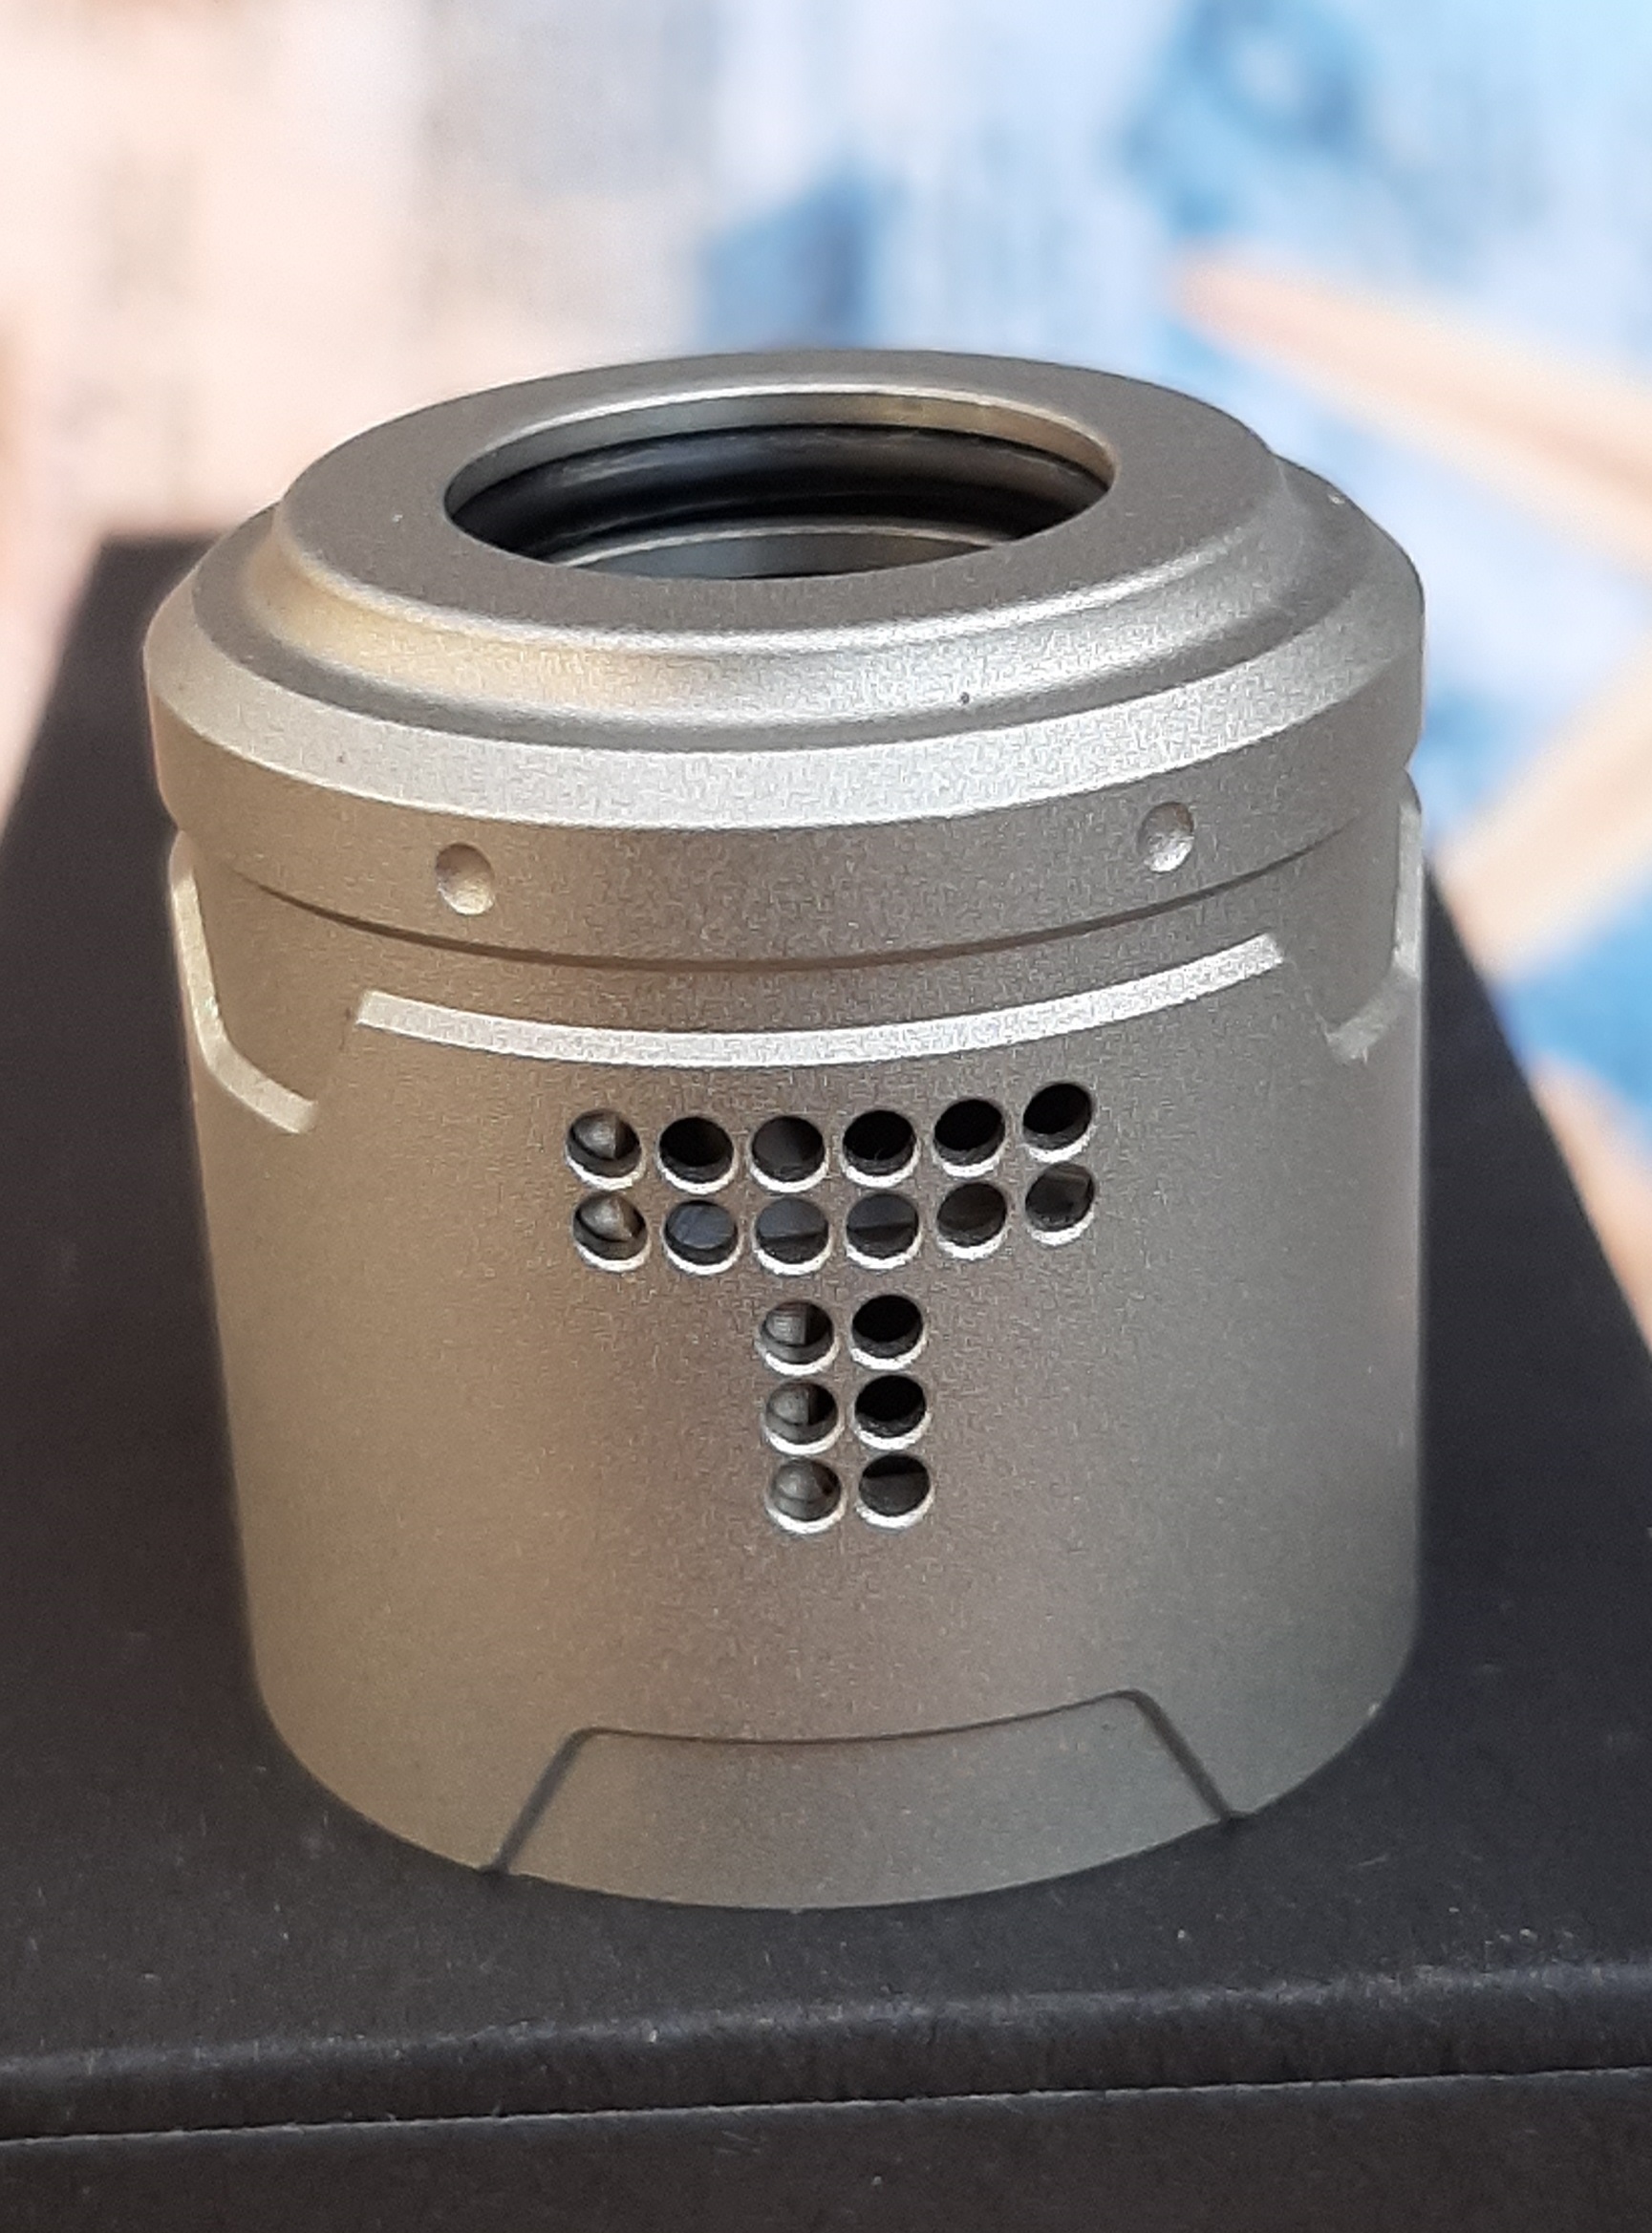
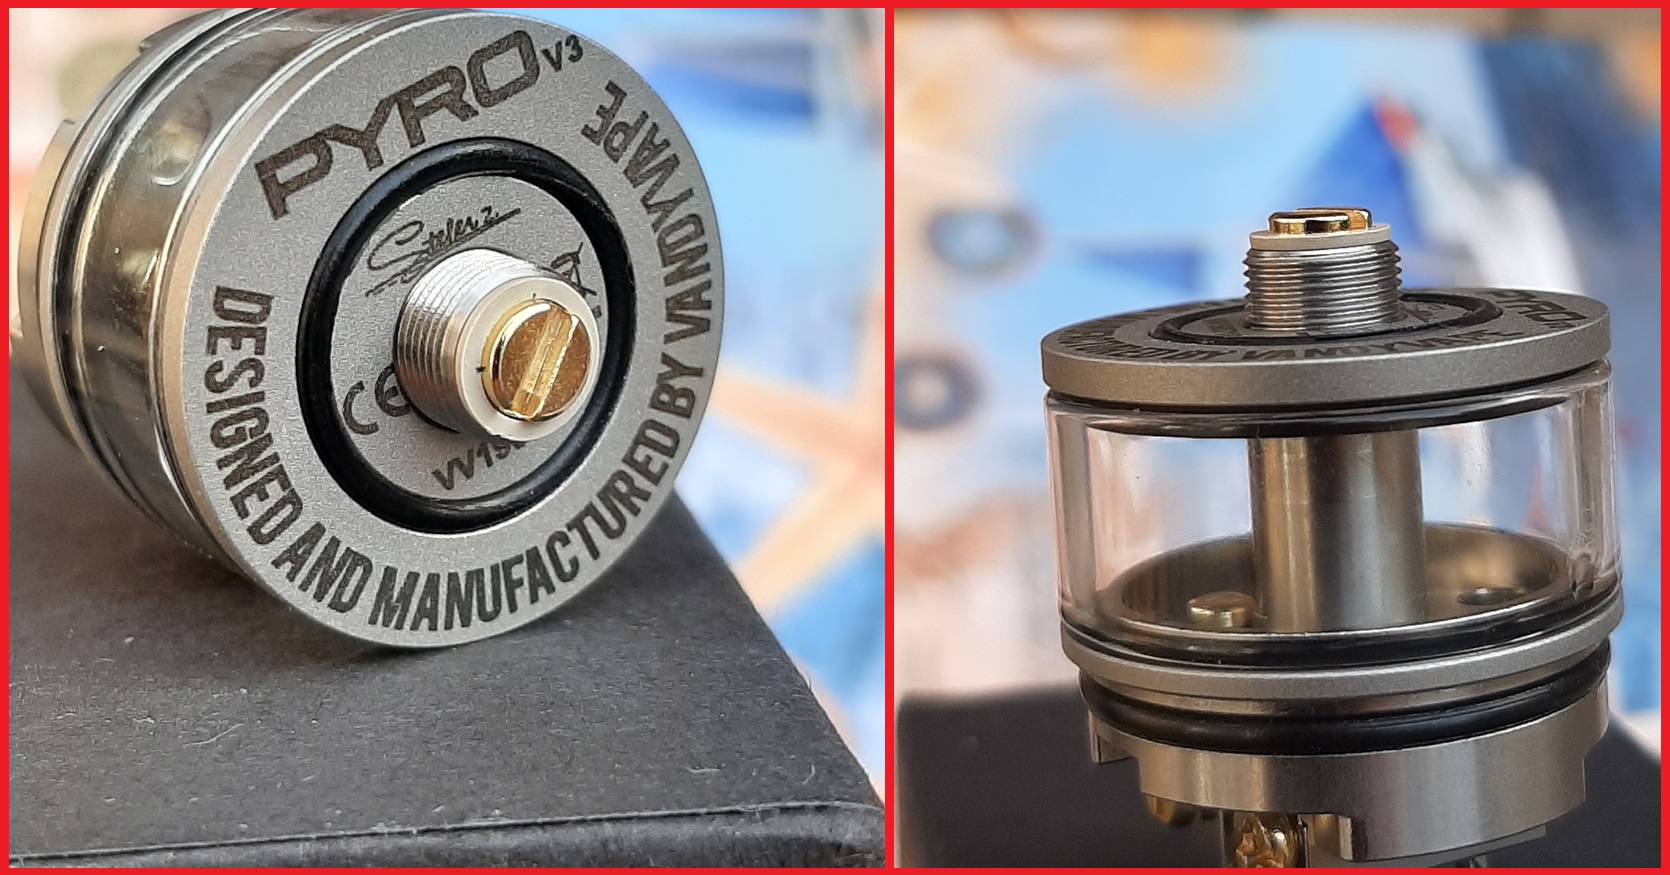
You can see some details on the atomizer, on the top cap you can see engraved "Pyro", also on the top cap you can see pretty nice details that helps when you want to adjust the airflow. From the bottom of the atomizer you can see some standard informations and also from the bottom you can see one o ring. Threads here are good and 510 pin is protruding and it is gold plated.
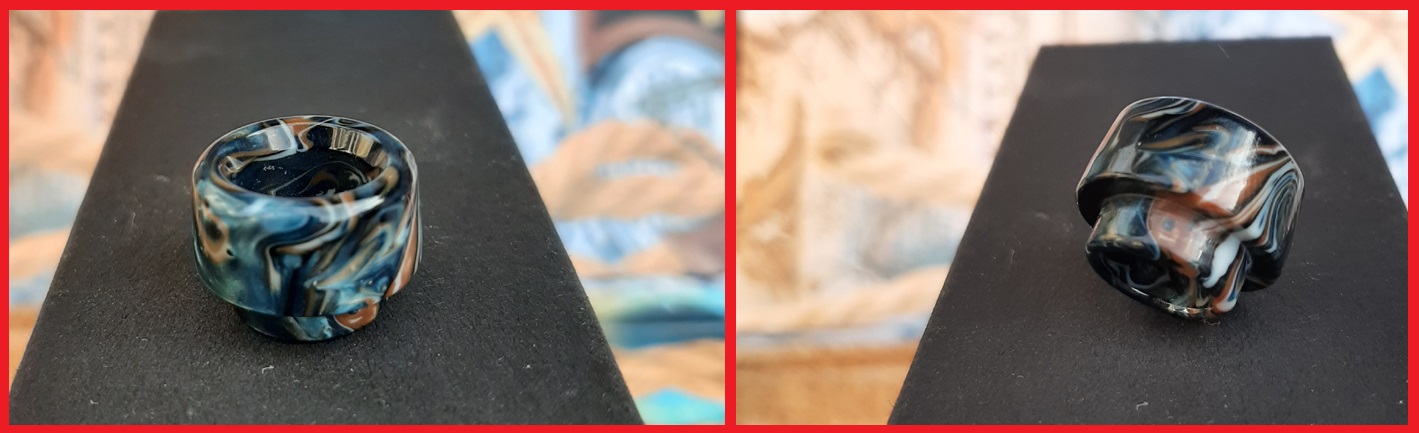
Atomizer comes with very nice drip tip, personally I really like how it looks. This is a 810 drip tip and on this atomizer you can use any other 810 drip tip if you don't like this one. I really like to use the drip tip that comes pre installed, it is very comfortable for using. In the package you will also receive 510 drip tip adapter so you can use any 510 drip tip if you prefer.
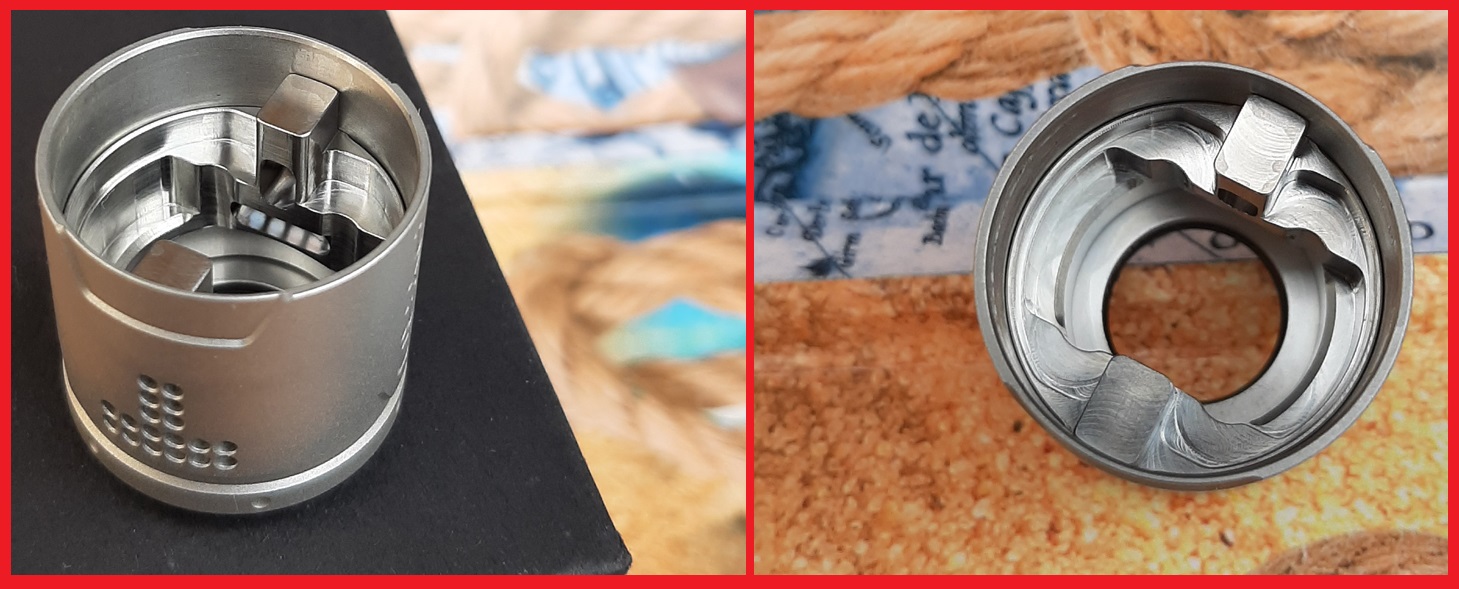
The top cap on this atomizer is a single piece and as I said on the top cap you can see some nice details that helps with airflow adjustment, so airflow adjustment is pretty simple and easy. On the top cap you can see 18 holes on each side and when you adjust the airflow what you adjust on one side it will be the same on the another side. We have no stopper on this atomizer which will be a con to someone. As you can see, we have here honeycomb airflow and airflow is shaped in T letter. From each side of the top cap we have 12 horizontal holes and we have 6 vertical holes from each side.
As I said it is pretty much simple to adjust the airflow by turning the top cap, when you are closing the airflow you will close 2 horizontal holes from each side and 3 vertical holes from each side. Air that comes through horizontal holes will hit the coils from sides and air from vertical holes will hit the coils from the bottom.
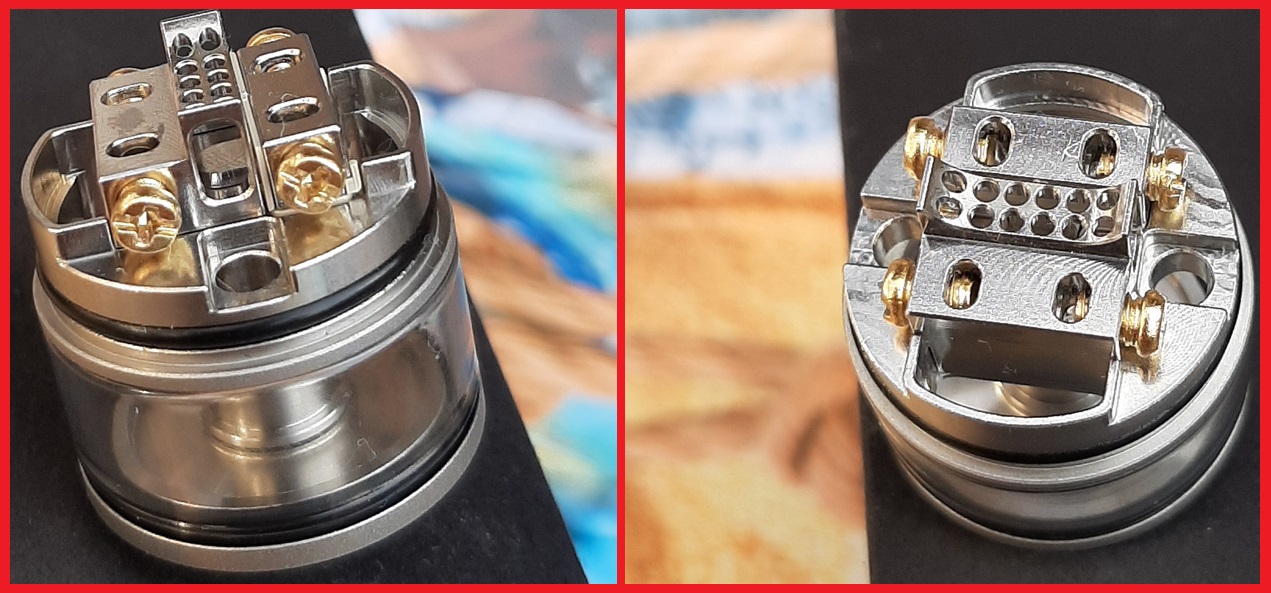
When you look the top cap from the inside you can see two pieces that goes in the slots on the build deck and because of that you will always need to place the top cap correctly on the base, also because of that, top cap is secured and you can easily adjust the airflow. Top cap stands very nice on the build deck I can say. Also from the inside of the top cap you can see how airflow actually works and how air from horizontal holes hits the coil from sides and also how air goes under the coils.
On the build deck you can see 4 slots for coil leads. Screws here are big and screws are very good and I didn't have any problems with the screws. Also on the build deck you can see two wick slots and you can see two fill holes. You can pretty much easy fill the tank on this atomizer, I use gorilla bottles and I didn't have any problems with filling.
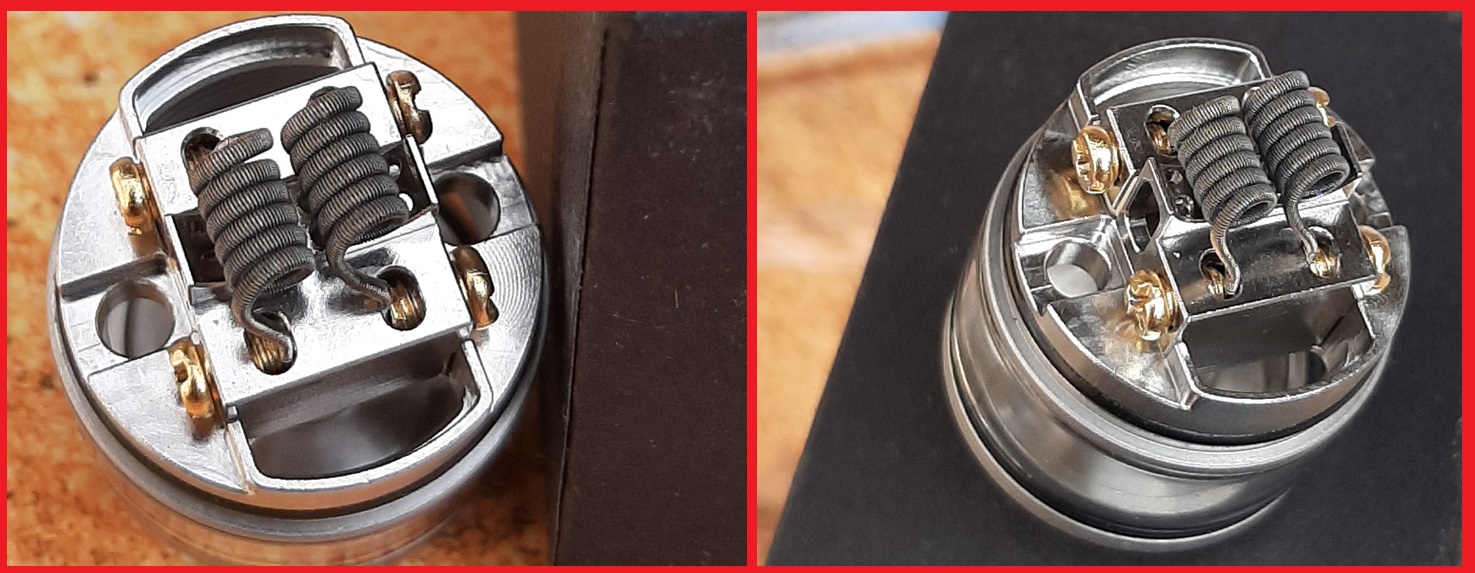
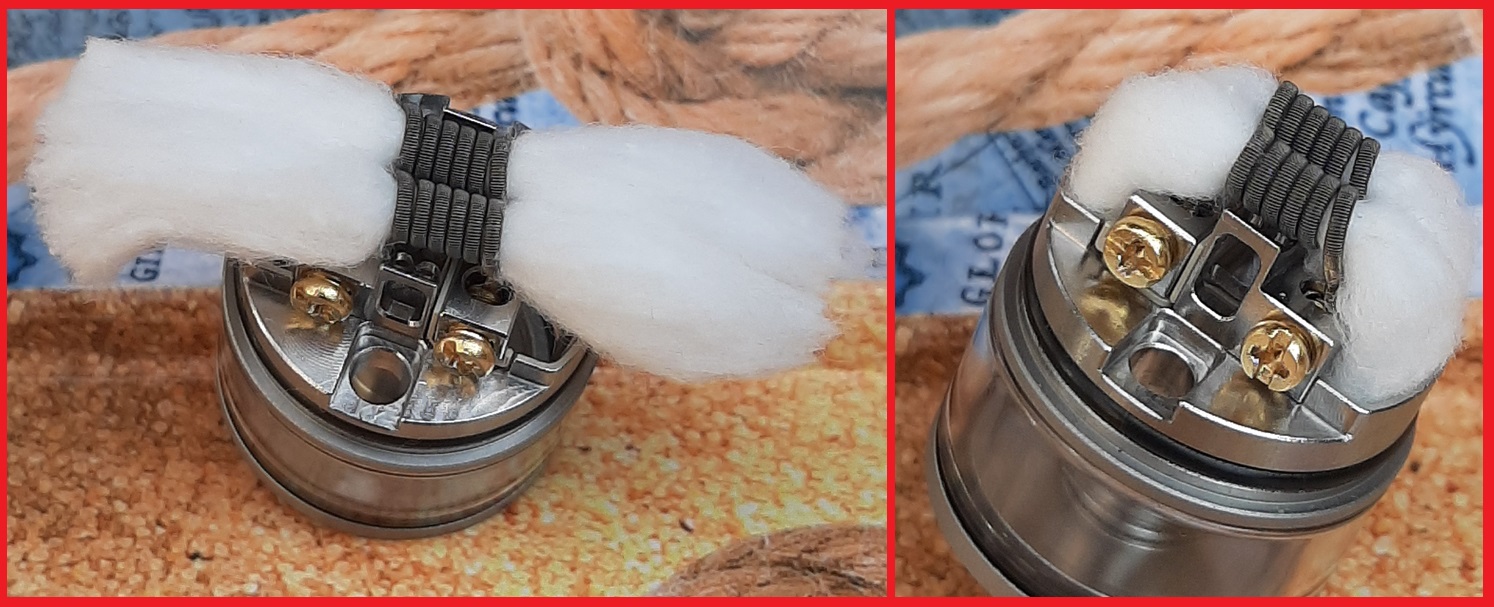
It is very easy to build on this atomizer, it is very nice that in the package you will receive coil lead tool that you will use to measure the coil leads, so all you need to do here is to measure where to clip coil leads and after that to place the coils on the build deck and tight down the screws, very simple and easy. Wicking is also pretty much easy here, it is very important that your wicks not touching the bottom of the tank, you can just let it sit in the middle of the tank and you will have no problems with wicking on this rdta.
On the center of the build deck you can see honeycomb airflow, air that goes through holes on the middle will hit the coils from the bottom, on the picture you can see how airflow works here. I must say that I really like the airflow on this atomizer, very nice solution with airflow.
Under the build deck you can see the glass tank and in the package you will receive one more spare tank. Capacity of the tank is 2ml which is okay capacity in my opinion because atomizer looks nice this way.
From the bottom you can see one o ring and this o ring is here to prevent any leaking when you are squonking, very good and nice solution, I really like it.
How this atomizer works and my thoughts:
Let me start with build quality and color quality, so build quality is very good and there is nothing bad here, very nice machining, color quality is also very good, so far there is no any scratches on the atomizer, also I really like the color on this atomizer. Package is pretty much good, in the package you will get 510 drip tip adapter, two clapton coils, bf pin and coil lead tool that helps with building on this atomizer, very nice.
So, pyro v3 is a dual coil atomizer, but still if you want you can use this atomizer with one bigger coil, personally I like to use this atomizer with two coils because it works just amazing this way.
As I said in the package you will receive bf pin and if you want you can use this rdta with bf pin and squonk mod, this way atomizer works very good because you will always have e juice in the tank and all you need to do is to press the bottle few times, also o ring on the bottom helps because there is no any leaking which is really nice. Also you can use this rdta with your regular mods, filling the tank is pretty much easy and without any problems, I use gorilla bottle and it fits just perfect.
It is really nice that in the package you will receive two coils because if you don't have coils you can use the coils from the package. On the tool that you will receive in the package you can see where to cut coil leads but still you can play a little bit here and you can find what works best for you. Anyway screws are good and it is very easy to place the coils on this atomizer.
Atomizer performs very well with squonk mods and with regular mods. Airflow is very smooth because of the design and I really like the airflow soluton on this atomizer, it is nice that airflow can hit the coils from the bottom and from the sides and it is also nice that you can only use it with side airflow if you prefer that way. I really like to use this atomizer with airflow fully opened or with one row of holes closed, in my opinion this rdta works best that way. It also works good when you close the bottom airflow and when you use only side airflow. Flavor on this rdta is very good because of very good airflow and also because of the design, cuz when you place the coils and cotton there is no much space left in the top cap which good affects the flavor. Vapor is very dense and vapor producion is very good. If you like rdta's and this kind of airflow I can suggest you this atomizer because it works pretty much good and I really like this one.
Cons:
- There is no stopper on the top cap
Pros:
- I like the drip tip
- Build quality is good
- Color quality is good
- Honeycomb airflow
- Airflow options (side and bottom or only side airflow)
- Good screws
- Coil lead tool
- Coils in the package
- Good flavor
- O ring from the bottom
- Bf pin in the package
- Easy to fill the tank
- Easy to build
- Easy to wick
- Vapor is dense
- You can use it with one coil or with two coils
Thanks Vandy vape
You can check it here: Pyro v3
Pyro rdta colors:
- Ss
- Matte black
- Gold
- Gun metal
- Blue
- Rainbow
- Frosted grey
Specifications:
- Length: 37mm
- Diameter: 24mm
- Capacity: 2ml
In the box:
- Pyro v3 rdta
- Spare parts bag
- User manual
- Squonk pin
- Glass tube
- Coil lead guide
- Two fused clapton coils 0.33ohm
Pyro v3 rdta is the new atomizer from Vandy vape and this one is older brother of well known pyro v2. Atomizer comes in a very nice package, in the package you will receive spare glass tank, you will receive two coils which is very nice if you don't have coils, also in the package you will receive coil lead tool and of course in the package you will get bf pin.
Color of the atomizer is really nice in my opinion and color quality looks good. You can buy this atomizer in very nice colors, color options are very good. Build quality of the atomizer is good as well, everything is as it should be, nothing to complain about.
You can see some details on the atomizer, on the top cap you can see engraved "Pyro", also on the top cap you can see pretty nice details that helps when you want to adjust the airflow. From the bottom of the atomizer you can see some standard informations and also from the bottom you can see one o ring. Threads here are good and 510 pin is protruding and it is gold plated.
Atomizer comes with very nice drip tip, personally I really like how it looks. This is a 810 drip tip and on this atomizer you can use any other 810 drip tip if you don't like this one. I really like to use the drip tip that comes pre installed, it is very comfortable for using. In the package you will also receive 510 drip tip adapter so you can use any 510 drip tip if you prefer.
The top cap on this atomizer is a single piece and as I said on the top cap you can see some nice details that helps with airflow adjustment, so airflow adjustment is pretty simple and easy. On the top cap you can see 18 holes on each side and when you adjust the airflow what you adjust on one side it will be the same on the another side. We have no stopper on this atomizer which will be a con to someone. As you can see, we have here honeycomb airflow and airflow is shaped in T letter. From each side of the top cap we have 12 horizontal holes and we have 6 vertical holes from each side.
As I said it is pretty much simple to adjust the airflow by turning the top cap, when you are closing the airflow you will close 2 horizontal holes from each side and 3 vertical holes from each side. Air that comes through horizontal holes will hit the coils from sides and air from vertical holes will hit the coils from the bottom.
When you look the top cap from the inside you can see two pieces that goes in the slots on the build deck and because of that you will always need to place the top cap correctly on the base, also because of that, top cap is secured and you can easily adjust the airflow. Top cap stands very nice on the build deck I can say. Also from the inside of the top cap you can see how airflow actually works and how air from horizontal holes hits the coil from sides and also how air goes under the coils.
On the build deck you can see 4 slots for coil leads. Screws here are big and screws are very good and I didn't have any problems with the screws. Also on the build deck you can see two wick slots and you can see two fill holes. You can pretty much easy fill the tank on this atomizer, I use gorilla bottles and I didn't have any problems with filling.
It is very easy to build on this atomizer, it is very nice that in the package you will receive coil lead tool that you will use to measure the coil leads, so all you need to do here is to measure where to clip coil leads and after that to place the coils on the build deck and tight down the screws, very simple and easy. Wicking is also pretty much easy here, it is very important that your wicks not touching the bottom of the tank, you can just let it sit in the middle of the tank and you will have no problems with wicking on this rdta.
On the center of the build deck you can see honeycomb airflow, air that goes through holes on the middle will hit the coils from the bottom, on the picture you can see how airflow works here. I must say that I really like the airflow on this atomizer, very nice solution with airflow.
Under the build deck you can see the glass tank and in the package you will receive one more spare tank. Capacity of the tank is 2ml which is okay capacity in my opinion because atomizer looks nice this way.
From the bottom you can see one o ring and this o ring is here to prevent any leaking when you are squonking, very good and nice solution, I really like it.
How this atomizer works and my thoughts:
Let me start with build quality and color quality, so build quality is very good and there is nothing bad here, very nice machining, color quality is also very good, so far there is no any scratches on the atomizer, also I really like the color on this atomizer. Package is pretty much good, in the package you will get 510 drip tip adapter, two clapton coils, bf pin and coil lead tool that helps with building on this atomizer, very nice.
So, pyro v3 is a dual coil atomizer, but still if you want you can use this atomizer with one bigger coil, personally I like to use this atomizer with two coils because it works just amazing this way.
As I said in the package you will receive bf pin and if you want you can use this rdta with bf pin and squonk mod, this way atomizer works very good because you will always have e juice in the tank and all you need to do is to press the bottle few times, also o ring on the bottom helps because there is no any leaking which is really nice. Also you can use this rdta with your regular mods, filling the tank is pretty much easy and without any problems, I use gorilla bottle and it fits just perfect.
It is really nice that in the package you will receive two coils because if you don't have coils you can use the coils from the package. On the tool that you will receive in the package you can see where to cut coil leads but still you can play a little bit here and you can find what works best for you. Anyway screws are good and it is very easy to place the coils on this atomizer.
Atomizer performs very well with squonk mods and with regular mods. Airflow is very smooth because of the design and I really like the airflow soluton on this atomizer, it is nice that airflow can hit the coils from the bottom and from the sides and it is also nice that you can only use it with side airflow if you prefer that way. I really like to use this atomizer with airflow fully opened or with one row of holes closed, in my opinion this rdta works best that way. It also works good when you close the bottom airflow and when you use only side airflow. Flavor on this rdta is very good because of very good airflow and also because of the design, cuz when you place the coils and cotton there is no much space left in the top cap which good affects the flavor. Vapor is very dense and vapor producion is very good. If you like rdta's and this kind of airflow I can suggest you this atomizer because it works pretty much good and I really like this one.
Cons:
- There is no stopper on the top cap
Pros:
- I like the drip tip
- Build quality is good
- Color quality is good
- Honeycomb airflow
- Airflow options (side and bottom or only side airflow)
- Good screws
- Coil lead tool
- Coils in the package
- Good flavor
- O ring from the bottom
- Bf pin in the package
- Easy to fill the tank
- Easy to build
- Easy to wick
- Vapor is dense
- You can use it with one coil or with two coils
Thanks Vandy vape
You can check it here: Pyro v3