
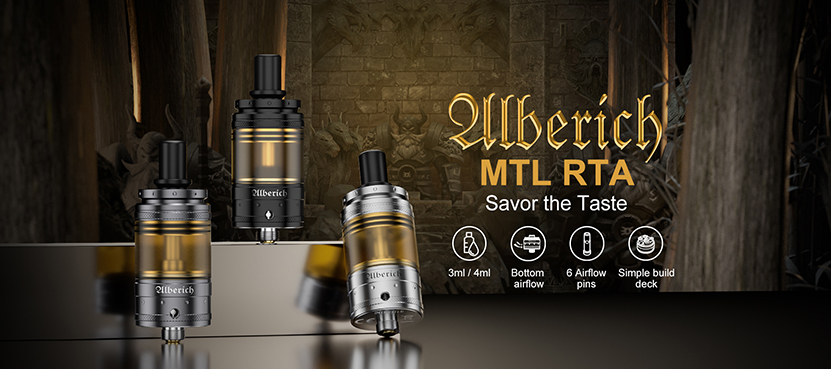
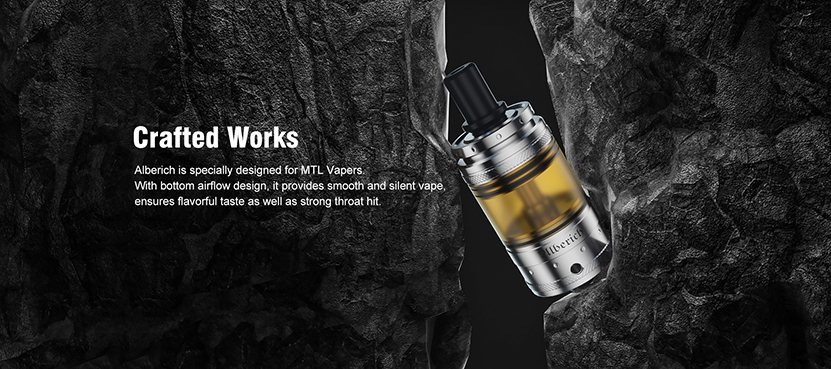
Today I’ll be taking a look at the Vapefly Alberich rta that was sent to me by Sourcemore to provide a fair, honest, and hopefully informative review for you. The Alberich was specifically designed to be an MTL rta. It is 22mm in diameter and has a 4ml liquid capacity with the included glass tank section and 3ml with the pre-installed PEI section. I always prefer glass and am glad that is included in the kit I received. It comes with six different airflow pins that you can choose from to help to customize your airflow experience. On most tanks that come with pins, I tend to use either the largest one or no pin at all. I’ll have to see how this one works out for me. The build deck has a simple four post design to make it easier for building. So, let’s see what’s included and check out some promotional images then I’ll give my thoughts on it.
WHAT’S IN THE BOX?
1* Vapefly Alberich MTL RTA
1* 4ml Glass Tube
1* Adapter
1* 0.8Ω KA1 Prebuilt Coil
2* Firebolt Cottons
5* Airflow Pins
4* Screws
O-rings

SPECIFICATIONS:
Diameter: Φ22mm
Drip Tip: 510
Capacity: 3ml/4ml
Filling: Top filling
Airflow: Bottom airflow
Airflow Pin: 0.8mm, 1.0mm, 1.3mm, 1.6mm, 2.0mm, 2.5mm
Coil Rebuildable: Single coil
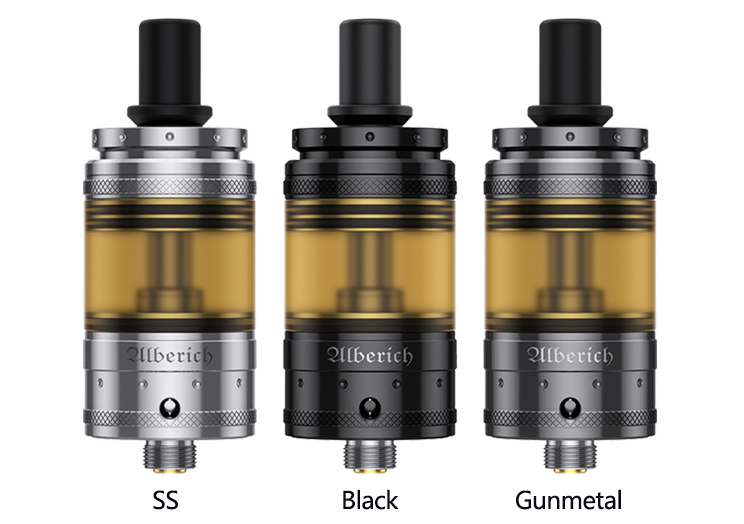
Color: SS, Black, Gunmetal

FEATURES:
INITIAL THOUGHTS:
The packaging for the Alberich is nice and similar to other Vapefly devices that I’ve reviewed before. The brown parchment affect that they use reminds me of an old scroll or document. The front of the box has a nice color picture of the tank along with a sticker indicating the color of the tank inside the box.
The back side of the box has a list of features along with social media information, Vapefly company information, and an authenticity code. I may have not noticed this before but it also has a warning on the bottom left corner to keep away from children. We always want to keep vaping equipment away from the hands of a child.


Once the outer sleeve and box top are removed then the tank, spare glass, chimney extender and a card explaining that you have gotten 50 promotional points. Underneath the foam insert that holds the tank is found the user manual, warranty card, accessory bag, and a second bag containing two coils and two cotton threads.

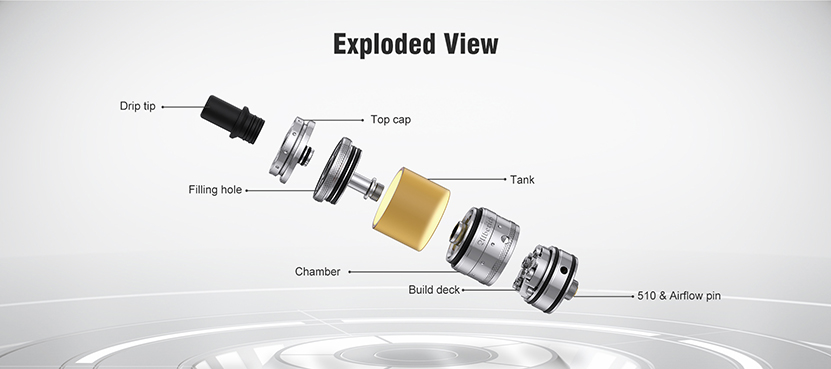
The Alberich is designed to be an MTL tank. The drip tip is a fairly restricted 510 tip but it is standard so you can replace it with one of your favorites if you like. After trying a few of my own, I went back to the one that came with the tank. It seems comfortable to use. I did take the tank completely apart to clean it before use and when I reassembled it I traded the 3ml PEI tank section for the 4ml glass tank section. I just prefer glass and honestly was surprised to see the tank ship with a PEI section. When you switch to the 4ml glass tank section then it is necessary to install the chimney extender that I mentioned briefly earlier. This threads onto the chimney. The threads on mine were very smooth.
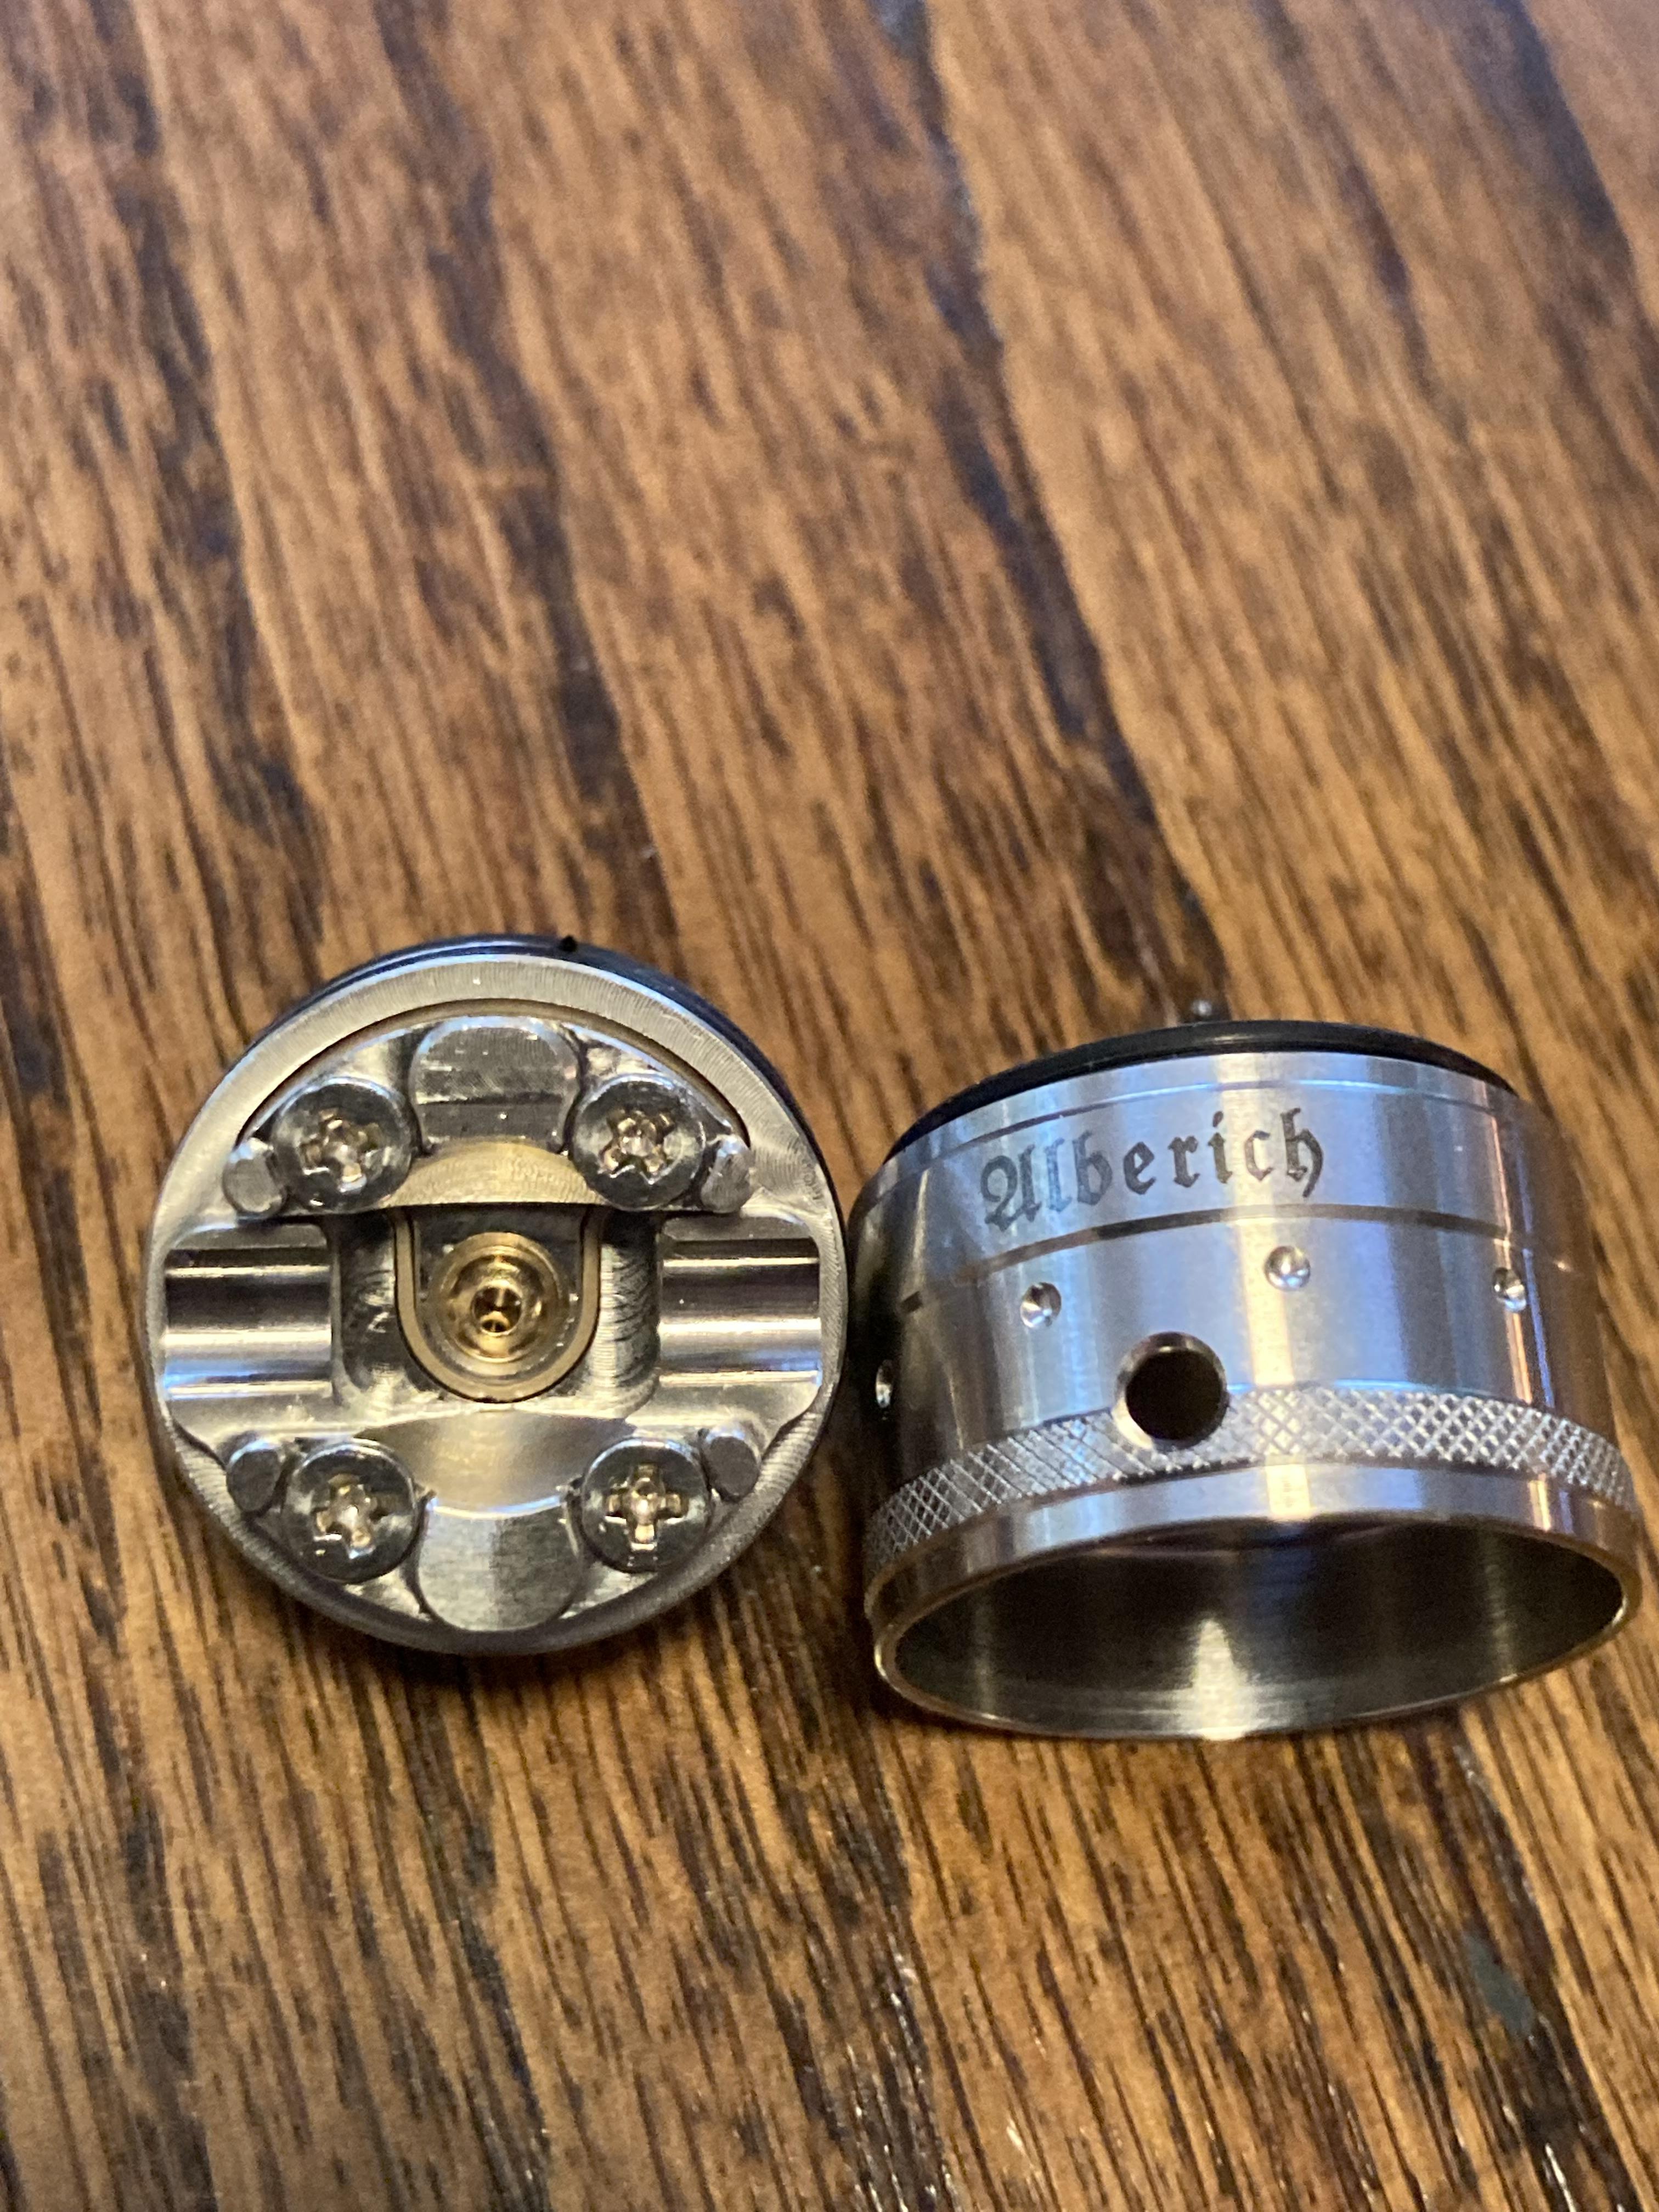
Some might think this is comical but having not seen this tank before and I hadn’t watched a video or anything, I had a little trouble taking it apart the first time. I didn’t realize at first that the outer chamber that goes over the deck and has the Alberich name on it pulled off instead of threaded off. I sat for a couple minutes trying to unthread the chamber with no success. I should have just read the user manual first.
You can see in the picture below that the top cap has two o rings on the underside to seal things up. The build deck also has two o rings that secure the outer chamber to the deck.

The first picture below is the chimney extender and the second picture shows the extender installed on the chimney which is required to use the longer 4ml glass section.


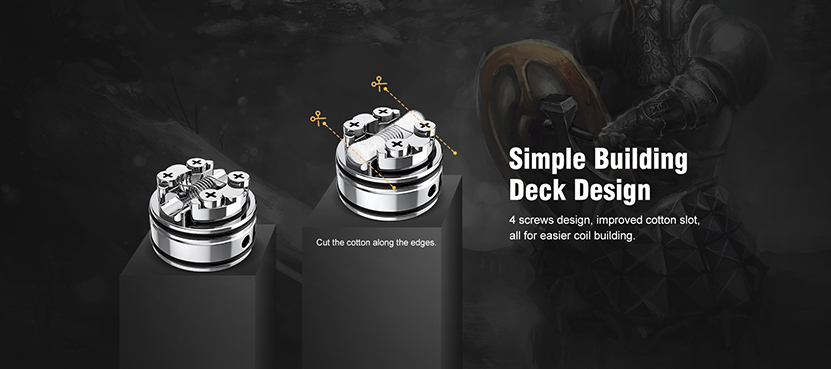
The build deck for the Alberich has four post screws so you can install a coil no matter which way it is wound. There is what I would call a wire stop beside each screw so you can slide the coil leg in and tighten it down without the wire slipping out. Some of you might remember some of the old build decks where you had to wrap the wire around the screw and it still tried to slip out. How spoiled are we with these new designs?
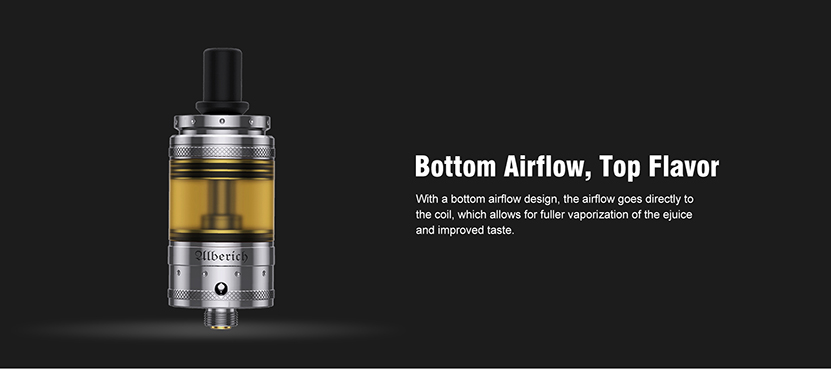
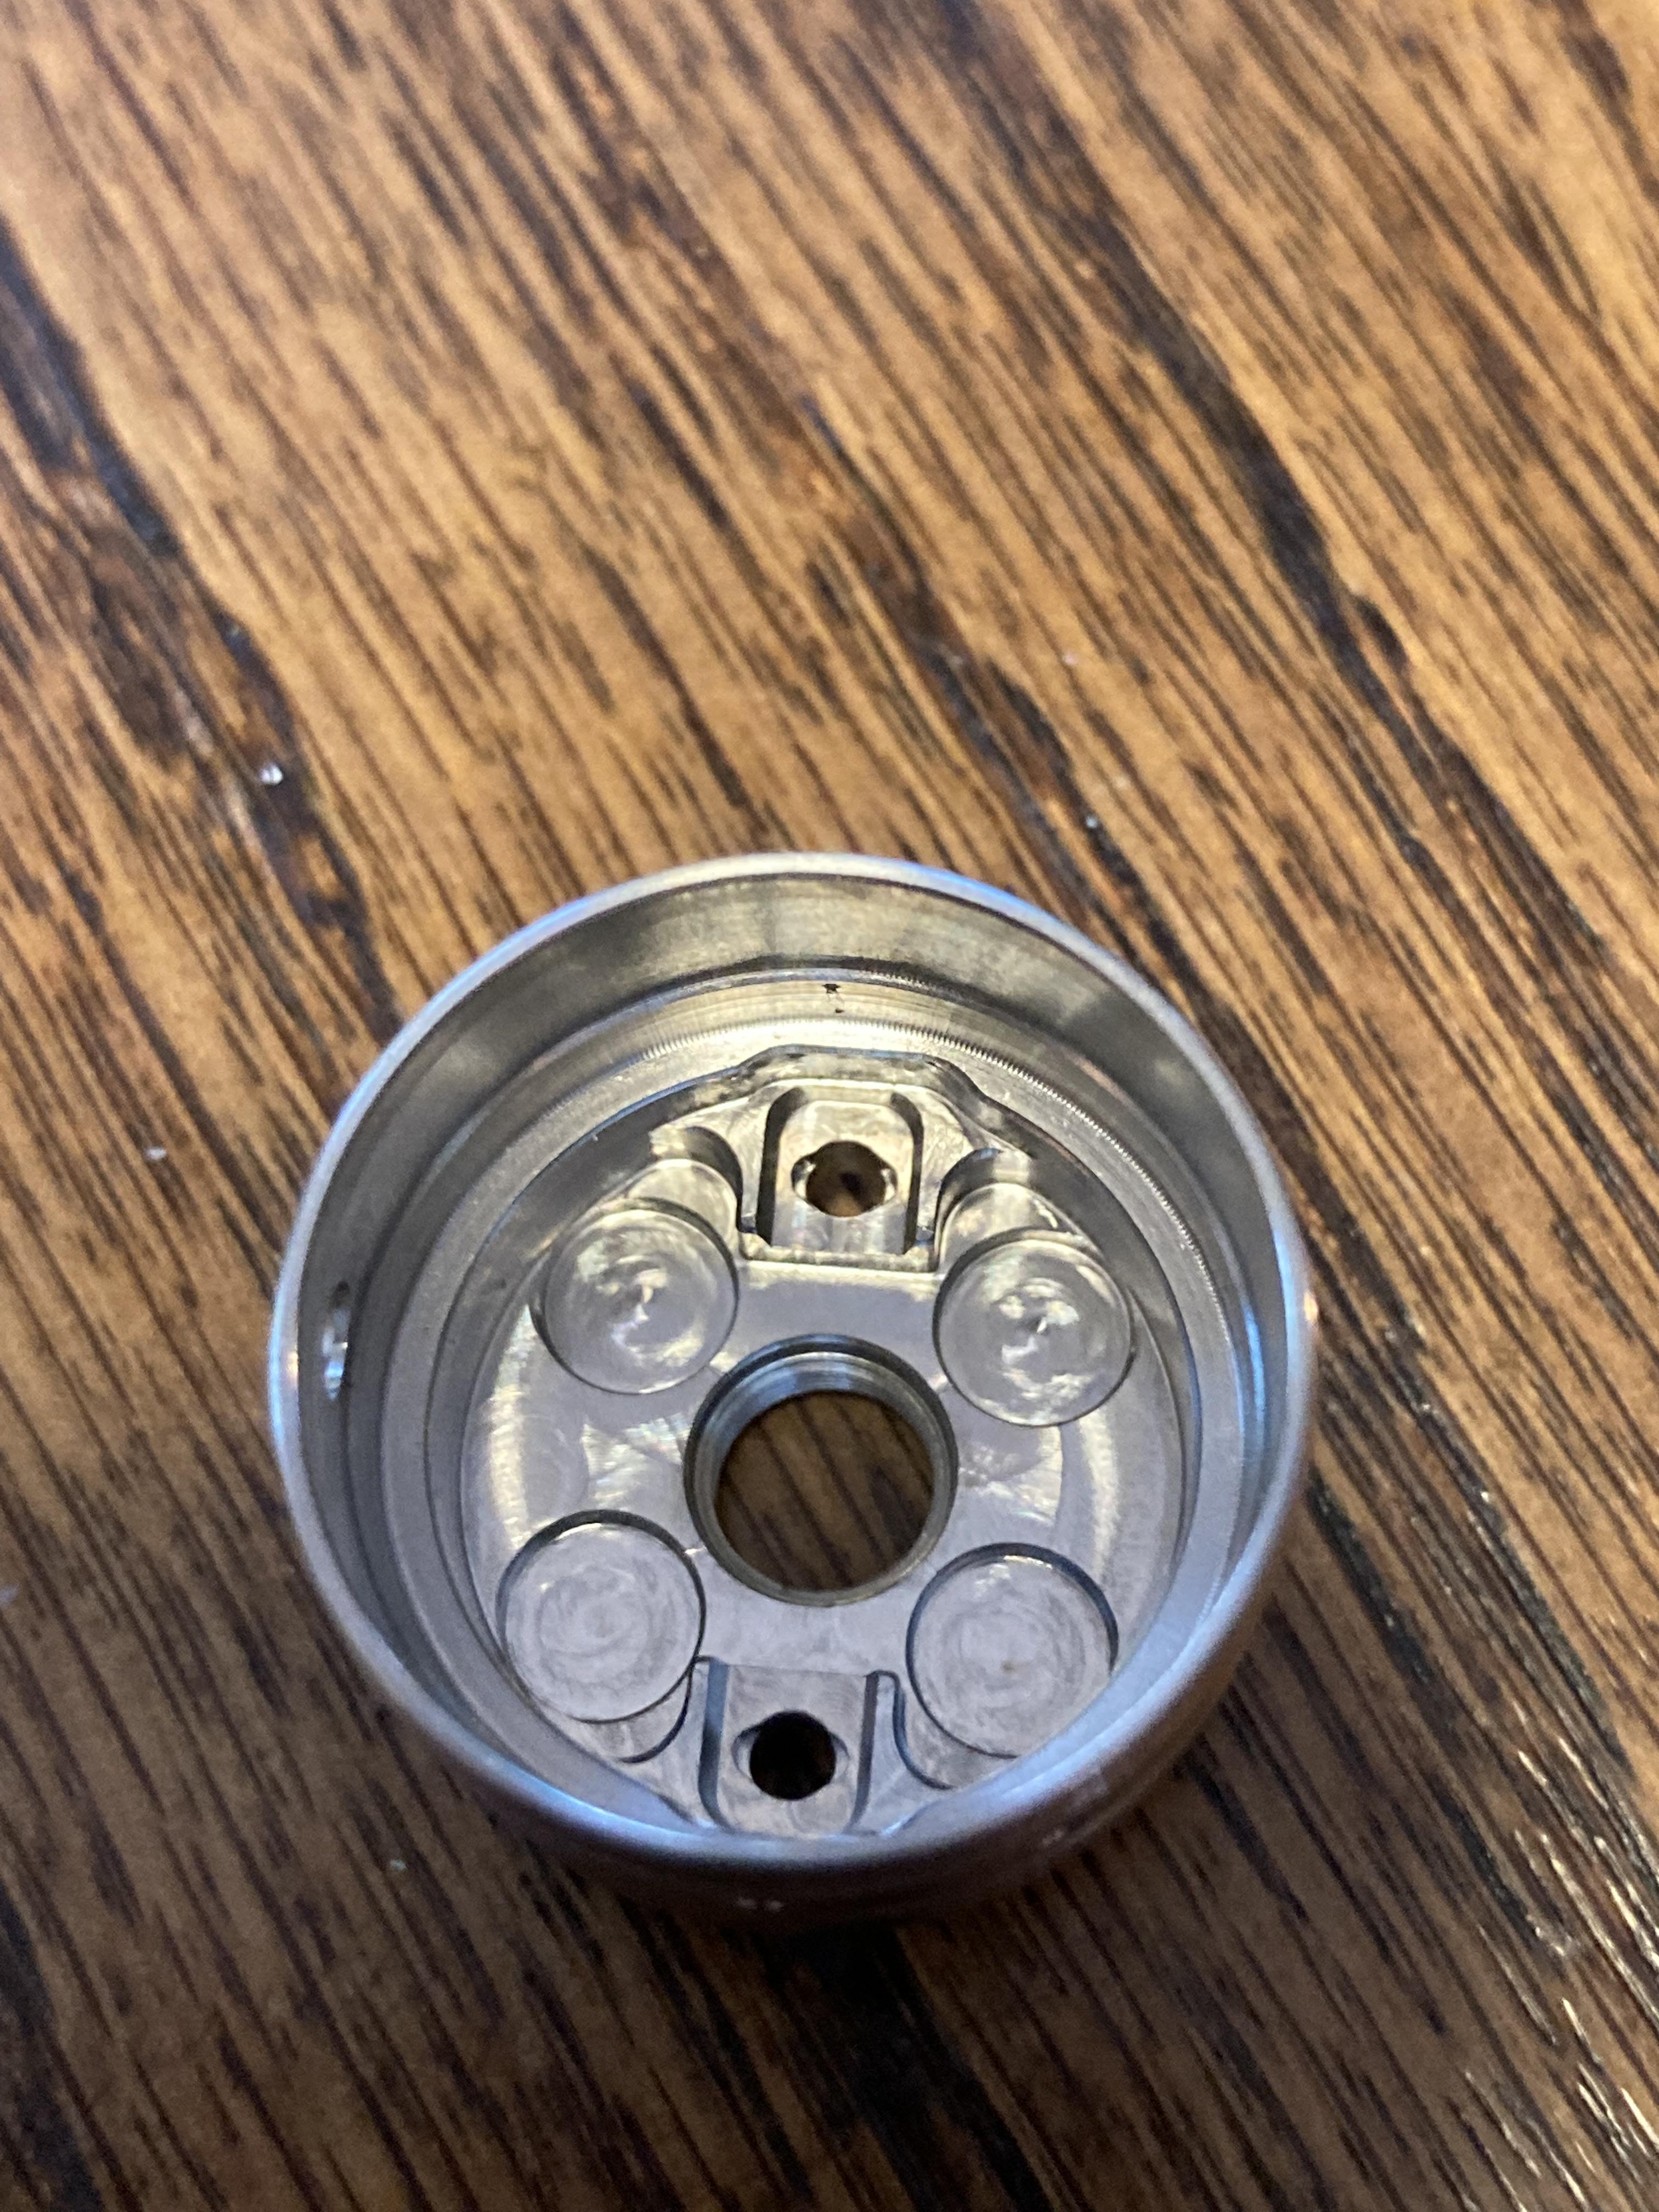
The Alberich is a bottom airflow design. The airflow comes in through the hole on the side and directly up over the coil to provide very good flavor production.

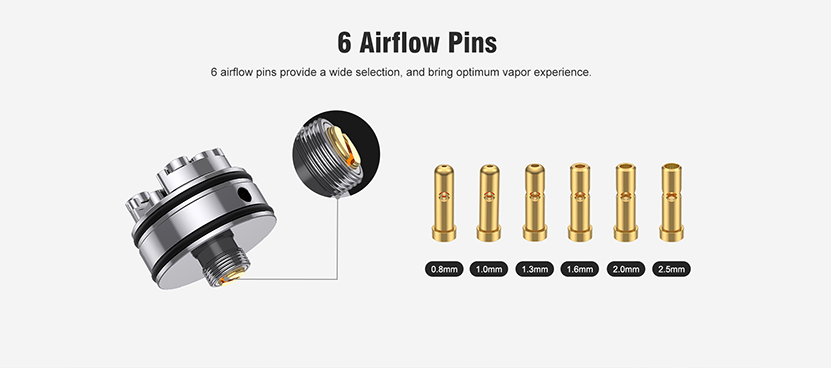
The Alberich has a single hole on the side of the deck to bring the airflow in. There are six different airflow pins included with the tank. This is how you adjust the airflow. Even though it kind of looks like there is, there is no exterior airflow adjustment. What you get with the pin you select is what you get and that’s it. When you remove the airflow pin, make sure to place the insulator that sits over it onto the new pin you are installing. On some tanks that come with airflow inserts that go in from the coil side, I will often not use any insert. That’s not an option since the airflow is built into the 510 pin. However, one advantage of this is I was able to remove the deck and change the airflow pin with a full tank and didn’t have to remove the coil. The sample I received came with the 1.3mm pin installed and it does provide a nice medium air MTL but I prefer a looser draw on MTL so switched it out for the 2.5mm pin. I really like it using this one.
Once the top cap is removed with a quarter turn, there are two nice size fill ports with gaskets covering them that help to keep from spilling. I personally am not a fan of these gaskets and they cause a mess normally if you fill with a glass dropper bottle.

I used one of the included coils and cotton threads to build the deck. I feel like the included accessories should be used so the average person knows what to expect upon receiving the tank. The two coils included are kanthal 2.5mm in diameter and rated at .8 ohms. On the mod I’ve been using it on the reading is coming in at .75. The included cotton threads seemed a little too big for this coil and I had to thin it out a bit before being able to pull it through the coil. Once the cotton was pulled through, I just trimmed it even with the edge of the deck. I gave it a light fluff and let it rip. It seemed like it took about half a tank to break in the wick. The way the deck is designed makes it easy to trim the coil legs flush. Also there is a little room after the ledge ends where the screws are mounted so if you did have a little bit of stick out then it would probably be alright but I always try to clip the legs as close as I can to the screw on a deck like this.

The liquid feed on the Alberich is a gravity feed system that reminds me of a boro tank rba that I have used before. The liquid feeds down through the two holes in the chamber right onto the wick that sits below. There are four round recesses cut into the inside of the chamber that align with the screw heads. You can actually turn the tank upside down and pull the deck with liquid in the tank. I did this to change the airflow pin and had zero leaking. That’s a nice feature. You could also rebuild with a new coil or just replace a wick without any spillage. Of course there is residual liquid on the wick and deck so keep a paper towel or rag handy to wipe it off.
FINAL THOUGHTS:
Although the Alberich comes with six airflow pins, I know from experience that I like a loose MTL draw. I did however go ahead and use the pre-installed 1.3mm pin for a couple days to get a feel for it. It wasn’t bad but not as loose as I like. I doubt I would ever use the pins included that are smaller. However, some like a really tight draw and they are included for those people. The 2.5mm pin was the perfect fit for MTL for me. I ended up running the included coil at 18 watts and did end up changing the drip tip to a less restrictive one once I changed the pin.
I ended up running the included coil at 18 watts with the 2.5mm pin and felt like I got very good flavor and generous vapor production for an MTL rta. During my past week and a half of use I have refilled the tank several times and have gotten no leaking or gurgling. I usually prefer a tank with an external airflow adjustment but this one works very well without it. I very much like that you can remove the deck to rebuild or change the airflow pin without emptying the tank. I really don’t have any cons to list on this one. It’s designed to be a solid MTL tank and it does it very well.
I’m sure you can guess the answer so I won’t ask the question. I will just say that if you are looking for a solid MTL tank and don’t mind not having an external airflow control then I would definitely recommend the Vapefly Alberich RTA. I’d like to thank Joyi and Sourcemore for sending the Vapefly Alberich MTL RTA for this review. I have a coupon code for you and a link if you’d like to try one out for yourself.
COUPON CODE: ALMR= $18.59
Vapefly Alberich MTL RTA 3ml/4ml Φ22mm Rebuildable Tank Atomizer (sourcemore.com)
WHAT’S IN THE BOX?
1* Vapefly Alberich MTL RTA
1* 4ml Glass Tube
1* Adapter
1* 0.8Ω KA1 Prebuilt Coil
2* Firebolt Cottons
5* Airflow Pins
4* Screws
O-rings
SPECIFICATIONS:
Diameter: Φ22mm
Drip Tip: 510
Capacity: 3ml/4ml
Filling: Top filling
Airflow: Bottom airflow
Airflow Pin: 0.8mm, 1.0mm, 1.3mm, 1.6mm, 2.0mm, 2.5mm
Coil Rebuildable: Single coil
Color: SS, Black, Gunmetal
FEATURES:
- 1. Φ22mm diameter, 510 drip tip
- 2. Specially designed for MTL vapers
- 3. Bottom airflow to bring excellent flavor
- 4. 6 airflow pins to optimize vapor experience
- 5. 3ml/4ml glass tube (sold separately) & 3ml/4ml PEI tube (included)
- 6. Top filling system, easy and convenient
INITIAL THOUGHTS:
The packaging for the Alberich is nice and similar to other Vapefly devices that I’ve reviewed before. The brown parchment affect that they use reminds me of an old scroll or document. The front of the box has a nice color picture of the tank along with a sticker indicating the color of the tank inside the box.
The back side of the box has a list of features along with social media information, Vapefly company information, and an authenticity code. I may have not noticed this before but it also has a warning on the bottom left corner to keep away from children. We always want to keep vaping equipment away from the hands of a child.
Once the outer sleeve and box top are removed then the tank, spare glass, chimney extender and a card explaining that you have gotten 50 promotional points. Underneath the foam insert that holds the tank is found the user manual, warranty card, accessory bag, and a second bag containing two coils and two cotton threads.
The Alberich is designed to be an MTL tank. The drip tip is a fairly restricted 510 tip but it is standard so you can replace it with one of your favorites if you like. After trying a few of my own, I went back to the one that came with the tank. It seems comfortable to use. I did take the tank completely apart to clean it before use and when I reassembled it I traded the 3ml PEI tank section for the 4ml glass tank section. I just prefer glass and honestly was surprised to see the tank ship with a PEI section. When you switch to the 4ml glass tank section then it is necessary to install the chimney extender that I mentioned briefly earlier. This threads onto the chimney. The threads on mine were very smooth.
Some might think this is comical but having not seen this tank before and I hadn’t watched a video or anything, I had a little trouble taking it apart the first time. I didn’t realize at first that the outer chamber that goes over the deck and has the Alberich name on it pulled off instead of threaded off. I sat for a couple minutes trying to unthread the chamber with no success. I should have just read the user manual first.
You can see in the picture below that the top cap has two o rings on the underside to seal things up. The build deck also has two o rings that secure the outer chamber to the deck.
The first picture below is the chimney extender and the second picture shows the extender installed on the chimney which is required to use the longer 4ml glass section.
The build deck for the Alberich has four post screws so you can install a coil no matter which way it is wound. There is what I would call a wire stop beside each screw so you can slide the coil leg in and tighten it down without the wire slipping out. Some of you might remember some of the old build decks where you had to wrap the wire around the screw and it still tried to slip out. How spoiled are we with these new designs?
The Alberich is a bottom airflow design. The airflow comes in through the hole on the side and directly up over the coil to provide very good flavor production.
The Alberich has a single hole on the side of the deck to bring the airflow in. There are six different airflow pins included with the tank. This is how you adjust the airflow. Even though it kind of looks like there is, there is no exterior airflow adjustment. What you get with the pin you select is what you get and that’s it. When you remove the airflow pin, make sure to place the insulator that sits over it onto the new pin you are installing. On some tanks that come with airflow inserts that go in from the coil side, I will often not use any insert. That’s not an option since the airflow is built into the 510 pin. However, one advantage of this is I was able to remove the deck and change the airflow pin with a full tank and didn’t have to remove the coil. The sample I received came with the 1.3mm pin installed and it does provide a nice medium air MTL but I prefer a looser draw on MTL so switched it out for the 2.5mm pin. I really like it using this one.
Once the top cap is removed with a quarter turn, there are two nice size fill ports with gaskets covering them that help to keep from spilling. I personally am not a fan of these gaskets and they cause a mess normally if you fill with a glass dropper bottle.
I used one of the included coils and cotton threads to build the deck. I feel like the included accessories should be used so the average person knows what to expect upon receiving the tank. The two coils included are kanthal 2.5mm in diameter and rated at .8 ohms. On the mod I’ve been using it on the reading is coming in at .75. The included cotton threads seemed a little too big for this coil and I had to thin it out a bit before being able to pull it through the coil. Once the cotton was pulled through, I just trimmed it even with the edge of the deck. I gave it a light fluff and let it rip. It seemed like it took about half a tank to break in the wick. The way the deck is designed makes it easy to trim the coil legs flush. Also there is a little room after the ledge ends where the screws are mounted so if you did have a little bit of stick out then it would probably be alright but I always try to clip the legs as close as I can to the screw on a deck like this.
The liquid feed on the Alberich is a gravity feed system that reminds me of a boro tank rba that I have used before. The liquid feeds down through the two holes in the chamber right onto the wick that sits below. There are four round recesses cut into the inside of the chamber that align with the screw heads. You can actually turn the tank upside down and pull the deck with liquid in the tank. I did this to change the airflow pin and had zero leaking. That’s a nice feature. You could also rebuild with a new coil or just replace a wick without any spillage. Of course there is residual liquid on the wick and deck so keep a paper towel or rag handy to wipe it off.
FINAL THOUGHTS:
Although the Alberich comes with six airflow pins, I know from experience that I like a loose MTL draw. I did however go ahead and use the pre-installed 1.3mm pin for a couple days to get a feel for it. It wasn’t bad but not as loose as I like. I doubt I would ever use the pins included that are smaller. However, some like a really tight draw and they are included for those people. The 2.5mm pin was the perfect fit for MTL for me. I ended up running the included coil at 18 watts and did end up changing the drip tip to a less restrictive one once I changed the pin.
I ended up running the included coil at 18 watts with the 2.5mm pin and felt like I got very good flavor and generous vapor production for an MTL rta. During my past week and a half of use I have refilled the tank several times and have gotten no leaking or gurgling. I usually prefer a tank with an external airflow adjustment but this one works very well without it. I very much like that you can remove the deck to rebuild or change the airflow pin without emptying the tank. I really don’t have any cons to list on this one. It’s designed to be a solid MTL tank and it does it very well.
I’m sure you can guess the answer so I won’t ask the question. I will just say that if you are looking for a solid MTL tank and don’t mind not having an external airflow control then I would definitely recommend the Vapefly Alberich RTA. I’d like to thank Joyi and Sourcemore for sending the Vapefly Alberich MTL RTA for this review. I have a coupon code for you and a link if you’d like to try one out for yourself.
COUPON CODE: ALMR= $18.59
Vapefly Alberich MTL RTA 3ml/4ml Φ22mm Rebuildable Tank Atomizer (sourcemore.com)


