
Hello and welcome back for today's review of the Drag Q from Voopoo. The Drag Q is the latest evolution in the Drag series of devices. The Drag Q was sent to me from Voopoo for the purpose of my review. The Drag Q is one of 2 latest released devices from Voopoo with the other one being the Argus Pod that I also reviewed and feel is a big winner, if you missed it I'll leave a link for you to check it out. VOOPOO ARGUS POD REVIEWED BY BIGBOB2322. The Drag Q has some great features on it but how well do they function? That's what my review will find out, lets get started.
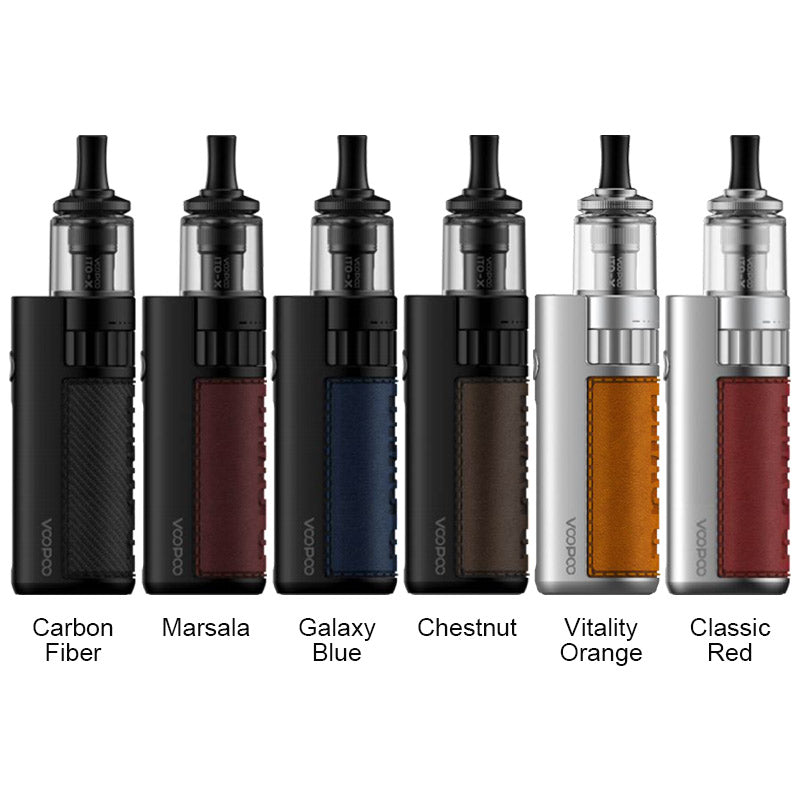
COLOR CHOICES
IN THE BOX
* 1pc VOOPOO Drag Q Device
* 1pc VOOPOO 3.5mL ITO-X Pod
* 1pc VOOPOO 0.5ohm ITO-M0 coils
* 1pc VOOPOO 1.2ohm ITO-M3 Coils
* 1pc Type-C Cable
* 1pc User Manual


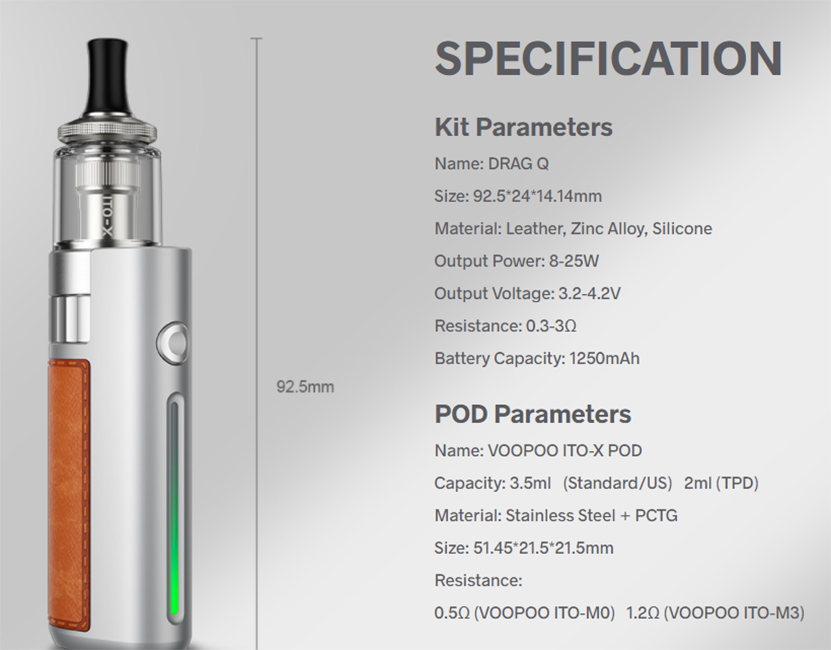
PARAMETERS AND SPECIFICATIONS
FEATURES
LARGE POD
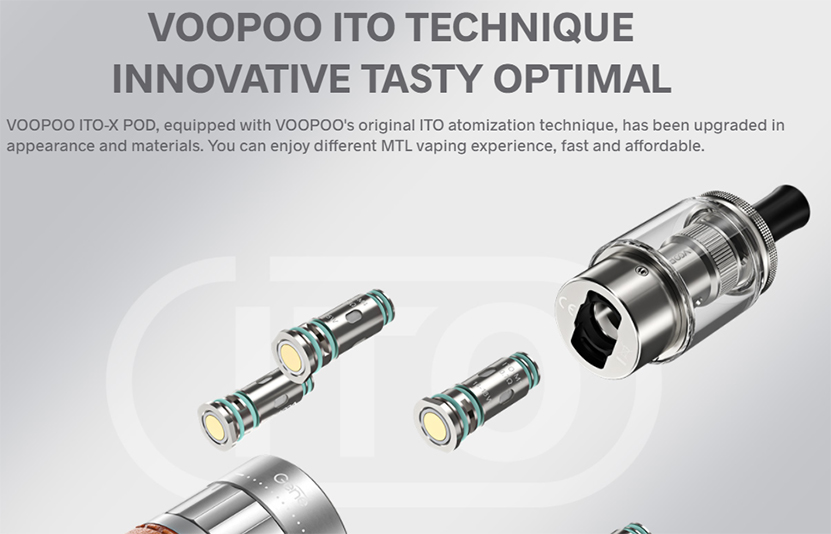
ITO COILS ( FEATURING AUTOMATION )


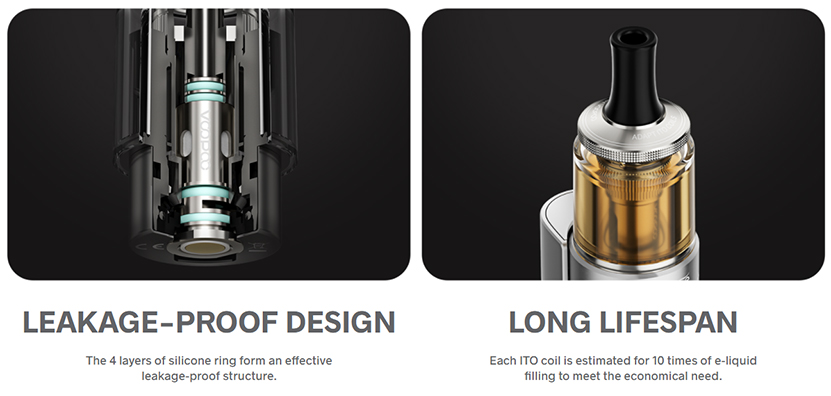
LEAKPROOF AND LONG COIL LONGEVITY
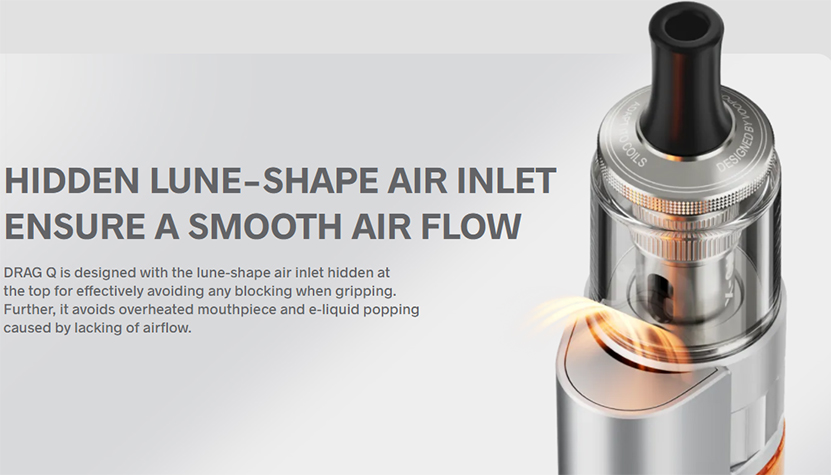
HIDDEN AIRFLOW INTAKE
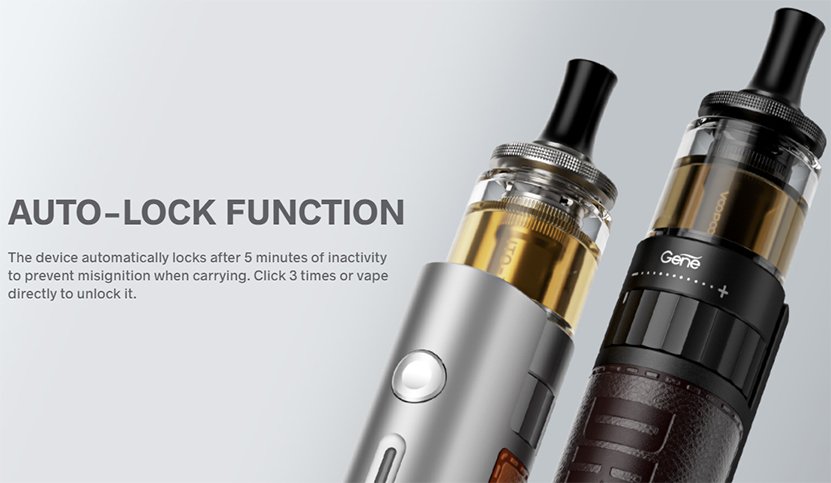
AUTO LOCK FUNCTION
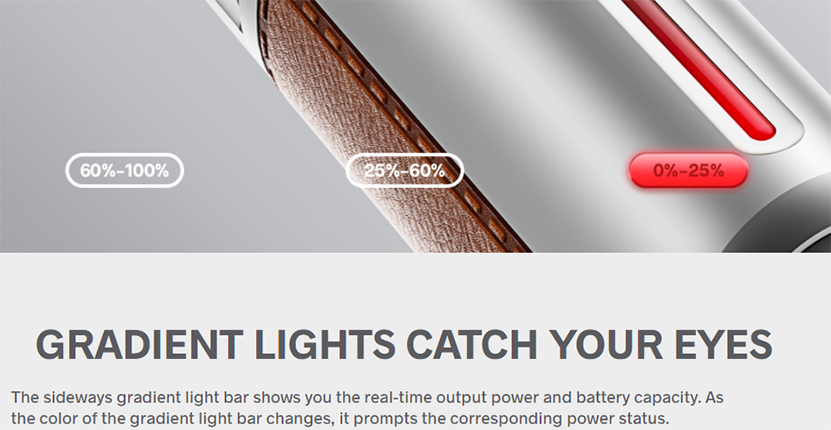
BATTERY STRENGTH METER FEATURING A GRADIENT LIGHT BAR
( GREEN - 60-100% ) - ( BLUE - 25-60% ) - ( RED - 0-25% )
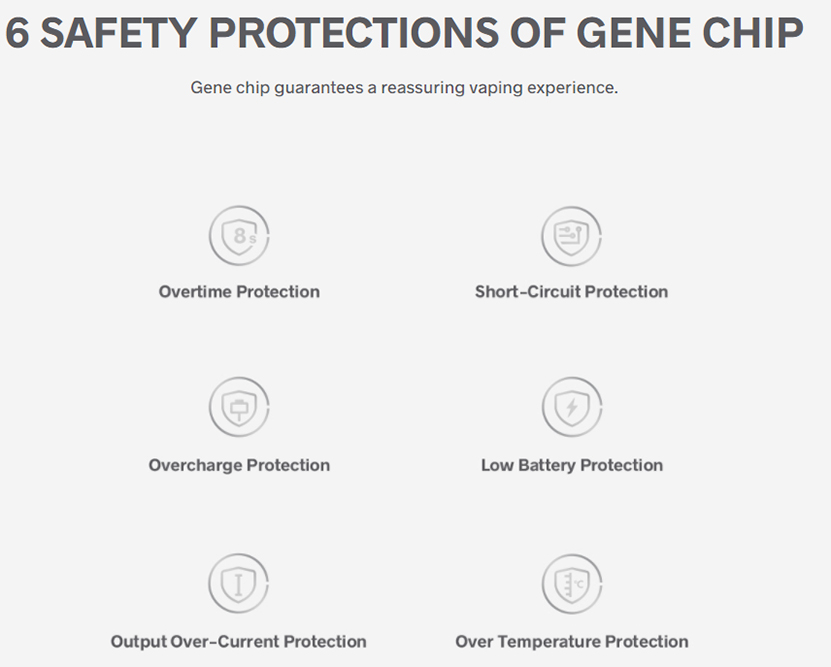
SIX SAFETY PROTECTIONS
FIRST IMPRESSIONS
Presentation for the Drag Q was nicely done, with the Drag Q and the ITO-X Pod housed in their own section with your 2 coils, charge cord, list of all Ito coils and your user manual in a Black rectangular box with JUST DRAG printed on it. I was sent a sample version so the final retail version may differ.
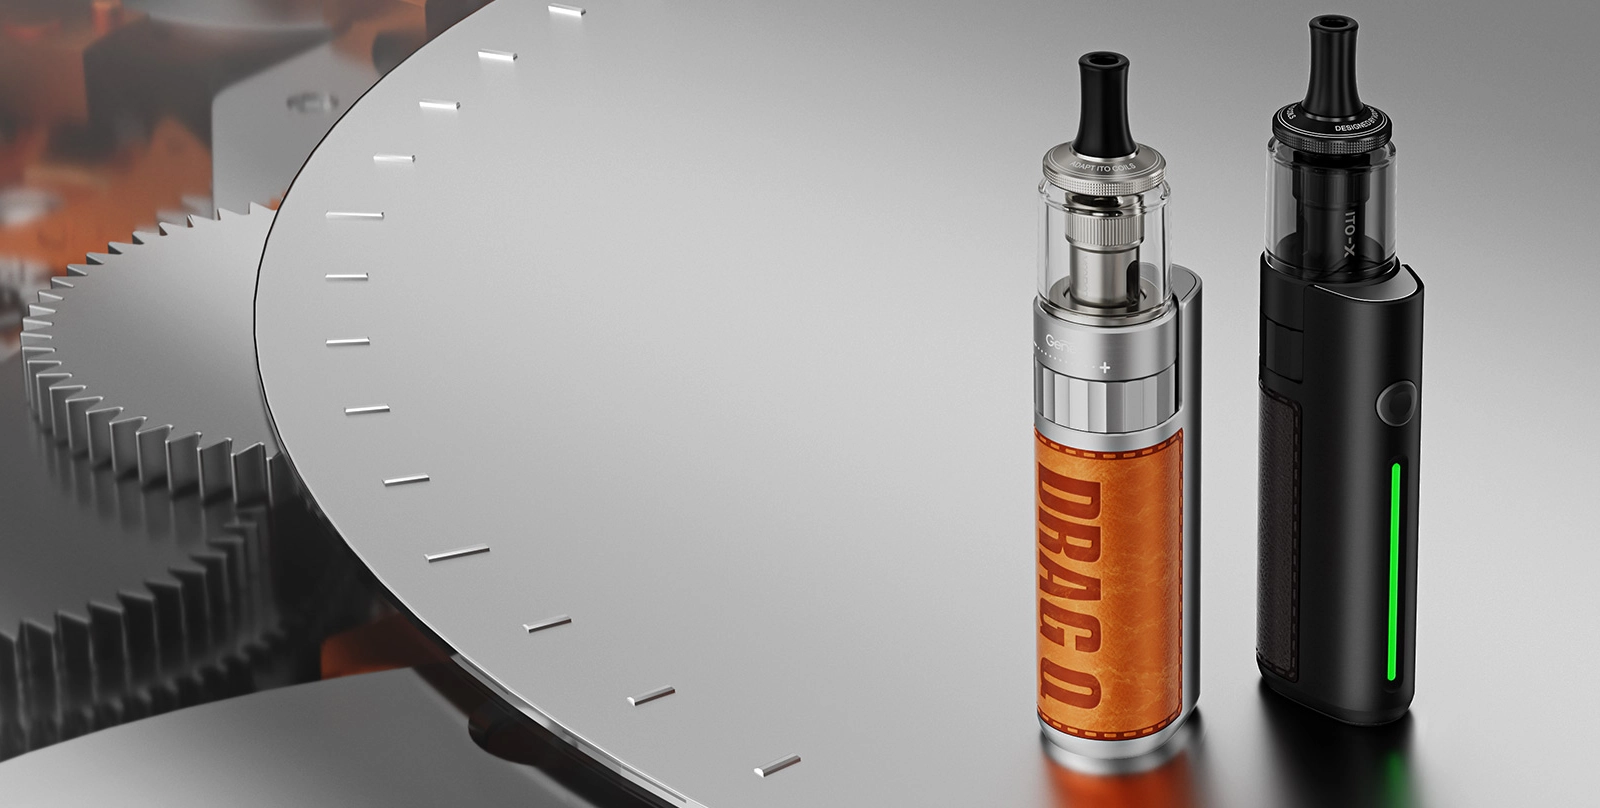
Right off the bat the Drag Q's Chestnut color caught my eye because the leather looks so deep and rich with color. Picking the device up I noticed how lightweight it is for it's size, and feeling of being solidly built.
Looking the device over the familiar look of the DRAG name being embossed on the leather spine is there. Looking at the front of the device I noticed there is no display screen only a button with a light bar underneath that is used as a color gradient battery meter that also illuminates when vaped showing the strength of the internal battery. The appearance is very clean and streamlined. At the top there's a adjustable wheel that is your airflow selector with what feels like a ball bearing movement when turned selecting your airflow.
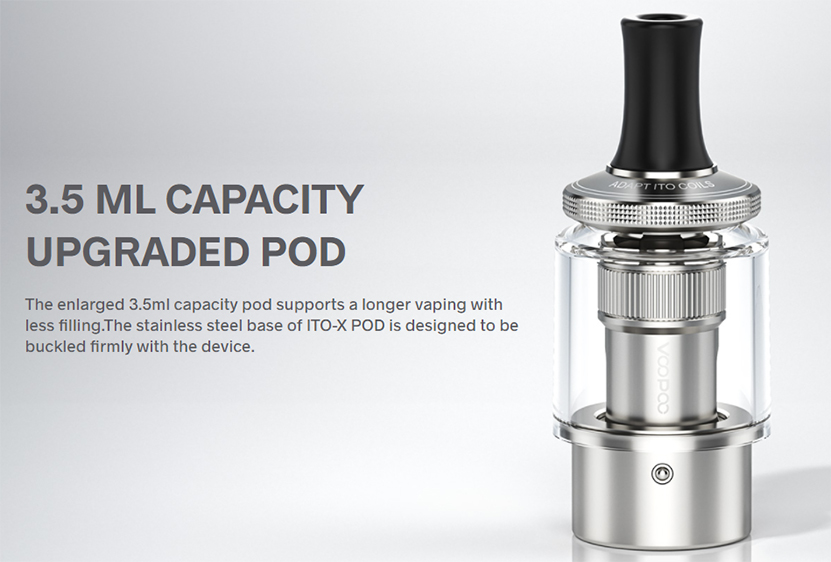
Above the Drag Q is the ITO-X Pod, pulling it out of it's housing I noticed ball bearings on the base of the Pod, 3 to be exact. The fist thing I checked was the drip tip and unfortunately it's a proprietary one that can't be swapped out for one of your own. I was happy to see no rubber plug to deal with because the ITO-X Pod is top fill utilizing a quarter turn opening top cap. It's pretty compact for having 3.5ml juice capacity.

Starting off with the ITO-X Pod, I've already told you about the drip tip being proprietary which is alright and it functions fine but I prefer a shorter one on my MTL Tanks and Pods and wish the drip tip was swappable for one of my own. The ITO Coils are a push and pull type that load into the Pod through the bottom of the base, there are however flat spots on the coils that have to be lined up with the flat spots of the Pod on installation of the coil.


You can notice 1 of the 3 ball bearings on the base of the Pod in the above picture, because of these ball bearings being spring loaded using a pinball buckle design the Pod needs some force when connecting it to the Drag Q, the connected to the Pod is a very secure one that also requires some force removing it from the device.
Because this Pod is as large as it is with a capacity of 3.5mls of juice I think it should really be called a Tank instead of a Pod.
Having top fill that requires just a quarter turn to open is a great feature instead of having to deal with a rubber plug. When replacing the top cap you will need to push down on it once it's lined up with the Tank/Pod to screw it back on, the top cap has very aggressive knurling that helps screwing it on/off.
There is a membrane covering the entire top opening of the Tank/Pod with 2 tiny holes, one of these holes is your fill port which has a image of 2 liquid droplets. These holes are very tiny and I didn't think a 100ml bottle tip would fit but when inserted the membrane opens up with no problem.

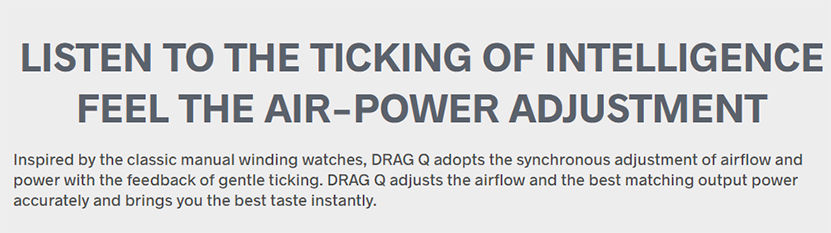
The Drag Q features fully adjustable airflow on device itself via a ball bearing Crown Wheel that lets you tailor your vape from a very tight to a loose MTL draw. It is possible to get a very nice RDL vape as well with the Wheel fully dialed to + symbol above the wheel.
The hidden lune shaped airflow inlet really puts out a very smooth vape at any setting dialed in on the Crown Wheel, however when the Wheel is in the fully open position the auto-draw requires a aggressive draw to function properly, choosing to vape it using the button in this airflow position it work great.
The auto-draw works flawlessly from the minimum airflow position that is marked with a - symbol above the Wheel all the way to 2 clicks from being fully open, there are 12 airflow positions on the Wheel to choose from. Bottom picture shows the Wheel dialed down in the fully closed position.

.jpg")
I think that Voopoo did a great job matching up the ITO-Pod with the Drag Q for a very clean and streamlined appearance, all branding is lightly printed on the Drag Q Kit except for the familiar bold DRAG Q embossed on the leather spine that not only looks great but also aides you when gripping the device. The Tank/Pod however has DESIGNED BY VOOPOO and ADAPT ITO COILS on the top cap in white lettering.

I normally don't care for a USB charge port being on the bottom but I am glad that Voopoo put the Drag Q charge port there because it keeps the lines of the device clean. There is silicone rubber in Gray surrounding the port which keeps it from scratching any surface when standing upright, it also keeps the Drag Q from sliding.

We now come to the Gradient Light Bar that acts as a battery meter showing 3 different colors indicating the strength of the internal 1250mAh battery. The 3 colors and there strengths of the battery are again listed below for you, the Gradient light bar is very bright and also activates when the Tank/Pod is placed in the Drag Q, button is pressed, auto-draw is activated, Wheel is adjusted and when charging the Drag Q.
When charging the Gradient Light Bar will pulsate in the color that the battery strength is at, then change colors as the battery strength gets stronger until at the full charge a Green solid light illuminates the Light Bar. Another thing I noticed about the Light Bar is it increases or decreases in brightness and amount of travel with each click adjustment going forward or back using the Wheel from bottom to top.
GREEN - ( 60-100% ) BLUE - ( 25-60% ) RED - ( 0-25% )

I think that Voopoo really upped their game with the their latest 2 released devices with the other being the Argus Pod. The new ITO Coils really produce fantastic flavor from such a small coil.
I think Voopoo gets the auto-draw done to near perfection on the Drag Q and we FINALLY don't have to wake the device up with pressing the fire button to wake the device up before being able to vape, there is a child safety lock that engages if the Drag Q is left idle for 5 minutes of longer requiring you to press the fire button 3 times to unlock it or bypass that with a simple inhale using the auto-draw. Having no display screen or the need for one because the vape is just about perfect without a screen of wattage adjustment.
My preference between the 2 Coils included in the kit is the ITO-MO 0.5Ω mesh for the simple fact of a slightly warmer vape, although your battery life on a single charge will be better using the ITO-M3 1.2Ω mesh Coil. Using the 0.5Ω Coil I got a little more than a tankful before needing a recharge. ( SIPPER OF JUICE NOT A GUZZLER ). In my opinion the Drag Q is a very attractive compact device with a perfectly matched Tank/Pod.

PROS
* Attractive
* Compact Size
* Fantastic Flavor
* Good Juice Capacity ( 3.5ml )
* Great Function Of The Auto-Draw
* Top Fill
* Quarter Turn Opening Top Cap
* Almost Seamless Airflow Selector Wheel
* 1250mAh Internal Battery
* Battery Meter Using Gradient Light Bar
* Sleek Design
* Type-C
CONS
* Proprietary Drip Tip
I would like to thank Alice and Voopoo for providing the Drag Q Kit for review a I hope all your questions regarding the Drag Q were answered in my review of it. This compact device using the new ITO Coils is a big time WINNER for sure and I recommend it 100%.
THANK YOU
BIGBOB2322
COLOR CHOICES
IN THE BOX
* 1pc VOOPOO Drag Q Device
* 1pc VOOPOO 3.5mL ITO-X Pod
* 1pc VOOPOO 0.5ohm ITO-M0 coils
* 1pc VOOPOO 1.2ohm ITO-M3 Coils
* 1pc Type-C Cable
* 1pc User Manual
PARAMETERS AND SPECIFICATIONS
FEATURES
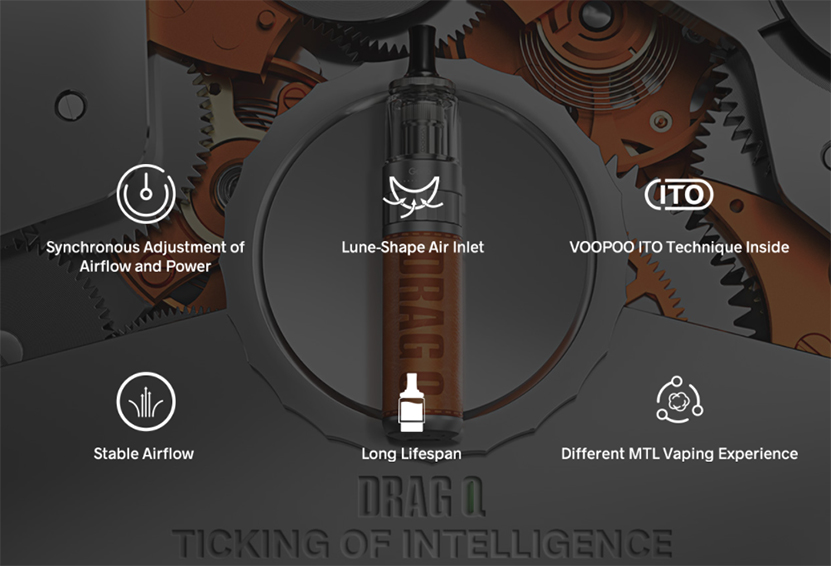
- 1. Synchronous adjustment of airflow and power
- 2. Lune-Shape air inlet
- 3. VOOPOO ITO technique
- 4. Gradient light bar
- 5. Brings different MTL vaping experience
- 6. 2A type-c charging
- 7. Stable airflow inside
- 8. ITO-MO 0.5ohm coil comes with a RDL vaping experience
- 9. Leakage-proof design, long lifespan
- 10. Automatically locks after 5 minutes of inactivity
- 11. Compatible with all ITO coils: M0, M1, M2, M3.
- 12. Safety protection: Overtime/Short-circuit/Overcharge/Low Battery/Output Over-current/Over Temperature Protection
LARGE POD
ITO COILS ( FEATURING AUTOMATION )
LEAKPROOF AND LONG COIL LONGEVITY
HIDDEN AIRFLOW INTAKE
AUTO LOCK FUNCTION
BATTERY STRENGTH METER FEATURING A GRADIENT LIGHT BAR
( GREEN - 60-100% ) - ( BLUE - 25-60% ) - ( RED - 0-25% )
SIX SAFETY PROTECTIONS
FIRST IMPRESSIONS
Presentation for the Drag Q was nicely done, with the Drag Q and the ITO-X Pod housed in their own section with your 2 coils, charge cord, list of all Ito coils and your user manual in a Black rectangular box with JUST DRAG printed on it. I was sent a sample version so the final retail version may differ.
Right off the bat the Drag Q's Chestnut color caught my eye because the leather looks so deep and rich with color. Picking the device up I noticed how lightweight it is for it's size, and feeling of being solidly built.
Looking the device over the familiar look of the DRAG name being embossed on the leather spine is there. Looking at the front of the device I noticed there is no display screen only a button with a light bar underneath that is used as a color gradient battery meter that also illuminates when vaped showing the strength of the internal battery. The appearance is very clean and streamlined. At the top there's a adjustable wheel that is your airflow selector with what feels like a ball bearing movement when turned selecting your airflow.
Above the Drag Q is the ITO-X Pod, pulling it out of it's housing I noticed ball bearings on the base of the Pod, 3 to be exact. The fist thing I checked was the drip tip and unfortunately it's a proprietary one that can't be swapped out for one of your own. I was happy to see no rubber plug to deal with because the ITO-X Pod is top fill utilizing a quarter turn opening top cap. It's pretty compact for having 3.5ml juice capacity.
Starting off with the ITO-X Pod, I've already told you about the drip tip being proprietary which is alright and it functions fine but I prefer a shorter one on my MTL Tanks and Pods and wish the drip tip was swappable for one of my own. The ITO Coils are a push and pull type that load into the Pod through the bottom of the base, there are however flat spots on the coils that have to be lined up with the flat spots of the Pod on installation of the coil.
You can notice 1 of the 3 ball bearings on the base of the Pod in the above picture, because of these ball bearings being spring loaded using a pinball buckle design the Pod needs some force when connecting it to the Drag Q, the connected to the Pod is a very secure one that also requires some force removing it from the device.
Because this Pod is as large as it is with a capacity of 3.5mls of juice I think it should really be called a Tank instead of a Pod.
Having top fill that requires just a quarter turn to open is a great feature instead of having to deal with a rubber plug. When replacing the top cap you will need to push down on it once it's lined up with the Tank/Pod to screw it back on, the top cap has very aggressive knurling that helps screwing it on/off.
There is a membrane covering the entire top opening of the Tank/Pod with 2 tiny holes, one of these holes is your fill port which has a image of 2 liquid droplets. These holes are very tiny and I didn't think a 100ml bottle tip would fit but when inserted the membrane opens up with no problem.
The Drag Q features fully adjustable airflow on device itself via a ball bearing Crown Wheel that lets you tailor your vape from a very tight to a loose MTL draw. It is possible to get a very nice RDL vape as well with the Wheel fully dialed to + symbol above the wheel.
The hidden lune shaped airflow inlet really puts out a very smooth vape at any setting dialed in on the Crown Wheel, however when the Wheel is in the fully open position the auto-draw requires a aggressive draw to function properly, choosing to vape it using the button in this airflow position it work great.
The auto-draw works flawlessly from the minimum airflow position that is marked with a - symbol above the Wheel all the way to 2 clicks from being fully open, there are 12 airflow positions on the Wheel to choose from. Bottom picture shows the Wheel dialed down in the fully closed position.
I think that Voopoo did a great job matching up the ITO-Pod with the Drag Q for a very clean and streamlined appearance, all branding is lightly printed on the Drag Q Kit except for the familiar bold DRAG Q embossed on the leather spine that not only looks great but also aides you when gripping the device. The Tank/Pod however has DESIGNED BY VOOPOO and ADAPT ITO COILS on the top cap in white lettering.
I normally don't care for a USB charge port being on the bottom but I am glad that Voopoo put the Drag Q charge port there because it keeps the lines of the device clean. There is silicone rubber in Gray surrounding the port which keeps it from scratching any surface when standing upright, it also keeps the Drag Q from sliding.
We now come to the Gradient Light Bar that acts as a battery meter showing 3 different colors indicating the strength of the internal 1250mAh battery. The 3 colors and there strengths of the battery are again listed below for you, the Gradient light bar is very bright and also activates when the Tank/Pod is placed in the Drag Q, button is pressed, auto-draw is activated, Wheel is adjusted and when charging the Drag Q.
When charging the Gradient Light Bar will pulsate in the color that the battery strength is at, then change colors as the battery strength gets stronger until at the full charge a Green solid light illuminates the Light Bar. Another thing I noticed about the Light Bar is it increases or decreases in brightness and amount of travel with each click adjustment going forward or back using the Wheel from bottom to top.
GREEN - ( 60-100% ) BLUE - ( 25-60% ) RED - ( 0-25% )
I think that Voopoo really upped their game with the their latest 2 released devices with the other being the Argus Pod. The new ITO Coils really produce fantastic flavor from such a small coil.
I think Voopoo gets the auto-draw done to near perfection on the Drag Q and we FINALLY don't have to wake the device up with pressing the fire button to wake the device up before being able to vape, there is a child safety lock that engages if the Drag Q is left idle for 5 minutes of longer requiring you to press the fire button 3 times to unlock it or bypass that with a simple inhale using the auto-draw. Having no display screen or the need for one because the vape is just about perfect without a screen of wattage adjustment.
My preference between the 2 Coils included in the kit is the ITO-MO 0.5Ω mesh for the simple fact of a slightly warmer vape, although your battery life on a single charge will be better using the ITO-M3 1.2Ω mesh Coil. Using the 0.5Ω Coil I got a little more than a tankful before needing a recharge. ( SIPPER OF JUICE NOT A GUZZLER ). In my opinion the Drag Q is a very attractive compact device with a perfectly matched Tank/Pod.
PROS
* Attractive
* Compact Size
* Fantastic Flavor
* Good Juice Capacity ( 3.5ml )
* Great Function Of The Auto-Draw
* Top Fill
* Quarter Turn Opening Top Cap
* Almost Seamless Airflow Selector Wheel
* 1250mAh Internal Battery
* Battery Meter Using Gradient Light Bar
* Sleek Design
* Type-C
CONS
* Proprietary Drip Tip
I would like to thank Alice and Voopoo for providing the Drag Q Kit for review a I hope all your questions regarding the Drag Q were answered in my review of it. This compact device using the new ITO Coils is a big time WINNER for sure and I recommend it 100%.
THANK YOU
BIGBOB2322
