I'm a sucker for a good looking mod, and seeing the above discounted by 50% was hard to resist. First impressions were overall positive, an attractive zinc alloy and resin mod with a thoroughbred dna chipset that was well balanced in the hand using either a single 18650 or 22700 cell. The fire button lighting up was a bonus, but seemed superfluous as this would be covered by your thumb 99% of the time. This feature is useful when charging in situ, the red glow gently pulsing rather than showing a plethora of colour in normal use.
My first reservation was the overall finish. Despite being brand new in the original packing, there was a slight scratch on the paint next to one of the 4 main body screws. Not the end of the world, but a hint as to what was to be discovered later. The side decals were quite sharp and unfinished as well, not so sharp as to cut flesh, but ragged enough to catch any fluff from a pocket or lint from a cleaning cloth. The battery cover was extremely tight, and I just managed to unscrew it without having to resort to inserting a pair of needle nosed pliers into the 2 vents holes to turn it. After cleaning the threads on the body and the cover it was much better fit but still very tight.
The size in length between an 18650 and a 22700 is accommodated with a removable plastic insert and adjusting the base screw on the battery door to take up the slack on the shorter cell. Again, this wasn't very well engineered, to get sufficient contact with my flat top 18650 I had to insert the screw just enough from the "wrong" side and manually tighten the cover until it made contact with the battery. Tightening the cover up manually to where I thought the end of travel was, and then adjusting the screw with a flat bladed screwdriver only resulted in the screw rattling around in the bottom of the mod. Thankfully, the base plate was connected to the negative of the battery casing, otherwise a serious short would have occurred. Saying that, if you put the battery in the wrong way ...
In use, the dna chipset was intuitive and easy to navigate. To get the most out of it, especially in TC mode, you really need the Escribe software. This is available for Windows, Mac and Linux, and the Beta version I downloaded worked perfectly with my stock Ubuntu install. This solved one problem I had under TC with this mod, in that even at 26W/220C, I could get the coil legs to mysteriously to glow and enter dry-hit hell. This was traced to a vicious pre-heat of 75W, once I had set that to a reasonable level, TC was a lot happier.
After about a weeks use I was a bit disappointed with battery life even with 22700's. I've put this down to the TC anomaly, and I hope this has cured the problem long term. In Wattage mode, the battery life seemed OK and I could get ~ 8 hours of it at around 32W. Then disaster struck. I noticed an annoying rattle at the weekend, and was torn between sending it back or performing some surgery. For the benefit of ECF I decided to take the latter path.
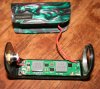
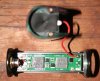
Tear down is straightforward, remove the battery cover, battery and atomiser and unscrew the 4 torx bolts. The U shaped resin side panel will then slide out from the metal frame. Holding the mod over a tray, I carefully did this as I wanted to know what foreign object was causing the rattle. Was it a stray piece of solder or worse? Sadly, it was the latter. I was concerned that a bit of solder rattling about could cause a short, but what I discovered was disappointing.
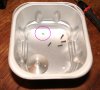
The first thing I noticed was the battery positive connection was loose where it attached to the main resin body. On closer inspection, this was a lollipop shaped piece of metal that rested in a cutout in the main body. It was then attached by 3 screws, which held it down via a small round plastic plate with 3 x 1mm columns to help with location and orientation. That was the theory, anyway. What I found in reality was 2 of the screws were loose, and the rattling was a small shard of resin which I found in the tray (highlighted). Tighten up the screws and job was done or so you would think. On trying to tighten up the screws I realised whatever thread they were meant to tighten on was now stripped, so further investigation was required. The third screw tightened fine, and it wasn't until I removed the plastic disk I discovered why. 2 out of the 3 screw holes had splintered, and only 1 1mm screw was holding the battery contact in place.
I was a bit surprised with this to say the least, but when I checked the side of the resin body, I was even more so. The 4 screws holding the case resin had brass inserts, whereas the most safety critical part of the device had no reinforcement. Granted, the screws were only 1mm or so in length, but why go to the trouble of reinforcing the case but not the battery contact assembly? To add insult to injury, the pip on the plastic disk did not locate in the undamaged hole as it was too narrow, so the insulation would not lay flat properly. Maybe the previously applied glue prevented this, it could be that the screws were meant to expand the columns of the disk to make a tight friction fit against the resin, but even then it is a very poor design. I wanted to solve a mystery though - why had the resin fractured? I hadn't dropped the mod, nor was I overzealous in tightening the battery up at any point. Where was the second piece of resin? Why had the loose battery connection not caused the mod to fail? Checking the space between the spring loaded 510 and the battery positive revealed another design issue - clearance. After reassembling the contact with liberal amounts of superglue to ensure the battery contact and screws stayed put, I added a piece of heat-resistant self-amalgamating tape (thickness 0.5mm) on top of the plastic disk, re-assembled and tested the device. I then took it apart again to see if any pressure had been placed on the tape. There was a clear indent where the base of 510 solder joint was pressing on the spongy tape. So another possible route for failure was revealed, apart from the obvious one that 2 out of the 3 screws were over tightened during manufacture. Extra long 510's on atty's could cause this mod to prematurely fail. More worrying though, the atomiser with a standard "short" 510 had effectively been holding the battery contact in place.
Admittedly, the lower part of the 510 has a white mastic applied to it, and the plastic disk seems robust enough. However, if the atomiser gets too hot, there is potential for the insulation to fail, and under those circumstances the battery will be connected directly across the coil. The only way to disable this "permanently on" scenario is to unscrew the battery cover or remove the atomiser, not something you want to entertain with flames shooting out the top from burning cotton.
I'm not sure where this leaves me concerning this mod. I really like it, and the DNA75 board is superb. It fits perfectly in my hand, and I even purchased a couple of extra 22700's to feed the beast. With the Nixon GR1 dripper, it is a great vape. As to how long it will last, especially taking into account the mechanical stress the wire on the bottom of the 510 will endure when changing atomisers, is another factor entirely. All mods suffer from this issue to a greater or lesser degree, as the bottom portion of the 510 has to move. Taking into account the lack of clearance, I suspect the GR1 was the only reason the mod didn't fail rather than the single solitary screw.
On that basis, I can't really recommend this mod to an inexperienced vaper.


My first reservation was the overall finish. Despite being brand new in the original packing, there was a slight scratch on the paint next to one of the 4 main body screws. Not the end of the world, but a hint as to what was to be discovered later. The side decals were quite sharp and unfinished as well, not so sharp as to cut flesh, but ragged enough to catch any fluff from a pocket or lint from a cleaning cloth. The battery cover was extremely tight, and I just managed to unscrew it without having to resort to inserting a pair of needle nosed pliers into the 2 vents holes to turn it. After cleaning the threads on the body and the cover it was much better fit but still very tight.
The size in length between an 18650 and a 22700 is accommodated with a removable plastic insert and adjusting the base screw on the battery door to take up the slack on the shorter cell. Again, this wasn't very well engineered, to get sufficient contact with my flat top 18650 I had to insert the screw just enough from the "wrong" side and manually tighten the cover until it made contact with the battery. Tightening the cover up manually to where I thought the end of travel was, and then adjusting the screw with a flat bladed screwdriver only resulted in the screw rattling around in the bottom of the mod. Thankfully, the base plate was connected to the negative of the battery casing, otherwise a serious short would have occurred. Saying that, if you put the battery in the wrong way ...
In use, the dna chipset was intuitive and easy to navigate. To get the most out of it, especially in TC mode, you really need the Escribe software. This is available for Windows, Mac and Linux, and the Beta version I downloaded worked perfectly with my stock Ubuntu install. This solved one problem I had under TC with this mod, in that even at 26W/220C, I could get the coil legs to mysteriously to glow and enter dry-hit hell. This was traced to a vicious pre-heat of 75W, once I had set that to a reasonable level, TC was a lot happier.
After about a weeks use I was a bit disappointed with battery life even with 22700's. I've put this down to the TC anomaly, and I hope this has cured the problem long term. In Wattage mode, the battery life seemed OK and I could get ~ 8 hours of it at around 32W. Then disaster struck. I noticed an annoying rattle at the weekend, and was torn between sending it back or performing some surgery. For the benefit of ECF I decided to take the latter path.
Tear down is straightforward, remove the battery cover, battery and atomiser and unscrew the 4 torx bolts. The U shaped resin side panel will then slide out from the metal frame. Holding the mod over a tray, I carefully did this as I wanted to know what foreign object was causing the rattle. Was it a stray piece of solder or worse? Sadly, it was the latter. I was concerned that a bit of solder rattling about could cause a short, but what I discovered was disappointing.
The first thing I noticed was the battery positive connection was loose where it attached to the main resin body. On closer inspection, this was a lollipop shaped piece of metal that rested in a cutout in the main body. It was then attached by 3 screws, which held it down via a small round plastic plate with 3 x 1mm columns to help with location and orientation. That was the theory, anyway. What I found in reality was 2 of the screws were loose, and the rattling was a small shard of resin which I found in the tray (highlighted). Tighten up the screws and job was done or so you would think. On trying to tighten up the screws I realised whatever thread they were meant to tighten on was now stripped, so further investigation was required. The third screw tightened fine, and it wasn't until I removed the plastic disk I discovered why. 2 out of the 3 screw holes had splintered, and only 1 1mm screw was holding the battery contact in place.
I was a bit surprised with this to say the least, but when I checked the side of the resin body, I was even more so. The 4 screws holding the case resin had brass inserts, whereas the most safety critical part of the device had no reinforcement. Granted, the screws were only 1mm or so in length, but why go to the trouble of reinforcing the case but not the battery contact assembly? To add insult to injury, the pip on the plastic disk did not locate in the undamaged hole as it was too narrow, so the insulation would not lay flat properly. Maybe the previously applied glue prevented this, it could be that the screws were meant to expand the columns of the disk to make a tight friction fit against the resin, but even then it is a very poor design. I wanted to solve a mystery though - why had the resin fractured? I hadn't dropped the mod, nor was I overzealous in tightening the battery up at any point. Where was the second piece of resin? Why had the loose battery connection not caused the mod to fail? Checking the space between the spring loaded 510 and the battery positive revealed another design issue - clearance. After reassembling the contact with liberal amounts of superglue to ensure the battery contact and screws stayed put, I added a piece of heat-resistant self-amalgamating tape (thickness 0.5mm) on top of the plastic disk, re-assembled and tested the device. I then took it apart again to see if any pressure had been placed on the tape. There was a clear indent where the base of 510 solder joint was pressing on the spongy tape. So another possible route for failure was revealed, apart from the obvious one that 2 out of the 3 screws were over tightened during manufacture. Extra long 510's on atty's could cause this mod to prematurely fail. More worrying though, the atomiser with a standard "short" 510 had effectively been holding the battery contact in place.
Admittedly, the lower part of the 510 has a white mastic applied to it, and the plastic disk seems robust enough. However, if the atomiser gets too hot, there is potential for the insulation to fail, and under those circumstances the battery will be connected directly across the coil. The only way to disable this "permanently on" scenario is to unscrew the battery cover or remove the atomiser, not something you want to entertain with flames shooting out the top from burning cotton.
I'm not sure where this leaves me concerning this mod. I really like it, and the DNA75 board is superb. It fits perfectly in my hand, and I even purchased a couple of extra 22700's to feed the beast. With the Nixon GR1 dripper, it is a great vape. As to how long it will last, especially taking into account the mechanical stress the wire on the bottom of the 510 will endure when changing atomisers, is another factor entirely. All mods suffer from this issue to a greater or lesser degree, as the bottom portion of the 510 has to move. Taking into account the lack of clearance, I suspect the GR1 was the only reason the mod didn't fail rather than the single solitary screw.
On that basis, I can't really recommend this mod to an inexperienced vaper.