Continued from Part-1...
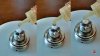
3(c) - Then just tuck both ends into the deck well.

Step-4: Test your build.
4(a) - Saturate the wicks.

4(b) - Check resistance once again (notice it remains the same).

4(c) - Vapor Test.

Step-5: Assemble the system.
5(a) - Fill the tank.

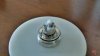
5(b) - Attach the deck base.

5(c) - Tighten the tank and base.

Step-6: Check final resistance once again (note: it still remains the same).

TAKE A vape")

BOTTOMLINE:
This is just another way to setup your nKFL. It is not a must to use it this way ~ the other builds that I've linked in Part-1 (which are perfect for novices) vape just as good. This one is for a slightly matured rebuilder ~ and gives an immense pleasure to work on as well as offers a warm and delicious vape.
Like I said, "the nKFL is a fantastic vape any which way you set-it-up". It is one perfect "no nonsense" RTA!
Happy vaping folks!
3(c) - Then just tuck both ends into the deck well.
Step-4: Test your build.
4(a) - Saturate the wicks.
4(b) - Check resistance once again (notice it remains the same).
4(c) - Vapor Test.
Step-5: Assemble the system.
5(a) - Fill the tank.
5(b) - Attach the deck base.
5(c) - Tighten the tank and base.
Step-6: Check final resistance once again (note: it still remains the same).
TAKE A vape
BOTTOMLINE:
This is just another way to setup your nKFL. It is not a must to use it this way ~ the other builds that I've linked in Part-1 (which are perfect for novices) vape just as good. This one is for a slightly matured rebuilder ~ and gives an immense pleasure to work on as well as offers a warm and delicious vape.
Like I said, "the nKFL is a fantastic vape any which way you set-it-up". It is one perfect "no nonsense" RTA!
Happy vaping folks!