
I purchased this device direct from sigelei while at the Oklahoma Vape Jam in August 2016. As always, this review is based on my experiences. These are just the ramblings of a random vaper. I’m just this guy, y’know… Your mileage may vary.
After the fiasco created by sigelei in their interactions with DJlsb over the Sigelei 213 and Sigelei Fuchai 213, one might ask why I even considered this device. The answer is simple… I was at a show, I had money, it’s kinda pretty, and I was curious. I might also mention that while at the same show I bought a Sigelei Fuchai 213 in orange just to match a tank with orange o-rings. Yeah… I am that far gone…

 The box is disappointingly simple. It’s a black box with red and white lettering. The only attempt at bling is the “218” done up in a metallic red. Of course, there are the requisite warnings on the sides, and the specs on the bottom. Inside, there is a manual with brief instructions in English, French, Russian, and Chinese, a leaflet on using the Sigelei Security Code, and the device itself. The device is, as with many other Sigelei devices, inserted in a very tight silicone sleeve. It’s nestled in a foam cutout. The foam, on top, has a bit of a red velveteen finish. That’s it. No USB cable. No extras. For a device at this price point (I paid $99, but I’ve seen it as low as $75), with as much hype as it’s getting, and with as much ground as Sigelei has to make up after the 213 debacle, I expected a bit more.
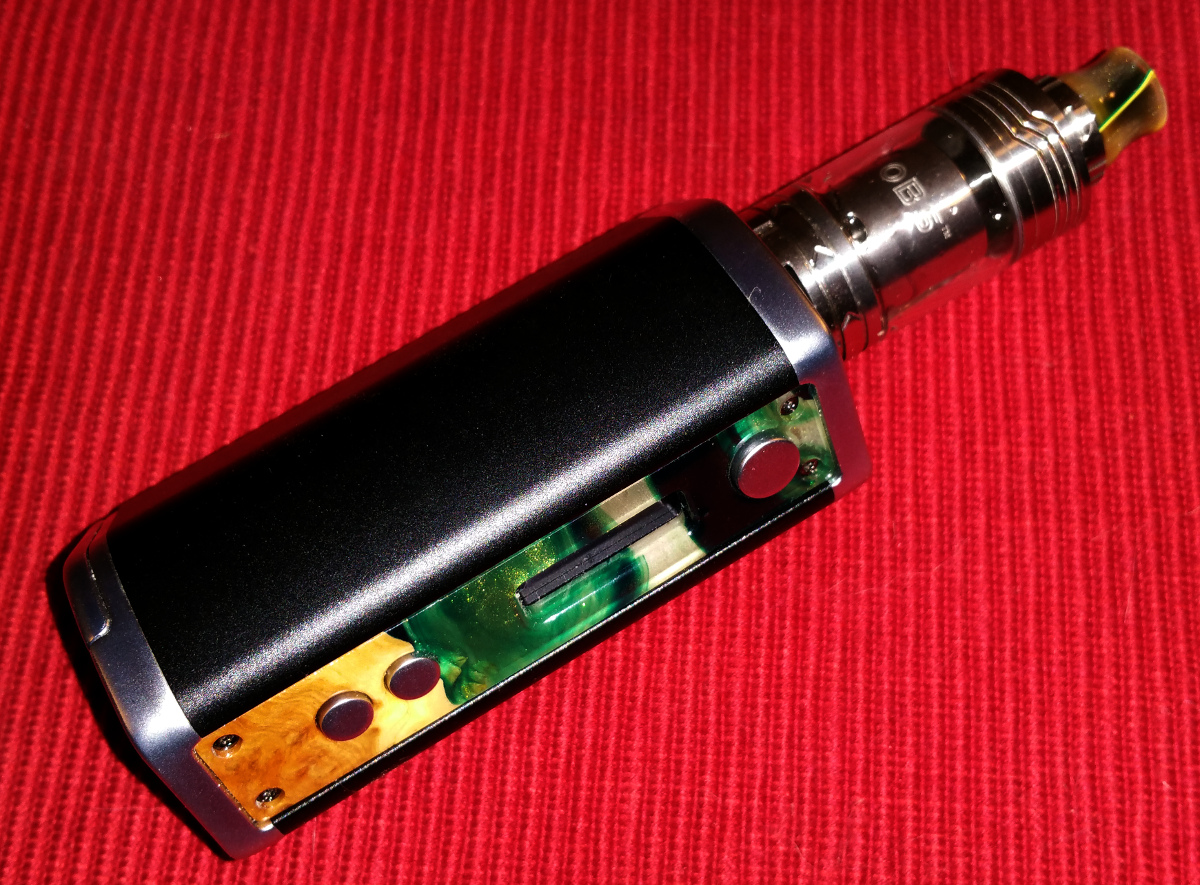
 Once removed from the sleeve - no small feat, I assure you - the device is pretty nice. Mine is black (more of a charcoal) with a brushed metal top and bottom, and the control interface inset in a small stick of stabwood. There is adequate venting along the back, and the venting is kinda cool looking, too. It’s a beveled cut through the anodized body with the silver showing around the edges. At top, the metal plate is interrupted by four screws, and an almost centered 510 connector. The 510 is stainless steel with a nice, stiff, spring-loaded, gold-plated center pin. The center pin is slotted, but DO NOT ADJUST IT as this can damage the 510. The majority of the body beneath the top plate is anodized aluminum with the previously mentioned beveled venting cuts. On the face, is a strip of stabwood with three matte finished metal buttons - one larger fire button above and two smaller adjustment buttons below the cutout for the screen. That stabwood strip is held in place by four small hex screws in the corners, and is replaceable. I selected a strip that was more stab and less wood because I liked the green, sparkly acrylic. I looked at several different strips while picking the mod, and while I do believe that this is stabwood (some have expressed doubts), it is mass produced and a little cheesy. Nice, but cheesy. Does that make sense? The screen is nice and bright and will display the battery level (single bar for all three batteries), the resistance, the wattage or voltage (depending on mode), the mode, and the temperature or wattage (again, depending on mode). Because it is set into the wide and so bright, I have had no issues reading it in even the brightest of light.
 The bottom of the device is another metal plate held in place by two visible screws and bisected in the middle with a hinge for the battery door. There is a set of shallow indentations that allow for the battery door to be opened. The hinge feels relatively sturdy, and inside the door there are slots for the three batteries. The contacts on the door itself are nicely marked so getting the polarity right shouldn’t be a problem. Two spring loaded pins complete the circuit. The door is held in place with a combination of the pressure from the pins, and a small tab and notch.
 The dimensions of the device, at its widest points, are 42.1 x 51.7 x 96.5 mm. With three 18650 batteries installed, it weighs in at 304 g. It’s bigger than the Reuleaux, but thanks to the aluminum body, lighter.
Overall, the fit and finish is just OK. The anodized body has a few places that do not perfectly match with the top and bottom plates. These are more felt than seen. I’ve had worse, but I’ve had worse, but I’ve also had MUCH better. For the near $100 mark, this should have been better.
Speaking of better, the board is better. Much better. Although it is basically the same board that is in the Sigelei 213 tweaked to now actually output 218 watts, the TCR and TFR now works (without using Sigelei math). I did hook the device up to a multimeter and I did get very close to 218 watts (about 6.97 volts on a .23 Ohm coil brought me up to 211 watts, pulling 30 Amps using LG HB6 batteries). Going by feel alone (I do have a temperature probe, now, but I’m learning its ins and outs), I am having a great TC vape in TCR mode on a dual SS coil build. I found the stock values to be on the cool side. With a 0.148 Ohm Ni200 build, I had to go to the 470-480F range to get a warmish vape. That’s not too bad, but could stand to be more accurate. Additional accuracy is not forthcoming, though. There is no USB port. There is no charging (fine for a three-battery device), and no forthcoming firmware upgrade. Ever…
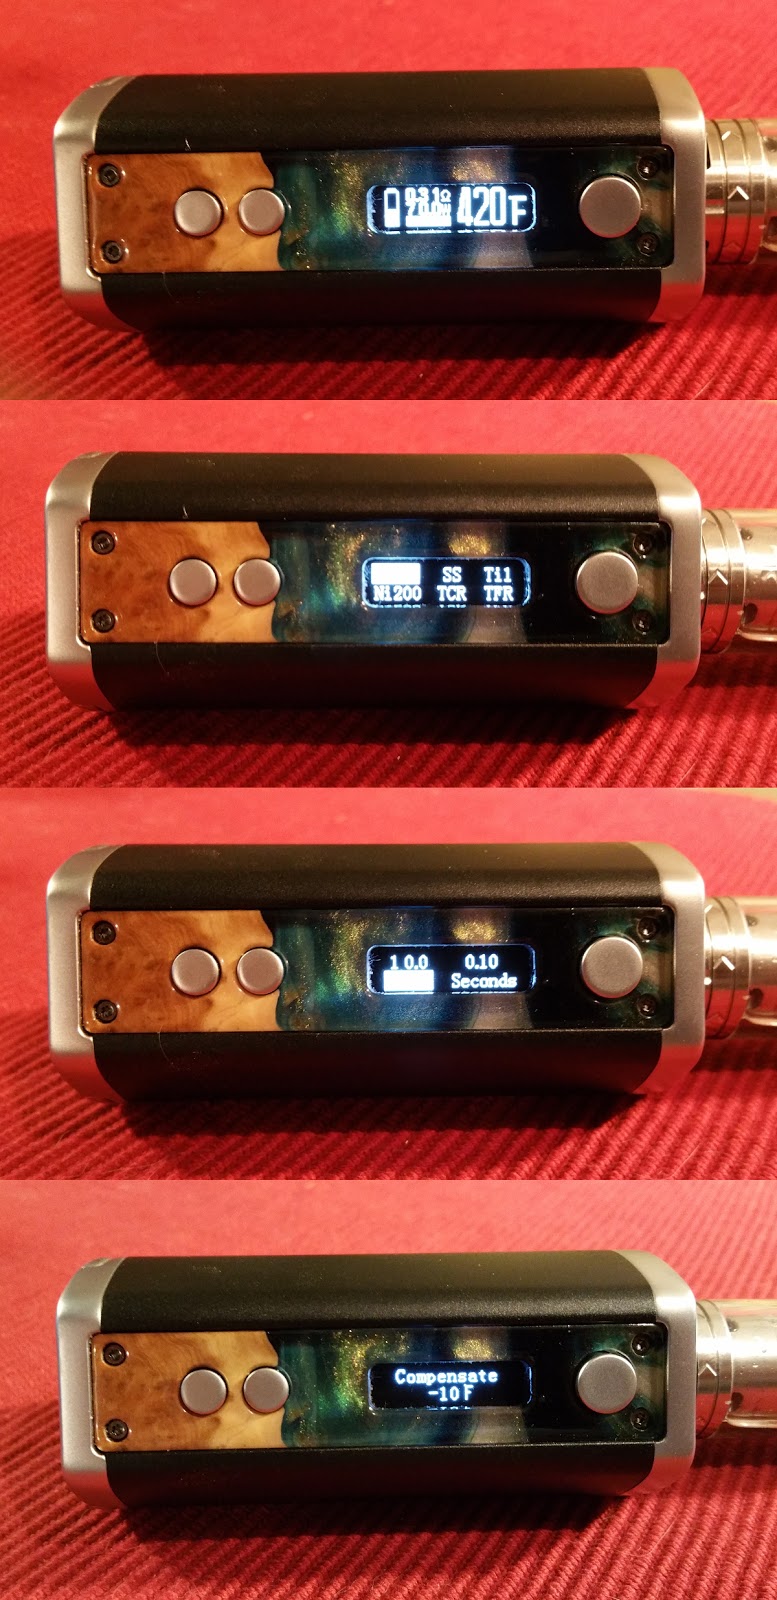
Taking a look at the board’s functions…

With the exception of the battery voltage too high warning and the ohms too high warning, all of the warnings are displayed in pretty simple English.
The battery life on this device is pretty good, but a lot will, of course, depend on the build, the mode of operation, and vaping styles. Tend to get a VERY solid day out of a set of LG HG2s or Samsung 25Rs. That said, when the batteries fall below a certain level, the vape will taper off or stop even if the battery life bar looks to have some life left to it. In the manual, they highly recommend authentic Sony/Samsung/LG batteries, and I like this. They then recommend 40A batteries which do not exist… sigh…
Pros:
If this were the first three-battery, 200+ watt fully-loaded temperature control mod on the market it would be a no-brainer. It does what it says it’s going to do, and does it well. As it is now competing against the Tempest, Reuleaux, Primus and other three-battery devices that cost much less, it’s a stickier widget. The little strip of stabwood does not outweigh the lack of firmware upgrade, and higher than average price point. If a second three-battery is desired, this ain’t bad. If it’s a first purchase, I would look elsewhere.
More reviews, including some video reviews, can be found on www.controlledcoil.com
After the fiasco created by sigelei in their interactions with DJlsb over the Sigelei 213 and Sigelei Fuchai 213, one might ask why I even considered this device. The answer is simple… I was at a show, I had money, it’s kinda pretty, and I was curious. I might also mention that while at the same show I bought a Sigelei Fuchai 213 in orange just to match a tank with orange o-rings. Yeah… I am that far gone…
 The box is disappointingly simple. It’s a black box with red and white lettering. The only attempt at bling is the “218” done up in a metallic red. Of course, there are the requisite warnings on the sides, and the specs on the bottom. Inside, there is a manual with brief instructions in English, French, Russian, and Chinese, a leaflet on using the Sigelei Security Code, and the device itself. The device is, as with many other Sigelei devices, inserted in a very tight silicone sleeve. It’s nestled in a foam cutout. The foam, on top, has a bit of a red velveteen finish. That’s it. No USB cable. No extras. For a device at this price point (I paid $99, but I’ve seen it as low as $75), with as much hype as it’s getting, and with as much ground as Sigelei has to make up after the 213 debacle, I expected a bit more.
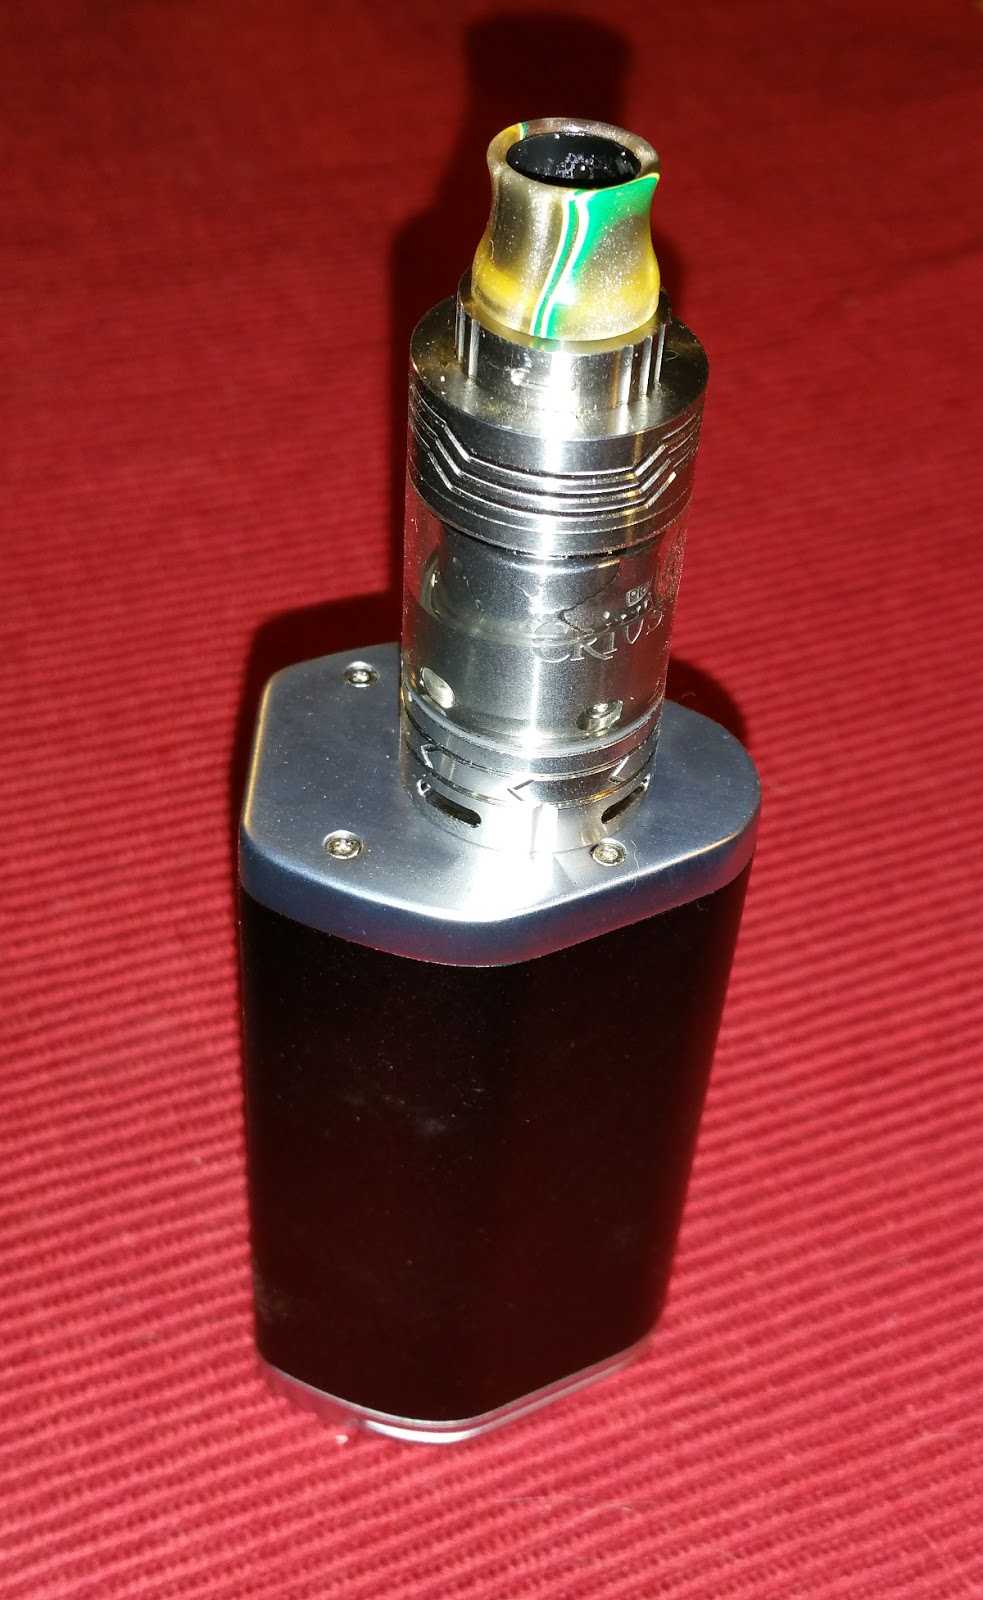 Once removed from the sleeve - no small feat, I assure you - the device is pretty nice. Mine is black (more of a charcoal) with a brushed metal top and bottom, and the control interface inset in a small stick of stabwood. There is adequate venting along the back, and the venting is kinda cool looking, too. It’s a beveled cut through the anodized body with the silver showing around the edges. At top, the metal plate is interrupted by four screws, and an almost centered 510 connector. The 510 is stainless steel with a nice, stiff, spring-loaded, gold-plated center pin. The center pin is slotted, but DO NOT ADJUST IT as this can damage the 510. The majority of the body beneath the top plate is anodized aluminum with the previously mentioned beveled venting cuts. On the face, is a strip of stabwood with three matte finished metal buttons - one larger fire button above and two smaller adjustment buttons below the cutout for the screen. That stabwood strip is held in place by four small hex screws in the corners, and is replaceable. I selected a strip that was more stab and less wood because I liked the green, sparkly acrylic. I looked at several different strips while picking the mod, and while I do believe that this is stabwood (some have expressed doubts), it is mass produced and a little cheesy. Nice, but cheesy. Does that make sense? The screen is nice and bright and will display the battery level (single bar for all three batteries), the resistance, the wattage or voltage (depending on mode), the mode, and the temperature or wattage (again, depending on mode). Because it is set into the wide and so bright, I have had no issues reading it in even the brightest of light.
 The bottom of the device is another metal plate held in place by two visible screws and bisected in the middle with a hinge for the battery door. There is a set of shallow indentations that allow for the battery door to be opened. The hinge feels relatively sturdy, and inside the door there are slots for the three batteries. The contacts on the door itself are nicely marked so getting the polarity right shouldn’t be a problem. Two spring loaded pins complete the circuit. The door is held in place with a combination of the pressure from the pins, and a small tab and notch.
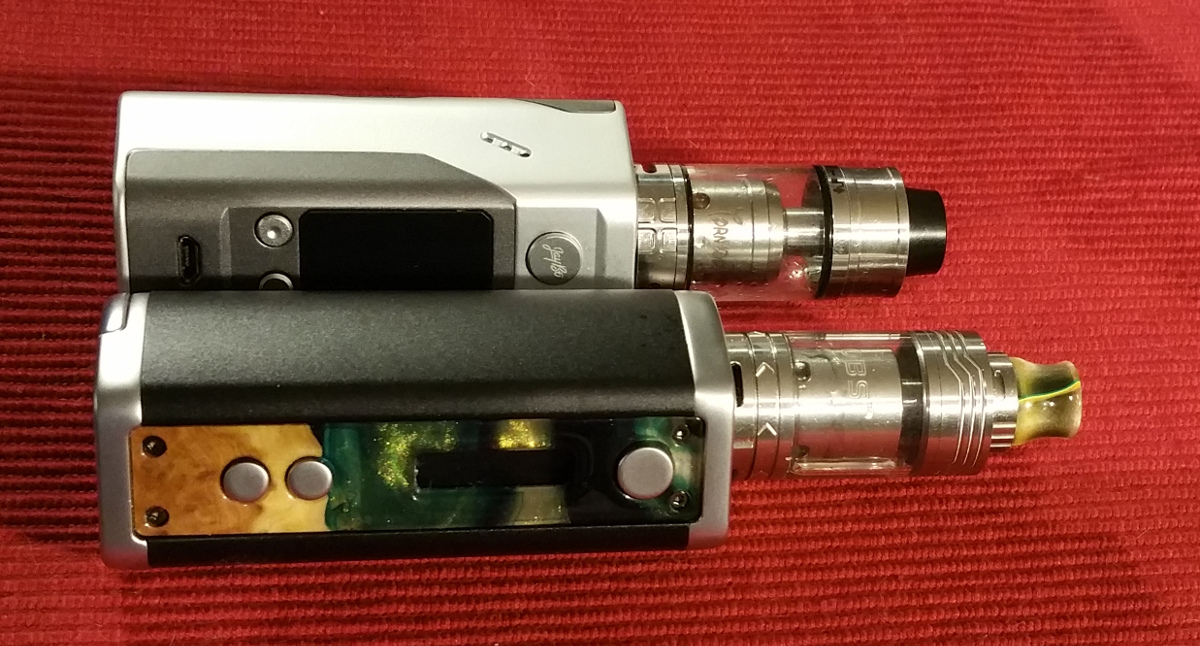 The dimensions of the device, at its widest points, are 42.1 x 51.7 x 96.5 mm. With three 18650 batteries installed, it weighs in at 304 g. It’s bigger than the Reuleaux, but thanks to the aluminum body, lighter.
Overall, the fit and finish is just OK. The anodized body has a few places that do not perfectly match with the top and bottom plates. These are more felt than seen. I’ve had worse, but I’ve had worse, but I’ve also had MUCH better. For the near $100 mark, this should have been better.
Speaking of better, the board is better. Much better. Although it is basically the same board that is in the Sigelei 213 tweaked to now actually output 218 watts, the TCR and TFR now works (without using Sigelei math). I did hook the device up to a multimeter and I did get very close to 218 watts (about 6.97 volts on a .23 Ohm coil brought me up to 211 watts, pulling 30 Amps using LG HB6 batteries). Going by feel alone (I do have a temperature probe, now, but I’m learning its ins and outs), I am having a great TC vape in TCR mode on a dual SS coil build. I found the stock values to be on the cool side. With a 0.148 Ohm Ni200 build, I had to go to the 470-480F range to get a warmish vape. That’s not too bad, but could stand to be more accurate. Additional accuracy is not forthcoming, though. There is no USB port. There is no charging (fine for a three-battery device), and no forthcoming firmware upgrade. Ever…
Taking a look at the board’s functions…
- Five clicks of the power button turns the device on, five clicks off
- Three clicks of the power button allows mode selection
- Power
- SS
- 304
- 316
- 317
- Neither 316 or 317 specify L grade...
- Ti1
- Ni200
- TCR
- M1 - M5
- Use standard TCR values, i.e. 0.006 for Ni200, 0.0088 for SS316L, etc.
- M1 - M5
- TFR
- M1 - M5
- Setting TFR allows input of specific rises in resistance over a range of temperatures rather than a baseline coefficient and is considered to be somewhat more accurate as properties of wires can change as they are heated. Steam Engine provides a wider range than the device allows for, but, as an example, for Ni200, the TFR curve looks like this on the device:
Temp. °C 100 150 200 250 300
Res. factor 1.3486 1.6357 1.9227 2.3088 2.7045
Values were rounded to the nearest decimal place. Note that Steam Engine values start lower, finish higher, and have more decimal places...
- Setting TFR allows input of specific rises in resistance over a range of temperatures rather than a baseline coefficient and is considered to be somewhat more accurate as properties of wires can change as they are heated. Steam Engine provides a wider range than the device allows for, but, as an example, for Ni200, the TFR curve looks like this on the device:
- M1 - M5
- Pressing up or down in power mode adjusts the wattage from 10 watts to 218 watts. The accelerator is fairly quick, but it's still a long way to travel. The increase or decrease is in 0.1 watt increments between 10 and 99.9. It's in 1 watt increments from 100 to 218.
- Pressing up or down in TC modes adjust the temperature from 212 F to 572 F or from 100 C to 300 C. It increases or decreases in 1 degree increments. The accelerator kicks it up to 10 degree increments after a few seconds.
- Pressing up and down simultaneously allows the resistance to be read and or locked. Locking is not recommended unless the atomizer is known to drift.
- Pressing up and fire allows the preheat wattage and duration to be set
- Pressing down and fire locks the adjustment buttons
- Pressing all three allows for temperature compensation
With the exception of the battery voltage too high warning and the ohms too high warning, all of the warnings are displayed in pretty simple English.
- Low resistance = Low Resistance
- No atomizer = Check Atomizer
- Short = Short!
- Low voltage = Check Battery
- Board too hot = Too Hot!
- Over time = Work Overtime
- High resistance = 0.00
- High voltage = HHHHHHHH
- Battery imbalance = The battery is imbalance
The battery life on this device is pretty good, but a lot will, of course, depend on the build, the mode of operation, and vaping styles. Tend to get a VERY solid day out of a set of LG HG2s or Samsung 25Rs. That said, when the batteries fall below a certain level, the vape will taper off or stop even if the battery life bar looks to have some life left to it. In the manual, they highly recommend authentic Sony/Samsung/LG batteries, and I like this. They then recommend 40A batteries which do not exist… sigh…
Pros:
- Pretty solid feeling device without a lot of weight.
- 510 placement allows for running up to 30 mm atties with no overhang
- Lots of adjustments and fair accuracy
- Relatively attractive appearance
- Included silicone sleeve (I never use these, but it’s nice to have one included for those that do)
- No button rattle
- Very responsive
- Stabwood
- Cheesy stabwood
- Less than stellar fit and finish on the body
- No USB for charging (not recommended, anyways), or firmware upgrades
- Slight battery rattle
- A little spendy
If this were the first three-battery, 200+ watt fully-loaded temperature control mod on the market it would be a no-brainer. It does what it says it’s going to do, and does it well. As it is now competing against the Tempest, Reuleaux, Primus and other three-battery devices that cost much less, it’s a stickier widget. The little strip of stabwood does not outweigh the lack of firmware upgrade, and higher than average price point. If a second three-battery is desired, this ain’t bad. If it’s a first purchase, I would look elsewhere.
More reviews, including some video reviews, can be found on www.controlledcoil.com
