
Hey Hey, This is part one for the vent hole 510 mod
Here is the 510 cart mod tutorial. This is not a new mod, so I can't take credit for it. I haven't seen this done on a 510 only the 901. I hope its ok to post this in the 510 review thread, I figured it would be easier to find it not piled under tons of other mod threads, since it is about the 510.

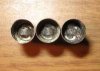
Sorry for the small pics, and low quality this is the largest format the ecf takes. These are 3 attys that I have, the left one and the middle are Janty Dura C attys and the right is a generic 510. The bridges on the Duras are slightly wider and more rounded. They seem to perform and operate the same so far. The 510 ones the bridge seems to sit deeper in the cart and can possibly melt the edges. I will also so pics for this mod also towards the end after the vent hole mod. Note also that the atty on the far left has 8 days use on it. The other two are brand new and have never been used, just sizzle ckecked on a manual batt for a doa test.

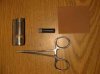
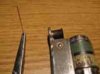
Here are the tools you will need. I have hemostats, which work very well but needle nose or regular pliers will also work. You will need one cart to modify, and a lighter. (any kind will work) You will also need a standard straight pin or sewing needle works too. The sand paper is needed for a seperate mod I'll mention after this pinhole mod. Also you will need a paper clip with the end bent out to pull the cart inserts with.

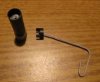
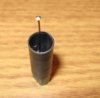
First thing to do, is take the paper clip stick it in the hole, and remove the first insert. There are two of them in each 510 cart. Take your pliers and bend a 45 degree angle on the tip helps grab the insert better.

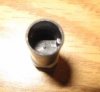
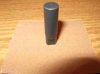
Although you do not have to remove the inner insert, go ahead and do so to get a good idea of how the back side of the filler cup looks. You should see the back flat side of the filler cup and the two slotted vent holes, where the vapor flows out to the tip of the cart.

This is what you should see with both inserts removed. This is where you are going to make your vent hole. I put mine in the middle, so when you assemble it back together you can clean the vent with your needle. Use a different needle because the one you burn through with will have melted plastic on it.
This is just part one of the tutorial, and I will post the next part to the thread when I get it composed.
Here is the 510 cart mod tutorial. This is not a new mod, so I can't take credit for it. I haven't seen this done on a 510 only the 901. I hope its ok to post this in the 510 review thread, I figured it would be easier to find it not piled under tons of other mod threads, since it is about the 510.
Sorry for the small pics, and low quality this is the largest format the ecf takes. These are 3 attys that I have, the left one and the middle are Janty Dura C attys and the right is a generic 510. The bridges on the Duras are slightly wider and more rounded. They seem to perform and operate the same so far. The 510 ones the bridge seems to sit deeper in the cart and can possibly melt the edges. I will also so pics for this mod also towards the end after the vent hole mod. Note also that the atty on the far left has 8 days use on it. The other two are brand new and have never been used, just sizzle ckecked on a manual batt for a doa test.
Here are the tools you will need. I have hemostats, which work very well but needle nose or regular pliers will also work. You will need one cart to modify, and a lighter. (any kind will work) You will also need a standard straight pin or sewing needle works too. The sand paper is needed for a seperate mod I'll mention after this pinhole mod. Also you will need a paper clip with the end bent out to pull the cart inserts with.
First thing to do, is take the paper clip stick it in the hole, and remove the first insert. There are two of them in each 510 cart. Take your pliers and bend a 45 degree angle on the tip helps grab the insert better.
Although you do not have to remove the inner insert, go ahead and do so to get a good idea of how the back side of the filler cup looks. You should see the back flat side of the filler cup and the two slotted vent holes, where the vapor flows out to the tip of the cart.
This is what you should see with both inserts removed. This is where you are going to make your vent hole. I put mine in the middle, so when you assemble it back together you can clean the vent with your needle. Use a different needle because the one you burn through with will have melted plastic on it.
This is just part one of the tutorial, and I will post the next part to the thread when I get it composed.

")

