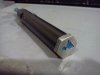
Lavatube DIY Hex End Cap mod
The plastic end cap of my LT 1.5 had separated from the metal battery spring cap. Instead of buying a replacement plastic cap, which would probably just break off again, I decided to make a LT end cap mod. I didnt really like the edge of the original plastic cap either. My solution was to affix one M14 hex nut to the metal battery spring cap using J-B Weld. The hex nut provides a more solid feel than the little piece of plastic that originally comes on the battery spring cap. Additionally, the hex nut provides better protection against the LT rolling. Overall, I think it looks better and that it will add more protection to the mod. Below are the steps I took to accomplish this, including photos of various steps during this process. Although it may seem time consuming, this really was not hard at all. In fact, I really enjoyed doing it. Please feel free to comment or ask questions, I will gladly field them. Take care everyone!
Materials required:
-1 M14 metric hex nut or equivalent (something that will fit ON the metal cap, and also protrude beyond the body of the LT).
-1 square of rough grit sandpaper.
-1 package/tube of J-B Weld (or an equivalent epoxy for metals).
-1 tongue depressor/popsicle stick or paint brush.
-1 disposable paper plate/bowl.
-Lighter fuel or isopropyl/rubbing alcohol.
-Dremel tool (Optional).
-Spray paint for metals, color of your choice (Optional).
Preparation:
Organize your work area. Put everything on a towel or rag which you can ruin (just in case). Keep your mods and delicate equipment away from this area in case you spill solvents or get epoxy on something.
Execution:
Step 1: If the plastic end cap has not already broken away from the battery spring cap, remove the plastic cap (there will be 2 holes where the plastic cap connects to the metal cap). Mine fell off in my pocket, but I imagine you can just drill it out carefully
Step 2: Using your sand paper, score the outer surface of the metal spring cap (avoiding the threads) and the surface of the M14 hex nut which is to be applied to the metal cap. Roughening up these surfaces will allow for a better bond. (See photo below).
Step 3: Brush or blow away any metal dust left from sanding and thoroughly clean the metal spring cap and the M14 hex nut using lighter fluid or isopropyl/rubbing alcohol. Making sure that there are no skin oils or outside contaminants on the surface will allow for a better bond
Step 4: Prepare your J-B weld on a disposable paper plate or bowl per the mixing instructions on the package.
Step 5: Apply the J-B Weld mixture to the surface of the hex nut which is to come in contact with the surface of the metal end cap. My M14 nut had writing on one end, so I applied the smooth side down against the metal cap. Dont worry if you get the J-B weld spilling out, but dont let it come in contact with the threads on the metal cap. If it does, dont worry, just wipe it down with your solvent.
Step 6: Once you are satisfied with the position of the M14 nut on the metal cap, make sure you apply even pressure across the surface. Do not fiddle with it too much once it is in place. (See photo below). The extra J-B Weld will be sanded off later using a Dremel.
Step 7: Allow the assembled piece to dry overnight...hope you have another mod")
(I cheated and only waited a few hours, but I don't want anyone to have problems because they didn't wait).
Step 8: The next day, examine the new cap and make sure everything is sturdy. Now is where we clean it up, by stripping away the excess J-B Weld, using a dremel. (See photo below). If you dont have a dremel, you can probably use a metal file.
Step 9: Once the J-B weld has been sanded down, clean the piece in preparation for paint (paint optional).
Step 10: Tape off the threads to protect them from being painted. Apply 2-3 coats of paint to the unit. Let it dry for a couple hours just to be sure. Carefully peel off the tape from the threads to reveal the painted piece. (See photo below). You might need to do a bit of touch up work.
And Finally...Enjoy your new custom end cap!
If anyone decides to try this, let me know how it goes! Happy vaping!


Last 2 photos in comments....
The plastic end cap of my LT 1.5 had separated from the metal battery spring cap. Instead of buying a replacement plastic cap, which would probably just break off again, I decided to make a LT end cap mod. I didnt really like the edge of the original plastic cap either. My solution was to affix one M14 hex nut to the metal battery spring cap using J-B Weld. The hex nut provides a more solid feel than the little piece of plastic that originally comes on the battery spring cap. Additionally, the hex nut provides better protection against the LT rolling. Overall, I think it looks better and that it will add more protection to the mod. Below are the steps I took to accomplish this, including photos of various steps during this process. Although it may seem time consuming, this really was not hard at all. In fact, I really enjoyed doing it. Please feel free to comment or ask questions, I will gladly field them. Take care everyone!
Materials required:
-1 M14 metric hex nut or equivalent (something that will fit ON the metal cap, and also protrude beyond the body of the LT).
-1 square of rough grit sandpaper.
-1 package/tube of J-B Weld (or an equivalent epoxy for metals).
-1 tongue depressor/popsicle stick or paint brush.
-1 disposable paper plate/bowl.
-Lighter fuel or isopropyl/rubbing alcohol.
-Dremel tool (Optional).
-Spray paint for metals, color of your choice (Optional).
Preparation:
Organize your work area. Put everything on a towel or rag which you can ruin (just in case). Keep your mods and delicate equipment away from this area in case you spill solvents or get epoxy on something.
Execution:
Step 1: If the plastic end cap has not already broken away from the battery spring cap, remove the plastic cap (there will be 2 holes where the plastic cap connects to the metal cap). Mine fell off in my pocket, but I imagine you can just drill it out carefully
Step 2: Using your sand paper, score the outer surface of the metal spring cap (avoiding the threads) and the surface of the M14 hex nut which is to be applied to the metal cap. Roughening up these surfaces will allow for a better bond. (See photo below).
Step 3: Brush or blow away any metal dust left from sanding and thoroughly clean the metal spring cap and the M14 hex nut using lighter fluid or isopropyl/rubbing alcohol. Making sure that there are no skin oils or outside contaminants on the surface will allow for a better bond
Step 4: Prepare your J-B weld on a disposable paper plate or bowl per the mixing instructions on the package.
Step 5: Apply the J-B Weld mixture to the surface of the hex nut which is to come in contact with the surface of the metal end cap. My M14 nut had writing on one end, so I applied the smooth side down against the metal cap. Dont worry if you get the J-B weld spilling out, but dont let it come in contact with the threads on the metal cap. If it does, dont worry, just wipe it down with your solvent.
Step 6: Once you are satisfied with the position of the M14 nut on the metal cap, make sure you apply even pressure across the surface. Do not fiddle with it too much once it is in place. (See photo below). The extra J-B Weld will be sanded off later using a Dremel.
Step 7: Allow the assembled piece to dry overnight...hope you have another mod
(I cheated and only waited a few hours, but I don't want anyone to have problems because they didn't wait).
Step 8: The next day, examine the new cap and make sure everything is sturdy. Now is where we clean it up, by stripping away the excess J-B Weld, using a dremel. (See photo below). If you dont have a dremel, you can probably use a metal file.
Step 9: Once the J-B weld has been sanded down, clean the piece in preparation for paint (paint optional).
Step 10: Tape off the threads to protect them from being painted. Apply 2-3 coats of paint to the unit. Let it dry for a couple hours just to be sure. Carefully peel off the tape from the threads to reveal the painted piece. (See photo below). You might need to do a bit of touch up work.
And Finally...Enjoy your new custom end cap!
If anyone decides to try this, let me know how it goes! Happy vaping!
Last 2 photos in comments....