My DIY - DSE901 - MAGNUM POWER

Status
Not open for further replies.

Multisync98

Senior Member
ECF Veteran
Apr 17, 2009
256
1
Stephenville, TX
Jim:

You can still build your magnum now and test it with the batteries that came with the flashlight or most any other DC power source (i.e. wallwart, hacked USB cable, etc.) If you absolutely cannot wait for your battery shipment, go to the local Walmart or pharmacy and pick up a pair so you can start using it.

I may just do that this weekend man! I'm getting tired of waiting. It hasn't even been a full week since they shipped, but all these new mods, and now Puresmoker has one. Ugh, just drives a man to vape.. LOL...

-Jim
 
I may just do that this weekend man! I'm getting tired of waiting. It hasn't even been a full week since they shipped, but all these new mods, and now Puresmoker has one. Ugh, just drives a man to vape.. LOL...

-Jim

Hey Jim, I just got my batteries today and this thing kicks .... (Pen Style).

So far I have made 2 and just checked and they both work. I'm working on my third one now. My first one, I seated the atomizer connection to far down and had to grind the atomizer to fit it. My second one, I left the connection higher so I would not have to modify the atomizer. And my 3rd, I am using the 1/4" phone jack from Radio Shack, 3/16" hollow brass tubing with a ball point pen spring soldered to it to allow for atomizer fit and variance.

You will love this thing once you have it. And you will never go back!
 

Multisync98

Senior Member
ECF Veteran
Apr 17, 2009
256
1
Stephenville, TX
Hey Jim, I just got my batteries today and this thing kicks .... (Pen Style).

So far I have made 2 and just checked and they both work. I'm working on my third one now. My first one, I seated the atomizer connection to far down and had to grind the atomizer to fit it. My second one, I left the connection higher so I would not have to modify the atomizer. And my 3rd, I am using the 1/4" phone jack from Radio Shack, 3/16" hollow brass tubing with a ball point pen spring soldered to it to allow for atomizer fit and variance.

You will love this thing once you have it. And you will never go back!
I'm going to begin construction on mine tomorrow! Beings you're in the area, how'd you like to come help out? PM me or call me if ya still have my cell..

-Jim
 

Vegatron75

Senior Member
ECF Veteran
Apr 3, 2009
100
0
NorthEast Kansas
UGH!! Stop it! I can't take it anymore! I want my batteries to show up so I can make my magnum.... LOL :p What am I supposed to do? Just sit around and wait.. LOL

-Jim

You might as well start now. Not to be a jerk but it'll probably take a few trys to get it right anyway. I know it did for me. What's another $10 bux for a couple of energizer cr2s.

I've built three of them, the first with the stock 801 battery top, which needed the atomizer ring removed or ground. The other 2 have the 1/4 phone jack for the atomizer connection.

You'll have to glue the switch in the housing as well. Mine take 2 days to build anyway. I use liquid nails to glue the switch in. That takes a while to dry. I also use a toothpick and wedge the switch against the opposite wall of the light to hold it firm while the liquid nails drys.

Like I said you'll find what works for you, but I doubt you'll nail it on the first one. Number 3 for me is the nicest one I've made.

I also drill the holes for the led and switch. This leaves the entire lip of the chrome piece. Makes for more surface area when the lens or whatever u use to mount the phone jack/batt connection.

ALos the schematic in the thread, the hand drawn one is not right. It shows the power going out of the switch to the resistor and then to the atomizer. That won't work. The power for the atomizer and the led originate from the out portion of the switch. The resistor is just a buffer for the led. The first diagram is what I tried and it wouldn't work. The second one is the one I use now.
 

Attachments

  • throwaway%20SD%20wiring.jpg
    throwaway%20SD%20wiring.jpg
    14.7 KB · Views: 125
  • MagnumModWiringSchematic.jpg
    MagnumModWiringSchematic.jpg
    16.4 KB · Views: 499
Last edited:

Multisync98

Senior Member
ECF Veteran
Apr 17, 2009
256
1
Stephenville, TX
Hello All, just wanted to update you on my progress... Well, with the help of my dad, Panderson, and Madog's Video, my "Ruby Magnum' is FINALLY complete! This baby's RED HOT!

Although I don't have my batteries yet, Panderson was kind enough to come help me out, bringing his batteries with him! We had a few minor problems with the wiring, but when it came down to it, we got it working!

Panderson is a really cool guy! I even taught him something... (I think :) 
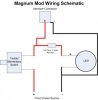
) We modified Madogs original and added one of the springs that he threw away for a more stable gound connection. He was having some problems with his 3 magnums that he built, and with the mod we made, he was able to get his magnum up and running again! :)

All in all, I'm just happy! I gained alot of knowledge in this project and now believe that I can build my next magnum, alone. Now the hard part, waiting for the damn batteries to arive in the mail. I'm a very impatient guy, but I do believe that is going to be worth the wait!

I'll be posting pics of my Ruby Magnum, tomorrow! And thanks again, Panderson! You're time and help really paid off!

-Jim :D:D:D:D:D:D
 
Very cool!!! What spring are you talking about? I was tinkering tonite and discovered I needed to vent the battery side of the connection on the 1/4 phone jack. A couple of holes in the threads and presto super easy draw.

It's the spring that comes in the flashlight, the big one that is about 7/8". My original mistake in assembly order was putting the pcb in first. The spring is actually used to make ground contact with the flashlight tube and the bottom of the pcb.

I was assembling in this order: pcb, lcd holder, spring, then capping it all off with the atomizer connector, when it should have been, spring, pcb, lcd holder, then capping it off.

Hope that makes sense.

-Paul
 

Multisync98

Senior Member
ECF Veteran
Apr 17, 2009
256
1
Stephenville, TX
Jim, it looks fantastic. Reminds me of my red one. Chances are you got the two-pack of flashlights so go ahead and make another one. This way you can use them throughout the day and sell off the rest of the stuff you probably bought. Cheers!

Gimme a call if you'd like to talk man... You have my number!

-Jim
 

Vegatron75

Senior Member
ECF Veteran
Apr 3, 2009
100
0
NorthEast Kansas
It's the spring that comes in the flashlight, the big one that is about 7/8". My original mistake in assembly order was putting the pcb in first. The spring is actually used to make ground contact with the flashlight tube and the bottom of the pcb.

I was assembling in this order: pcb, lcd holder, spring, then capping it all off with the atomizer connector, when it should have been, spring, pcb, lcd holder, then capping it off.

Hope that makes sense.

-Paul

My light looks the same but didn't have the spring to begin with. Weird.
 
Ok, for a bit of vaping review with this thing:

This thing tastes like it buring when using carts, so now I'm dripping only and it tastes fine. May be that the 6+ volts is too hot for the carts and is buring the matting?

I'm considering putting in a resister to calm it down or seeing if I can find a 3.7 battery that will fit in there. Any ideas?

-Paul
 
Status
Not open for further replies.

Users who are viewing this thread