Need a little help with presta switch

Status
Not open for further replies.

Karltinsly

Senior Member
Verified Member
Dec 7, 2011
72
28
65
Austin, TX
This question is really for asdaq, but I'm sure others will be interested in the answer.

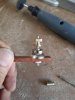
Here's my first attempt at an asdaq-style presta switch:
2014-04-25 10.41.48 (Mobile).jpg

I hope that pic comes out okay - it looks really small in the editor.

Anyway, it functions correctly, but I'm trying to figure out how to isolate the switch from the battery. In the pictures asdaq posted, it looks like he just put some rubber or silicon over the bottom retaining nut, but in what I have so far, that would not be enough to isolate the battery. Do I need to grind down the screw head on the 6-32 center screw, or is there some other way?

I really enjoyed building this switch. The hardest part was gathering all the pieces necessary. Now that I've built it, I realized that what makes the presta valve a great starting point is the threaded tube. I've since been keeping my eyes open for threaded tubes, and recently picked up some lamp nipples to try and build with.

Thanks in advance, asdaq, and anyone else who contributes to solving my problem!
 

Attachments

  • 2014-04-25 10.41.48.jpg
    2014-04-25 10.41.48.jpg
    22.4 KB · Views: 33

asdaq

Vaping Master
ECF Veteran
Verified Member
Feb 23, 2010
4,570
1,845
poland, and the brassy lands of google
Hey, it's coming along nicely. :) I agree, keeping the parts in supply is a royal PIA. The insulator I use is just a slice of 3/8" vinyl tubing that presses over the lower presta nut's knurl. Save that part for last as once the rest comes together you will know how long it needs to be.

Some details are hard to tell, but yes the screw head gets ground down from every direction to make it flatter and narrower. Flatter to reduce the depth and narrower to clear the lower presta nut's inner threads. Also, do have a sleeve over the screw inside the presta tube?

The tube could be much shorter too, in the end it doesn't quite reach the top edge of the upper nut and certainly doesn't reach the bottom edge of the lower nut (from above you get a good lock in the switch and from the bottom the screw can retract just about all the way so the insulator is just a touch longer than the bottom nut).

Your magnets look bigger than what I'm using, seems to be a 3/8 OD for the little one and the big one looks like 1/8" thickness. See maybe if you dremel away the interior of the finishing washer just enough you can fit the magnet under the washer and under the nut. It looks like it would work, but it is pretty close. This will let you use a much shorter presta tube, like the one laying on the bench. You might need a bigger finishing washer for this to work.

Another option is use two smaller magnets just on the screw, I've done this also and the tension just depends on how close they are to each other.

Of course as all these measurements depend on each other, make sure that the piece of wood you have there is the right thickness for the mod too. :)

I looked at lamp nipples too, but then you need bigger magnets, bigger screws, etc. Presta are nice as they fit a 6mm hole and have a clean 4mm bore. I think lamp nipples are 1/8IPS which measures 3/8" OD.

Since you have those 3/8" magnets, you could try something I've been thinking about but haven't got around to: cut/sand off the bottom of the knurled nut so that just the knurled part remains, this will make the button part half as long.

Here's mine again for reference, note the bottom is there too and there is still room for the mod's brass plate:

IMG_20140410_221753.jpg


Keep up the good work!
 

Karltinsly

Senior Member
Verified Member
Dec 7, 2011
72
28
65
Austin, TX
Thanks, asdaq! I left the presta tube long, until I could figure out how long it really needed to be. I will try routing out the finishing nut, and maybe the knurled knob, too. I'll post pics if I do.

I have goofy-sized ring magnets, as they're all I've been able to get so far, either at local stores, or guessing at sizes while shopping on the internet. I'm sure I'll eventually figure out what I need for each application.

I do have an inner sleeve on the screw. It's whatever is the closest imperial size to the 4mm you specified (3/16?). Had to ream it out some with my dremel to fit the 6-32 screw. For that matter, I had to ream the center of the upper magnet with the dremel, too. Neodymium magnets to not like to be drilled!

One last question - is the length of travel on the switch only about 1/8 inch? Shorter? Longer? How far is it from the battery terminal in the off position?

Thanks again!
 

asdaq

Vaping Master
ECF Veteran
Verified Member
Feb 23, 2010
4,570
1,845
poland, and the brassy lands of google
Ahh, some 5/32" most likely. That is 3.9688mm, very close to 4. I've got that in brass and copper, and there is just a bit of extra play in that, and I have used both and even added silver solder to both and sanded it back down for a tighter fit. The 4mm is just a better tolerance and the switch doesn't need cleaning as often. These guys have it, plus other K&S metric, but it's good to get a few things at once to get more for the shipping:

K&S brass from omnimodels | eBay

For magnets the little ones are 8mm x 3.5mm x 1.2mm and the big ones are 1/2 x 1/4 x 1/16 also ebay or if not available K&J magnetics.

The bottom of a knurled nut is also 8mm so the match is nice there. Yours are fine too, you can match the top section pretty nicely as well.

The throw is however much longer the insulator is than the head of the screw in locked position, and however much you want it to be. I prefer 1-1.5mm but it is totally up to you.

I've wondered if just the knurled part would be to short or wobbly, but I saw one of these in the store the other day and it got me thinking why not:

PDI4c706392cfd2e.png


Plus some nice parts to be had there. :)
 

Karltinsly

Senior Member
Verified Member
Dec 7, 2011
72
28
65
Austin, TX
Thanks for the parts info, asdaq! That will come in handy.

I'm closer to the point where I will be mounting my switch, so I've taken some of your suggestions and come up with this:

2014-04-26 13.30.09.jpg

2014-04-26 13.30.13.jpg

The parts are mounted on a scraps of wood and brass that are used in the mod, so the thickness should be just right. The larger magnet is under the finishing washer - I just used a hammer and socket extension to flatten the center part of the washer. I also dremeled off part of the knurled nut. Overall, I'm pretty happy with it! Now I just need to figure out what I have on hand for the insulator. Thanks, asdaq, for a great design!
 

asdaq

Vaping Master
ECF Veteran
Verified Member
Feb 23, 2010
4,570
1,845
poland, and the brassy lands of google
Karl, that looks really great, and I like the sleek button too. Having made a few of these (lol) the head of the screw looks just about right, I even take off material from the thread side of the head, but you are all set with this one. Also make sure there is nothing sharp where the screw is cut short as your finger will spend a lot of time there.

It took me awhile to get to the vinyl tubing, I think the first was the end of a marker with a hole in it as it was bolted on, which made everything need to be longer. You can use just about anything that is sturdy enough for the job, some really thick o-rings would be great, and I even got some plastic washers to try, but they weren't quite right.

edit: Cant wait to see your mod too. :)
 
Last edited:
Status
Not open for further replies.

Users who are viewing this thread