Second Build on my Kayfun Lite+

Status
Not open for further replies.

OVO Kyle

Full Member
Jun 17, 2014
58
47
Toronto, Canada
Hey everyone,

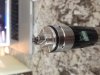
I did my second build on my kayfun Lite+ using 28 gauge wire and cotton. It worked out to be 1.2 ohms.

I was just wondering how you more experienced builders thought it looked, and if there was anything I could improve on? or any tips anyone might have?

Thanks!
EDIT: Im not sure why the hosting site rotated my images, working on fixing that.

2v0on10.jpg

6p8d51.jpg

29c48w0.jpg
 

Attachments

  • Kayfun 1.jpg
    Kayfun 1.jpg
    22 KB · Views: 40
Last edited:

State O' Flux

Vaping Master
ECF Veteran
Verified Member
Jul 17, 2013
4,844
4,993
Seattle
I was just wondering how you more experienced builders thought it looked, and if there was anything I could improve on? or any tips anyone might have?
Lets call your coil a "clockwise wrap"... just so we have a reference.

Instead... wrap it counterclockwise, or opposite if what you're doing now. That brings the tails out opposite of where they are relative to the coil. Now, take that coil and position it so the open ends are at the 10 and 4 o:clock positions.
The tails will align to the screws just as you have them (wrapped clockwise around the screws)... but this orientation will place your wick in an 'S' shape on the deck.

The purpose of this is so that when you screw on the chimney, the wick tails are not distorted, but simply tucked in firmer to the deck walls... without chance of the threads catching and distorting them. This also allows for a slightly longer wick.

Yes, this is a small thing - but building attys is a series of small things... perfected. ;-)

Although the length is about right for the current coil orientation, your wick appears to be too dense and/or too tight in (too large for) the coil... unless you "fluffed it up" for photos. :laugh:
Although either one can restrict capillary action... too tight will limit juice to the cotton inside the coil... the last place you want a dry wick.

Cheers
 

nasca

Super Member
ECF Veteran
Verified Member
Jun 6, 2014
536
477
USA
I build my kayfun in a similar fashion as the OP. coil inline with the juice channels, 1-1.5mm above airflow hole, wick just long enough to touch the deck -- like an upside down U shape. then I put on the base of the chimney and use a sewing needle to fold the cotton down and make the juice channels visible.

the additional step is to add a ring/nest of cotton on top and lightly push it down so that its touching the wick as outlined in this blog. I use the needle to open it up just a tiny bit -- maybe enough so I can see a bit of the screws -- for the sake of better airflow with all that cotton. drip some juice into the cotton. screw everything down, fill it 80%. Sometimes first pulls are kinda tight and floody, but once that clears out I'm good. the test of whether it's a good build is if I see bubbles.

I havent had a single dry hit since doing this. I can pull and pull rapidly and it's always get a dense flavorful vapor. I used to get a dry hit on occasion, but not anymore.

I also have removed the botton airflow control set screw.
 

OVO Kyle

Full Member
Jun 17, 2014
58
47
Toronto, Canada
Instead... wrap it counterclockwise, or opposite if what you're doing now. That brings the tails out opposite of where they are relative to the coil. Now, take that coil and position it so the open ends are at the 10 and 4 o:clock positions.
The tails will align to the screws just as you have them (wrapped clockwise around the screws)... but this orientation will place your wick in an 'S' shape on the deck.

The purpose of this is so that when you screw on the chimney, the wick tails are not distorted, but simply tucked in firmer to the deck walls... without chance of the threads catching and distorting them. This also allows for a slightly longer wick.

Yes, this is a small thing - but building attys is a series of small things... perfected. ;-)

Although the length is about right for the current coil orientation, your wick appears to be too dense and/or too tight in (too large for) the coil... unless you "fluffed it up" for photos. :laugh:

It took me a minuite to visualize wrapping it the other way, but it makes sense and will do next time!
I think I did use a bit too much cotton, and will try to correct that next time!

I build my kayfun in a similar fashion as the OP. coil inline with the juice channels, 1-1.5mm above airflow hole, wick just long enough to touch the deck -- like an upside down U shape. then I put on the base of the chimney and use a sewing needle to fold the cotton down and make the juice channels visible.

What I have been doing is putting a few drops on the cotton and set it into the position above the reservoirs. I imagined that this would help combat the friction from the chimney when screwing it on.

Thanks for the advice guys, I appreciate you taking the time to post!
 
Status
Not open for further replies.

Users who are viewing this thread