
Where can i find beryllium copper sheet or sterling silver? What thickness would i need as well?
You are using an out of date browser. It may not display this or other websites correctly.
You should upgrade or use an alternative browser.
You should upgrade or use an alternative browser.
BOTTOM FEEDERS= a place for everything modified and/or custom made
- Thread starter turbocad6
- Start date
- th_trl_thread_readers 0
- Status
- Not open for further replies.
a friend sent me an authentic stumpy as a gift, so i made her this
not pretty inside, but the pure fine silver [not sterling] hits quite hard for a single cell mod
i still don't think karma is balanced, she even put candy in with the rda. I mean here i am, trying to be cynical and grumpy, and people run around doing really sweet things to spoil that
not pretty inside, but the pure fine silver [not sterling] hits quite hard for a single cell mod
i still don't think karma is balanced, she even put candy in with the rda. I mean here i am, trying to be cynical and grumpy, and people run around doing really sweet things to spoil that
How did you do the firing mechanism in yours?I've done a couple of them,and the only way i could figure to make it work,was a pita to do,i'd like to do a few more but my method is too much work haha.Just finished putting an old Abaddon back in service as a squonker. Svelte little mod.
View attachment 650491
How did you do the firing mechanism in yours?I've done a couple of them,and the only way i could figure to make it work,was a pita to do,i'd like to do a few more but my method is too much work haha.
I'll take a few disassembly pics. The stock internal firing components are gone, replaced with something simpler.
I look forward to seeing them.The ones i did,most of the stock components are gone,but i modified the center copper part where the screw goes down the middle,then made a copper tab that the feed pin on the 510 goes through.It works,but it ain't fancy and definitely a pain to do that way haha.I've done a wood version,and a brass one.The wood broke on that one,so i want to do another,plus a copper version,but the only way i could figure to mod them is keeping me from doing the others.I'll take a few disassembly pics. The stock internal firing components are gone, replaced with something simpler.
I look forward to seeing them.The ones i did,most of the stock components are gone,but i modified the center copper part where the screw goes down the middle,then made a copper tab that the feed pin on the 510 goes through.It works,but it ain't fancy and definitely a pain to do that way haha.I've done a wood version,and a brass one.The wood broke on that one,so i want to do another,plus a copper version,but the only way i could figure to mod them is keeping me from doing the others.
That's a shame about the wood one. All of them are getting hard to find now, though FT has copper dirt cheap. I have a spare aluminum, so that covers me.
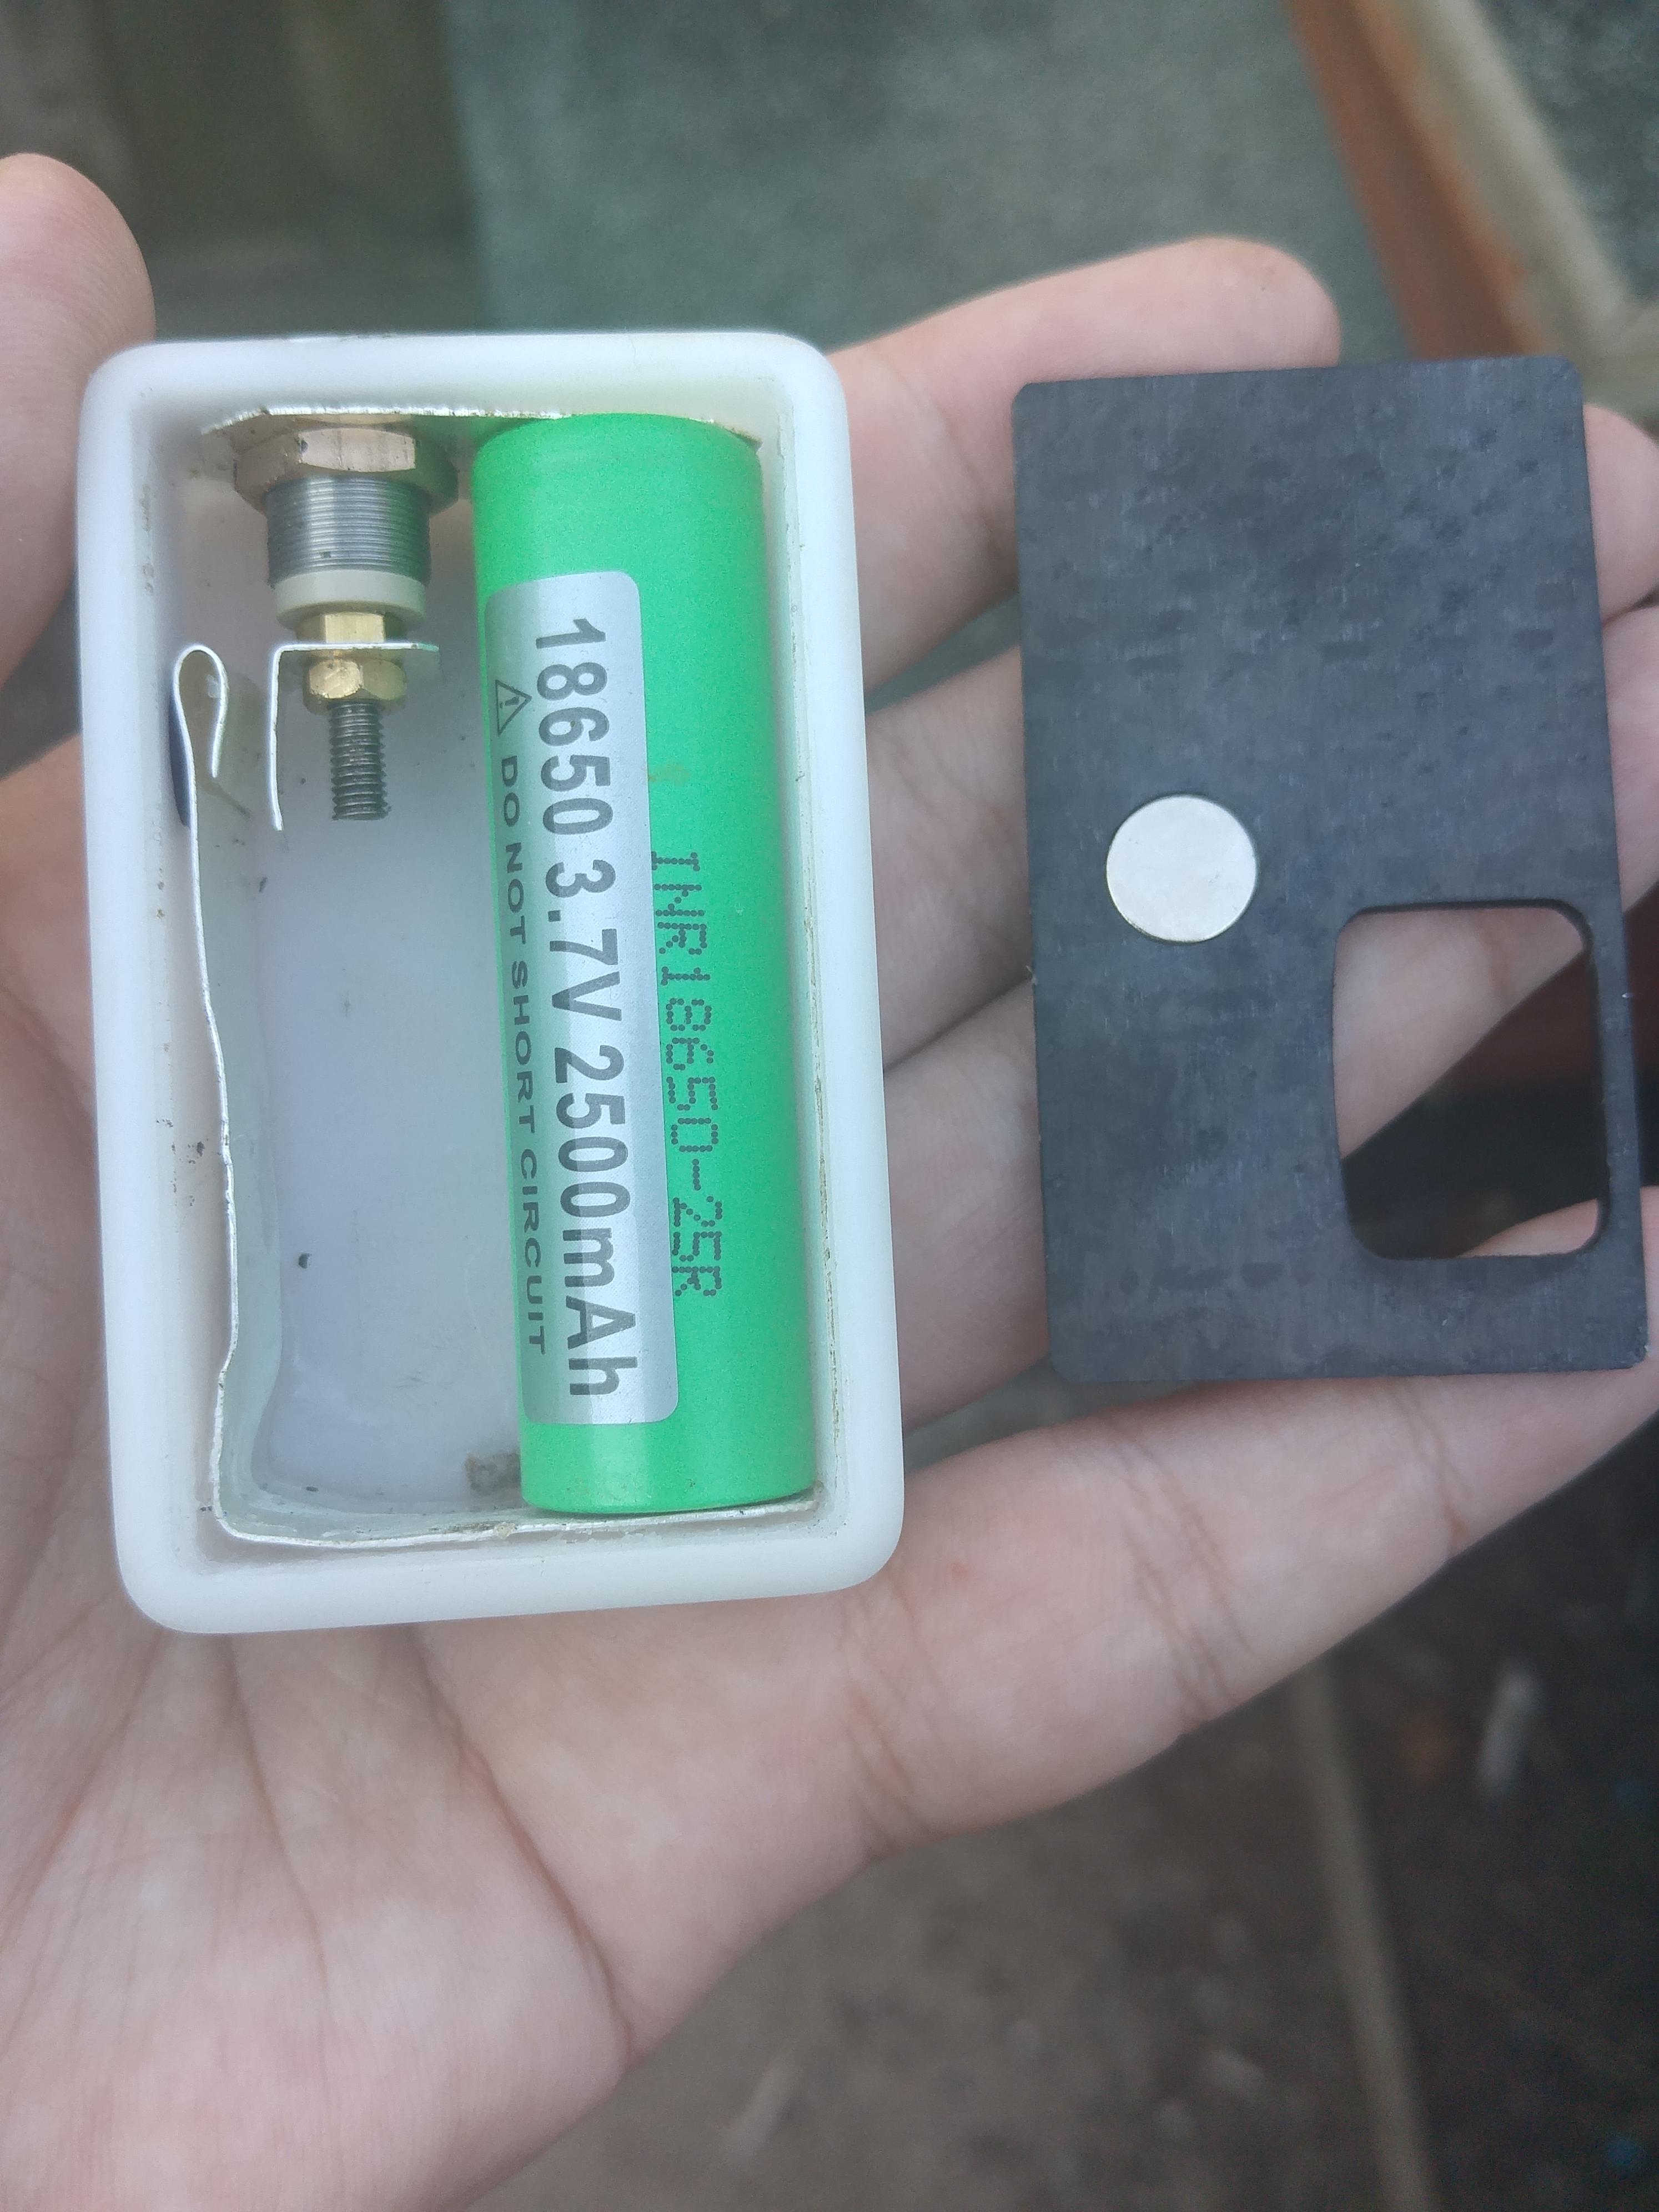
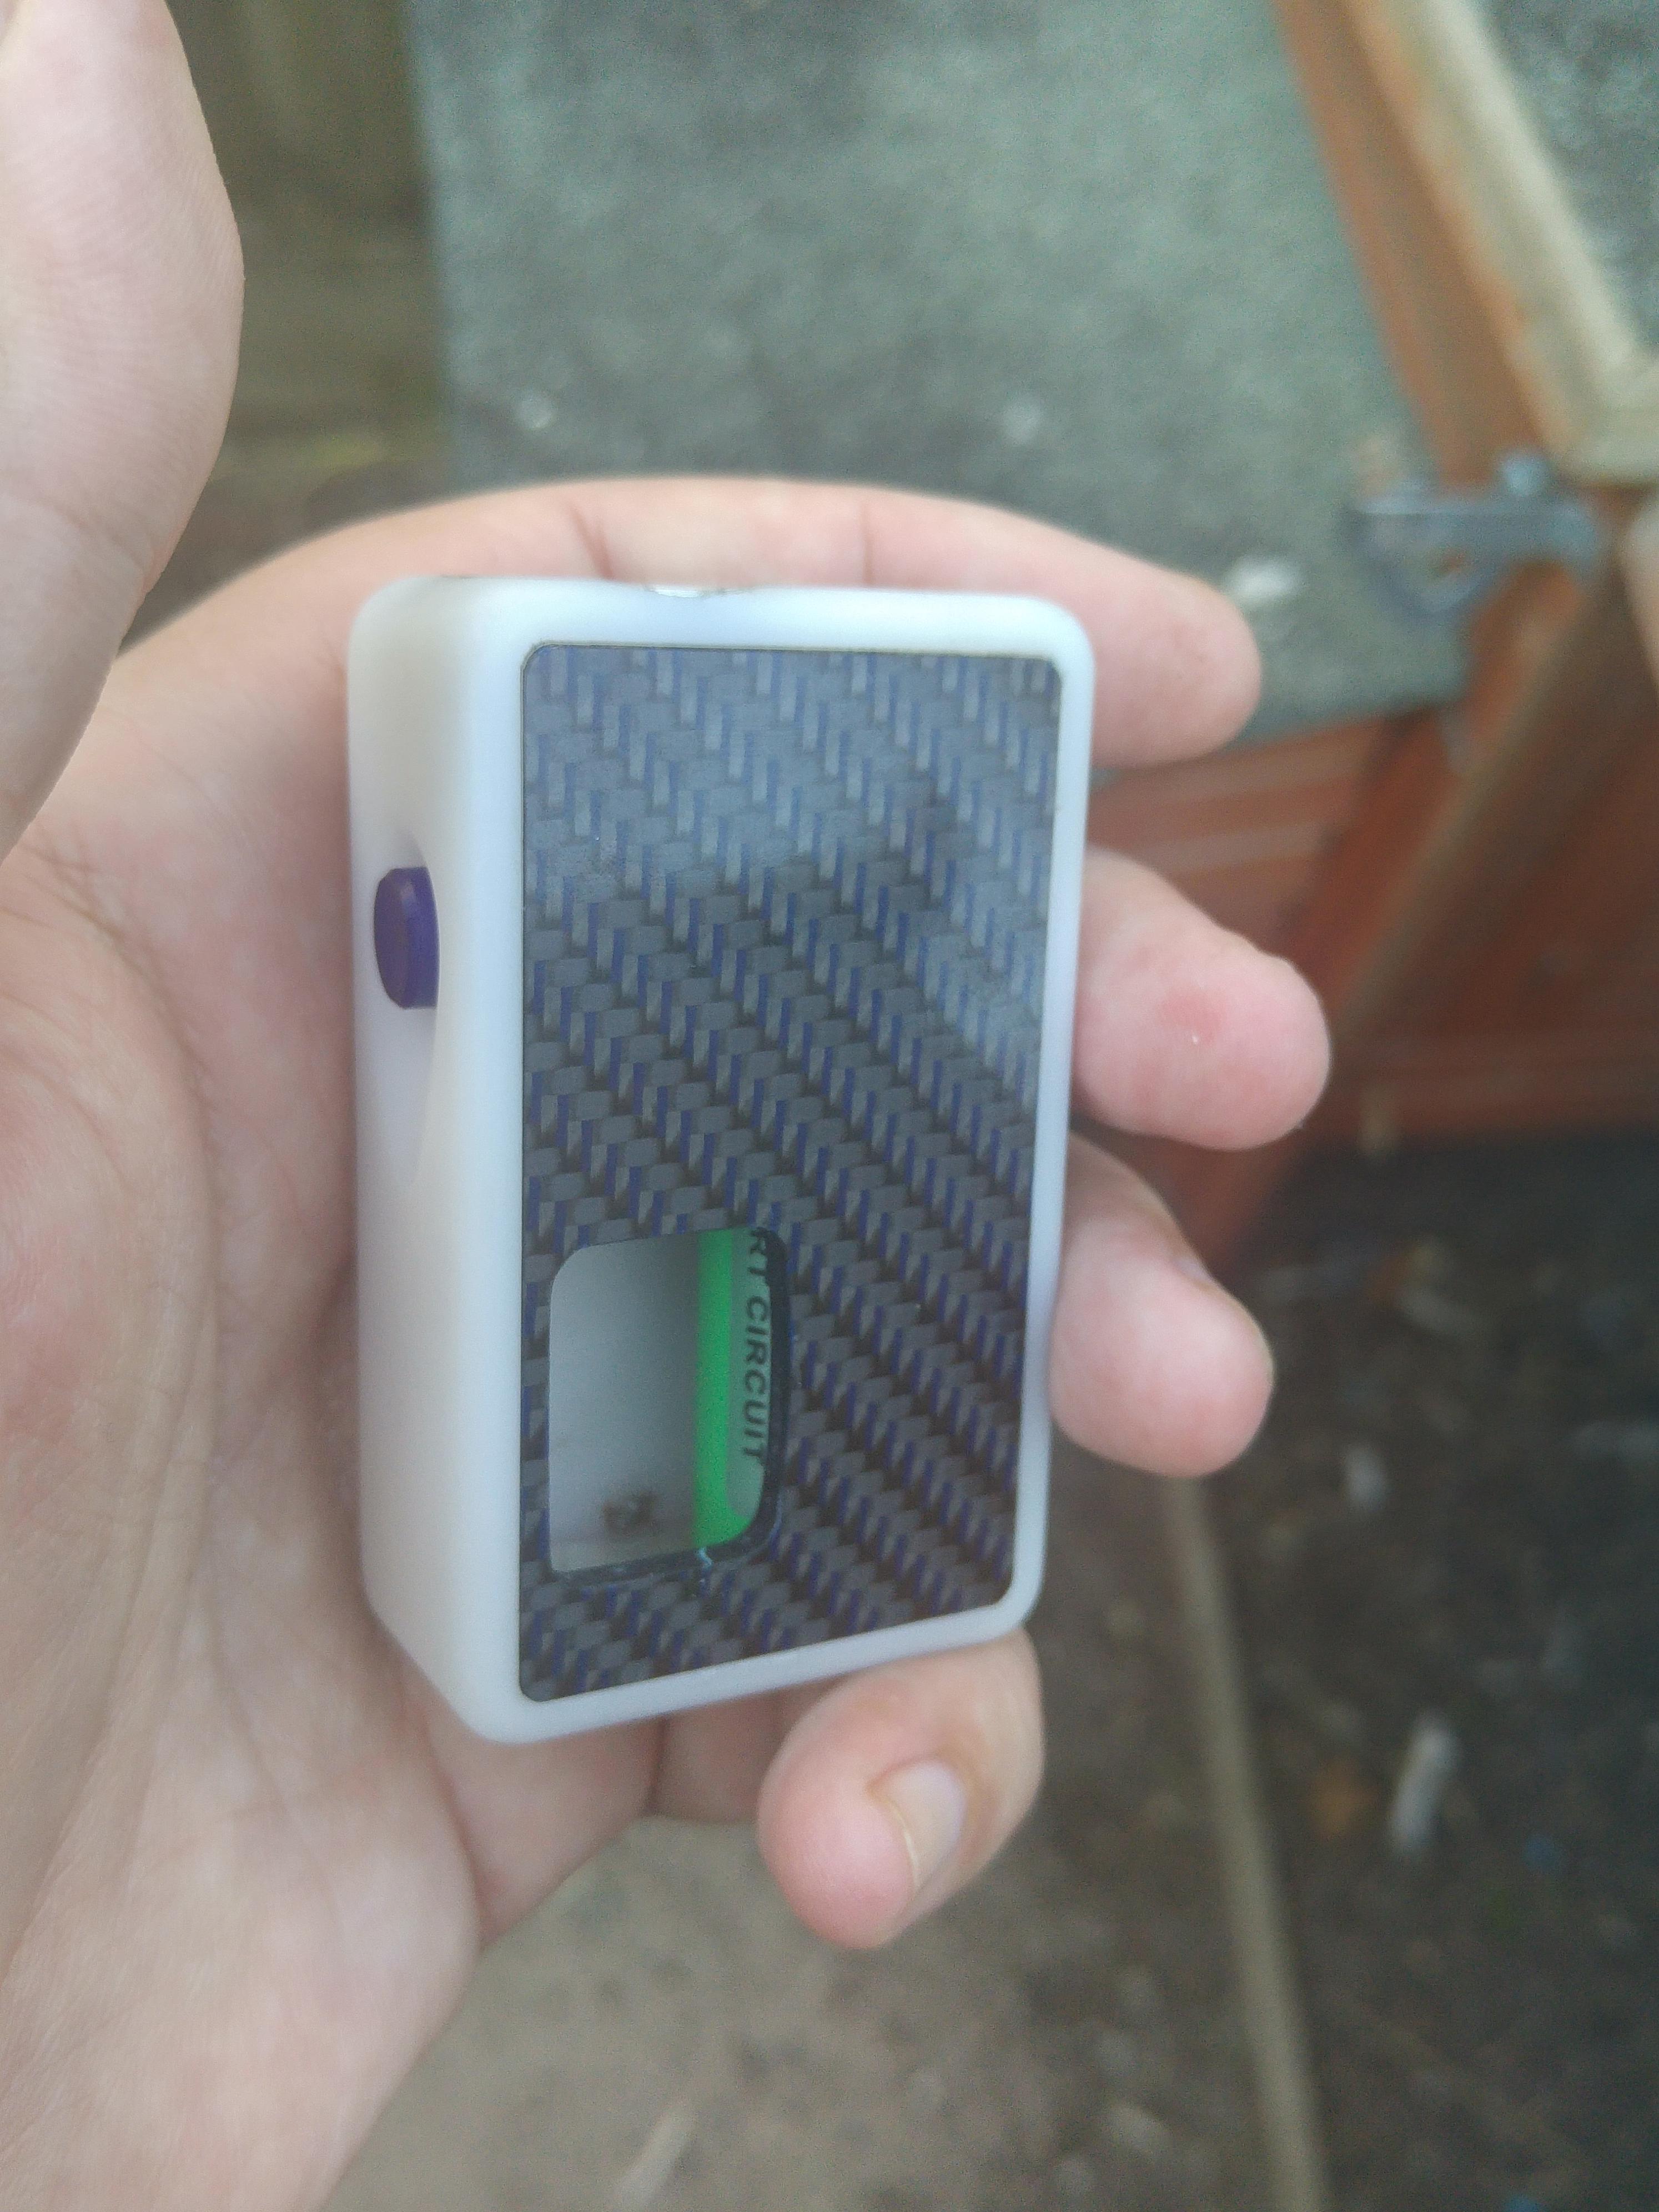
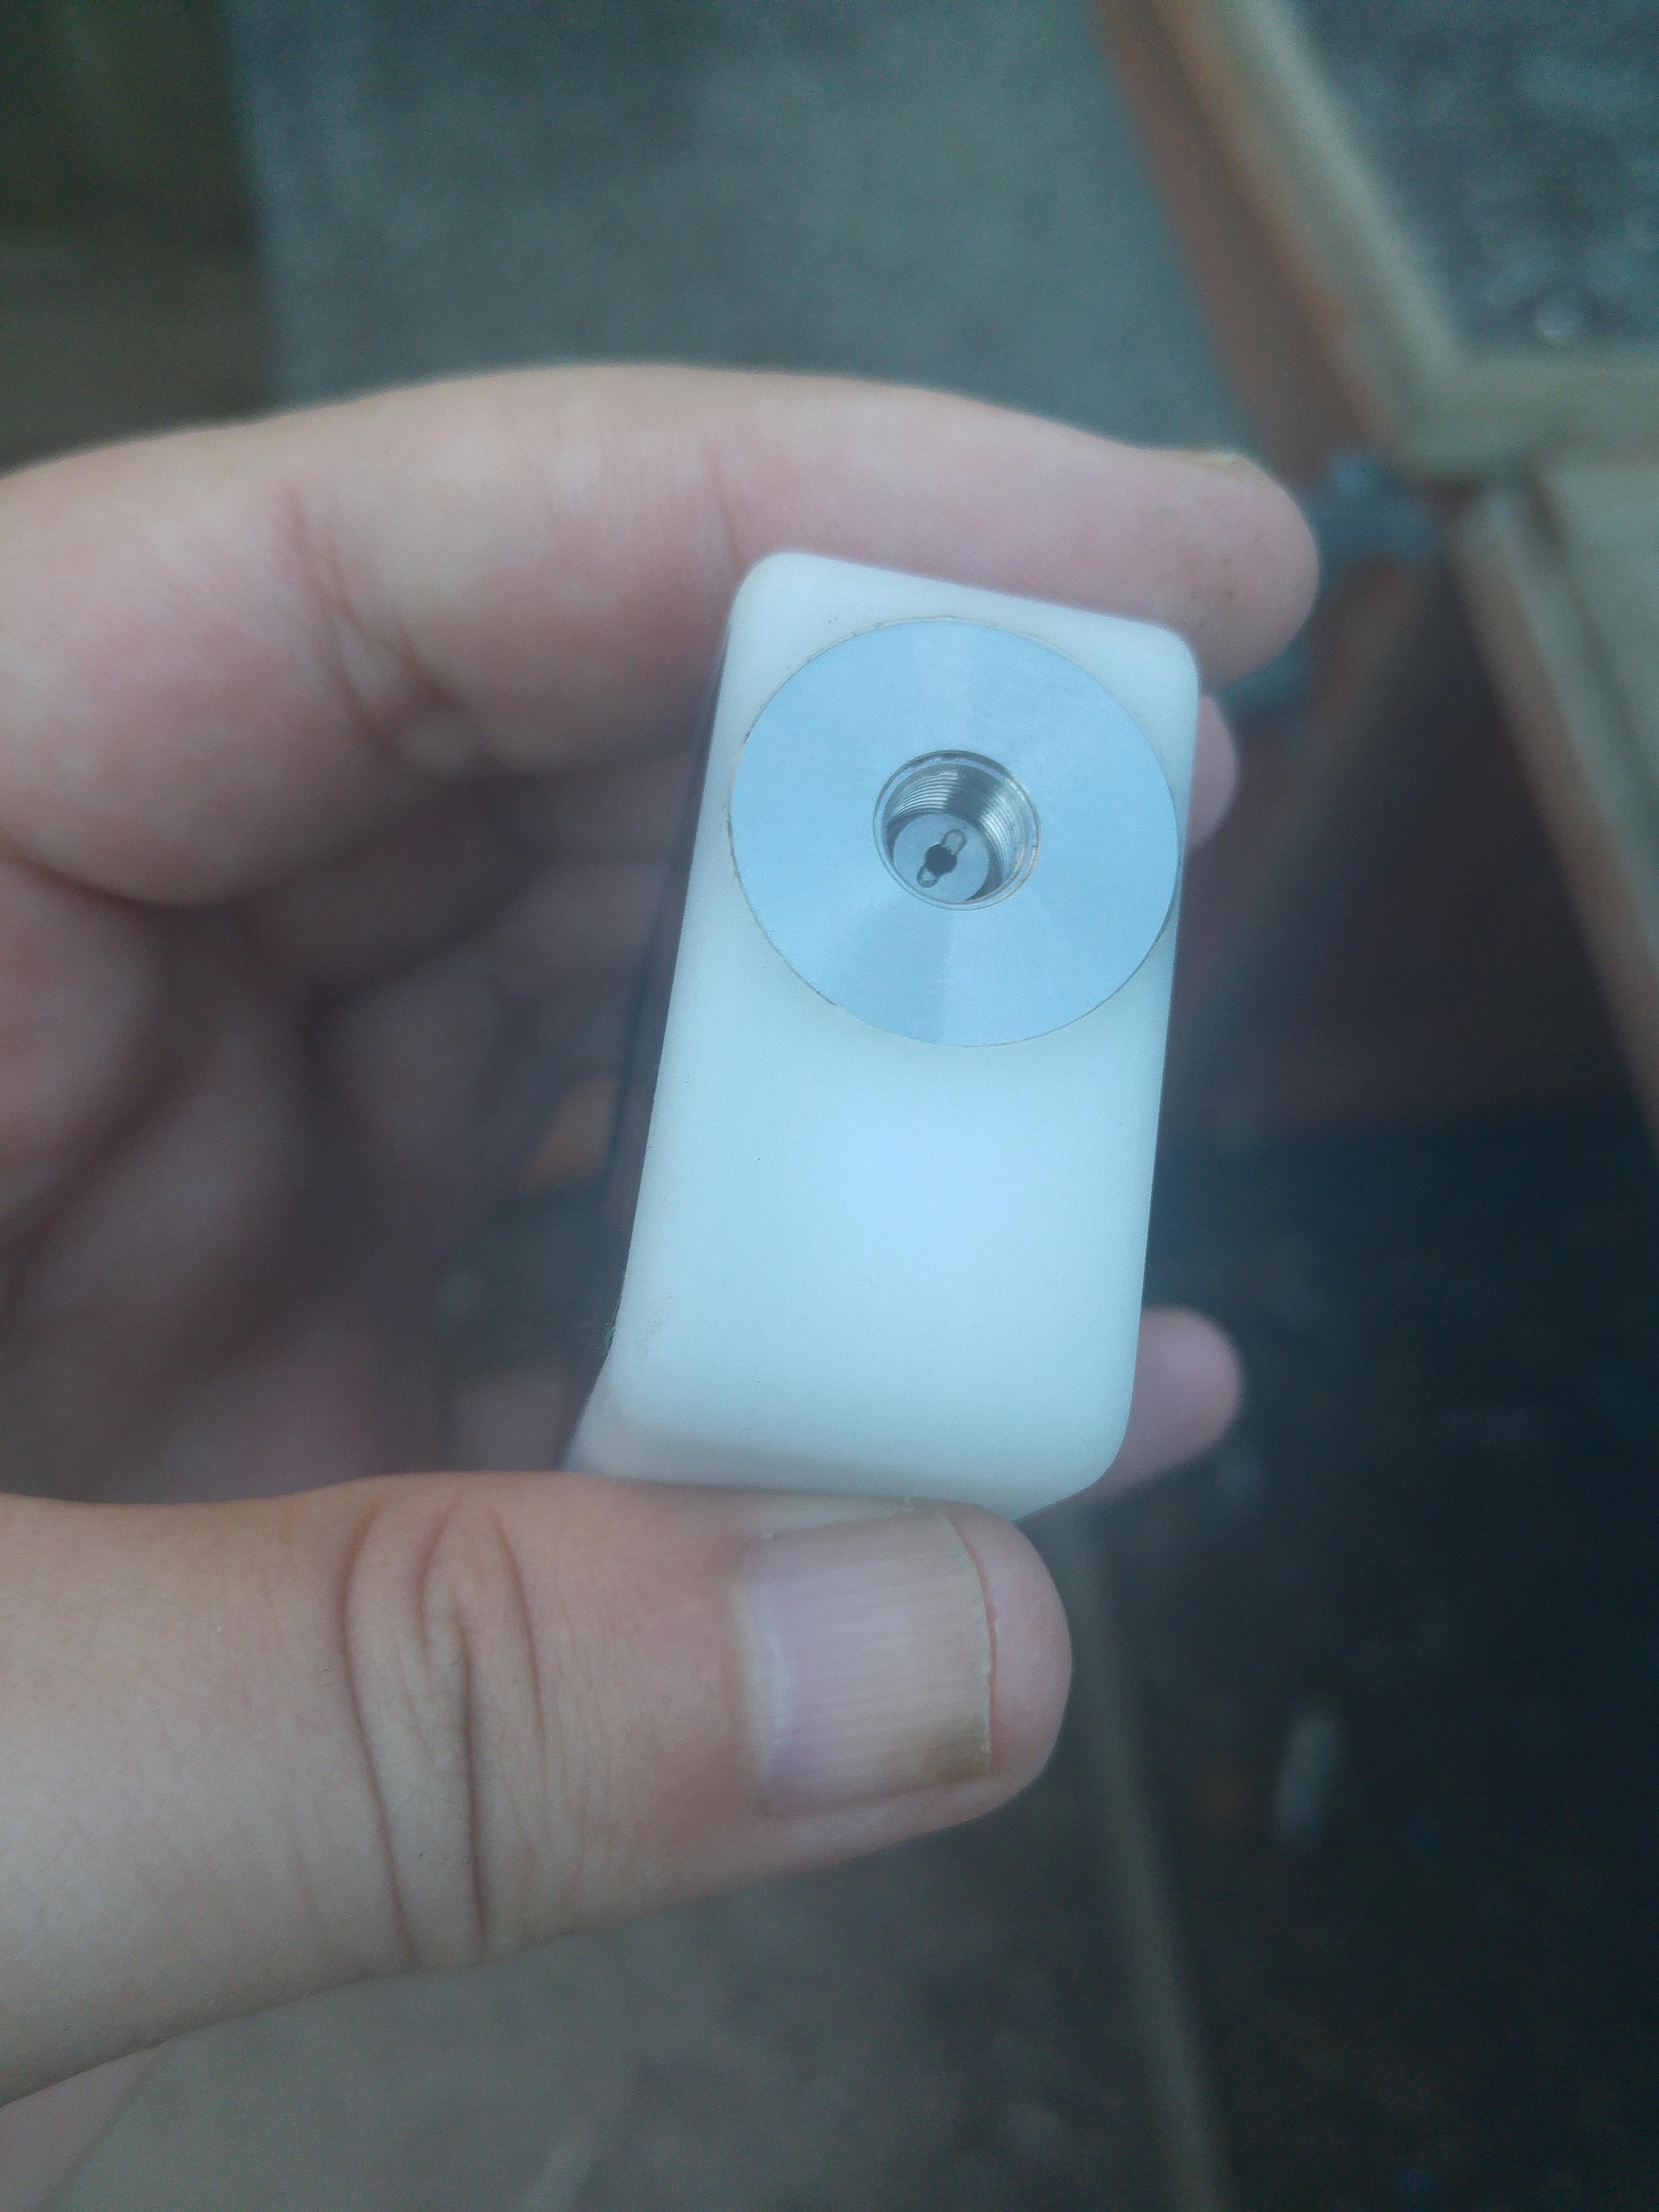
Here's some shots. I took a few mm off the height by removing the rise in the top piece. Not needed with the Varitube 510. The single 14g wire simplifies a lot. Personally I don't care if a mod's not full mech if it hits like one. The button hardware is basically the same, though tweaked for a very short throw and smooth feel. The brass plate on the battery side is just to increase the contact area on the switch screw, which is offset from the battery center line.
Very nice,thanks for posting it.Looks so much cleaner than how i did mine,and looks to be a lot simpler too.What type of needle are you using?The only ones i have been able to find are the Fat Daddy flanged needles,and they are pretty small i/d,your's looks to be bigger than those.That's a shame about the wood one. All of them are getting hard to find now, though FT has copper dirt cheap. I have a spare aluminum, so that covers me.
Here's some shots. I took a few mm off the height by removing the rise in the top piece. Not needed with the Varitube 510. The single 14g wire simplifies a lot. Personally I don't care if a mod's not full mech if it hits like one. The button hardware is basically the same, though tweaked for a very short throw and smooth feel. The brass plate on the battery side is just to increase the contact area on the switch screw, which is offset from the battery center line.
View attachment 650731 View attachment 650733 View attachment 650735
Yeah,i hated it when the wood broke,as it was my favorite one,but the wood they use is very thin,and just a small fall and it broke into pieces.I still have all the brass parts from it,so i may try and make a new wood section some day.There is a Chinese vendor on Ebay that is still selling the wood one,so i'll probably pick another up before they are gone.I have a brass one that's finished,and a copper waiting to be done,and i want to get the aluminum one as well.I love the look and size of these mods,but the brass and copper are both heavy little things haha.
Very nice,thanks for posting it.Looks so much cleaner than how i did mine,and looks to be a lot simpler too.What type of needle are you using?The only ones i have been able to find are the Fat Daddy flanged needles,and they are pretty small i/d,your's looks to be bigger than those.
Yeah,i hated it when the wood broke,as it was my favorite one,but the wood they use is very thin,and just a small fall and it broke into pieces.I still have all the brass parts from it,so i may try and make a new wood section some day.There is a Chinese vendor on Ebay that is still selling the wood one,so i'll probably pick another up before they are gone.I have a brass one that's finished,and a copper waiting to be done,and i want to get the aluminum one as well.I love the look and size of these mods,but the brass and copper are both heavy little things haha.
I've been using syringe needles for these bottom loading mods. This one is 15g (1.5 mm ID) to fit bottles using the Kanger Dripbox caps (Kanger, Pico Squeeze, and Inbox). For the Italian Supersoft bottles you'll want 14g, but I've been trying to get away from those because I'm cheap.
So far this 15g / Kanger cap combination is working fine, just fairly difficult to pull out with a fingertip up around the neck. A tool reaching in there gets it going fine. I might put a little hole in Abaddon so I can get better access for the initial push out.
Personally I wouldn't use the Fatdaddy flanged needles with anything but high PG juice. I'm max VG and don't need the frustration.
I haven't pulled any syringe needles apart,do they already have a flange on them or do you use something to put a flange on them?I've been using syringe needles for these bottom loading mods. This one is 15g (1.5 mm ID) to fit bottles using the Kanger Dripbox caps (Kanger, Pico Squeeze, and Inbox). For the Italian Supersoft bottles you'll want 14g, but I've been trying to get away from those because I'm cheap.
So far this 15g / Kanger cap combination is working fine, just fairly difficult to pull out with a fingertip up around the neck. A tool reaching in there gets it going fine. I might put a little hole in Abaddon so I can get better access for the initial push out.
Personally I wouldn't use the Fatdaddy flanged needles with anything but high PG juice. I'm max VG and don't need the frustration.
As for trouble pulling the bottle out,a little trick i learned with the vaporflask sqounker,tie a piece of string or some ribbon like used in most mod battery slots,and leave it hang down from the neck of the bottle,it gives something to pull on,and makes life a little easier haha.
I have a bunch of the inbox bottles,i really like them,so i have been using them any time i can.I bought a 3 pack of the super soft bottles,and almost threw them out.I could not get them to sqounk no matter what i did.I finally put o-rings under the caps and got them working,but for $6 a bottle,i shouldn't of had to fix them,so the 3 i have are the only ones i will have,i won't buy more of them.
I agree,the fat daddy pins are a pain,the only reason i have continued to use them was because i couldn't find any other options,those things are tiny inside haha.
I haven't pulled any syringe needles apart,do they already have a flange on them or do you use something to put a flange on them?
Under the plastic the needle usually has a little bump. I don't use that though. Just drill out the center pin to a slip fit, plug the needle bore, coat the the squonk pin bore with epoxy so there's a true seal, insert, cure. After cure I drill out from both ends to completely clear any excess epoxy.
Thanks for the bottle pull trick.
Already made a little hook tool, but I will try it.Totally agree about the inbox bottles.

Last edited:
Haven't been on the thread for a while but I see you guys have been busy making awesome squonkers.
I got myself a while back an SVA squonker because I really liked the form and size of it but this thing was like stupid money. Anyway I really liked the original but since I wasn't prepared to pay that kinda money for more SVA's I decided to make some of my own. A bunch of DNA 40's as well as a DNA 75.
 DNA 40&75 Squonkers
 DNA 40&75 Squonkers
 Untitled
 Untitled
Size comparison with one of my Lil' Pinches
 Untitled
 Untitled
This is the DNA 75 inners
 DNA 40&75 Squonkers
Pretty time consuming to mill the block manually since I don't have a CNC mill but is very much doable with patience. To be honest I could not have done the precision milling without my digital readout so that is a must.
I got myself a while back an SVA squonker because I really liked the form and size of it but this thing was like stupid money. Anyway I really liked the original but since I wasn't prepared to pay that kinda money for more SVA's I decided to make some of my own. A bunch of DNA 40's as well as a DNA 75.
DNA 40&75 Squonkers
DNA 40&75 Squonkers
Untitled
UntitledSize comparison with one of my Lil' Pinches
Untitled
UntitledThis is the DNA 75 inners
DNA 40&75 SquonkersPretty time consuming to mill the block manually since I don't have a CNC mill but is very much doable with patience. To be honest I could not have done the precision milling without my digital readout so that is a must.
Last edited:
 P1280185
 P1280184
Amazing stuff there Captain. Nice detail, top to bottom. Interesting form factor on that last one.
To every problem there's an easy solution and I found the easiest way around removing the bottle is thisHey Cap, how do you fill the bottle on the last pic?
Sent from my SM-N920V using Tapatalk
 Untitled
I soldered this wire
 Untitled
 Untitled
It's easy to remove the bottle now and you can't see that wire
I've only heard of this method of removing the bottle, this is the first time that I've seen it in practise. It looks very impressive.
I've thought of trying it myself but my biggest problem is always the relocation of the tube over the 510 centre pin.
I build a service hatch in mine that helps with the removal and relocation of the bottle.
I've thought of trying it myself but my biggest problem is always the relocation of the tube over the 510 centre pin.
I build a service hatch in mine that helps with the removal and relocation of the bottle.
If your bottle hole and 510 are concentric the bottle tube centers on it's own on the feed pin. I always pay particular attention that I'm true on both the bottle hole and the 510I've only heard of this method of removing the bottle, this is the first time that I've seen it in practise. It looks very impressive.
I've thought of trying it myself but my biggest problem is always the relocation of the tube over the 510 centre pin.
I build a service hatch in mine that helps with the removal and relocation of the bottle.
And.... I've found the Squonk section of the forum. Hello fellow Squonkers. I'll be following this section with interest.
- Status
- Not open for further replies.
Similar threads
- Replies
- 4
- Views
- 1K
- Replies
- 10
- Views
- 5K
- Replies
- 5
- Views
- 2K
- Replies
- 6
- Views
- 1K
- Replies
- 10
- Views
- 2K
Users who are viewing this thread
Total: 3 (members: 0, guests: 3)