Milo-DNA20D mod step-by-step how-to

Status
Not open for further replies.

mamu

Ultra Member
ECF Veteran
Verified Member
Mar 29, 2009
2,551
1,523
IN USA
Thanks for this tutorial Mamu, it's going to be a big help on my first mod. I was going to attempt the Lexi build when I first saw it, but this looks a bit easier to work with and still looks good.

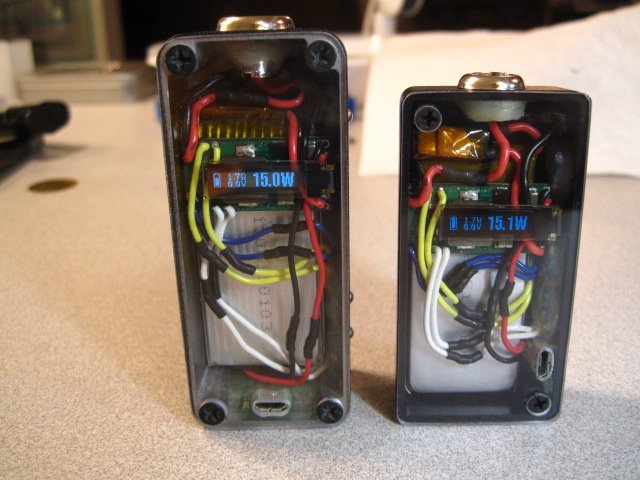
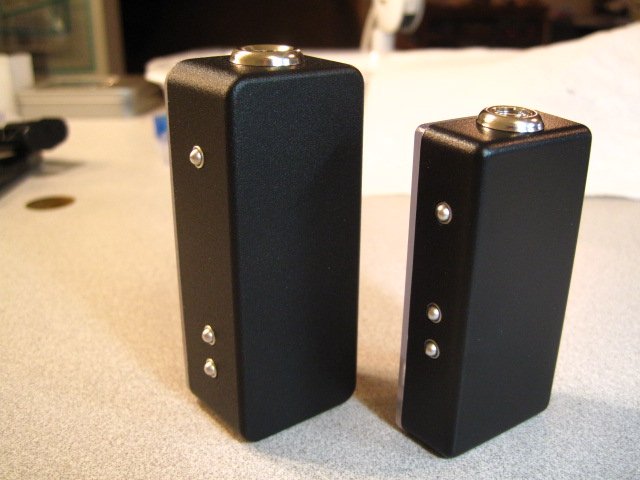
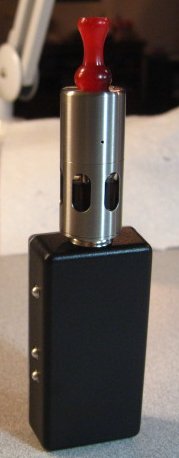
I would like mine to be a bit smaller though, so I was thinking about getting the same enclosure, but only using a single battery and trimming the depth down a bit. Do the screw holes on the case go all the way through so I can still use them after shaving it down?

Also, do I still need a fuse on the battery if I am just using a single cell? I'm thinking that is just needed for running the 2 in parallel, but I wanted to verify first. I know the board has Li-Po protection on it already, so I should be able to solder it directly.

Thanks!

Lexi is a challenge, even for me. :laugh:

I'm not sure if the holes in this case go all the way down. They might.

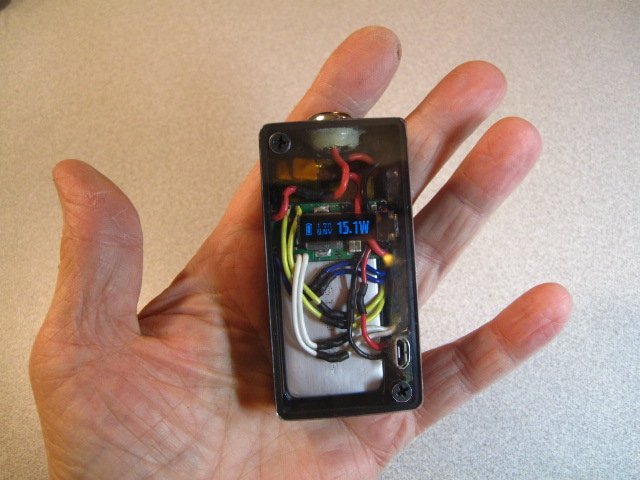
I know the dna has over current protection, so adding a fuse is at your option. I like the added safety of adding my own external fuse - peace of mind surety sort of thing with these high drain batts we use. And in case of a fault in wiring or failed components the external fuse will add protection to the entire circuit.

Adding a fuse whether using single or dual parallel batts is not relevant as a fuse is added for protection no matter whether you have one batt or two in parallel.

The only reason for the 2 fuses in parallel, instead of 1, is that it cuts the resistance in half so the parallel fuses minimally affects the resistance.

ETA: I just checked and the holes do go all the way down.
 
Last edited:

tvBilly

Senior Member
ECF Veteran
May 20, 2010
120
65
Times Square
Lexi is a challenge, even for me. :laugh:

I'm not sure if the holes in this case go all the way down. They might.

I know the DNA has over current protection, so adding a fuse is at your option. I like the added safety of adding my own external fuse - peace of mind surety sort of thing with these high drain batts we use. And in case of a fault in wiring or failed components the external fuse will add protection to the entire circuit.

Adding a fuse whether using single or dual parallel batts is not relevant as a fuse is added for protection no matter whether you have one batt or two in parallel.

The only reason for the 2 fuses in parallel, instead of 1, is that it cuts the resistance in half so the parallel fuses minimally affects the resistance.

ETA: I just checked and the holes do go all the way down.
Really, really outstanding work mamu! While the electronic part doesn't escape me, none of my projects ever seem to look as wonderful as yours do, and your ability to come up with great switches and cases and just-the-right-batteries astounds me.

:thumbs:

I have a question about the fuse wiring you are using. Is there some reason you don't connect the positive leads of each battery to one leg of each fuse, and then connect the other ends of both fuses together? This would protect against catastrophic failure in one of the batteries allowing the other battery to discharge directly into it. Since half the current would be going through each fuse, I think the voltage drops would be the same as the two fuses in parallel being driven with twice the current.

Of course, I haven't designed any really high current devices before, and I have zero experience with putting two cells in parallel with nothing isolating them, which scares the hell out of me, so I may be missing something completely. I just wanted to thank you for your great work, and for sharing it with everyone.
 

bapgood

Vaping Master
ECF Veteran
Verified Member
Apr 16, 2012
4,426
6,599
43
Utah
mamu,
I know you said you were headed down the road of tint paint. But I checked out the amber/bronze lexan I have, it's 1/8" thick and kind of a matte but not to much. There is a problem though, only one side has the protective film on it and the other is kind of scratched up. Anyway the offer still stands if you change your mind, its hard to see the scratches and etc but here is a pic.

36CDB562-302E-40FE-AF6A-8753B296B4DE-6083-00000370815A86F5.jpg


I remembered another RC product that I was thinking about using to cheat with the brushed/engine turned look. Its xxxmain's lexan picture glue. It's an adhesive that dries clear, so you can use printed material.

ScreenShot531.jpg


This is some metal vinyl similar to what I was going to use. Most sign shops that deal with vinyl can cut it pretty cheap, so like the screen cut out/ nice rounded corners/ hardware holes/ etc. If your interested and don't have a local sign shop PM me, I know a guy.

ScreenShot529.jpg

Aluminum Vinyl Film| Rwraps

ScreenShot530.jpg

Engine Turn Vinyl Film| Rwraps
 

bapgood

Vaping Master
ECF Veteran
Verified Member
Apr 16, 2012
4,426
6,599
43
Utah
Nice job, I'm liking the dual batts and ones selected, DuPont Corian makes for a nice case ;-) you can mill it to any size you like, comes in 1/2" sheets, and in numerous colors and patterns , I especially like the ones that looks just like granite. Stack 3 x 1/2" slabs using the Dupont seam filler to hold and adhear all 3 together making 1 - 1-1/2 box, take the plunge router to the solid block to mill out the inside, mill to exact depth & thickness needed, leave small offset on opening for finish panel to set on ;-)

MWA,
Have you used this before for some of your mods?

Would the seems be noticeable when laminating panels together? (But doing three layers with something like the granite on the outside and a black center layer would take care of that and probably look pretty dang good)

For anybody interested here is the DuPont Corian Colors, you can even order samples direct for cheap! 4"x4" is $2, but doesn't say what the thickness is...going to give them a call.

ScreenShot532.jpg
 

d9mel

Super Member
ECF Veteran
Verified Member
Jan 14, 2012
498
369
Spa City
Great tutorial mamu! Thank you for all of the time you put into helping the modding community!

I spent a good month looking for enclosures while waiting for the DNA 20 release, ive always liked the 1590g and figured the plexi door was the easiest way to get the screen setup.

Ive had thoughts about making a new encapsulated mod out of resin, all transparent with a couple aluminum panels to reinforce the 510 connection and switches. Do you think there would be an issue with the board being embedded in resin?
 

mamu

Ultra Member
ECF Veteran
Verified Member
Mar 29, 2009
2,551
1,523
IN USA
Thanks again guys! It's fun to see new modders jumping on board and learning to mod with my tutorials. There's so much more to modding, but at least it gives you a good start. :)

...Is there some reason you don't connect the positive leads of each battery to one leg of each fuse, and then connect the other ends of both fuses together?

No reason other than I didn't think of doing that. :laugh:

...I remembered another RC product that I was thinking about using to cheat with the brushed/engine turned look. Its xxxmain's lexan picture glue. It's an adhesive that dries clear, so you can use printed material.

Now that would be interesting to put custom graphics under the Lexan and leave a spot open for the display.

Great tutorial mamu! Thank you for all of the time you put into helping the modding community!

I spent a good month looking for enclosures while waiting for the DNA 20 release, ive always liked the 1590g and figured the plexi door was the easiest way to get the screen setup.

Ive had thoughts about making a new encapsulated mod out of resin, all transparent with a couple aluminum panels to reinforce the 510 connection and switches. Do you think there would be an issue with the board being embedded in resin?

I don't see issues with embedding the board in resin as that shouldn't affect the board or its electronics. But not totally sure about that. The only thing I can think of is heat dissipation if the board should get hot. But if the board or any other components should fail down the road, the whole mod would be toast as you wouldn't be able to remove and replace just that part.
 

Switched

ECF Guru
ECF Veteran
Feb 18, 2010
10,144
2,544
Dartmouth, NS Canada
MWA,
Have you used this before for some of your mods?

Would the seems be noticeable when laminating panels together? (But doing three layers with something like the granite on the outside and a black center layer would take care of that and probably look pretty dang good)

For anybody interested here is the DuPont Corian Colors, you can even order samples direct for cheap! 4"x4" is $2, but doesn't say what the thickness is...going to give them a call.

ScreenShot532.jpg
If it is what we see in the showrooms, then they are 3/8"
 

mwa102464

Resting In Peace
ECF Veteran
Oct 14, 2009
14,447
12,564
Outside of the Philadelphia Burbs, NJ & Fla
Corian is available in 3 thicknesses 3/8",,,,1/2",,, and 3/4" I believe,,you can go directly to Dupont website the creator of Corian for info on it, or see link below,,. I got Corian certified at Dupont when it 1st was introduced back in the early 80"s sometime I believe. There is a special liquid corian seam filler, that comes in different colors to do your seams with, and bond it together with. you bond it and let the liquid ooz out of the seam, then I take my real sharp hand plane and plane the ooz off once it hardens,, then you wet sand it,, when I'm done you can hardly see my seems, it looks seamless when finished. I used 1/2" pieces because I have a friend that has a countertop shop and I get the scrap pieces free,,, if you had to buy a whole sheet it cost $$$ it comes in various colors and I believe most sheets are 30" x 12' , you can check it out here = DuPont™ Corian® Sheet Plastic In Stock

You can also do custom inlays with Brass, metal moldings or wood :)

I find it very easy to work with, as long as you have the proper tools & knowledge it is very simple to work with, I'm very surprised others have not used this material to make some mods with, especially seeing it can be milled to whatever size you want and it looks beautiful, I have 2 boxes made that have been sitting for a while now, just need to finish them up with my DNA's & wiring :)
 
Last edited:

mamu

Ultra Member
ECF Veteran
Verified Member
Mar 29, 2009
2,551
1,523
IN USA
Mini Milo...

Essentially same build as Milo, except I used one 1200mAh 25C li-poly bat, #10 finishing washer, shortened the length of the connector, and used a Hammond enclosure 1551KBK (3.15" x 1.58" x 0.8").

I ran into a snafu when I got er done and went to screw the lid on - needed just an unch more depth. grrr :laugh: So I desoldered a few of the wires, removed the board and batt, and dremeled a bit more depth into the bottom of the case. I also removed the outer wrapper off the batt. Then everything fit.

This case has more of a slope to it than the Milo case. Bit disappointed that it has that slope as it would be a perfect case then.

mm-01.jpg


With Milo, I removed the black transparent plastic piece on the display and with Mini Milo I left it on so shows a bit darker...
mm-02.jpg


mm-03.jpg


mm-04.jpg


mm-05.jpg
 

VpnDrgn

Ultra Member
ECF Veteran
Jul 21, 2010
1,310
382
Gulfport, MS.
Great work as always Mamu.

A couple questions-

I see a lot of these builds with the flat poly batts. Is this necessary for the high discharge rate?
Would an IMR batt be fine, especially since I won't push the watts very high.
( the only reason I would use the DNA20 board is for the display )

A suggestion before you put out more dough than necessary for dye or special paint.
I seen a mod a while back where they painted the display white to match the box and
it shined through the paint just fine. Black may be too opaque for this to work, but it will
cost less than a dollar for a small bottle of black paint to test it out.

Painting the underside of lexan always gives a nice shiny finish and you could try sanding
down the paint so it is a little thinner right over the display.

edit - Another thought, you said the display was right up against the lexan, and the display
has a black border, you could just leave a cutout in the paint and it would not even be
destinguishable from the display.
 
Last edited:

mamu

Ultra Member
ECF Veteran
Verified Member
Mar 29, 2009
2,551
1,523
IN USA
Great work as always Mamu.

A couple questions-

I see a lot of these builds with the flat poly batts. Is this necessary for the high discharge rate?
Would an IMR batt be fine, especially since I won't push the watts very high.
( the only reason I would use the DNA20 board is for the display )

A suggestion before you put out more dough than necessary for dye or special paint.
I seen a mod a while back where they painted the display white to match the box and
it shined through the paint just fine. Black may be too opaque for this to work, but it will
cost less than a dollar for a small bottle of black paint to test it out.

Painting the underside of lexan always gives a nice shiny finish and you could try sanding
down the paint so it is a little thinner right over the display.

edit - Another thought, you said the display was right up against the lexan, and the display
has a black border, you could just leave a cutout in the paint and it would not even be
destinguishable from the display.

Either the high drain li-poly batts or the IMR batts are fine. The size of the case you choose mostly determines which batt type you'll be using.

I'm not sure if you're referring to this mod, but I saw one where the case was white and the modder sanded off the black paint of the voltage reader so that he had an all white look.

I'm getting used to the geeky look of Milo. :laugh: so maybe I'll just leave it that way. I do have some black tint paint coming in though so will experiment with that.

Another fine mod by mamu....great mods......what's next mamu....can't wait to see....

My next mod is Lexi's big brother. He'll prob be making an appearance this week end. :laugh:

And I'm thinking of doing a Beast-DNA20D. I gave away my Beast dual DNA12 and kinda missing that loooooooooooong vape time between charges that Beast gave me. Beast is BIG but ya can't beat going almost a week before having to charge the batts.

I'd LOVE to find a box type case that would fit a 26650 IMR batt and the DNA20D circuitry. I've spent hours searching but no luck yet.
 
Status
Not open for further replies.

Users who are viewing this thread